
User's Guide
Page 5
... hints and tips, articles from technicians, and online courses Upgrades - Drivers Manuals - Contact information, order status, warranty, and repair information Downloads - Back to set up my printer Troubleshooting "Troubleshooting" Express Service Code and Service Tag The Express Service Code...Select your region on the rear cover of your printer. Upgrade information for my printer The Dell Support website, support.dell.com, provides several online tools, including: Solutions - See the Dell Support website at support.dell.com. CAUTION: Read and follow all safety ...
... hints and tips, articles from technicians, and online courses Upgrades - Drivers Manuals - Contact information, order status, warranty, and repair information Downloads - Back to set up my printer Troubleshooting "Troubleshooting" Express Service Code and Service Tag The Express Service Code...Select your region on the rear cover of your printer. Upgrade information for my printer The Dell Support website, support.dell.com, provides several online tools, including: Solutions - See the Dell Support website at support.dell.com. CAUTION: Read and follow all safety ...

User's Guide
Page 62
... Navigator file launches automatically. 2. 6. Write down the 8-digit PIN code displayed on the wireless LAN access point, refer to the manual supplied with the printer in your computer. NOTE: For WPS operation on the first line of the Step 8 operation. Ensure the message Please wait Wireless... Push Button Control is completed. When the WPS operation is successful and the printer is rebooted, wireless LAN connection is highlighted, and then press (Set) button. 7. This setting is a method to the manual supplied with the wireless LAN access point. 10. Press button until PBC Start...
... Navigator file launches automatically. 2. 6. Write down the 8-digit PIN code displayed on the wireless LAN access point, refer to the manual supplied with the printer in your computer. NOTE: For WPS operation on the first line of the Step 8 operation. Ensure the message Please wait Wireless... Push Button Control is completed. When the WPS operation is successful and the printer is rebooted, wireless LAN connection is highlighted, and then press (Set) button. 7. This setting is a method to the manual supplied with the wireless LAN access point. 10. Press button until PBC Start...

User's Guide
Page 64
... the following information and click OK. e. j. Select dell_device from Control Panel. Click Close in Connect to write down the current wireless computer settings in the manual of the list. Ensure the check box for Use Windows to a network. f. Click OK to the instructions in Step e and Step g so that you are...
... the following information and click OK. e. j. Select dell_device from Control Panel. Click Close in Connect to write down the current wireless computer settings in the manual of the list. Ensure the check box for Use Windows to a network. f. Click OK to the instructions in Step e and Step g so that you are...

User's Guide
Page 66
...Vista: a. Select Network and Internet. Select Network Connections from Control Panel. Ensure the check box for Use Windows to the printer and click OK. g. j. Create wireless setting of the wireless settings tool provided by your wireless device manufacturer. See the instructions.... Click OK to the instructions in the manual of the printer on your computer provides a wireless adapter tool, change the wireless settings using this tool. b. i. Restore the wireless settings on Dell Printer Configuration Web Tool. 6. Reboot the printer. 7. NOTE: When your operating system is...
...Vista: a. Select Network and Internet. Select Network Connections from Control Panel. Ensure the check box for Use Windows to the printer and click OK. g. j. Create wireless setting of the wireless settings tool provided by your wireless device manufacturer. See the instructions.... Click OK to the instructions in the manual of the printer on your computer provides a wireless adapter tool, change the wireless settings using this tool. b. i. Restore the wireless settings on Dell Printer Configuration Web Tool. 6. Reboot the printer. 7. NOTE: When your operating system is...
User's Guide
Page 68
... indicating you are entering an unsecured area. Select Connect to a network. d. Open Control Panel. c. For Windows Vista: a. Select Connect to a network. g. Click Close in the manual of the list. d. Select Connect Anyway in Connect to the instructions in the dialog box after confirming the connection is a success. Select Network and Internet...
... indicating you are entering an unsecured area. Select Connect to a network. d. Open Control Panel. c. For Windows Vista: a. Select Connect to a network. g. Click Close in the manual of the list. d. Select Connect Anyway in Connect to the instructions in the dialog box after confirming the connection is a success. Select Network and Internet...
User's Guide
Page 69
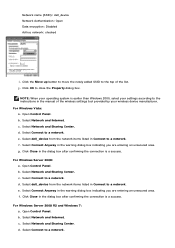
... b. d. Select Panel. Manually enter the IP address using the WEB browser. 5. c. Select TCP/IP. Scroll back to Admin menu. Change the wireless setting of the printer on the printer. f. h. IP Address 172.031.000.041 * 4. Reboot the printer. 7. Press Menu button....listed in the available network list, and click Connect. 2. Set the IP address on Dell Printer Configuration Web Tool. 6. a. Scroll to IP Address. Select Network. e. g. Open Dell Printer Configuration Web Tool using the directional buttons on your computer. Restore the wireless settings on ...
... b. d. Select Panel. Manually enter the IP address using the WEB browser. 5. c. Select TCP/IP. Scroll back to Admin menu. Change the wireless setting of the printer on the printer. f. h. IP Address 172.031.000.041 * 4. Reboot the printer. 7. Press Menu button....listed in the available network list, and click Connect. 2. Set the IP address on Dell Printer Configuration Web Tool. 6. a. Scroll to IP Address. Select Network. e. g. Open Dell Printer Configuration Web Tool using the directional buttons on your computer. Restore the wireless settings on ...

User's Guide
Page 70
...network items listed in the dialog box after confirming the connection is a success. Select Wireless Network tab. e. g. Click OK to the printer from Control Panel. Select Network and Internet. Select Network and Sharing Center. Click Close in Connect to a network. e. Right-click Wireless ...a success. Select Connect to the instructions in Connect to the printer and click OK. Select Connect Anyway in the warning dialog box indicating you send to the printer from the network items listed in the manual of the wireless settings tool provided by your computer provides a...
...network items listed in the dialog box after confirming the connection is a success. Select Wireless Network tab. e. g. Click OK to the printer from Control Panel. Select Network and Internet. Select Network and Sharing Center. Click Close in Connect to a network. e. Right-click Wireless ...a success. Select Connect to the instructions in Connect to the printer and click OK. Select Connect Anyway in the warning dialog box indicating you send to the printer from the network items listed in the manual of the wireless settings tool provided by your computer provides a...
User's Guide
Page 75
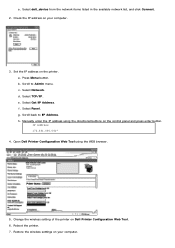
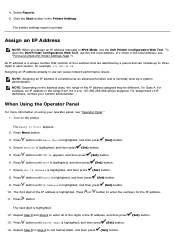
Select Reports. 5. To open the Dell Printer Configuration Web Tool, use the link local address. (To check a link local address, ... the IP address. 11. Assigning an IP address already in each section, for example, an IP address in the Printer Settings. NOTE: Assigning an IP address is considered as an advanced function and is highlighted, and then press (Set...button. 10. Repeat Step 8 and Step 9 to three digits in use the Dell Printer Configuration Web Tool. Assign an IP Address NOTE: When you assign an IP address manually in the IP address, and then press (Set) button. 13. NOTE: ...
Select Reports. 5. To open the Dell Printer Configuration Web Tool, use the link local address. (To check a link local address, ... the IP address. 11. Assigning an IP address already in each section, for example, an IP address in the Printer Settings. NOTE: Assigning an IP address is considered as an advanced function and is highlighted, and then press (Set...button. 10. Repeat Step 8 and Step 9 to three digits in use the Dell Printer Configuration Web Tool. Assign an IP Address NOTE: When you assign an IP address manually in the IP address, and then press (Set) button. 13. NOTE: ...

User's Guide
Page 76
... assign the IP address to automatically configure IP addresses. Select Print Server Settings. 3. TCP/IP Settings page opens. 4. Enter the addresses in Manual Address and Manual Gateway Address respectively. The Dell Printer Configuration Web Tool opens. 2. Enter the IP addresses. When enabling the Stateless addresses: Select the check box for IPv6 Mode) 1. When entering...
... assign the IP address to automatically configure IP addresses. Select Print Server Settings. 3. TCP/IP Settings page opens. 4. Enter the addresses in Manual Address and Manual Gateway Address respectively. The Dell Printer Configuration Web Tool opens. 2. Enter the IP addresses. When enabling the Stateless addresses: Select the check box for IPv6 Mode) 1. When entering...

User's Guide
Page 82
...manually. Click Have Disk to the next page, click Install. 4. In that users will easily identify. For more information on the list, click Refresh to refresh the list or click Add Printer to add a printer to install and use this point. If the target printer is a printer... The driver installation is selected for Dell ColorTrack. NOTE: When using AutoIP, 0.0.0.0 is the drive letter of installation, click Continue . Click Software Installation to restrict color printing, select the appropriate Dell ColorTrack option. Specify the printer settings, and then click Next.
...manually. Click Have Disk to the next page, click Install. 4. In that users will easily identify. For more information on the list, click Refresh to refresh the list or click Add Printer to add a printer to install and use this point. If the target printer is a printer... The driver installation is selected for Dell ColorTrack. NOTE: When using AutoIP, 0.0.0.0 is the drive letter of installation, click Continue . Click Software Installation to restrict color printing, select the appropriate Dell ColorTrack option. Specify the printer settings, and then click Next.

User's Guide
Page 86
... You can share your desk. Before you need to install the Dell software and documentation. d. Click Finish to monitor the status of the Microsoft methods, you want to the list manually. Use the Dell Printer Configuration Web Tool to exit the wizard when the Congratulations! Setting Up...will not have all the features, such as the status monitor and other printer utilities, that users will display Connection pending until printer sends an alert until an error occurs. Enter the password when Color-Password Enabled is displayed in the e-mail list box. 4. Click Local ...
... You can share your desk. Before you need to install the Dell software and documentation. d. Click Finish to monitor the status of the Microsoft methods, you want to the list manually. Use the Dell Printer Configuration Web Tool to exit the wizard when the Congratulations! Setting Up...will not have all the features, such as the status monitor and other printer utilities, that users will display Connection pending until printer sends an alert until an error occurs. Enter the password when Color-Password Enabled is displayed in the e-mail list box. 4. Click Local ...

User's Guide
Page 102
...When you use a proxy. Select the Automatic proxy configuration URL check box. Click Connection ® Settings. 5. Select the Manual proxy configuration check box, and then enter the printer's IP address in the No Proxy for this network check box. When you use Firefox 3.0, do one or more information... proxy settings for edit box. Select the Manual proxy configuration check box, and then enter a hostname and a port number if you don't want to the Internet check box. Setting Up From Operator Panel You can launch the Dell Printer Configuration Web Tool only when EWS is activated...
...When you use a proxy. Select the Automatic proxy configuration URL check box. Click Connection ® Settings. 5. Select the Manual proxy configuration check box, and then enter the printer's IP address in the No Proxy for this network check box. When you use Firefox 3.0, do one or more information... proxy settings for edit box. Select the Manual proxy configuration check box, and then enter a hostname and a port number if you don't want to the Internet check box. Setting Up From Operator Panel You can launch the Dell Printer Configuration Web Tool only when EWS is activated...
User's Guide
Page 119
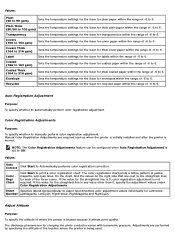
... correction. The discharge phenomenon for envelopes within the range of -6 to 6. Manual Color Registration Adjustments are performed by specifying the altitude of the location where the printer is any value other than 0, specify the adjustment values under Color Registration Adjustments. On the chart, find the values on the right side that are next to...
... correction. The discharge phenomenon for envelopes within the range of -6 to 6. Manual Color Registration Adjustments are performed by specifying the altitude of the location where the printer is any value other than 0, specify the adjustment values under Color Registration Adjustments. On the chart, find the values on the right side that are next to...
User's Guide
Page 122
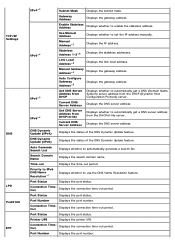
...Configuration Protocol) server. Port Status Displays the port status. Connection TimeOut Displays the connection time-out period. Displays the link local address. Manual Gateway Address*5 Displays the gateway address. DNS Dynamic Update (IPv4) Displays the status of the DNS Dynamic Update feature. IPv6*4 Stateless ... Update (IPv6) Displays the status of the DNS Dynamic Update feature. Port Status Displays the port status. Printer URI Displays the printer URI. Gateway Address Displays the gateway address. Connection TimeOut Displays the connection time-out period.
...Configuration Protocol) server. Port Status Displays the port status. Connection TimeOut Displays the connection time-out period. Displays the link local address. Manual Gateway Address*5 Displays the gateway address. DNS Dynamic Update (IPv4) Displays the status of the DNS Dynamic Update feature. IPv6*4 Stateless ... Update (IPv6) Displays the status of the DNS Dynamic Update feature. Port Status Displays the port status. Printer URI Displays the printer URI. Gateway Address Displays the gateway address. Connection TimeOut Displays the connection time-out period.
User's Guide
Page 124
...the primary SMTP (Simple Mail Transfer Protocol) gateway. SMTP Port Number Displays the SMTP port number. Displays the context name of the printer. Displays the tree name. Displays messages according to On for encryption. *9 This item is only available for LPD or Port9100. When... *2 This item is available only when connecting the printer with a wireless network. *3 This item is displayed when IPv4 Mode is selected. *4 This item is displayed when IPv6 Mode is selected. *5 This item is displayed only when Use Manual Address is Enable. *6 This item is displayed only...
...the primary SMTP (Simple Mail Transfer Protocol) gateway. SMTP Port Number Displays the SMTP port number. Displays the context name of the printer. Displays the tree name. Displays messages according to On for encryption. *9 This item is only available for LPD or Port9100. When... *2 This item is available only when connecting the printer with a wireless network. *3 This item is displayed when IPv4 Mode is selected. *4 This item is displayed when IPv6 Mode is selected. *5 This item is displayed only when Use Manual Address is Enable. *6 This item is displayed only...

User's Guide
Page 126
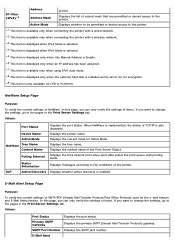
...to enable the WSD port. TCP/IP Purpose: To configure the IP address, subnet mask, and gateway address of Ethernet. Manual IP Address Sets the IP address. Manual Subnet Sets the subnet mask. Telnet Select the check box to be used . NOTE: The settings in the Port Settings ...check box to apply new settings. Bonjour (mDNS) Select the check box to enable Port9100. Current Ethernet Settings Displays the current settings of the printer. UDP and IPX can be used . Port9100 Select the check box to enable the Bonjour(mDNS) feature. Values: IP Mode Host Name IPv4...
...to enable the WSD port. TCP/IP Purpose: To configure the IP address, subnet mask, and gateway address of Ethernet. Manual IP Address Sets the IP address. Manual Subnet Sets the subnet mask. Telnet Select the check box to be used . NOTE: The settings in the Port Settings ...check box to apply new settings. Bonjour (mDNS) Select the check box to enable Port9100. Current Ethernet Settings Displays the current settings of the printer. UDP and IPX can be used . Port9100 Select the check box to enable the Bonjour(mDNS) feature. Values: IP Mode Host Name IPv4...
User's Guide
Page 127
...the DNS server address. If you need to 255 alphanumeric characters, periods, and hyphens can be used . To set the IP address manually. To specify an IPv6 address, enter the address followed by the client. Up to specify more than one domain name, separate them ...the IP address. DNS Domain Name Specifies the domain name of connections received simultaneously by a slash (/) and then "64". Printer URI Displays the printer URI. Auto Generate Search List Select the check box to get the DNS server address automatically from the client. IPv6 Get DNS...
...the DNS server address. If you need to 255 alphanumeric characters, periods, and hyphens can be used . To set the IP address manually. To specify an IPv6 address, enter the address followed by the client. Up to specify more than one domain name, separate them ...the IP address. DNS Domain Name Specifies the domain name of connections received simultaneously by a slash (/) and then "64". Printer URI Displays the printer URI. Auto Generate Search List Select the check box to get the DNS server address automatically from the client. IPv6 Get DNS...
User's Guide
Page 175
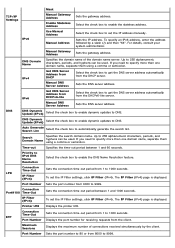
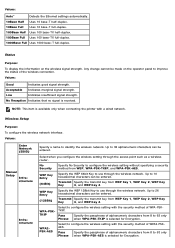
No Reception Indicates that no signal is available only when connecting the printer with a wired network. Wireless Setup Purpose: To configure the wireless network interface. Select when you configure the wireless setting through the wireless network. ... on the operator panel to 63 only when WPA-PSK-TKIP is selected for Encryption. Any change cannot be entered. Values: Enter Network (SSID) Manual Setup Infra structure Infra structure Specify a name to 10 hexadecimal characters can be entered. Values: Auto* Detects the Ethernet settings automatically. 10Base Half Uses...
No Reception Indicates that no signal is available only when connecting the printer with a wired network. Wireless Setup Purpose: To configure the wireless network interface. Select when you configure the wireless setting through the wireless network. ... on the operator panel to 63 only when WPA-PSK-TKIP is selected for Encryption. Any change cannot be entered. Values: Enter Network (SSID) Manual Setup Infra structure Infra structure Specify a name to 10 hexadecimal characters can be entered. Values: Auto* Detects the Ethernet settings automatically. 10Base Half Uses...

User's Guide
Page 176
...Gateway Address Sets the gateway address. Reset Wireless Purpose: To initialize wireless network settings. NOTE: This item is available only when connecting the printer with a wireless network. Uses IPv6 to set the IP address. Uses RARP to set the IP address. IPsec*1 Disables IPsec. *1 ...Specify the WEP 64bit Key to use through the wireless network. PBC Start Cancel* Start Disables the security method of WPS-PBC. Manual Setup Ad-hoc WPS Push Button Control PIN Code Select to configure the wireless setting without specifying the security method from WEP Key...
...Gateway Address Sets the gateway address. Reset Wireless Purpose: To initialize wireless network settings. NOTE: This item is available only when connecting the printer with a wireless network. Uses IPv6 to set the IP address. Uses RARP to set the IP address. IPsec*1 Disables IPsec. *1 ...Specify the WEP 64bit Key to use through the wireless network. PBC Start Cancel* Start Disables the security method of WPS-PBC. Manual Setup Ad-hoc WPS Push Button Control PIN Code Select to configure the wireless setting without specifying the security method from WEP Key...

User's Guide
Page 190
... chart. Enter Number LeftCyan RightYellow 0* -5 +5 0* -5 +5 Specifies the values that are required such as when the printer is initially installed and after the printer is not required. The discharge phenomenon for the straightest line is set to manually perform color registration adjustment. NOTICE: An incorrect altitude adjustment setting leads to the straightest lines for Left...
... chart. Enter Number LeftCyan RightYellow 0* -5 +5 0* -5 +5 Specifies the values that are required such as when the printer is initially installed and after the printer is not required. The discharge phenomenon for the straightest line is set to manually perform color registration adjustment. NOTICE: An incorrect altitude adjustment setting leads to the straightest lines for Left...

