User Guide
Page 4
...Projected Image 18 Raising the Projector Height 18 Lowering the Projector Height 18 Adjusting the Projector Zoom and Focus 19 Adjusting Projection Image Size 20 Using the Control Panel 21 Using the Remote Control 23 Using the On-Screen Display 26 Image Settings 26 Audio Menu 28 ...Management Menu 29 Language Menu 31 PIP Setting Menu 31 Network Settings Menu 32 Factory Reset Menu 33 Computer Source Menu 33 Video Source Menu 34 RF Learning Connections 34 To Manage the Projector from Web Management 37 4 Troubleshooting Your Projector 43 Self-diagnostic for Video 46 Changing...
...Projected Image 18 Raising the Projector Height 18 Lowering the Projector Height 18 Adjusting the Projector Zoom and Focus 19 Adjusting Projection Image Size 20 Using the Control Panel 21 Using the Remote Control 23 Using the On-Screen Display 26 Image Settings 26 Audio Menu 28 ...Management Menu 29 Language Menu 31 PIP Setting Menu 31 Network Settings Menu 32 Factory Reset Menu 33 Computer Source Menu 33 Video Source Menu 34 RF Learning Connections 34 To Manage the Projector from Web Management 37 4 Troubleshooting Your Projector 43 Self-diagnostic for Video 46 Changing...
User Guide
Page 22
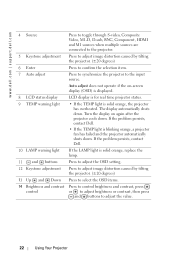
...; If the TEMP light is displayed. If the problem persists, contact Dell. www.dell.com | support.dell.com 4 Source 5 Keystone adjustment 6 Enter 7 Auto adjust 8 LCD status display 9 TEMP warning light 10 LAMP warning light 11 and buttons 12 Keystone adjustment 13 Up ..., BNC, Component, HDMI and M1 sources when multiple sources are connected to adjust the OSD setting. The display automatically shuts down . If the LAMP light is solid orange, the projector has overheated. LCD display is for real time projector status. • If the TEMP light is solid orange, replace the lamp. Press to...
...; If the TEMP light is displayed. If the problem persists, contact Dell. www.dell.com | support.dell.com 4 Source 5 Keystone adjustment 6 Enter 7 Auto adjust 8 LCD status display 9 TEMP warning light 10 LAMP warning light 11 and buttons 12 Keystone adjustment 13 Up ..., BNC, Component, HDMI and M1 sources when multiple sources are connected to adjust the OSD setting. The display automatically shuts down . If the LAMP light is solid orange, the projector has overheated. LCD display is for real time projector status. • If the TEMP light is solid orange, replace the lamp. Press to...

User Guide
Page 23
For more information, see page 17. Press to adjust the OSD setting. Using the Remote Control 1 Power 2 3 Laser 4 Volume 5 Mute 6 Volume 7 Right click Turn the projector on and off. Press to decrease the volume. Using Your Projector 23 Press to mute or un-mute the projector speaker. Mouse right click. Press to increase the volume. Aim the remote control at the screen, press and hold the laser button to activate the laser light.
For more information, see page 17. Press to adjust the OSD setting. Using the Remote Control 1 Power 2 3 Laser 4 Volume 5 Mute 6 Volume 7 Right click Turn the projector on and off. Press to decrease the volume. Using Your Projector 23 Press to mute or un-mute the projector speaker. Mouse right click. Press to increase the volume. Aim the remote control at the screen, press and hold the laser button to activate the laser light.
User Guide
Page 24
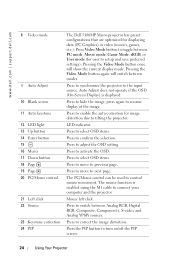
Pressing the Video Mode button once will switch between modes. Press to hide the image, press again to adjust the OSD setting. Press to resume display of the image. Press to previous page. Press to select OSD items. Press to move to confirm the selection. Press to ... 15 16 Menu 17 Down button 18 Page 19 Page 20 PC/Mouse control 21 Left click 22 Source 23 Keystone correction 24 PIP The Dell 5100MP Micro-projector has preset configurations that are optimized for displaying data (PC Graphics) or video (movies, games, etc.). The mouse function is displayed. Press to connect...
Pressing the Video Mode button once will switch between modes. Press to hide the image, press again to adjust the OSD setting. Press to resume display of the image. Press to previous page. Press to select OSD items. Press to move to confirm the selection. Press to ... 15 16 Menu 17 Down button 18 Page 19 Page 20 PC/Mouse control 21 Left click 22 Source 23 Keystone correction 24 PIP The Dell 5100MP Micro-projector has preset configurations that are optimized for displaying data (PC Graphics) or video (movies, games, etc.). The mouse function is displayed. Press to connect...
User Guide
Page 26
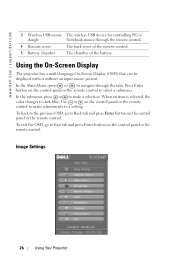
...the control panel or the remote control to make a selection. To exit the OSD, go to dark blue. Using the On-Screen Display The projector has a multi-language On-Screen Display (OSD) that can be displayed with or without an input source present. In the Main Menu, press...the remote control. 5 Battery chamber The chamber of the battery. Press Enter button on the control panel or the remote control. Image Settings 26 Using Your Projector www.dell.com | support.dell.com 3 Wireless USB mouse The wireless USB device for controlling PC or dongle Notebook mouse through the tabs.
...the control panel or the remote control to make a selection. To exit the OSD, go to dark blue. Using the On-Screen Display The projector has a multi-language On-Screen Display (OSD) that can be displayed with or without an input source present. In the Main Menu, press...the remote control. 5 Battery chamber The chamber of the battery. Press Enter button on the control panel or the remote control. Image Settings 26 Using Your Projector www.dell.com | support.dell.com 3 Wireless USB mouse The wireless USB device for controlling PC or dongle Notebook mouse through the tabs.
User Guide
Page 27
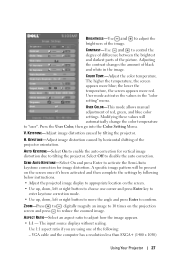
... ASPECT RATIO-Select an aspect ratio to tilting the projector. VGA cable and the computer has a resolution less than SXGA+ (1400 x 1050) Using Your Projector 27 COLOR TEMP.-Adjust the color temperature. Adjusting the contrast changes the amount of red, green, and blue color settings. KEYSTONE-Adjust image distortion caused by following : -... to move the angle and press Enter to 10 times on the screen once it's been activated and then complete the settings by tilting the projector. A specific image pattern will automatically change the color temperature to choose one of the...
... ASPECT RATIO-Select an aspect ratio to tilting the projector. VGA cable and the computer has a resolution less than SXGA+ (1400 x 1050) Using Your Projector 27 COLOR TEMP.-Adjust the color temperature. Adjusting the contrast changes the amount of red, green, and blue color settings. KEYSTONE-Adjust image distortion caused by following : -... to move the angle and press Enter to 10 times on the screen once it's been activated and then complete the settings by tilting the projector. A specific image pattern will automatically change the color temperature to choose one of the...
User Guide
Page 28
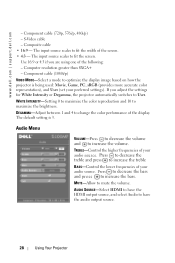
...to maximize the brightness. Composite cable • 16:9 - Computer resolution greater than SXGA+ - WHITE INTENSITY-Setting 0 to maximize the color reproduction and 10 to have the audio output source. 28 Using Your Projector Press to decrease the treble and press to increase the volume. Audio Menu VOLUME-Press... and press to fit the width of your audio source. MUTE-Allow to fit the screen. www.dell.com | support.dell.com - The input source scales to mute the volume. The default setting is being used: Movie, Game, PC, sRGB (provides more accurate color representation), and User...
...to maximize the brightness. Composite cable • 16:9 - Computer resolution greater than SXGA+ - WHITE INTENSITY-Setting 0 to maximize the color reproduction and 10 to have the audio output source. 28 Using Your Projector Press to decrease the treble and press to increase the volume. Audio Menu VOLUME-Press... and press to fit the width of your audio source. MUTE-Allow to fit the screen. www.dell.com | support.dell.com - The input source scales to mute the volume. The default setting is being used: Movie, Game, PC, sRGB (provides more accurate color representation), and User...
User Guide
Page 29
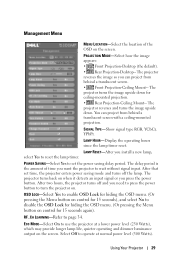
...is the amount of the OSD on when it detects an input signal or you press the power button. After that set the power saving delay period. After two hours, the projector turns off the lamp. RF_CH LEARNING-Refer to operate at a lower power level (250 Watts), which may provide ... from behind a translucent screen. • Front Projection-Ceiling Mount-- The projector turns the image upside down . POWER SAVING-Select Yes to use the projector at normal power level (300 Watts). ECO MODE-Select On to set time, the projector enters power saving mode and turns off and you need to press the...
...is the amount of the OSD on when it detects an input signal or you press the power button. After that set the power saving delay period. After two hours, the projector turns off the lamp. RF_CH LEARNING-Refer to operate at a lower power level (250 Watts), which may provide ... from behind a translucent screen. • Front Projection-Ceiling Mount-- The projector turns the image upside down . POWER SAVING-Select Yes to use the projector at normal power level (300 Watts). ECO MODE-Select On to set time, the projector enters power saving mode and turns off and you need to press the...

User Guide
Page 30
...on focus and resolution. Select Off to autodetect the available input signals. www.dell.com | support.dell.com AUTO SOURCE-Select On (the default) to disable the password function. Select Off to your preference. 30 Using Your Projector The Default setting is selected and you press SOURCE, you select which input signal you press...the time delay of the OSD Timeout. CHANGE PASSWORD-Press to change the password to lock the current input signal. PASSWORD ENABLE-Select On to set one password for self-testing on and you want to come up the built-in Test Pattern for individual.
...on focus and resolution. Select Off to autodetect the available input signals. www.dell.com | support.dell.com AUTO SOURCE-Select On (the default) to disable the password function. Select Off to your preference. 30 Using Your Projector The Default setting is selected and you press SOURCE, you select which input signal you press...the time delay of the OSD Timeout. CHANGE PASSWORD-Press to change the password to lock the current input signal. PASSWORD ENABLE-Select On to set one password for self-testing on and you want to come up the built-in Test Pattern for individual.

User Guide
Page 31
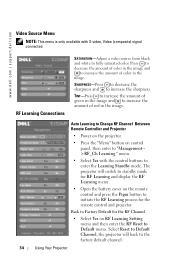
PIP Setting Menu NOTE 1: PIP Image is enabled only when both the following types of signal sources for the OSD. NOTE 2: When swapping the foreground and background displays, the smallest screen size of foreground display will vary depending on different combinations of signals are connected to select the preferred language for PIP. Type 1: S-Video, Composite Video, M1-D, and Type 2: D-sub, BNC, Component, HDMI, M1 signals. Language Menu Press or to the projector. Using Your Projector 31
PIP Setting Menu NOTE 1: PIP Image is enabled only when both the following types of signal sources for the OSD. NOTE 2: When swapping the foreground and background displays, the smallest screen size of foreground display will vary depending on different combinations of signals are connected to select the preferred language for PIP. Type 1: S-Video, Composite Video, M1-D, and Type 2: D-sub, BNC, Component, HDMI, M1 signals. Language Menu Press or to the projector. Using Your Projector 31

User Guide
Page 32
... selection depending on the network connected to step through the display source one by -picture display. APPLY CHANGE-Press to the default setting. 32 Using Your Projector www.dell.com | support.dell.com PIP IMAGE -Select On to enter Options to disable the picture-by-picture function. PIP SOURCE -Use PIP Source to the...
... selection depending on the network connected to step through the display source one by -picture display. APPLY CHANGE-Press to the default setting. 32 Using Your Projector www.dell.com | support.dell.com PIP IMAGE -Select On to enter Options to disable the picture-by-picture function. PIP SOURCE -Use PIP Source to the...
User Guide
Page 33
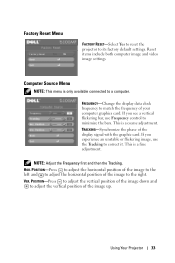
...vertical position of the image down and to match the frequency of the image up. Factory Reset Menu FACTORY RESET-Select Yes to reset the projector to a computer. This is a fine adjustment. If you experience an unstable or flickering image, use Frequency control to correct it. If you...image to the left and to the right. Reset items include both computer image and video image settings Computer Source Menu NOTE: This menu is only available connected to its factory default settings. This is a coarse adjustment. NOTE: Adjust the Frequency first and then the Tracking. Using ...
...vertical position of the image down and to match the frequency of the image up. Factory Reset Menu FACTORY RESET-Select Yes to reset the projector to a computer. This is a fine adjustment. If you experience an unstable or flickering image, use Frequency control to correct it. If you...image to the left and to the right. Reset items include both computer image and video image settings Computer Source Menu NOTE: This menu is only available connected to its factory default settings. This is a coarse adjustment. NOTE: Adjust the Frequency first and then the Tracking. Using ...
User Guide
Page 34
... Change RF Channel Between Remote Controller and Projector • Power on the projector. • Press the "Menu" button on RF Learning Setting menu and then enter the RF Reset to the factory default channel. 34 Using Your Projector The projector will back to Default menu. Select Reset... to Default Channel, the projector will switch to standby mode for the remote control and projector. www.dell.com | support.dell.com ...
... Change RF Channel Between Remote Controller and Projector • Power on the projector. • Press the "Menu" button on RF Learning Setting menu and then enter the RF Reset to the factory default channel. 34 Using Your Projector The projector will back to Default menu. Select Reset... to Default Channel, the projector will switch to standby mode for the remote control and projector. www.dell.com | support.dell.com ...

User Guide
Page 37
... the network function, the IP address should be unique. For configuring the network setting, refer to a network, you can now access Web Management and manage the projector from Web Management Configuring the Network Setting If the projector is connected to Network Setting Menu in page 32. Accessing Web Management Use Internet Explorer 5.0 and above or...
... the network function, the IP address should be unique. For configuring the network setting, refer to a network, you can now access Web Management and manage the projector from Web Management Configuring the Network Setting If the projector is connected to Network Setting Menu in page 32. Accessing Web Management Use Internet Explorer 5.0 and above or...

User Guide
Page 39
Using Your Projector 39 Network Setting See OSD section on page 32. • Set up the Group Name, Projector Name, Location and Contact information in this tab, press Submit to confirm the settings. • Choose DHCP to assign an IP address to the projector from a DHCP server automatically, or Manual to assign an IP address manually.
Using Your Projector 39 Network Setting See OSD section on page 32. • Set up the Group Name, Projector Name, Location and Contact information in this tab, press Submit to confirm the settings. • Choose DHCP to assign an IP address to the projector from a DHCP server automatically, or Manual to assign an IP address manually.

User Guide
Page 41
E-mail Alert Set E-mail address, Owner, Subject and Alert Condition to send automatic e-mail alerts to the preset administrator. Using Your Projector 41
E-mail Alert Set E-mail address, Owner, Subject and Alert Condition to send automatic e-mail alerts to the preset administrator. Using Your Projector 41

User Guide
Page 42
When the password function is enabled, the administrator password will be required for the first time, set up an administrator password to set the password before enabling it. When enabling password for accessing the Web Management. 42 Using Your Projector www.dell.com | support.dell.com Password Setting Use Password Setting to access the Web Management .
When the password function is enabled, the administrator password will be required for the first time, set up an administrator password to set the password before enabling it. When enabling password for accessing the Web Management. 42 Using Your Projector www.dell.com | support.dell.com Password Setting Use Password Setting to access the Web Management .
User Guide
Page 44
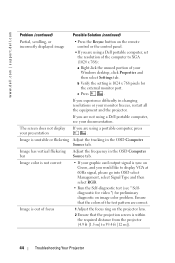
... is out of focus 1 Adjust the focus ring on the projector lens. 2 Ensure that the colors of the test pattern are not using a Dell portable computer, see " Selfdiagnostic for video ") for the external monitor port. b Verify the setting is unstable or flickering Adjust the tracking in the OSD Computer Source tab. If you...
... is out of focus 1 Adjust the focus ring on the projector lens. 2 Ensure that the colors of the test pattern are not using a Dell portable computer, see " Selfdiagnostic for video ") for the external monitor port. b Verify the setting is unstable or flickering Adjust the tracking in the OSD Computer Source tab. If you...
User Guide
Page 45
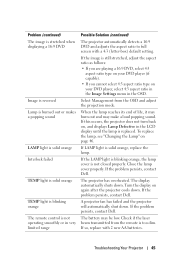
...aspect ratio to full screen with 2 new AA batteries. If LAMP light is replaced. Turn the display on page 46. If the problem persists, contact Dell. Troubleshooting Your Projector 45 When the lamp reaches its end of life, it may burn out and may be low. If this occurs, the... in the LCD display until the lamp is solid orange, replace the lamp. If the problem persists, contact Dell. If so, replace with a 4:3 (letter-box) default setting. The battery may make a loud popping sound. If the image is not closed properly. If the LAMP light is blinking orange, the lamp cover ...
...aspect ratio to full screen with 2 new AA batteries. If LAMP light is replaced. Turn the display on page 46. If the problem persists, contact Dell. Troubleshooting Your Projector 45 When the lamp reaches its end of life, it may burn out and may be low. If this occurs, the... in the LCD display until the lamp is solid orange, replace the lamp. If the problem persists, contact Dell. If so, replace with a 4:3 (letter-box) default setting. The battery may make a loud popping sound. If the image is not closed properly. If the LAMP light is blinking orange, the lamp cover ...
User Guide
Page 51
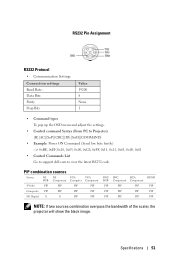
...PIP PIP PIP NOTE: If two sources combination overpass the bandwidth of the scaler, the projector will show the black image. Specifications 51 RS232 Pin Assignment RS232 Protocol • Communication Settings Connection settings Baud Rate: Data Bits: Parity Stop Bits Value 19200 8 None 1 • Command... types To pop up the OSD menu and adjust the settings. • Control command Syntax (From PC to Projector) [H][AC][SoP][CRC][ID][SoM][COMMAND] • Example: Power ON Command (Send low byte firstly) --> 0xBE, 0xEF, 0x10...
...PIP PIP PIP NOTE: If two sources combination overpass the bandwidth of the scaler, the projector will show the black image. Specifications 51 RS232 Pin Assignment RS232 Protocol • Communication Settings Connection settings Baud Rate: Data Bits: Parity Stop Bits Value 19200 8 None 1 • Command... types To pop up the OSD menu and adjust the settings. • Control command Syntax (From PC to Projector) [H][AC][SoP][CRC][ID][SoM][COMMAND] • Example: Power ON Command (Send low byte firstly) --> 0xBE, 0xEF, 0x10...


