User Manual
Page 3
... brightness of the display ...72 Setting the standard exit bin light...72 Reducing printer noise...73 Loading paper and specialty media 75 Setting the Paper Size and Paper Type...75 Configuring Universal paper settings...75 Avoiding jams...76 Loading trays...76 Using the multipurpose feeder...80 Linking and unlinking trays...85 Linking trays...85 Unlinking...
... brightness of the display ...72 Setting the standard exit bin light...72 Reducing printer noise...73 Loading paper and specialty media 75 Setting the Paper Size and Paper Type...75 Configuring Universal paper settings...75 Avoiding jams...76 Loading trays...76 Using the multipurpose feeder...80 Linking and unlinking trays...85 Linking trays...85 Unlinking...
User Manual
Page 9
......231 Printer attached locally to a computer ...231 Replacing supplies...231 Replacing the toner cartridge ...231 Replacing the photoconductor kit ...233 Recycling Dell products...236 Moving the printer to another location...236 Shipping the printer...237 Administrative support 238 Using the Embedded Web Server...238 Checking the... device status...238 Setting up e-mail alerts...238 Viewing reports...239 Restoring the factory default settings...239 Clearing jams 240 Understanding jam messages and locations...240 200 and 201 paper jams...241 202 paper jam...243 231 paper jam...244 Contents 9
......231 Printer attached locally to a computer ...231 Replacing supplies...231 Replacing the toner cartridge ...231 Replacing the photoconductor kit ...233 Recycling Dell products...236 Moving the printer to another location...236 Shipping the printer...237 Administrative support 238 Using the Embedded Web Server...238 Checking the... device status...238 Setting up e-mail alerts...238 Viewing reports...239 Restoring the factory default settings...239 Clearing jams 240 Understanding jam messages and locations...240 200 and 201 paper jams...241 202 paper jam...243 231 paper jam...244 Contents 9

User Manual
Page 10
......259 Unsupported disk ...259 Contents 10 Contact system administrator 257 Fax server 'To Format' not set up . 233 paper jam...246 234 paper jam...246 235 paper jam...247 240-249 paper jams...247 250 paper jam...248 251 paper jam...249 290-294 paper jams...250 Troubleshooting 254 Solving basic printer problems...254 Printer control panel display is blank or displays only diamonds...
......259 Unsupported disk ...259 Contents 10 Contact system administrator 257 Fax server 'To Format' not set up . 233 paper jam...246 234 paper jam...246 235 paper jam...247 240-249 paper jams...247 250 paper jam...248 251 paper jam...249 290-294 paper jams...250 Troubleshooting 254 Solving basic printer problems...254 Printer control panel display is blank or displays only diamonds...

User Manual
Page 11
...refill, change cartridge ...259 31.yy Replace defective or missing cartridge ...260 32.yy Cartridge part number unsupported by device...260 34 Short paper ...260 35 Insufficient memory to support Resource Save feature 260 37 Insufficient memory to collate job ...260 37 Insufficient memory, some Held Jobs ..., load emulation option...264 Scanner ADF Cover Open ...265 Scan Document Too Long ...265 Replace all originals if restarting job...265 Paper Change: Load Tray ...265 290-295.yy scanner jam...265 293 Replace all originals if restarting job...265 293.02 Flatbed Cover Open ...266 294 ADF...
...refill, change cartridge ...259 31.yy Replace defective or missing cartridge ...260 32.yy Cartridge part number unsupported by device...260 34 Short paper ...260 35 Insufficient memory to support Resource Save feature 260 37 Insufficient memory to collate job ...260 37 Insufficient memory, some Held Jobs ..., load emulation option...264 Scanner ADF Cover Open ...265 Scan Document Too Long ...265 Replace all originals if restarting job...265 Paper Change: Load Tray ...265 290-295.yy scanner jam...265 293 Replace all originals if restarting job...265 293.02 Flatbed Cover Open ...266 294 ADF...

User Manual
Page 12
Job takes longer than expected to print ...268 Job prints from the wrong tray or on the wrong paper 269 Incorrect characters print...269 Tray linking does not work ...269 Large jobs do not collate ...269 Unexpected page breaks occur...270 ... card...279 Hard disk with adapter...279 Internal Solutions Port ...280 Solving paper feed problems...280 Paper frequently jams ...280 Paper trays...281 Paper jam message remains after jam is cleared ...281 Page that jammed does not reprint after you clear the jam 281 Solving print quality problems...282 Isolating print quality problems...282 Blank pages...
Job takes longer than expected to print ...268 Job prints from the wrong tray or on the wrong paper 269 Incorrect characters print...269 Tray linking does not work ...269 Large jobs do not collate ...269 Unexpected page breaks occur...270 ... card...279 Hard disk with adapter...279 Internal Solutions Port ...280 Solving paper feed problems...280 Paper frequently jams ...280 Paper trays...281 Paper jam message remains after jam is cleared ...281 Page that jammed does not reprint after you clear the jam 281 Solving print quality problems...282 Isolating print quality problems...282 Blank pages...

User Manual
Page 70
... feature • Turn off . • The scanner lamps are turned off print log features. Avoid paper jams Carefully select and load paper to avoid paper jams. For more ways to reduce your first draft for accuracy Before printing or making a paper output of the document to check its content and format for your printer's environmental impact...
... feature • Turn off . • The scanner lamps are turned off print log features. Avoid paper jams Carefully select and load paper to avoid paper jams. For more ways to reduce your first draft for accuracy Before printing or making a paper output of the document to check its content and format for your printer's environmental impact...

User Manual
Page 182
... is displayed on status screen On Off Black Toner When to Display Display Do not display Message to Display. The displayed information for Paper Jam, Load Paper, and Service Errors can be customized with the following options: Activate Yes No Message to Display Default Alternate Default Message Alternate Message Notes.... Note: 9751:12000 is the factory default setting for Message to Display Default Alternate Default Message Alternate Message Displayed Information (continued) Paper Jam Load Paper Service Errors Description Specifies a valid port range for When to Display.
... is displayed on status screen On Off Black Toner When to Display Display Do not display Message to Display. The displayed information for Paper Jam, Load Paper, and Service Errors can be customized with the following options: Activate Yes No Message to Display Default Alternate Default Message Alternate Message Notes.... Note: 9751:12000 is the factory default setting for Message to Display Default Alternate Default Message Alternate Message Displayed Information (continued) Paper Jam Load Paper Service Errors Description Specifies a valid port range for When to Display.
User Manual
Page 184
... On is selected, the Allow Custom Job Scans setting can be enabled for specific jobs. Specifies how a scanned job should be reloaded if a paper jam occurs in the ADF Notes: • If Job level is selected, the entire job must be installed in the printer and operating properly for the... printer Specifies the location of the image will be available. • On is selected, rescan from the jammed page forward. Understanding printer menus 184 If On is the factory default setting. Specifies a contact name for this menu item to be removed. ...
... On is selected, the Allow Custom Job Scans setting can be enabled for specific jobs. Specifies how a scanned job should be reloaded if a paper jam occurs in the ADF Notes: • If Job level is selected, the entire job must be installed in the printer and operating properly for the... printer Specifies the location of the image will be available. • On is selected, rescan from the jammed page forward. Understanding printer menus 184 If On is the factory default setting. Specifies a contact name for this menu item to be removed. ...

User Manual
Page 241
... the front door, and then open the rear door. Open the multipurpose feeder door. Clearing jams 241 Jam number 231 233 234 235 240-249 250 251 290-295 To access the jam Open the front door, and then open the rear door. Note: For alternative access to cool before touching. 1 Pull the... following : • Open the ADF cover, and then remove the separator roll. • Open the scanner cover. • Remove the ADF tray. 200 and 201 paper jams CAUTION-HOT SURFACE: The inside of injury from the standard exit bin. Remove Tray 2. Remove Tray 1, and then depress the lever.
... the front door, and then open the rear door. Open the multipurpose feeder door. Clearing jams 241 Jam number 231 233 234 235 240-249 250 251 290-295 To access the jam Open the front door, and then open the rear door. Note: For alternative access to cool before touching. 1 Pull the... following : • Open the ADF cover, and then remove the separator roll. • Open the scanner cover. • Remove the ADF tray. 200 and 201 paper jams CAUTION-HOT SURFACE: The inside of injury from the standard exit bin. Remove Tray 2. Remove Tray 1, and then depress the lever.

User Manual
Page 243
If the paper is exiting the printer, then pull the paper out, and then touch Continue. Clearing jams 243 5 If you do not see any jammed sheets, open the rear door. 6 Remove the jam. 7 Close the rear door. 8 Insert the photoconductor kit and toner cartridge. 9 Close the front door. 10 Touch Continue. 202 paper jam Touch Status/Supplies to identify the location of the jam.
If the paper is exiting the printer, then pull the paper out, and then touch Continue. Clearing jams 243 5 If you do not see any jammed sheets, open the rear door. 6 Remove the jam. 7 Close the rear door. 8 Insert the photoconductor kit and toner cartridge. 9 Close the front door. 10 Touch Continue. 202 paper jam Touch Status/Supplies to identify the location of the jam.

User Manual
Page 244
Clearing jams 244 If the paper is not exiting the printer: 1 Pull down the rear door. 2 Remove the jammed paper. 3 Close the rear door. 4 Touch Continue. 231 paper jam CAUTION-HOT SURFACE: The inside of injury from a hot component, allow the surface to cool before touching. 1 Open the front door. 2 Open the rear door. To reduce the risk of the printer might be hot.
Clearing jams 244 If the paper is not exiting the printer: 1 Pull down the rear door. 2 Remove the jammed paper. 3 Close the rear door. 4 Touch Continue. 231 paper jam CAUTION-HOT SURFACE: The inside of injury from a hot component, allow the surface to cool before touching. 1 Open the front door. 2 Open the rear door. To reduce the risk of the printer might be hot.

User Manual
Page 246
If this does not clear the jam, complete the steps in "231 paper jam" on page 244. 234 paper jam A single jam or multiple jams are in : • "231 paper jam" on page 244 • "233 paper jam" on page 246 Clearing jams 246 233 paper jam 1 Remove the tray from the printer. 2 Locate the lever shown, and then pull it down to release and remove the jammed sheets. 3 Insert the tray. 4 Touch Continue. To locate and remove the jammed sheets, complete all the steps in the duplex area of the printer.
If this does not clear the jam, complete the steps in "231 paper jam" on page 244. 234 paper jam A single jam or multiple jams are in : • "231 paper jam" on page 244 • "233 paper jam" on page 246 Clearing jams 246 233 paper jam 1 Remove the tray from the printer. 2 Locate the lever shown, and then pull it down to release and remove the jammed sheets. 3 Insert the tray. 4 Touch Continue. To locate and remove the jammed sheets, complete all the steps in the duplex area of the printer.

User Manual
Page 247
Clearing jams 247 235 paper jam 1 Gently pull the jammed sheet out of the standard exit bin. 2 Touch Continue. 240-249 paper jams 1 Touch Status/Supplies to identify the location of the jam. 2 Pull the standard tray out. 3 Remove any jammed paper. 4 Insert the tray, and then touch Continue. 5 If the jam message persists, then pull out any optional trays.
Clearing jams 247 235 paper jam 1 Gently pull the jammed sheet out of the standard exit bin. 2 Touch Continue. 240-249 paper jams 1 Touch Status/Supplies to identify the location of the jam. 2 Pull the standard tray out. 3 Remove any jammed paper. 4 Insert the tray, and then touch Continue. 5 If the jam message persists, then pull out any optional trays.

User Manual
Page 248
Do not fold or crease the paper. Clearing jams 248 Straighten the edges on a level surface. 4 Load the paper into the multipurpose feeder. 5 Slide the paper guide toward the inside of the tray until it lightly rests against the edge of paper back and forth to identify the location of the jam. 2 Remove the paper from the multipurpose feeder. 3 Flex the sheets of the paper. 6 Touch Continue. 6 Remove the jammed paper, and then insert the trays. 7 Touch Continue. 250 paper jam 1 Touch Status/Supplies to loosen them, and then fan them.
Do not fold or crease the paper. Clearing jams 248 Straighten the edges on a level surface. 4 Load the paper into the multipurpose feeder. 5 Slide the paper guide toward the inside of the tray until it lightly rests against the edge of paper back and forth to identify the location of the jam. 2 Remove the paper from the multipurpose feeder. 3 Flex the sheets of the paper. 6 Touch Continue. 6 Remove the jammed paper, and then insert the trays. 7 Touch Continue. 250 paper jam 1 Touch Status/Supplies to loosen them, and then fan them.
User Manual
Page 249
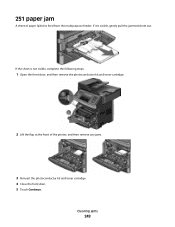
If it is not visible, complete the following steps: 1 Open the front door, and then remove the photoconductor kit and toner cartridge. 2 Lift the flap at the front of paper failed to feed from the multipurpose feeder. Clearing jams 249 251 paper jam A sheet of the printer, and then remove any jams. 3 Reinsert the photoconductor kit and toner cartridge. 4 Close the front door. 5 Touch Continue. If the sheet is visible, gently pull the jammed sheet out.
If it is not visible, complete the following steps: 1 Open the front door, and then remove the photoconductor kit and toner cartridge. 2 Lift the flap at the front of paper failed to feed from the multipurpose feeder. Clearing jams 249 251 paper jam A sheet of the printer, and then remove any jams. 3 Reinsert the photoconductor kit and toner cartridge. 4 Close the front door. 5 Touch Continue. If the sheet is visible, gently pull the jammed sheet out.

User Manual
Page 250
Clearing jams 250 290-294 paper jams Clearing jams under the ADF cover 1 Remove all original documents from the ADF. 2 Open the ADF cover. 3 Unlock the separator roll. 4 Remove the separator roll.
Clearing jams 250 290-294 paper jams Clearing jams under the ADF cover 1 Remove all original documents from the ADF. 2 Open the ADF cover. 3 Unlock the separator roll. 4 Remove the separator roll.

User Manual
Page 279
... between the option and the printer. For more of the following: MAKE SURE THE PAPER IS LOADED CORRECTLY 1 Pull the tray completely out. 2 Check for paper jams or misfeeds. 3 Make sure the guides are aligned against the edges of the paper. 4 Insert the tray. CHECK TO SEE IF THE OPTION IS CONNECTED TO THE...
... between the option and the printer. For more of the following: MAKE SURE THE PAPER IS LOADED CORRECTLY 1 Pull the tray completely out. 2 Check for paper jams or misfeeds. 3 Make sure the guides are aligned against the edges of the paper. 4 Insert the tray. CHECK TO SEE IF THE OPTION IS CONNECTED TO THE...

User Manual
Page 281
... following: MAKE SURE THE PAPER IS LOADED CORRECTLY 1 Open the paper tray. 2 Check for paper jams or misfeeds. 3 Make sure paper guides are possible solutions. Clear jammed paper from the entire paper path, and then touch Continue. Page that jammed does not reprint after jam is cleared CHECK THE PAPER PATH The paper path is not clear. Set Jam Recovery to Auto or...
... following: MAKE SURE THE PAPER IS LOADED CORRECTLY 1 Open the paper tray. 2 Check for paper jams or misfeeds. 3 Make sure paper guides are possible solutions. Clear jammed paper from the entire paper path, and then touch Continue. Page that jammed does not reprint after jam is cleared CHECK THE PAPER PATH The paper path is not clear. Set Jam Recovery to Auto or...
User Manual
Page 297
... an overlay message 112 adjusting quality 109 canceling a copy job 113 collating copies 109 custom job (job build) 111 document containing mixed paper sizes 107 enlarging 108 from one size to another 106 improving copy quality 116 making transparencies 105 multiple pages on one sheet 110 on ... exterior of the printer cleaning 227 e-mail canceling 121 enabling 117 notice of low supply level 238 notice of paper jam 238 notice of paper needed 238 Index 297 notice that different paper is needed 238 e-mail function setting up 118 e-mail screen advanced options 123 options 122, 123 E-mail Settings...
... an overlay message 112 adjusting quality 109 canceling a copy job 113 collating copies 109 custom job (job build) 111 document containing mixed paper sizes 107 enlarging 108 from one size to another 106 improving copy quality 116 making transparencies 105 multiple pages on one sheet 110 on ... exterior of the printer cleaning 227 e-mail canceling 121 enabling 117 notice of low supply level 238 notice of paper jam 238 notice of paper needed 238 Index 297 notice that different paper is needed 238 e-mail function setting up 118 e-mail screen advanced options 123 options 122, 123 E-mail Settings...

User Manual
Page 299
... size 75 setting type 75 storing 89 unacceptable 88 Universal Paper Size 163 Universal size setting 75 paper capacities trays 91 paper capacity multipurpose feeder 91 Paper Change: Load Tray 265 paper feed troubleshooting message remains after jam is cleared 281 paper jams accessing jam areas 240 avoiding 76 paper jams, clearing 200-201 241 231 244 233 246 234 246...
... size 75 setting type 75 storing 89 unacceptable 88 Universal Paper Size 163 Universal size setting 75 paper capacities trays 91 paper capacity multipurpose feeder 91 Paper Change: Load Tray 265 paper feed troubleshooting message remains after jam is cleared 281 paper jams accessing jam areas 240 avoiding 76 paper jams, clearing 200-201 241 231 244 233 246 234 246...


