Owner's Manual
Page 5
... Dell™ Laser Printer 3100cn 3 1 Loading Paper 11 Loading the Standard Tray 12 Loading the Multipurpose Feeder 15 Loading Envelopes ...17 2 Setting Up for Local Printing 19 Installing Printer Drivers 20 Connecting the Printer to the Computer Before Inserting the Drivers and Utilities CD 20 3 Setting Up for Network Printing 23 Network Set-Up ...24 Print and Check the Printer...
... Dell™ Laser Printer 3100cn 3 1 Loading Paper 11 Loading the Standard Tray 12 Loading the Multipurpose Feeder 15 Loading Envelopes ...17 2 Setting Up for Local Printing 19 Installing Printer Drivers 20 Connecting the Printer to the Computer Before Inserting the Drivers and Utilities CD 20 3 Setting Up for Network Printing 23 Network Set-Up ...24 Print and Check the Printer...

Owner's Manual
Page 6
www.dell.com/supplies | support.dell.com 5 Using Your Printer 33 Changing Printer Settings 34 Initializing NVRAM ...35 Setting of Panel Lock 35 Adjusting the Language 36 Printing a Job ...36 Canceling a Job From the Printer Operator Panel 36 Canceling the Job From a Computer 36 Canceling a Job From the Taskbar 36 Canceling a Job From the Desktop 37 Software...
www.dell.com/supplies | support.dell.com 5 Using Your Printer 33 Changing Printer Settings 34 Initializing NVRAM ...35 Setting of Panel Lock 35 Adjusting the Language 36 Printing a Job ...36 Canceling a Job From the Printer Operator Panel 36 Canceling the Job From a Computer 36 Canceling a Job From the Taskbar 36 Canceling a Job From the Desktop 37 Software...
Owner's Manual
Page 9
...print media, and heat can cause certain media to release emissions. CAUTION: To move the printer safety, remove the optional 250-sheet tray module and 500-sheet tray module before moving your system and working environment from potential damage. • Your product uses a laser. To lift the printer ...safely, remove the drum cartridge and lift it must be connected to an electrical outlet that is properly grounded. • The power cable must understand the section in your product is not marked with the use of non-Dell-authorized components. ...
...print media, and heat can cause certain media to release emissions. CAUTION: To move the printer safety, remove the optional 250-sheet tray module and 500-sheet tray module before moving your system and working environment from potential damage. • Your product uses a laser. To lift the printer ...safely, remove the drum cartridge and lift it must be connected to an electrical outlet that is properly grounded. • The power cable must understand the section in your product is not marked with the use of non-Dell-authorized components. ...
Owner's Manual
Page 12
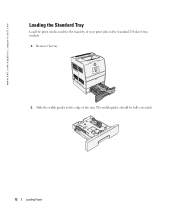
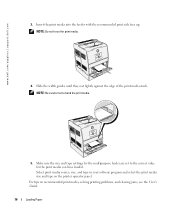
Slide the width guides to the edge of your print jobs in the standard 250-sheet tray module. 1. www.dell.com/supplies | support.dell.com Loading the Standard Tray Load the print media used for the majority of the tray. The width guides should be fully extended. 12 Loading Paper Remove the tray. 2.
Slide the width guides to the edge of your print jobs in the standard 250-sheet tray module. 1. www.dell.com/supplies | support.dell.com Loading the Standard Tray Load the print media used for the majority of the tray. The width guides should be fully extended. 12 Loading Paper Remove the tray. 2.

Owner's Manual
Page 13
Overfilling the tray may cause paper jams. Loading Paper 13 Place the print media into the tray with the recommended print side face up. Straighten the edges of the tray. 4. Before loading the print media, flex the sheets back and forth, and then fan them. NOTE: Do not exceed the maximum fill line in the tray. 3. Squeeze the length guide and slide it to the edge of the stack on a level surface. 5.
Overfilling the tray may cause paper jams. Loading Paper 13 Place the print media into the tray with the recommended print side face up. Straighten the edges of the tray. 4. Before loading the print media, flex the sheets back and forth, and then fan them. NOTE: Do not exceed the maximum fill line in the tray. 3. Squeeze the length guide and slide it to the edge of the stack on a level surface. 5.

Owner's Manual
Page 14
If you load any print media into the tray, configure the Paper Type and Paper Size settings for that tray. 14 Loading Paper Slide the width guides and length guide until they rest lightly against the edge of the print media stack. 7. Insert the tray. 8. www.dell.com/supplies | support.dell.com 6.
If you load any print media into the tray, configure the Paper Type and Paper Size settings for that tray. 14 Loading Paper Slide the width guides and length guide until they rest lightly against the edge of the print media stack. 7. Insert the tray. 8. www.dell.com/supplies | support.dell.com 6.

Owner's Manual
Page 15
Slide the width guides to plain paper, the multipurpose feeder can use various other sizes and types of the tray. The width guides should be fully extended. Loading the Multipurpose Feeder In addition to the edge of print media such as envelopes and transparencies. 1. Loading Paper 15 Gently pull open the multipurpose feeder cover. 2.
Slide the width guides to plain paper, the multipurpose feeder can use various other sizes and types of the tray. The width guides should be fully extended. Loading the Multipurpose Feeder In addition to the edge of print media such as envelopes and transparencies. 1. Loading Paper 15 Gently pull open the multipurpose feeder cover. 2.
Owner's Manual
Page 16
...and type in your software program and select the print media size and type on recommended print media, solving printing problems, and clearing jams, see the User's Guide. 16 Loading Paper www.dell.com/supplies | support.dell.com 3. For tips on the printer operator panel. NOTE: Be careful not to the... correct value for the multipurpose feeder are set to bend the print media. 5. Slide the width guides until they rest ...
...and type in your software program and select the print media size and type on recommended print media, solving printing problems, and clearing jams, see the User's Guide. 16 Loading Paper www.dell.com/supplies | support.dell.com 3. For tips on the printer operator panel. NOTE: Be careful not to the... correct value for the multipurpose feeder are set to bend the print media. 5. Slide the width guides until they rest ...
Owner's Manual
Page 19
2 Section 2 Setting Up for Local Printing Installing Printer Drivers Setting Up for Local Printing
2 Section 2 Setting Up for Local Printing Installing Printer Drivers Setting Up for Local Printing
Owner's Manual
Page 20
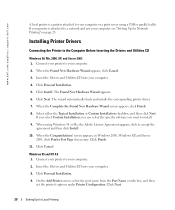
...Printing" on page 23. Installing Printer Drivers Connecting the Printer to install. 9. When the Found New Hardware Wizard appears, click Cancel. 3. Click Install. Select either the Typical Installation or Custom Installation checkbox, and then click Next. Click Cancel. www.dell.com/supplies | support.dell.com A local printer... is attached to a network and not your computer. 4. On the Add Printer screen, select the port name from the Port Name combo box, and...
...Printing" on page 23. Installing Printer Drivers Connecting the Printer to install. 9. When the Found New Hardware Wizard appears, click Cancel. 3. Click Install. Select either the Typical Installation or Custom Installation checkbox, and then click Next. Click Cancel. www.dell.com/supplies | support.dell.com A local printer... is attached to a network and not your computer. 4. On the Add Printer screen, select the port name from the Port Name combo box, and...

Owner's Manual
Page 21
When the Congratulations! Setting Up for Local Printing 21 screen appears, click Finish. 8. 5. If you select Custom Installation, you can select the specific software you want to accept the agreement and then click Install. 7. The Adobe License Agreement appears, click to install. 6. Select either the Typical Installation or Custom Installation checkbox, and then click Next. Click Cancel.
When the Congratulations! Setting Up for Local Printing 21 screen appears, click Finish. 8. 5. If you select Custom Installation, you can select the specific software you want to accept the agreement and then click Install. 7. The Adobe License Agreement appears, click to install. 6. Select either the Typical Installation or Custom Installation checkbox, and then click Next. Click Cancel.

Owner's Manual
Page 23
3 Section 3 Setting Up for Network Printing Network Set-Up Setting Up for Network Printing
3 Section 3 Setting Up for Network Printing Network Set-Up Setting Up for Network Printing
Owner's Manual
Page 24
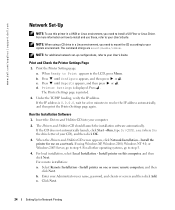
...dell.com/supplies | support.dell.com Network Set-Up NOTE: To use this computer, and then click Next. d. For remote installation: a. Enter your computer. 2. c. Install printer on one or more information on this printer in a UNIX or Linux environment, you need to Print... screen appears, click Network Installation - The command strings are mount/media/cdrom. Run the Installation Software 1. Install the printer for Network Printing The Printer Settings page is 0.0.0.0, wait for a few minutes to your User's Guide. NOTE: When using Windows XP, Windows ...
...dell.com/supplies | support.dell.com Network Set-Up NOTE: To use this computer, and then click Next. d. For remote installation: a. Enter your computer. 2. c. Install printer on one or more information on this printer in a UNIX or Linux environment, you need to Print... screen appears, click Network Installation - The command strings are mount/media/cdrom. Run the Installation Software 1. Install the printer for Network Printing The Printer Settings page is 0.0.0.0, wait for a few minutes to your User's Guide. NOTE: When using Windows XP, Windows ...

Owner's Manual
Page 25
... computers on the screen. If you want to restrict color printing, select the appropriate Color Track option. If the Adobe License Agreement appears, click to install the Dell software and documentation. You can set a printer as the default, select the printer and then click the Set this printer as default check box. 9. You can view and/or...
... computers on the screen. If you want to restrict color printing, select the appropriate Color Track option. If the Adobe License Agreement appears, click to install the Dell software and documentation. You can set a printer as the default, select the printer and then click the Set this printer as default check box. 9. You can view and/or...
Owner's Manual
Page 26
Click Apply New Settings. 26 Setting Up for Network Printing www.dell.com/supplies | support.dell.com To set up email alerts: 1. Launch the Dell Printer Configuration Web Tool. 2. Click E-Mail Alert link. 3. Under Setup E-Mail Lists and Alerts, enter the Primary SMTP Gateway, the Reply Address, and enter your email address or the key operator's email address in the email list box. 4.
Click Apply New Settings. 26 Setting Up for Network Printing www.dell.com/supplies | support.dell.com To set up email alerts: 1. Launch the Dell Printer Configuration Web Tool. 2. Click E-Mail Alert link. 3. Under Setup E-Mail Lists and Alerts, enter the Primary SMTP Gateway, the Reply Address, and enter your email address or the key operator's email address in the email list box. 4.
Owner's Manual
Page 30
..., install Adobe PS 8.8 by using Full Installation. 3. Click the icon of the dialog box. 8. www.dell.com/supplies | support.dell.com Setting the Printer Driver (for the printer being used in the AdobePS Components folder on the menu bar, and select Change Setup. 3. NOTE: The Desktop... desktop printer name and target location, then click Save. Type the IP address for LPR Connection) For the LPR connection, you created. 2. Start your Macintosh HD. Click Change under PostScript™ Printer Description (PPD) File, and then select the correct PPD file. 7. Click Printing on your...
..., install Adobe PS 8.8 by using Full Installation. 3. Click the icon of the dialog box. 8. www.dell.com/supplies | support.dell.com Setting the Printer Driver (for the printer being used in the AdobePS Components folder on the menu bar, and select Change Setup. 3. NOTE: The Desktop... desktop printer name and target location, then click Save. Type the IP address for LPR Connection) For the LPR connection, you created. 2. Start your Macintosh HD. Click Change under PostScript™ Printer Description (PPD) File, and then select the correct PPD file. 7. Click Printing on your...
Owner's Manual
Page 31
... then double-click the Dell 3100cn Installer icon. 4. Type the administrator's name and password, and then click OK. 5. Adding a Printer Mac OS X 10.2.8 or 10.3.X After the PPD file has been installed, add a printer setting the PPD file. If you can find the Printer Setup Utility in the ...X 10.2.8, and connecting the USB cable to delete it. For Mac OS X 10.3.X, your printer from Printer Model. It uses a generic PostScript driver that is provided with the power on, the print queue, which uses a generic PPD file, is automatically created. Click Quit. When Using USB ...
... then double-click the Dell 3100cn Installer icon. 4. Type the administrator's name and password, and then click OK. 5. Adding a Printer Mac OS X 10.2.8 or 10.3.X After the PPD file has been installed, add a printer setting the PPD file. If you can find the Printer Setup Utility in the ...X 10.2.8, and connecting the USB cable to delete it. For Mac OS X 10.3.X, your printer from Printer Model. It uses a generic PostScript driver that is provided with the power on, the print queue, which uses a generic PPD file, is automatically created. Click Quit. When Using USB ...
Owner's Manual
Page 32
... from the list. 3. Select Dell from Printer Model, and confirm Dell Laser Printer 3100cn is not selected, select it is selected for the Model Name. If it . You do not have been installed on the Print Center menu bar, and select Show Info. 4. Start Printer Setup Utility. Select your printer from Printer Model. 4. Select IP Printing from the menu, and specify...
... from the list. 3. Select Dell from Printer Model, and confirm Dell Laser Printer 3100cn is not selected, select it is selected for the Model Name. If it . You do not have been installed on the Print Center menu bar, and select Show Info. 4. Start Printer Setup Utility. Select your printer from Printer Model. 4. Select IP Printing from the menu, and specify...

Owner's Manual
Page 33
Section 5 Using Your Printer Changing Printer Settings Adjusting the Language Printing a Job Canceling a Job From the Printer Operator Panel Software Overview 5 Using Your Printer
Section 5 Using Your Printer Changing Printer Settings Adjusting the Language Printing a Job Canceling a Job From the Printer Operator Panel Software Overview 5 Using Your Printer
Owner's Manual
Page 35
... message appears on again. Turn off the printer. Press until Configure appears, and then press or . 3. The password has been changed. Initializing NVRAM You can be configured using the printer driver. 1. Press . 6. For regular printing, items can restore the original factory default... menu settings by the printer administrator. Press until Change Password appears, and then press or . 8. Enter ...
... message appears on again. Turn off the printer. Press until Configure appears, and then press or . 3. The password has been changed. Initializing NVRAM You can be configured using the printer driver. 1. Press . 6. For regular printing, items can restore the original factory default... menu settings by the printer administrator. Press until Change Password appears, and then press or . 8. Enter ...


