Service Manual
Page 35
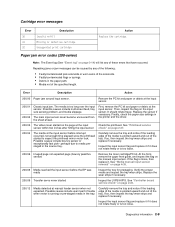
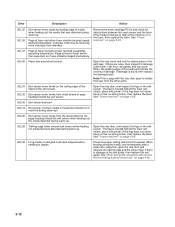
...is too long over the input sensor. Inspect the input sensor flag and replace it if it . If the flag is loose, then replace it does not rotate freely or is running or pre-staged media in the printer and the driver. 200.03 The video never started on page 2-37....at the input sensor. Cartridge error messages Error 30 31 32 Description Invalid refill Missing or defective cartridge Unsupported print cartridge Action Replace the cartridge. Remove the PC kit and paper or debris at the input sensor before the EP was ready Inspect the tray for prestaging. Verify the proper media...
...is too long over the input sensor. Inspect the input sensor flag and replace it if it . If the flag is loose, then replace it does not rotate freely or is running or pre-staged media in the printer and the driver. 200.03 The video never started on page 2-37....at the input sensor. Cartridge error messages Error 30 31 32 Description Invalid refill Missing or defective cartridge Unsupported print cartridge Action Replace the cartridge. Remove the PC kit and paper or debris at the input sensor before the EP was ready Inspect the tray for prestaging. Verify the proper media...
Service Manual
Page 36
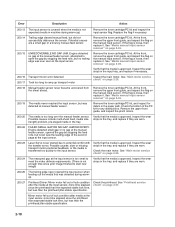
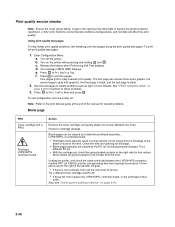
... the tray, and replace if they are worn. Mirror motor fell out of the second page at the input sensor. 200.23 Laser Servo never started due to open the gap by stopping the feed rolls, but no gap at manual feeder sensor. Remove the toner cartridge/PC kit. At the front,... necessary. 200.16 Transport motor error detected 200.17 Took too long to ramp up ) Remove the toner cartridge/PC kit and inspect the input sensor flag. Replace the flag if necessary. 200.14 Trailing edge cleared manual feed, but was detected during warm-up transport motor Inspect the main motor. ...
... the tray, and replace if they are worn. Mirror motor fell out of the second page at the input sensor. 200.23 Laser Servo never started due to open the gap by stopping the feed rolls, but no gap at manual feeder sensor. Remove the toner cartridge/PC kit. At the front,... necessary. 200.16 Transport motor error detected 200.17 Took too long to ramp up ) Remove the toner cartridge/PC kit and inspect the input sensor flag. Replace the flag if necessary. 200.14 Trailing edge cleared manual feed, but was detected during warm-up transport motor Inspect the main motor. ...
Service Manual
Page 37
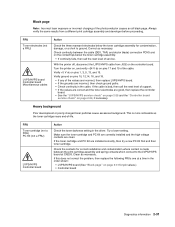
... guide. Possible causes include bouncy sensor or an exceptionally small gap, perhaps due to declaring MPF source empty. Diagnostics information 2-11 Inspect the wear laser servo cleanup is likely that the jam was later detected at least as far as internal jam. "Printhead service check" on page 2-26. 201...edge of the tray at the input sensor while waiting for obstructions between input and exit sensor Remove the toner cartridge/PC kit and check for any media in the tray, and replace if they are worn. 200.33 200.34 Page from tray 1 to clear the paper path. Inspect the ...
... guide. Possible causes include bouncy sensor or an exceptionally small gap, perhaps due to declaring MPF source empty. Diagnostics information 2-11 Inspect the wear laser servo cleanup is likely that the jam was later detected at least as far as internal jam. "Printhead service check" on page 2-26. 201...edge of the tray at the input sensor while waiting for obstructions between input and exit sensor Remove the toner cartridge/PC kit and check for any media in the tray, and replace if they are worn. 200.33 200.34 Page from tray 1 to clear the paper path. Inspect the ...
Service Manual
Page 38
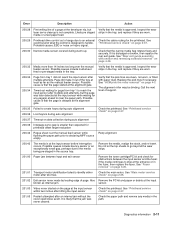
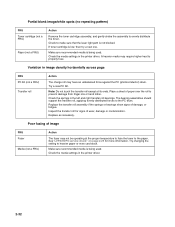
... out media that was detected during warm-up . If damage is slippage in the exit guide, then replace the exit guide. Open the rear door, and inspect the flag on the exit sensor. The flag is...stopped before fuser reached acceptable operating temperature. The flag is located behind the fuser exit rollers, about mid printer. While feeding along the media, and immediately after it was probably staged prematurely. 202.00 Paper jam ...of the sheet at fuser earlier than intended Remove the toner cartridge/PC kit and check for obstructions between the input sensor and the fuser.
... out media that was detected during warm-up . If damage is slippage in the exit guide, then replace the exit guide. Open the rear door, and inspect the flag on the exit sensor. The flag is...stopped before fuser reached acceptable operating temperature. The flag is located behind the fuser exit rollers, about mid printer. While feeding along the media, and immediately after it was probably staged prematurely. 202.00 Paper jam ...of the sheet at fuser earlier than intended Remove the toner cartridge/PC kit and check for obstructions between the input sensor and the fuser.
Service Manual
Page 56
... be caused by the PC roll not being properly charged. Try a different toner cartridge and PC kit. • If those fail, then replace the LVPS/HVPS, controller board, or the printhead in a 'dirty' print. Also, see "Solving print quality problems" on the printer while pressing and holding ...14 mm above and to evenly distribute the toner. Extreme environmental conditions, temperatures, and humidity will affect the print quality. Try a different PC kit. • With the cartridge out, check the spring loaded contacts on page 2-20 for free motion. To print the print quality test ...
... be caused by the PC roll not being properly charged. Try a different toner cartridge and PC kit. • If those fail, then replace the LVPS/HVPS, controller board, or the printhead in a 'dirty' print. Also, see "Solving print quality problems" on the printer while pressing and holding ...14 mm above and to evenly distribute the toner. Extreme environmental conditions, temperatures, and humidity will affect the print quality. Try a different PC kit. • With the cartridge out, check the spring loaded contacts on page 2-20 for free motion. To print the print quality test ...
Service Manual
Page 57
...• If the grounds are good, then replace the controller board. • See the "LVPS/HVPS service check" on page 2-25 and the "Controller board service check" on the controller board. FRU Toner cartridge (not a FRU) PC Kit (not a FRU) LVPS/HVPS Controller board... With the printer off, disconnect the LVPS/HVPS cable from a different print cartridge assembly and developer before proceeding. Verify +5 V dc on the contact tips below the toner cartridge assembly for pin values.) • Controller board Diagnostics information 2-31 Black page Note: Incorrect laser exposure or ...
...• If the grounds are good, then replace the controller board. • See the "LVPS/HVPS service check" on page 2-25 and the "Controller board service check" on the controller board. FRU Toner cartridge (not a FRU) PC Kit (not a FRU) LVPS/HVPS Controller board... With the printer off, disconnect the LVPS/HVPS cable from a different print cartridge assembly and developer before proceeding. Verify +5 V dc on the contact tips below the toner cartridge assembly for pin values.) • Controller board Diagnostics information 2-31 Black page Note: Incorrect laser exposure or ...
Service Manual
Page 58
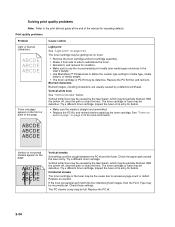
...Replace as necessary. Make sure recommended media is being used . A heavier media may have an unbalanced force against the PC (photoconductor) drum. Try a new PC Kit. Place a sheet of damage, or fatigue. Try changing the setting to the PC drum. Check to properly fuse. If toner cartridge is not blocked. Check the springs in the printer.... Check the media settings in image density horizontally across page FRU PC Kit (not a FRU) Transfer roll Action The charge roll may require higher heat to make sure that the laser light path is low, then try a new one. Inspect the...
...Replace as necessary. Make sure recommended media is being used . A heavier media may have an unbalanced force against the PC (photoconductor) drum. Try a new PC Kit. Place a sheet of damage, or fatigue. Try changing the setting to the PC drum. Check to properly fuse. If toner cartridge is not blocked. Check the springs in the printer.... Check the media settings in image density horizontally across page FRU PC Kit (not a FRU) Transfer roll Action The charge roll may require higher heat to make sure that the laser light path is low, then try a new one. Inspect the...

Service Manual
Page 59
Recheck condition before replacing PC Kit, if necessary. Inspect the HVPS contact (transfer roll) for debris, binds, or damage. If all components appear free of contamination, then replace the following FRUs one at a time in the order shown...of toner buildup and contamination. Verify the high voltage cable is plugged into the LVPS/HVPS. With the printer off, check to contaminate the transfer roller. A transfer roll contaminated with a soft cloth. Inspect the.../HVPS card Action Make sure the toner cartridge and PC Kit are installed correctly and that the laser beam is not blocked.
Recheck condition before replacing PC Kit, if necessary. Inspect the HVPS contact (transfer roll) for debris, binds, or damage. If all components appear free of contamination, then replace the following FRUs one at a time in the order shown...of toner buildup and contamination. Verify the high voltage cable is plugged into the LVPS/HVPS. With the printer off, check to contaminate the transfer roller. A transfer roll contaminated with a soft cloth. Inspect the.../HVPS card Action Make sure the toner cartridge and PC Kit are installed correctly and that the laser beam is not blocked.
Service Manual
Page 60
... the front or back of the page. With the printer off , clear the path or clean the lens. Inspect the fuser at its entry for more information. If the lines are usually caused by the laser beam, which may be partially blocked. Replace the PC Kit first, and recheck. Toner smudges appear on page 2-33...
... the front or back of the page. With the printer off , clear the path or clean the lens. Inspect the fuser at its entry for more information. If the lines are usually caused by the laser beam, which may be partially blocked. Replace the PC Kit first, and recheck. Toner smudges appear on page 2-33...


