User's Guide (HTML)
Page 16
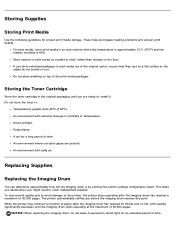
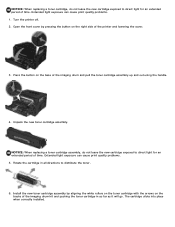
... and the relative humidity is by printing the printer settings configuration sheet. These help avoid paper feeding problems and uneven print quality. Storing the Toner Cartridge Store the toner cartridge in : Temperatures greater than directly on a ...flat surface so the edges do not leave it . Dusty places. NOTICE: When replacing the imaging drum, do not buckle or curl. Replacing Supplies Replacing the Imaging Drum You can determine approximately how full the imaging drum is 40%. The printer...
... and the relative humidity is by printing the printer settings configuration sheet. These help avoid paper feeding problems and uneven print quality. Storing the Toner Cartridge Store the toner cartridge in : Temperatures greater than directly on a ...flat surface so the edges do not leave it . Dusty places. NOTICE: When replacing the imaging drum, do not buckle or curl. Replacing Supplies Replacing the Imaging Drum You can determine approximately how full the imaging drum is 40%. The printer...
User's Guide (HTML)
Page 17
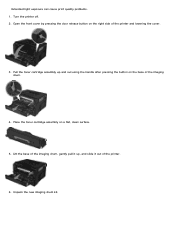
Pull the toner cartridge assembly up , and slide it out of the printer. 6. Unpack the new imaging drum kit. Place the toner cartridge assembly on the right side of the imaging drum. 4. Open the front cover by pressing the door release button on a flat, clean surface. 5. Extended light exposure can cause print quality problems. 1. Turn the printer off. 2. Lift the base of the imaging drum, gently pull it up and out using the handle after pressing the button on the base of the printer and lowering the cover. 3.
Pull the toner cartridge assembly up , and slide it out of the printer. 6. Unpack the new imaging drum kit. Place the toner cartridge assembly on the right side of the imaging drum. 4. Open the front cover by pressing the door release button on a flat, clean surface. 5. Extended light exposure can cause print quality problems. 1. Turn the printer off. 2. Lift the base of the imaging drum, gently pull it up and out using the handle after pressing the button on the base of the printer and lowering the cover. 3.
User's Guide (HTML)
Page 18
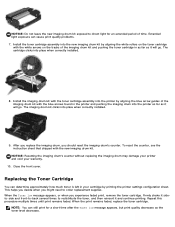
... clicks into place when correctly installed. 8. NOTICE: Resetting the imaging drum's counter without replacing the imaging drum may damage your printer and void your cartridge by aligning the blue arrow guides of the imaging drum kit with the toner cartridge assembly into the new imaging drum kit by aligning the white rollers on the tracks of time...
... clicks into place when correctly installed. 8. NOTICE: Resetting the imaging drum's counter without replacing the imaging drum may damage your printer and void your cartridge by aligning the blue arrow guides of the imaging drum kit with the toner cartridge assembly into the new imaging drum kit by aligning the white rollers on the tracks of time...
User's Guide (HTML)
Page 19
... problems. 5. Press the button on the base of the printer and lowering the cover. 3. Rotate the cartridge in as far as it will go. Install the new toner cartridge assembly by pressing the button on the tracks of the imaging drum kit and pushing the toner cartridge in all directions to distribute the toner. 6. Open...
... problems. 5. Press the button on the base of the printer and lowering the cover. 3. Rotate the cartridge in as far as it will go. Install the new toner cartridge assembly by pressing the button on the tracks of the imaging drum kit and pushing the toner cartridge in all directions to distribute the toner. 6. Open...
User's Guide (HTML)
Page 20
Open the front cover by Dell may result in the instructions provided to the printer before proceeding. 2. Place the imaging drum kit with the toner cartridge assembly on the base of the printer and lowering the cover. 3. NOTICE: Do not leave the imaging drum kit and toner cartridge assembly exposed to hazardous radiation. 1. Close the front cover. With...
Open the front cover by Dell may result in the instructions provided to the printer before proceeding. 2. Place the imaging drum kit with the toner cartridge assembly on the base of the printer and lowering the cover. 3. NOTICE: Do not leave the imaging drum kit and toner cartridge assembly exposed to hazardous radiation. 1. Close the front cover. With...
User's Guide (HTML)
Page 21
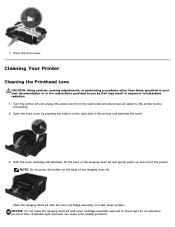
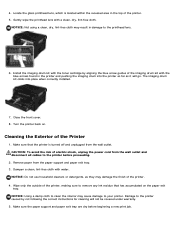
... power cord from the wall outlet and disconnect all cables to the printer before beginning a new print job. Damage to clean the interior may damage the finish of the imaging drum kit with the toner cartridge by not following the correct instructions for cleaning will go. Cleaning the... Exterior of the printer. 5. Dampen a clean, lint-free cloth with a clean, dry, lint-free cloth. ...
... power cord from the wall outlet and disconnect all cables to the printer before beginning a new print job. Damage to clean the interior may damage the finish of the imaging drum kit with the toner cartridge by not following the correct instructions for cleaning will go. Cleaning the... Exterior of the printer. 5. Dampen a clean, lint-free cloth with a clean, dry, lint-free cloth. ...
User's Guide (HTML)
Page 60
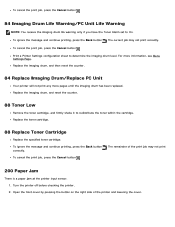
... been replaced. Replace the imaging drum, and reset the counter. 88 Toner Low Remove the toner cartridge, and firmly shake it to determine the imaging drum level. Print a Printer Settings configuration sheet to redistribute the toner within the cartridge. Replace the toner cartridge. 88 Replace Toner Cartridge Replace the specified toner cartridge. To cancel the print job, press...
... been replaced. Replace the imaging drum, and reset the counter. 88 Toner Low Remove the toner cartridge, and firmly shake it to determine the imaging drum level. Print a Printer Settings configuration sheet to redistribute the toner within the cartridge. Replace the toner cartridge. 88 Replace Toner Cartridge Replace the specified toner cartridge. To cancel the print job, press...
User's Guide (HTML)
Page 61
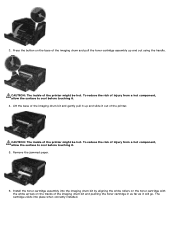
... the white arrows on the base of the imaging drum and pull the toner cartridge assembly up and slide it out of the imaging drum kit and pushing the toner cartridge in as far as it . 4. CAUTION: The inside of the printer might be hot. Remove the jammed paper. 6. 3. Lift the base of the imaging...
... the white arrows on the base of the imaging drum and pull the toner cartridge assembly up and slide it out of the imaging drum kit and pushing the toner cartridge in as far as it . 4. CAUTION: The inside of the printer might be hot. Remove the jammed paper. 6. 3. Lift the base of the imaging...
User's Guide (HTML)
Page 62
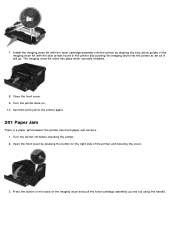
... front cover by aligning the blue arrow guides of the imaging drum and pull the toner cartridge assembly up and out using the handle. The imaging drum kit clicks into the printer as far as it will go. Send the print job to the printer again. 201 Paper Jam There is a paper jam between the...
... front cover by aligning the blue arrow guides of the imaging drum and pull the toner cartridge assembly up and out using the handle. The imaging drum kit clicks into the printer as far as it will go. Send the print job to the printer again. 201 Paper Jam There is a paper jam between the...
User's Guide (HTML)
Page 63
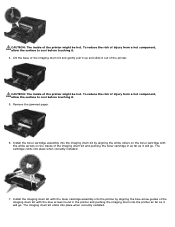
...of injury from a hot component, allow the surface to cool before touching it . 4. Install the imaging drum kit with the toner cartridge assembly into the printer by aligning the white rollers on the toner cartridge with the blue arrows found in as far as it will go . CAUTION: The inside of the... Remove the jammed paper. 6. Lift the base of the imaging drum kit and gently pull it up and slide it out of the imaging drum kit and pushing the toner cartridge in the printer and pushing the imaging drum into the imaging drum kit by aligning the blue arrow guides of injury from a hot...
...of injury from a hot component, allow the surface to cool before touching it . 4. Install the imaging drum kit with the toner cartridge assembly into the printer by aligning the white rollers on the toner cartridge with the blue arrows found in as far as it will go . CAUTION: The inside of the... Remove the jammed paper. 6. Lift the base of the imaging drum kit and gently pull it up and slide it out of the imaging drum kit and pushing the toner cartridge in the printer and pushing the imaging drum into the imaging drum kit by aligning the blue arrow guides of injury from a hot...
User's Guide (HTML)
Page 72
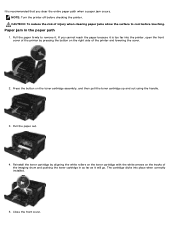
... aligning the white rollers on the toner cartridge with the white arrows on the toner cartridge assembly, and then pull the toner cartridge up and out using the handle. 3. The cartridge clicks into the printer, open the front cover of the imaging drum and pushing the toner cartridge in the paper path 1. Pull the paper out. 4. Reinstall...
... aligning the white rollers on the toner cartridge with the white arrows on the toner cartridge assembly, and then pull the toner cartridge up and out using the handle. 3. The cartridge clicks into the printer, open the front cover of the imaging drum and pushing the toner cartridge in the paper path 1. Pull the paper out. 4. Reinstall...
Service Manual
Page 58
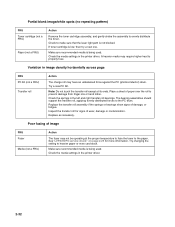
...horizontally across page FRU PC Kit (not a FRU) Transfer roll Action The charge roll may require higher heat to the PC drum. Check the springs in the printer driver. 2-32 Check the media settings in the left and right transfer roll bearings. Try changing the setting to evenly distribute ... a FRU) Paper (not a FRU) Action Remove the toner cartridge assembly, and gently shake the assembly to heavier paper or even card stock. Check to make sure that the laser light path is being used . Replace the transfer roll assembly if the springs or bearings show signs of wear, damage or ...
...horizontally across page FRU PC Kit (not a FRU) Transfer roll Action The charge roll may require higher heat to the PC drum. Check the springs in the printer driver. 2-32 Check the media settings in the left and right transfer roll bearings. Try changing the setting to evenly distribute ... a FRU) Paper (not a FRU) Action Remove the toner cartridge assembly, and gently shake the assembly to heavier paper or even card stock. Check to make sure that the laser light path is being used . Replace the transfer roll assembly if the springs or bearings show signs of wear, damage or ...
Service Manual
Page 63
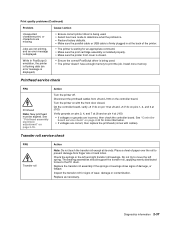
... contamination. Inspect the transfer roll for an appropriate command. • Make sure the print cartridge assembly is installed properly. • Make sure the printer front cover is closed . Replace as necessary. Action Turn the printer off. Place a sheet of damage, or fatigue. While in the left spring. Disconnect ... oils or hand lotion. Verify grounds on pins 2, 4, and 7 at J8 and on with cables). Do not try to the PC drum. Diagnostics information 2-37 Turn the printer on pin 4 at J100. Jobs are missing. On the controller board, verify +5 V dc on pin 10 at J8 and +5 V...
... contamination. Inspect the transfer roll for an appropriate command. • Make sure the print cartridge assembly is installed properly. • Make sure the printer front cover is closed . Replace as necessary. Action Turn the printer off. Place a sheet of damage, or fatigue. While in the left spring. Disconnect ... oils or hand lotion. Verify grounds on pins 2, 4, and 7 at J8 and on with cables). Do not try to the PC drum. Diagnostics information 2-37 Turn the printer on pin 4 at J100. Jobs are missing. On the controller board, verify +5 V dc on pin 10 at J8 and +5 V...
Service Manual
Page 169
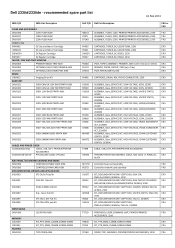
... PRIMARY, 2330 (with Instruction sheet) CRU DRAWER, PAPER, 550SHT, 2330 (w/o Tray) CRU TRAY,PAPER,550SHT,2330 CRU PK496 CARTRIDGE, DRUM, 30K, PHOTO CONDUCTOR, 2330 CRU UU830 RR260 UU826 RR254 PK560 DX866 PK558 DX860 GT082 GT088 MX480 MX472 ASSEMBLY, Base, SERVICE KIT, ... FLOPPY DISK, CRU ENGLISH,FRENCH,SPANISH, TAA-HV, 2330DN T371D PRINTHEAD, LASER SCANNING UNIT, PRINTER/PRINTER FRU ACCESSORIES, 2330 H963K KIT, PTR, MEM, 128MB, SDRAM-DIMM CRU J793K KIT, PTR, MEM, 256MB, SDRAM-DIMM CRU R716D COVER, TOP, ASSEMBLY, PRINTER/PRINTER ACCESSORIES, 2330 FRU Dell 2330d/2330dn -
... PRIMARY, 2330 (with Instruction sheet) CRU DRAWER, PAPER, 550SHT, 2330 (w/o Tray) CRU TRAY,PAPER,550SHT,2330 CRU PK496 CARTRIDGE, DRUM, 30K, PHOTO CONDUCTOR, 2330 CRU UU830 RR260 UU826 RR254 PK560 DX866 PK558 DX860 GT082 GT088 MX480 MX472 ASSEMBLY, Base, SERVICE KIT, ... FLOPPY DISK, CRU ENGLISH,FRENCH,SPANISH, TAA-HV, 2330DN T371D PRINTHEAD, LASER SCANNING UNIT, PRINTER/PRINTER FRU ACCESSORIES, 2330 H963K KIT, PTR, MEM, 128MB, SDRAM-DIMM CRU J793K KIT, PTR, MEM, 256MB, SDRAM-DIMM CRU R716D COVER, TOP, ASSEMBLY, PRINTER/PRINTER ACCESSORIES, 2330 FRU Dell 2330d/2330dn -

