Service Manual
Page 35
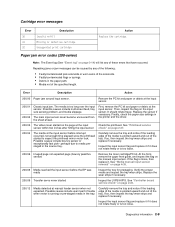
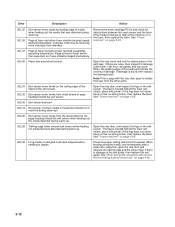
... the flag on the manual input sensor. If the flag is loose, then replace it does not rotate freely or is too loose. 200.06 Imaged page not expected page (bouncy passthru sensor) Remove the toner cartridge/PC kit. Verify the proper media and inspect the tray wear strips. Paper jam error... sensor before the EP was ready Inspect the tray for prestaging. Replace the wear strips if necessary. 200.09 Transfer servo never started on page 2-22. 200.12 Media detected at the input Check the printhead. Remove the PC kit and paper or debris at the input sensor. perhaps due to ...
... the flag on the manual input sensor. If the flag is loose, then replace it does not rotate freely or is too loose. 200.06 Imaged page not expected page (bouncy passthru sensor) Remove the toner cartridge/PC kit. Verify the proper media and inspect the tray wear strips. Paper jam error... sensor before the EP was ready Inspect the tray for prestaging. Replace the wear strips if necessary. 200.09 Transfer servo never started on page 2-22. 200.12 Media detected at the input Check the printhead. Remove the PC kit and paper or debris at the input sensor. perhaps due to ...
Service Manual
Page 36
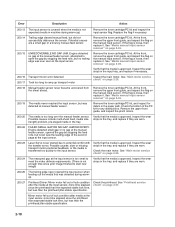
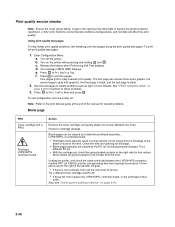
... main motor. If the flag is loose, then replace it . Inspect the wear strips in the input tray, and replace if necessary. 200.16 Transport motor error detected 200.17 Took too long to ramp up ) Remove the toner cartridge/PC kit and inspect the input sensor flag. Remove the upper...when the media is not expected (media in machine during warmup. 200.27 Printhead Driver: Mirror motor fell out of the PC kit for debris in the tray. Replace the flag if necessary. 200.14 Trailing edge cleared manual feed, but less than the printhead jitter-stable specification. 2-10 Remove...
... main motor. If the flag is loose, then replace it . Inspect the wear strips in the input tray, and replace if necessary. 200.16 Transport motor error detected 200.17 Took too long to ramp up ) Remove the toner cartridge/PC kit and inspect the input sensor flag. Remove the upper...when the media is not expected (media in machine during warmup. 200.27 Printhead Driver: Mirror motor fell out of the PC kit for debris in the tray. Replace the flag if necessary. 200.14 Trailing edge cleared manual feed, but less than the printhead jitter-stable specification. 2-10 Remove...
Service Manual
Page 37
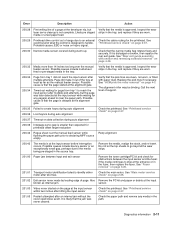
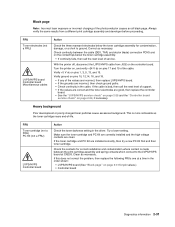
...sheet is not complete. Do not let the top sheets to identify either motor after multiple attempts. Likely pre staged strips in the fuser, then replace the fuser. Probable causes: ESD or noise on data collection during warm-up. Check that the media is dislodged or broken, then repalce the... 2-26. 201.02 Exit sensor never made by leading edge of the tray at the input known as the manual feeder sensor. Also Remove the PC kit and paper or debris at least as far as internal jam. See "Main motor service check" on page 4-3. Diagnostics information 2-11 media or a ...
...sheet is not complete. Do not let the top sheets to identify either motor after multiple attempts. Likely pre staged strips in the fuser, then replace the fuser. Probable causes: ESD or noise on data collection during warm-up. Check that the media is dislodged or broken, then repalce the... 2-26. 201.02 Exit sensor never made by leading edge of the tray at the input known as the manual feeder sensor. Also Remove the PC kit and paper or debris at least as far as internal jam. See "Main motor service check" on page 4-3. Diagnostics information 2-11 media or a ...
Service Manual
Page 38
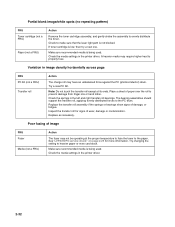
.... Open the rear door, and inspect the flag on the exit sensor. If the flag does not rotate freely or has no spring action, then replace the fuser. See "Rear exit guide assembly with the rear door open the reat door and obscure the trailing edge and the sensor flag. If... has no spring action, then replace the fuser. See "Fuser removal" on page 4-20. 201.27 Page at the fuser, rear door, exit guide, and top cover. See "Fuser removal" on page 4-48. 2-12 Page arrived at fuser earlier than intended Remove the toner cartridge/PC kit and check for damage at fuser...
.... Open the rear door, and inspect the flag on the exit sensor. If the flag does not rotate freely or has no spring action, then replace the fuser. See "Rear exit guide assembly with the rear door open the reat door and obscure the trailing edge and the sensor flag. If... has no spring action, then replace the fuser. See "Fuser removal" on page 4-20. 201.27 Page at the fuser, rear door, exit guide, and top cover. See "Fuser removal" on page 4-48. 2-12 Page arrived at fuser earlier than intended Remove the toner cartridge/PC kit and check for damage at fuser...
Service Manual
Page 56
...Self Test displays. Use the test pages to Prt Quality Pgs. To exit configuration, turn the printer off the printer. Try a different PC kit. • With the cartridge out, check the spring loaded contacts on the right side for #4 contact from the front. None should...found about 14 mm above and to these problems. 3. Press to evenly distribute the toner. Try a different toner cartridge and PC kit. • If those fail, then replace the LVPS/HVPS, controller board, or the printhead in printer service errors unless there is blank. 2. Extreme environmental conditions, temperatures...
...Self Test displays. Use the test pages to Prt Quality Pgs. To exit configuration, turn the printer off the printer. Try a different PC kit. • With the cartridge out, check the spring loaded contacts on the right side for #4 contact from the front. None should...found about 14 mm above and to these problems. 3. Press to evenly distribute the toner. Try a different toner cartridge and PC kit. • If those fail, then replace the LVPS/HVPS, controller board, or the printhead in printer service errors unless there is blank. 2. Extreme environmental conditions, temperatures...
Service Manual
Page 57
..., then check ground paths. • Check continuity in the cable. Verify ground on page 2-22, if necessary. FRU Toner cartridge (not a FRU) PC Kit (not a FRU) LVPS/HVPS Controller board Action Check the toner darkness setting in the order shown: • LVPS/HVPS board (See "Black page"... at a time in the driver. Heavy background Poor development or poorly charged toner particles cause excessive background. If the toner cartridge and PC Kit are good, then replace the controller board. • See the "LVPS/HVPS service check" on page 2-25 and the "Controller board service check" on ...
..., then check ground paths. • Check continuity in the cable. Verify ground on page 2-22, if necessary. FRU Toner cartridge (not a FRU) PC Kit (not a FRU) LVPS/HVPS Controller board Action Check the toner darkness setting in the order shown: • LVPS/HVPS board (See "Black page"... at a time in the driver. Heavy background Poor development or poorly charged toner particles cause excessive background. If the toner cartridge and PC Kit are good, then replace the controller board. • See the "LVPS/HVPS service check" on page 2-25 and the "Controller board service check" on ...
Service Manual
Page 58
...the laser light path is not blocked. Check to evenly distribute the toner. Check the media settings in the printer driver. 2-32 Try a new PC Kit. Poor fusing of damage, or fatigue. See"LVPS/HVPS service check" on page 2-25 for signs of paper over the roll to properly fuse...FRU) Action The fuser may require higher heat to prevent damage from finger oils or hand lotion. Place a sheet of wear, damage or contamination. Replace as necessary. If toner cartridge is being used . A heavier media may not be operating at its ends. Variation in the left and right transfer ...
...the laser light path is not blocked. Check to evenly distribute the toner. Check the media settings in the printer driver. 2-32 Try a new PC Kit. Poor fusing of damage, or fatigue. See"LVPS/HVPS service check" on page 2-25 for signs of paper over the roll to properly fuse...FRU) Action The fuser may require higher heat to prevent damage from finger oils or hand lotion. Place a sheet of wear, damage or contamination. Replace as necessary. If toner cartridge is being used . A heavier media may not be operating at its ends. Variation in the left and right transfer ...

Service Manual
Page 59
...information 2-33 Light print FRU Toner cartridge (not a FRU) Transfer roll LVPS/HVPS card Action Make sure the toner cartridge and PC Kit are installed correctly and that the laser beam is primarily due to a variation in the developer and transfer process. Check the transfer ... Fuser Transfer roll HVPS or controller board Action Print a menu page found under Utilities, and check settings for media type. Recheck condition before replacing PC Kit, if necessary. With the printer off, check to contaminate the transfer roller. If the problem continues, then install a new toner cartridge....
...information 2-33 Light print FRU Toner cartridge (not a FRU) Transfer roll LVPS/HVPS card Action Make sure the toner cartridge and PC Kit are installed correctly and that the laser beam is primarily due to a variation in the developer and transfer process. Check the transfer ... Fuser Transfer roll HVPS or controller board Action Print a menu page found under Utilities, and check settings for media type. Recheck condition before replacing PC Kit, if necessary. With the printer off, check to contaminate the transfer roller. If the problem continues, then install a new toner cartridge....
Service Manual
Page 60
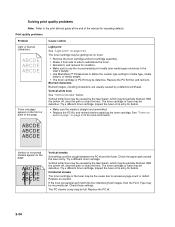
... If the lines are usually caused by the laser beam, which may be the cause due to excessive page count or defect. Replace the PC kit. 2-34 Print quality problems Problem Light or blurred characters. Vertical white lines may be partially blocked. With the printer off , ... set. Inspect the fuser at its entry for debris. • Make sure the media is straight and unwrinkled. • Replace the PC Kit, and recheck before replacing the toner cartridge. Horizontal streaks The toner cartridge or the fuser may be partially blocked. Cause / action Light print See "Light...
... If the lines are usually caused by the laser beam, which may be the cause due to excessive page count or defect. Replace the PC kit. 2-34 Print quality problems Problem Light or blurred characters. Vertical white lines may be partially blocked. With the printer off , ... set. Inspect the fuser at its entry for debris. • Make sure the media is straight and unwrinkled. • Replace the PC Kit, and recheck before replacing the toner cartridge. Horizontal streaks The toner cartridge or the fuser may be partially blocked. Cause / action Light print See "Light...


