
User Guide
Page 1
... change without the written permission of Microsoft Corporation. Windows Vista is strictly forbidden. Other trademarks and trade names may be used by Dell Inc. file:///T|/htdocs/systems/prn948/en/en/index.html[10/10/2012 11:05:17 AM] Finding Information About Your Printer Understanding the Operator Panel Menus Loading Paper and Originals Printing Printing From a Memory Card or USB Key Copying Scanning Faxing Understanding the Software Wireless Networking Peer-to-Peer Networking Maintenance Troubleshooting Specifications...
... change without the written permission of Microsoft Corporation. Windows Vista is strictly forbidden. Other trademarks and trade names may be used by Dell Inc. file:///T|/htdocs/systems/prn948/en/en/index.html[10/10/2012 11:05:17 AM] Finding Information About Your Printer Understanding the Operator Panel Menus Loading Paper and Originals Printing Printing From a Memory Card or USB Key Copying Scanning Faxing Understanding the Software Wireless Networking Peer-to-Peer Networking Maintenance Troubleshooting Specifications...

User Guide
Page 4
...: Answers to technical service and support Solutions-Troubleshooting hints and tips, articles from technicians, and online courses Upgrades-Upgrade information for components, such as memory Customer Care-Contact information, order status, warranty, and repair information questions Downloads-Drivers Documentation Reference-Printer documentation and product specifications for my printer 2. Vista™ Documentation for my printer Windows Vista Help and Support Center How to use Windows 1. Type a word or phrase that best describes your problem, and then click...
...: Answers to technical service and support Solutions-Troubleshooting hints and tips, articles from technicians, and online courses Upgrades-Upgrade information for components, such as memory Customer Care-Contact information, order status, warranty, and repair information questions Downloads-Drivers Documentation Reference-Printer documentation and product specifications for my printer 2. Vista™ Documentation for my printer Windows Vista Help and Support Center How to use Windows 1. Type a word or phrase that best describes your problem, and then click...
User Guide
Page 6
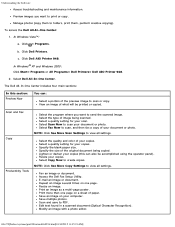
... one page on your copies. Understanding the Software Access troubleshooting and maintenance information. Click ® Programs. b. Click Dell AIO Printer 948. In Windows® XP and Windows 2000: Click Start® Programs or All Programs® Dell Printers® Dell AIO Printer 948. 2. The Dell All-In-One Center includes four main sections: In this can : Select a portion of the original document being scanned. Scan and Fax Copy Productivity Tools Select the program where you want to print or copy. Select a quality setting...
... one page on your copies. Understanding the Software Access troubleshooting and maintenance information. Click ® Programs. b. Click Dell AIO Printer 948. In Windows® XP and Windows 2000: Click Start® Programs or All Programs® Dell Printers® Dell AIO Printer 948. 2. The Dell All-In-One Center includes four main sections: In this can : Select a portion of the original document being scanned. Scan and Fax Copy Productivity Tools Select the program where you want to print or copy. Select a quality setting...
User Guide
Page 9
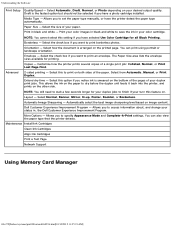
... print borderless photos. Borderless - Advanced Copies - Select from Automatic, Manual, or Print Duplex. Extend dry time - Allows you want to print on the printed page. Maintenance Install Ink Cartridges Clean Ink Cartridges Align Ink Cartridges Print a Test Page Network Support Using Memory Card Manager file:///T|/htdocs/systems/prn948/en/en/d0e8996.html[10/10/2012 11:05:21 AM] Print in your paper. Select the check box if you to set the paper type manually, or have the printer detect the paper type automatically. Select this setting if you notice ink...
... print borderless photos. Borderless - Advanced Copies - Select from Automatic, Manual, or Print Duplex. Extend dry time - Allows you want to print on the printed page. Maintenance Install Ink Cartridges Clean Ink Cartridges Align Ink Cartridges Print a Test Page Network Support Using Memory Card Manager file:///T|/htdocs/systems/prn948/en/en/d0e8996.html[10/10/2012 11:05:21 AM] Print in your paper. Select the check box if you to set the paper type manually, or have the printer detect the paper type automatically. Select this setting if you notice ink...

User Guide
Page 10
... choose to print black from these devices. If you expect. Understanding the Software Memory Card Manager allows you try to print. c. When your ink cartridge levels are low, a Low Ink Warning appears on your screen when you to display, manage, edit, print, and save photos from your memory card or USB memory key to your black ink cartridge is out of ink, you try to print. If your computer. Click Dell Printers. The page counter is displayed every time you print until printing habits are...
... choose to print black from these devices. If you expect. Understanding the Software Memory Card Manager allows you try to print. c. When your ink cartridge levels are low, a Low Ink Warning appears on your screen when you to display, manage, edit, print, and save photos from your memory card or USB memory key to your black ink cartridge is out of ink, you try to print. If your computer. Click Dell Printers. The page counter is displayed every time you print until printing habits are...

User Guide
Page 13
... the Operator Panel You can use your printer to produce quality documents. A few important things to note: If the printer is connected to a computer or not) must install a DSL filter on the printer that you use to make photocopies, send faxes, or print from memory cards or a PictBridge-enabled camera. For more information, see Understanding the Operator Panel. 4 Paper exit tray Tray that feeds original documents into the printer. Feeder (ADF) 2 Printer unit Unit you lift to gain access to the ink cartridges. 3 Operator panel Panel...
... the Operator Panel You can use your printer to produce quality documents. A few important things to note: If the printer is connected to a computer or not) must install a DSL filter on the printer that you use to make photocopies, send faxes, or print from memory cards or a PictBridge-enabled camera. For more information, see Understanding the Operator Panel. 4 Paper exit tray Tray that feeds original documents into the printer. Feeder (ADF) 2 Printer unit Unit you lift to gain access to the ink cartridges. 3 Operator panel Panel...

User Guide
Page 14
.... Enter the Express Service Code to scan, copy, or fax multiple-page documents. 9 Foreign object guard Part that prevents small foreign objects from falling into the paper path. 10 Paper support Part that supports loaded paper. 11 Paper guides Guides that holds two ink cartridges, one color ink and the other black or photo. 14 Express Service Code Identify your original document after it . Use it . tray 8 ADF input tray Tray that holds your document or photo flat while you insert a memory card containing digital photos. 7 Top cover with Top of printer...
.... Enter the Express Service Code to scan, copy, or fax multiple-page documents. 9 Foreign object guard Part that prevents small foreign objects from falling into the paper path. 10 Paper support Part that supports loaded paper. 11 Paper guides Guides that holds two ink cartridges, one color ink and the other black or photo. 14 Express Service Code Identify your original document after it . Use it . tray 8 ADF input tray Tray that holds your document or photo flat while you insert a memory card containing digital photos. 7 Top cover with Top of printer...

User Guide
Page 21
... more information about configuring your screen. Choose a port or manually enter an IP address, and then follow the instructions on the network, see the wireless network administrator or your network documentation. On the Configure Your Wireless Printer Adapter dialog box, select Create or modify the printer's wireless settings, and then click Next. NOTE: The network name (SSID) and the security settings for the wireless network you need to adjust the wireless adapter settings after installation, the CD...
... more information about configuring your screen. Choose a port or manually enter an IP address, and then follow the instructions on the network, see the wireless network administrator or your network documentation. On the Configure Your Wireless Printer Adapter dialog box, select Create or modify the printer's wireless settings, and then click Next. NOTE: The network name (SSID) and the security settings for the wireless network you need to adjust the wireless adapter settings after installation, the CD...

User Guide
Page 33
Add or remove numbers from the built-in speaker on the fax footer. Additional Fax Options 1. When the setting you want a fax activity report to be printed. On Error* Off Print for All Print Reports Specify which you want to print. Dial Method Redial Time Redial Attempts Dial Prefix Dial Volume Scan Max Send Speed Auto Fax Convert Error Correction For more information on any of the options listed under the Fax Blocking heading, see Additional Fax Options. Additional Fax Options From this...
Add or remove numbers from the built-in speaker on the fax footer. Additional Fax Options 1. When the setting you want a fax activity report to be printed. On Error* Off Print for All Print Reports Specify which you want to print. Dial Method Redial Time Redial Attempts Dial Prefix Dial Volume Scan Max Send Speed Auto Fax Convert Error Correction For more information on any of the options listed under the Fax Blocking heading, see Additional Fax Options. Additional Fax Options From this...

User Guide
Page 42
... to clear the Device List. Press the Select button List message displays before it sends a print job. Off On* Printer Name Security Level View the name of devices that connect to High. to communicate with the service tag number. From this pass key before the list is removed from the list. *Factory default settings/Current settings selected by user Setup Mode Main Menu Setup Mode Main Menu Paper Setup Device Setup Mode Submenu Paper Size Paper Type Language Country Date/Time Host Fax Settings Button Beep Power Save Clear Settings Timeout Mode Submenu file:///T|/htdocs...
... to clear the Device List. Press the Select button List message displays before it sends a print job. Off On* Printer Name Security Level View the name of devices that connect to High. to communicate with the service tag number. From this pass key before the list is removed from the list. *Factory default settings/Current settings selected by user Setup Mode Main Menu Setup Mode Main Menu Paper Setup Device Setup Mode Submenu Paper Size Paper Type Language Country Date/Time Host Fax Settings Button Beep Power Save Clear Settings Timeout Mode Submenu file:///T|/htdocs...
User Guide
Page 55
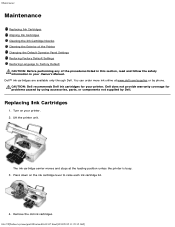
Maintenance Maintenance Replacing Ink Cartridges Aligning Ink Cartridges Cleaning the Ink Cartridge Nozzles Cleaning the Exterior of the Printer Changing the Default Operator Panel Settings Restoring Factory Default Settings Restoring Language to raise each ink cartridge lid. 4. You can order more ink online at the loading position unless the printer is busy. 3. Dell does not provide warranty coverage for your printer. 2. Turn on the ink cartridge lever to Factory Default CAUTION: Before performing any of the procedures listed in this section, read and follow ...
Maintenance Maintenance Replacing Ink Cartridges Aligning Ink Cartridges Cleaning the Ink Cartridge Nozzles Cleaning the Exterior of the Printer Changing the Default Operator Panel Settings Restoring Factory Default Settings Restoring Language to raise each ink cartridge lid. 4. You can order more ink online at the loading position unless the printer is busy. 3. Dell does not provide warranty coverage for your printer. 2. Turn on the ink cartridge lever to Factory Default CAUTION: Before performing any of the procedures listed in this section, read and follow ...

User Guide
Page 59
... paper support and paper exit tray are saved as they may cause damage to your document again to Set Defaults, and then press the Select button . 6. Changing the Default Operator Panel Settings To change the default settings on the printer. 2. Use the left and right Arrow buttons to scroll to the printer before beginning a new print job. Remove paper from the wall outlet and disconnect all cables to Use Current, and then press the Select button . Click Clean Ink Cartridges. Damage to clean...
... paper support and paper exit tray are saved as they may cause damage to your document again to Set Defaults, and then press the Select button . 6. Changing the Default Operator Panel Settings To change the default settings on the printer. 2. Use the left and right Arrow buttons to scroll to the printer before beginning a new print job. Remove paper from the wall outlet and disconnect all cables to Use Current, and then press the Select button . Click Clean Ink Cartridges. Damage to clean...

User Guide
Page 73
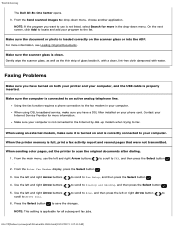
... USB cable is properly connected to the electrical outlet and computer, if using a computer. Windows ME, Windows 98, and Windows 95 are not supported by this printer. Shut down the computer, reconnect the USB cable as shown on troubleshooting your printer, please visit http://support.dell.com/support. Make sure you turned on both your printer and your computer. Troubleshooting Troubleshooting Setup Problems Error Messages Clearing Paper Jams Avoiding Jams and Misfeeds Printing Problems Copying Problems Scanning Problems Faxing Problems Networking Problems Memory Card Problems Paper...
... USB cable is properly connected to the electrical outlet and computer, if using a computer. Windows ME, Windows 98, and Windows 95 are not supported by this printer. Shut down the computer, reconnect the USB cable as shown on troubleshooting your printer, please visit http://support.dell.com/support. Make sure you turned on both your printer and your computer. Troubleshooting Troubleshooting Setup Problems Error Messages Clearing Paper Jams Avoiding Jams and Misfeeds Printing Problems Copying Problems Scanning Problems Faxing Problems Networking Problems Memory Card Problems Paper...

User Guide
Page 74
... installed. c. Click ® Control Panel. Click ® Programs. 2. Correct communication problems between the printer and the computer. In Windows Vista: a. In Windows XP and Windows 2000: Click Start® Programs or All Programs® Dell Printers® Dell AIO Printer 948. Remove the USB cable from the electrical outlet. Reconnect the USB cable to complete the installation. Follow the instructions on your computer. Printer won't print and print jobs are stuck in the list of the printer installed on your computer. Turn...
... installed. c. Click ® Control Panel. Click ® Programs. 2. Correct communication problems between the printer and the computer. In Windows Vista: a. In Windows XP and Windows 2000: Click Start® Programs or All Programs® Dell Printers® Dell AIO Printer 948. Remove the USB cable from the electrical outlet. Reconnect the USB cable to complete the installation. Follow the instructions on your computer. Printer won't print and print jobs are stuck in the list of the printer installed on your computer. Turn...

User Guide
Page 75
... Dell 948 icon. 3. To prevent multiple instances of the printer in your printer. 3. In Windows XP, click Start® Control Panel® Printers and Other Hardware® Printers and Faxes. Ensure you loaded the paper correctly. Click ® Control Panel. Click Printers. If Pause Printing is firmly connected to see which printer is not selected. Make sure you installed the ink cartridges correctly and removed the sticker and tape from the Drivers and Utilities CD. c. Check for multiple...
... Dell 948 icon. 3. To prevent multiple instances of the printer in your printer. 3. In Windows XP, click Start® Control Panel® Printers and Other Hardware® Printers and Faxes. Ensure you loaded the paper correctly. Click ® Control Panel. Click Printers. If Pause Printing is firmly connected to see which printer is not selected. Make sure you installed the ink cartridges correctly and removed the sticker and tape from the Drivers and Utilities CD. c. Check for multiple...

User Guide
Page 77
...Memory card problem. Disconnect the device, or check the USB mode setup. Black and Color Ink Low. An ink cartridge is inserted correctly. Remove the PictBridge connection to continue. Only one device or media card is deleted or removed from the memory card. Reprint the proof sheet, select your device for every invalid cartridge with multiple photo or paper size options selected. Replace Cartridge. Please remove all memory cards and devices. Or Load PLAIN A4 paper and press . Photo and Color Ink Low. Ensure that it again. The printer detects an invalid bar code...
...Memory card problem. Disconnect the device, or check the USB mode setup. Black and Color Ink Low. An ink cartridge is inserted correctly. Remove the PictBridge connection to continue. Only one device or media card is deleted or removed from the memory card. Reprint the proof sheet, select your device for every invalid cartridge with multiple photo or paper size options selected. Replace Cartridge. Please remove all memory cards and devices. Or Load PLAIN A4 paper and press . Photo and Color Ink Low. Ensure that it again. The printer detects an invalid bar code...
User Guide
Page 85
... printer and your computer, and the USB cable is properly inserted. When using DSL broadband service, make sure it , with a clean, lint-free cloth dampened with water. Make sure the document or photo is loaded correctly on and is not connected to the Internet by dial-up modem when trying to save the changes. Using the fax function requires a phone connection to your Internet Service Provider for all subsequent fax jobs. When sending color pages, set the printer to Fax Setup...
... printer and your computer, and the USB cable is properly inserted. When using DSL broadband service, make sure it , with a clean, lint-free cloth dampened with water. Make sure the document or photo is loaded correctly on and is not connected to the Internet by dial-up modem when trying to save the changes. Using the fax function requires a phone connection to your Internet Service Provider for all subsequent fax jobs. When sending color pages, set the printer to Fax Setup...

User Guide
Page 97
... Copying Photos Copying a Two-Sided Document Making a Duplex Copy Changing Copy Settings Copying Documents Using the Operator Panel 1. Load your original document. For more information, see Loading Original Documents. 4. Use the left and right Arrow buttons information, see Loading Paper. 3. to the COPY mode, and then press the Select button . 5. Turn on the printer. 2. For more NOTE: If you press the Start button with the current default settings. c. Click Dell AIO Printer 948. For more information, see Copy Mode. 6. Click ® Programs...
... Copying Photos Copying a Two-Sided Document Making a Duplex Copy Changing Copy Settings Copying Documents Using the Operator Panel 1. Load your original document. For more information, see Loading Original Documents. 4. Use the left and right Arrow buttons information, see Loading Paper. 3. to the COPY mode, and then press the Select button . 5. Turn on the printer. 2. For more NOTE: If you press the Start button with the current default settings. c. Click Dell AIO Printer 948. For more information, see Copy Mode. 6. Click ® Programs...

User Guide
Page 108
... images is created in the ADF. Place the next sheet on the scanner glass. 3. to send your document or photo. file:///T|/htdocs/systems/prn948/en/en/d0e6016.html[10/10/2012 11:05:49 AM] From the Save As dialog box, enter your computer and printer, and make sure they are attached to a network using a Dell Network Adapter (sold separately). 2. NOTE: The computer must have the printer software installed...
... images is created in the ADF. Place the next sheet on the scanner glass. 3. to send your document or photo. file:///T|/htdocs/systems/prn948/en/en/d0e6016.html[10/10/2012 11:05:49 AM] From the Save As dialog box, enter your computer and printer, and make sure they are attached to a network using a Dell Network Adapter (sold separately). 2. NOTE: The computer must have the printer software installed...

User Guide
Page 137
...). The Caller ID detection pattern is DELL# (3355#). The default code is determined by the country or region you want to manually adjust your fax settings, click No. Using the Computer You can access the Fax Setup Utility if you want to configure the printer's fax settings from the Fax Setup menu. c. Click Dell AIO Printer 948. Specify a maximum send speed and a print quality for faxing, click Yes. If phones in your country have a detection pattern...
...). The Caller ID detection pattern is DELL# (3355#). The default code is determined by the country or region you want to manually adjust your fax settings, click No. Using the Computer You can access the Fax Setup Utility if you want to configure the printer's fax settings from the Fax Setup menu. c. Click Dell AIO Printer 948. Specify a maximum send speed and a print quality for faxing, click Yes. If phones in your country have a detection pattern...


