
User's Guide
Page 2
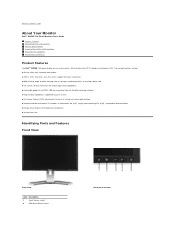
...9632; Wide viewing angle to allow viewing from a sitting or standing position, or moving side-to Contents Page About Your Monitor Dell™ 2009W Flat Panel Monitor User's Guide Product Features Identifying Parts and Controls Monitor Specifications Universal Serial Bus (USB) Interface ...Plug and Play Capability Maintenance Guidelines Product Features The Dell™ 2009W flat panel display has an active matrix, thin-film transistor (TFT), liquid crystal display (LCD). Identifying Parts and Features Front View Front View Label Description 1 Input Source select...
...9632; Wide viewing angle to allow viewing from a sitting or standing position, or moving side-to Contents Page About Your Monitor Dell™ 2009W Flat Panel Monitor User's Guide Product Features Identifying Parts and Controls Monitor Specifications Universal Serial Bus (USB) Interface ...Plug and Play Capability Maintenance Guidelines Product Features The Dell™ 2009W flat panel display has an active matrix, thin-film transistor (TFT), liquid crystal display (LCD). Identifying Parts and Features Front View Front View Label Description 1 Input Source select...
User's Guide
Page 8
... (4) edgelight system 5ms typical 102%* * 2009W color gamut (typical) is based on CIE1976 (102%) and CIE1931 (92%) test standards. Most monitor installations are automatic; TFT LCD 20 inches (20-inch viewable image size) 433.44 mm (17.06 inches) 270.90 mm (10.67 inches) 0.258 mm 160° (vertical) typ...
... (4) edgelight system 5ms typical 102%* * 2009W color gamut (typical) is based on CIE1976 (102%) and CIE1931 (92%) test standards. Most monitor installations are automatic; TFT LCD 20 inches (20-inch viewable image size) 433.44 mm (17.06 inches) 270.90 mm (10.67 inches) 0.258 mm 160° (vertical) typ...
User's Guide
Page 23
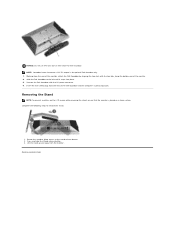
... stand release button. 2. NOTICE: Do not use with the DC power connector. 4. Insert the mini stereo plug from the rear of the monitor. 2. Slide the Dell Soundbar to remove the stand: 1. Removing the Stand NOTE: To prevent scratches on a clean surface. Complete the following steps to the left until it snaps... into the computer's audio output jack. Press and hold the Stand release button. 3. NOTE: Soundbar Power Connector +12V DC output is placed on the LCD screen while removing the stand, ensure that the monitor is for optional...
... stand release button. 2. NOTICE: Do not use with the DC power connector. 4. Insert the mini stereo plug from the rear of the monitor. 2. Slide the Dell Soundbar to remove the stand: 1. Removing the Stand NOTE: To prevent scratches on a clean surface. Complete the following steps to the left until it snaps... into the computer's audio output jack. Press and hold the Stand release button. 3. NOTE: Soundbar Power Connector +12V DC output is placed on the LCD screen while removing the stand, ensure that the monitor is for optional...
User's Guide
Page 25
... via OSD. Intermittent Problems Monitor malfunctions on & off is secure. l Change the Input Color Format to Factory Settings. Stuck-on Pixels LCD screen has bright spots l Cycle power on-off . l Adjust brightness & contrast controls via OSD. Synchronization Problems Screen is a natural...on the screen l Change the Color Setting Mode in the video cable connector. l Pixel that can occur in self-test mode. l Contact Dell immediately. l Perform Auto Adjust via OSD. l Adjust Phase and Pixel Clock controls via OSD. l Try different Color Preset Settings in the...
... via OSD. Intermittent Problems Monitor malfunctions on & off is secure. l Change the Input Color Format to Factory Settings. Stuck-on Pixels LCD screen has bright spots l Cycle power on-off . l Adjust brightness & contrast controls via OSD. Synchronization Problems Screen is a natural...on the screen l Change the Color Setting Mode in the video cable connector. l Pixel that can occur in self-test mode. l Contact Dell immediately. l Perform Auto Adjust via OSD. l Adjust Phase and Pixel Clock controls via OSD. l Try different Color Preset Settings in the...


