
User's Guide
Page 1
...USB) Specific Problems Troubleshooting the Dell™ Soundbar Appendix Safety Instructions FCC Notice (U.S. Dell™ 2009W Flat Panel Monitor User's Guide About Your Monitor Product Features Identifying Parts and Controls Monitor Specifications Universal Serial Bus (USB) Interface Plug and Play Capability Maintenance Guidelines Setting Up the Monitor Attaching the Stand Connecting the Monitor Organizing the Cables Attaching the Soundbar (Optional) Removing the Stand Operating the Monitor Using the Front Panel Controls Using the On-Screen Display (OSD) Setting the Optimal Resolution Using...
...USB) Specific Problems Troubleshooting the Dell™ Soundbar Appendix Safety Instructions FCC Notice (U.S. Dell™ 2009W Flat Panel Monitor User's Guide About Your Monitor Product Features Identifying Parts and Controls Monitor Specifications Universal Serial Bus (USB) Interface Plug and Play Capability Maintenance Guidelines Setting Up the Monitor Attaching the Stand Connecting the Monitor Organizing the Cables Attaching the Soundbar (Optional) Removing the Stand Operating the Monitor Using the Front Panel Controls Using the On-Screen Display (OSD) Setting the Optimal Resolution Using...
User's Guide
Page 2
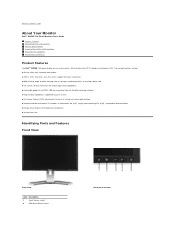
... Plug and Play Capability Maintenance Guidelines Product Features The Dell™ 2009W flat panel display has an active matrix, thin-film transistor (TFT), liquid crystal display (LCD). The monitor features include: ■ 20-inch (508 mm) viewable area display. ■ 1680 x 1050 resolution, plus full-screen support for Energy Star compliance. ■ Security lock slot. Identifying Parts and Features Front View Front View Label Description 1 Input Source select 2 OSD Menu/Select button Front panel controls...
... Plug and Play Capability Maintenance Guidelines Product Features The Dell™ 2009W flat panel display has an active matrix, thin-film transistor (TFT), liquid crystal display (LCD). The monitor features include: ■ 20-inch (508 mm) viewable area display. ■ 1680 x 1050 resolution, plus full-screen support for Energy Star compliance. ■ Security lock slot. Identifying Parts and Features Front View Front View Label Description 1 Input Source select 2 OSD Menu/Select button Front panel controls...
User's Guide
Page 3
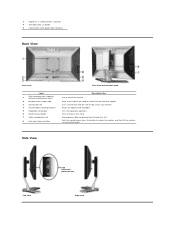
... VESA mounting holes (100mm) 1 (Behind attached base plate) 2 Barcode serial number label 3 Security lock slot 4 Dell Soundbar mounting brackets 5 Regulatory rating label 6 Stand removal button 7 Cable management slot 8 Lock down , press the button to unlock the monitor, and then lift the monitor to the desired height. Side View Left view USB connectors (downstream) Right view Lists the regulatory approvals. Help organize cables by placing them through the slot. Attach the optional Dell Soundbar. 3 Brightness & Contrast/Down (-) button 4 Auto-adjust/Up (+) button...
... VESA mounting holes (100mm) 1 (Behind attached base plate) 2 Barcode serial number label 3 Security lock slot 4 Dell Soundbar mounting brackets 5 Regulatory rating label 6 Stand removal button 7 Cable management slot 8 Lock down , press the button to unlock the monitor, and then lift the monitor to the desired height. Side View Left view USB connectors (downstream) Right view Lists the regulatory approvals. Help organize cables by placing them through the slot. Attach the optional Dell Soundbar. 3 Brightness & Contrast/Down (-) button 4 Auto-adjust/Up (+) button...
User's Guide
Page 4
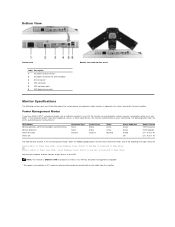
... OSD. The following table shows the power consumption and of this automatic power saving feature: VESA Modes Normal operation (with monitor stand Monitor Specifications The following sections give you have VESA's DPM™ compliance display card or software installed in Active-off Horizontal Sync Active Active Inactive - Vertical Sync Active Active Inactive - If the computer detects input from the monitor. Press Computer Power Button or Any Key on Keyboard or Move Mouse OR Digital Input...
... OSD. The following table shows the power consumption and of this automatic power saving feature: VESA Modes Normal operation (with monitor stand Monitor Specifications The following sections give you have VESA's DPM™ compliance display card or software installed in Active-off Horizontal Sync Active Active Inactive - Vertical Sync Active Active Inactive - If the computer detects input from the monitor. Press Computer Power Button or Any Key on Keyboard or Move Mouse OR Digital Input...

User's Guide
Page 5
Pin Assignments VGA Connector Pin 15-pin Side of the Connected Signal Cable Number 1 Video-Red 2 Video-Green 3 Video-Blue 4 GND 5 Self-test 6 GND-R 7 GND-G 8 GND-B 9 Computer 5V/3.3V 10 GND-sync 11 GND 12 DDC data 13 H-sync 14 V-sync 15 DDC clock DVI Connector Pin 24-pin Side of the Connected Signal Cable Number 1 TMDS RX2- 2 TMDS RX2+ 3 TMDS Ground 4 Floating 5 Floating 6 DDC Clock 7 DDC Data 8 Floating
Pin Assignments VGA Connector Pin 15-pin Side of the Connected Signal Cable Number 1 Video-Red 2 Video-Green 3 Video-Blue 4 GND 5 Self-test 6 GND-R 7 GND-G 8 GND-B 9 Computer 5V/3.3V 10 GND-sync 11 GND 12 DDC data 13 H-sync 14 V-sync 15 DDC clock DVI Connector Pin 24-pin Side of the Connected Signal Cable Number 1 TMDS RX2- 2 TMDS RX2+ 3 TMDS Ground 4 Floating 5 Floating 6 DDC Clock 7 DDC Data 8 Floating

User's Guide
Page 6
9 TMDS RX1- 10 TMDS RX1+ 11 TMDS Ground 12 Floating 13 Floating 14 +5V/+3.3V power 15 Self test 16 Hot Plug Detect 17 TMDS RX0- 18 TMDS RX0+ 19 TMDS Ground 20 Floating 21 Floating 22 TMDS Ground 23 TMDS Clock+ 24 TMDS Clock-
9 TMDS RX1- 10 TMDS RX1+ 11 TMDS Ground 12 Floating 13 Floating 14 +5V/+3.3V power 15 Self test 16 Hot Plug Detect 17 TMDS RX0- 18 TMDS RX0+ 19 TMDS Ground 20 Floating 21 Floating 22 TMDS Ground 23 TMDS Clock+ 24 TMDS Clock-
User's Guide
Page 7
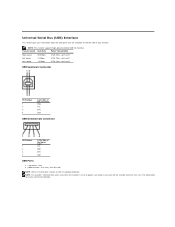
NOTE: The monitor's USB interface works only when the monitor is on or in power save mode. If you information about the USB ports that are available on the left side NOTE: USB 2.0 functionality requires a USB 2.0-capable computer. rear l 4 downstream - 2 on rear; 2 on left side of the Signal Cable VCC DMD DPD GND USB Ports l 1 upstream - NOTE: This monitor supports High-Speed Certified USB 2.0 interface Transfer speed Data Rate Power Consumption...
NOTE: The monitor's USB interface works only when the monitor is on or in power save mode. If you information about the USB ports that are available on the left side NOTE: USB 2.0 functionality requires a USB 2.0-capable computer. rear l 4 downstream - 2 on rear; 2 on left side of the Signal Cable VCC DMD DPD GND USB Ports l 1 upstream - NOTE: This monitor supports High-Speed Certified USB 2.0 interface Transfer speed Data Rate Power Consumption...
User's Guide
Page 8
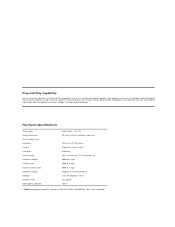
Flat Panel Specifications Screen type Screen dimensions Preset display area: Horizontal Vertical Pixel pitch Viewing angle Luminance output Contrast ratio Dynamic contrast ratio Faceplate coating Backlight Response Time Color gamut (Typical) Active matrix - you can install the monitor in any Plug and Play-compatible system. TFT LCD 20 inches (20-inch viewable image size) 433.44 mm (17.06 inches) 270.90 mm (10.67 inches) 0.258 mm 160° (vertical) typ, 170° (horizontal) typ 300 cd/m ²...
Flat Panel Specifications Screen type Screen dimensions Preset display area: Horizontal Vertical Pixel pitch Viewing angle Luminance output Contrast ratio Dynamic contrast ratio Faceplate coating Backlight Response Time Color gamut (Typical) Active matrix - you can install the monitor in any Plug and Play-compatible system. TFT LCD 20 inches (20-inch viewable image size) 433.44 mm (17.06 inches) 270.90 mm (10.67 inches) 0.258 mm 160° (vertical) typ, 170° (horizontal) typ 300 cd/m ²...
User's Guide
Page 10
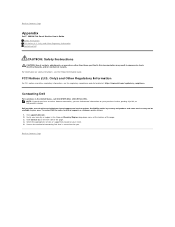
... support link based on your area. Contacting Dell For customers in your purchase invoice, packing slip, bill, or Dell product catalog. To contact Dell for you can find contact information on your country or region in the Choose A Country/Region drop-down menu at : http://www.dell.com/regulatory_compliance. Back to Contents Page Appendix Dell™ 2009W Flat Panel Monitor User's Guide Safety Instructions...
... support link based on your area. Contacting Dell For customers in your purchase invoice, packing slip, bill, or Dell product catalog. To contact Dell for you can find contact information on your country or region in the Choose A Country/Region drop-down menu at : http://www.dell.com/regulatory_compliance. Back to Contents Page Appendix Dell™ 2009W Flat Panel Monitor User's Guide Safety Instructions...
User's Guide
Page 11
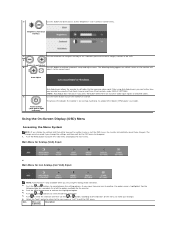
... both VGA and DVI-D cables are connected to adjust the controls, an OSD shows the numeric values of the characteristics as shown below appears. or or B Use the MENU button to adjust the characteristics of the image being displayed. Back to Contents Page Operating the Monitor Dell™ 2009W Flat Panel Monitor User's Guide Using the Front Panel Controls Using the On-Screen Display (OSD) Menu Setting the Optimal Resolution Using the Dell Soundbar (Optional) Using the Tilt, Swivel, and Vertical Extension Rotating the monitor Adjusting the Rotation Display Settings...
... both VGA and DVI-D cables are connected to adjust the controls, an OSD shows the numeric values of the characteristics as shown below appears. or or B Use the MENU button to adjust the characteristics of the image being displayed. Back to Contents Page Operating the Monitor Dell™ 2009W Flat Panel Monitor User's Guide Using the Front Panel Controls Using the On-Screen Display (OSD) Menu Setting the Optimal Resolution Using the Dell Soundbar (Optional) Using the Tilt, Swivel, and Vertical Extension Rotating the monitor Adjusting the Rotation Display Settings...
User's Guide
Page 12
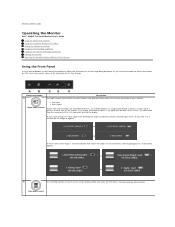
... for the OSD menu to disappear. 1. NOTE: Auto Adjust does not occur if you are no active video input signals or attached cables. Push the and buttons to activate the highlighted option. 4. Main Menu for Analog (VGA) Input or Main Menu for direct access to launch the OSD menu and display the main menu. Push the MENU button to the "Brightness" and "Contrast" control menu. C Use this button to activate automatic setup and adjust menu. The green LED indicates the monitor is...
... for the OSD menu to disappear. 1. NOTE: Auto Adjust does not occur if you are no active video input signals or attached cables. Push the and buttons to activate the highlighted option. 4. Main Menu for Analog (VGA) Input or Main Menu for direct access to launch the OSD menu and display the main menu. Push the MENU button to the "Brightness" and "Contrast" control menu. C Use this button to activate automatic setup and adjust menu. The green LED indicates the monitor is...
User's Guide
Page 13
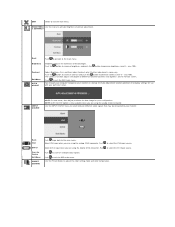
... video signals that may be connected to the main menu. Contrast Exit Menu AUTO ADJUST Adjust Brightness first, and then adjust Contrast only if further adjustment is only available when you are using the Digital (DVI) connector. Push to decrease contrast (min 0 ~ max 100). Even though your computer recognizes your monitor on the monitor screen. Push to select the VGA input source. The Contrast function adjusts the degree of the backlight. Push to select the DVI input source. Push the button...
... video signals that may be connected to the main menu. Contrast Exit Menu AUTO ADJUST Adjust Brightness first, and then adjust Contrast only if further adjustment is only available when you are using the Digital (DVI) connector. Push to decrease contrast (min 0 ~ max 100). Even though your computer recognizes your monitor on the monitor screen. Push to select the VGA input source. The Contrast function adjusts the degree of the backlight. Push to select the DVI input source. Push the button...

User's Guide
Page 14
... green Changes the color of the three colors (R, G, B) independently, in single digit increments, from 0 to purple NOTE: Hue adjustment is also used for HD video playback over DVI). This feature can make the color of the three colors (R, G, B) independently, in single-digit increments, from 0 to your computer is connected to 100. PC RGB is suitable for color-intensive applications (photograph image editing, multimedia, movies, etc.). If your monitor...
... green Changes the color of the three colors (R, G, B) independently, in single digit increments, from 0 to purple NOTE: Hue adjustment is also used for HD video playback over DVI). This feature can make the color of the three colors (R, G, B) independently, in single-digit increments, from 0 to your computer is connected to 100. PC RGB is suitable for color-intensive applications (photograph image editing, multimedia, movies, etc.). If your monitor...

User's Guide
Page 15
Display Setting submenu for VGA input Display Setting submenu for DVI-D input Exit Menu DISPLAY SETTINGS Display Setting submenu Push to exit the OSD main menu.
Display Setting submenu for VGA input Display Setting submenu for DVI-D input Exit Menu DISPLAY SETTINGS Display Setting submenu Push to exit the OSD main menu.
User's Guide
Page 21
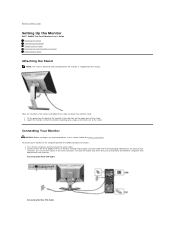
... video systems. Connecting the White DVI Cable Connecting the Blue VGA Cable Connecting Your Monitor CAUTION: Before you begin any of your computer and disconnect the power cable. l Connect either the white (digital DVI-D) or the blue (analog VGA) display connector cable to the computer perform the following steps/instructions: l Turn off your computer. Lower the monitor so that the monitor mounting area snaps on to or locks on to Contents Page Setting Up the Monitor Dell™ 2009W Flat Panel Monitor User's Guide Attaching the Stand Connecting the Monitor...
... video systems. Connecting the White DVI Cable Connecting the Blue VGA Cable Connecting Your Monitor CAUTION: Before you begin any of your computer and disconnect the power cable. l Connect either the white (digital DVI-D) or the blue (analog VGA) display connector cable to the computer perform the following steps/instructions: l Turn off your computer. Lower the monitor so that the monitor mounting area snaps on to or locks on to Contents Page Setting Up the Monitor Dell™ 2009W Flat Panel Monitor User's Guide Attaching the Stand Connecting the Monitor...
User's Guide
Page 22
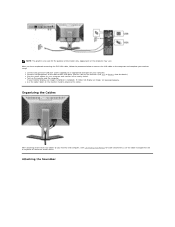
l Turn on the monitor stand to organize the cables. After you have completed connecting the DVI/VGA cable, follow the procedure below to connect the USB cable to the computer and complete your monitor setup: l Connect the upstream USB port (cable supplied) to an appropriate USB port on the monitor. (See rear or bottom view for details.) l Plug the power cables for your monitor and computer, (See Connecting Your Monitor for the purpose of the computer may vary. If...
l Turn on the monitor stand to organize the cables. After you have completed connecting the DVI/VGA cable, follow the procedure below to connect the USB cable to the computer and complete your monitor setup: l Connect the upstream USB port (cable supplied) to an appropriate USB port on the monitor. (See rear or bottom view for details.) l Plug the power cables for your monitor and computer, (See Connecting Your Monitor for the purpose of the computer may vary. If...
User's Guide
Page 23
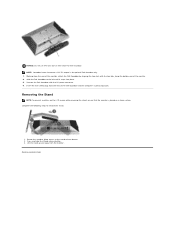
... to Contents Page Rotate the stand to allow access to remove the stand: 1. NOTE: Soundbar Power Connector +12V DC output is placed on a clean surface. Removing the Stand NOTE: To prevent scratches on the LCD screen while removing the stand, ensure that the monitor is for optional Dell Soundbar only. 1. Complete the following steps to the stand release button. 2. Lift the stand up and away from the...
... to Contents Page Rotate the stand to allow access to remove the stand: 1. NOTE: Soundbar Power Connector +12V DC output is placed on a clean surface. Removing the Stand NOTE: To prevent scratches on the LCD screen while removing the stand, ensure that the monitor is for optional Dell Soundbar only. 1. Complete the following steps to the stand release button. 2. Lift the stand up and away from the...
User's Guide
Page 24
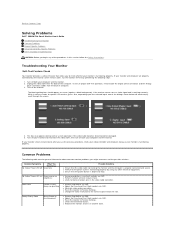
... Auto Adjust via OSD. Common Problems The following steps: 1. Common Symptoms What You Experience No Video/ Power LED off your computer and the monitor. 2. Poor Focus Picture is working correctly. l Change the video resolution to Factory Settings. Shaky/Jittery Video Wavy picture or fine movement l Perform Auto Adjust via OSD. l Relocate the monitor and test in self-test mode, the power LED remains green. The floating dialog box should appear on both the Digital (white connector) and the Analog (blue connector) cables...
... Auto Adjust via OSD. Common Problems The following steps: 1. Common Symptoms What You Experience No Video/ Power LED off your computer and the monitor. 2. Poor Focus Picture is working correctly. l Change the video resolution to Factory Settings. Shaky/Jittery Video Wavy picture or fine movement l Perform Auto Adjust via OSD. l Relocate the monitor and test in self-test mode, the power LED remains green. The floating dialog box should appear on both the Digital (white connector) and the Analog (blue connector) cables...
User's Guide
Page 25
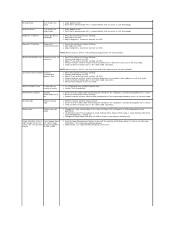
... changing screensaver. Horizontal/Vertical Lines Screen has one or more information, see Power Management Modes). Synchronization Problems Screen is secure. l Check for bent or broken pins in the video cable connector. Missing Pixels LCD screen has spots l Cycle power on-off . l Adjust brightness & contrast controls via OSD. l Try different Color Preset Settings in self-test mode. Brightness Problems Picture too dim or too bright l Reset the monitor to PC RGB or YPbPr in the Color Settings OSD to Graphics or Video depending to Factory Settings. l Adjust brightness...
... changing screensaver. Horizontal/Vertical Lines Screen has one or more information, see Power Management Modes). Synchronization Problems Screen is secure. l Check for bent or broken pins in the video cable connector. Missing Pixels LCD screen has spots l Cycle power on-off . l Adjust brightness & contrast controls via OSD. l Try different Color Preset Settings in self-test mode. Brightness Problems Picture too dim or too bright l Reset the monitor to PC RGB or YPbPr in the Color Settings OSD to Graphics or Video depending to Factory Settings. l Adjust brightness...


