

Owners Manual
Page 8
...Preparing Networking 26 Attaching Cables 26 Printing the Network Configuration Page 27 Run the Installation Software 28 2 Understanding the Printer Software Software Overview 31 Installing Dell Software For Local Printing 32 Windows XP 32 Windows 2000 33 Windows 98 33 Windows Me 34 Assigning an ... 34 Installing Dell Software For Network Printing 35 Uninstalling Software 36 3 Loading Print Media Print Media Guidelines 37 Loading Paper 40 Using the Paper Tray 40 Using the Bypass Tray 43 Setting the Paper Size and Type 47 Setting the Paper Size 47 Setting the Paper Type 47 ...
...Preparing Networking 26 Attaching Cables 26 Printing the Network Configuration Page 27 Run the Installation Software 28 2 Understanding the Printer Software Software Overview 31 Installing Dell Software For Local Printing 32 Windows XP 32 Windows 2000 33 Windows 98 33 Windows Me 34 Assigning an ... 34 Installing Dell Software For Network Printing 35 Uninstalling Software 36 3 Loading Print Media Print Media Guidelines 37 Loading Paper 40 Using the Paper Tray 40 Using the Bypass Tray 43 Setting the Paper Size and Type 47 Setting the Paper Size 47 Setting the Paper Type 47 ...
Owners Manual
Page 9
... Your Multi-Function Printer Printing 51 Printing in Windows 51 Printing in Macintosh 51 Printing in Linux 51 Printing from the USB Memory Key 52 Copying 52 Knowing the Copy Menu 52 Setting the Basic Copy Options 52 Making Copies 54 Special Copy Features 54 Selecting a Paper Tray 55 Printing ...Copies on Both Sides of Paper 55 Changing the Default Settings 56 Scanning 57 Knowing the Scan Menu 58 Scanning to an Application 58 Scanning Using...
... Your Multi-Function Printer Printing 51 Printing in Windows 51 Printing in Macintosh 51 Printing in Linux 51 Printing from the USB Memory Key 52 Copying 52 Knowing the Copy Menu 52 Setting the Basic Copy Options 52 Making Copies 54 Special Copy Features 54 Selecting a Paper Tray 55 Printing ...Copies on Both Sides of Paper 55 Changing the Default Settings 56 Scanning 57 Knowing the Scan Menu 58 Scanning to an Application 58 Scanning Using...
Owners Manual
Page 10
... Duplex Jam 91 Tips for Avoiding Paper Jams 94 More Troubleshooting 94 7 Installing Options Precautions When Installing Printer Accessories 95 Expanding Printer Memory 95 Activating the Added Memory in the PS Printer Properties 97 Installing an Optional Tray 2 98 Activating the Installed Optional Tray 2 in the Printer Properties 100 8 Contacting Dell Technical Assistance 101 Automated Order...
... Duplex Jam 91 Tips for Avoiding Paper Jams 94 More Troubleshooting 94 7 Installing Options Precautions When Installing Printer Accessories 95 Expanding Printer Memory 95 Activating the Added Memory in the PS Printer Properties 97 Installing an Optional Tray 2 98 Activating the Installed Optional Tray 2 in the Printer Properties 100 8 Contacting Dell Technical Assistance 101 Automated Order...
Owners Manual
Page 15
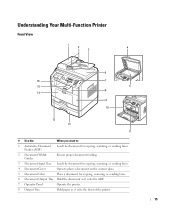
..., or sending faxes. 6 Document Output Tray Hold the document as it exits the ADF. 7 Operator Panel Operate the printer. 8 Output Tray Hold paper as it exits the front of the printer. 15 Understanding Your Multi-Function Printer Front View 1 2 3 4 6 16 7 15 5 8 14 9 10 13 12 11 # Use the: When you want to place a document...
..., or sending faxes. 6 Document Output Tray Hold the document as it exits the ADF. 7 Operator Panel Operate the printer. 8 Output Tray Hold paper as it exits the front of the printer. 15 Understanding Your Multi-Function Printer Front View 1 2 3 4 6 16 7 15 5 8 14 9 10 13 12 11 # Use the: When you want to place a document...
Owners Manual
Page 16
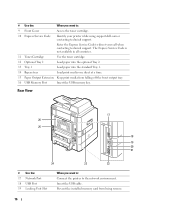
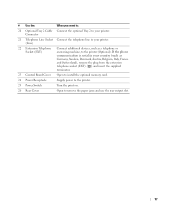
... one sheet at a time. 15 Paper Output Extension Keep print media from being remove. 16 Rear View 17 26 25 18 19 20 21 24 23 22 # Use the: 17 Network Port 18 USB Port 19 Locking Unit Slot When you want to: Connect the printer to the network environment. Prevent the...: 9 Front Cover Access the toner cartridge. 10 Express Service Code Identify your call when contacting technical support. Enter the Express Service Code to direct your printer while using support.dell.com or contacting technical support.
... one sheet at a time. 15 Paper Output Extension Keep print media from being remove. 16 Rear View 17 26 25 18 19 20 21 24 23 22 # Use the: 17 Network Port 18 USB Port 19 Locking Unit Slot When you want to: Connect the printer to the network environment. Prevent the...: 9 Front Cover Access the toner cartridge. 10 Express Service Code Identify your call when contacting technical support. Enter the Express Service Code to direct your printer while using support.dell.com or contacting technical support.
Owners Manual
Page 17
...When you want to: 20 Optional Tray 2 Cable Connect the optional Tray 2 to remove the paper jams and use the rear output slot. 17 Connector 21 Telephone Line Socket Connect the telephone line to your printer. (Line) 22 Extension Telephone Socket (EXT) Connect additional devices, such as Germany, Sweden, ... ) and insert the supplied terminator. 23 Control Board Cover Open to install the optional memory card. 24 Power Receptacle Supply power to the printer. 25 Power Switch Turn the print on. 26 Rear Cover Open to your country (such as a telephone or answering machine, to the...
...When you want to: 20 Optional Tray 2 Cable Connect the optional Tray 2 to remove the paper jams and use the rear output slot. 17 Connector 21 Telephone Line Socket Connect the telephone line to your printer. (Line) 22 Extension Telephone Socket (EXT) Connect additional devices, such as Germany, Sweden, ... ) and insert the supplied terminator. 23 Control Board Cover Open to install the optional memory card. 24 Power Receptacle Supply power to the printer. 25 Power Switch Turn the print on. 26 Rear Cover Open to your country (such as a telephone or answering machine, to the...
Owners Manual
Page 21
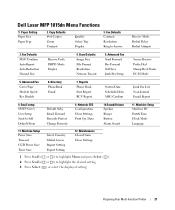
...Report RCV Report System Data Scheduled Jobs MSG Confirm 8. Network CFG Configuration Clear Settings Print Sys. Paper Setting Paper Size Paper Type 2. Copy Defaults # of Copies Zoom Contrast Quality Select Tray Duplex 3. Fax Defaults MSG ... Server User Setup Send to Answer 3. Scan Defaults Image Size File Format Resolution Netscan Tm-out 5. Dell Laser MFP 1815dn Menu Functions 1. Directory PhoneBook Email 7. Data 10.Sound/Volume Speaker Ringer Button Alarm Sound 11. Receive...Setup Machine ID Date&Time Clock Mode Language Preparing Your Multi-Function Printer 21
...Report RCV Report System Data Scheduled Jobs MSG Confirm 8. Network CFG Configuration Clear Settings Print Sys. Paper Setting Paper Size Paper Type 2. Copy Defaults # of Copies Zoom Contrast Quality Select Tray Duplex 3. Fax Defaults MSG ... Server User Setup Send to Answer 3. Scan Defaults Image Size File Format Resolution Netscan Tm-out 5. Dell Laser MFP 1815dn Menu Functions 1. Directory PhoneBook Email 7. Data 10.Sound/Volume Speaker Ringer Button Alarm Sound 11. Receive...Setup Machine ID Date&Time Clock Mode Language Preparing Your Multi-Function Printer 21

Owners Manual
Page 37
Y Y (182 x 257 mm) 6.93 x 9.84 in . Y Y (216 x 330 mm) Duplex Printing Y Y Y Y Y Loading Print Media 37 Print Media Sizes and Support Legend Dimensions Paper Tray Bypass Tray Y- Y Y (210 x 297 mm) 5.83 x 8.27 in . Y Y (215.9 x 279.4 mm) 8.5 x 14 in . Y Y (215.9 x 355.6 mm) 7.25...10.5 in . Y Y (184.2 x 266.7 mm) 8.5 x 13.5 in . Y Y (176 x 250 mm) 8.5 x 11 in . NOTE: If you can select from the paper size menu and supported weights. Y Y (216 x 343 mm) 8.5 x 13 in . Y Y (105 x 148.5 mm) 7.17 x 10.1 in . 3 Loading Print Media Print ...
Y Y (182 x 257 mm) 6.93 x 9.84 in . Y Y (216 x 330 mm) Duplex Printing Y Y Y Y Y Loading Print Media 37 Print Media Sizes and Support Legend Dimensions Paper Tray Bypass Tray Y- Y Y (210 x 297 mm) 5.83 x 8.27 in . Y Y (215.9 x 279.4 mm) 8.5 x 14 in . Y Y (215.9 x 355.6 mm) 7.25...10.5 in . Y Y (184.2 x 266.7 mm) 8.5 x 13.5 in . Y Y (176 x 250 mm) 8.5 x 11 in . NOTE: If you can select from the paper size menu and supported weights. Y Y (216 x 343 mm) 8.5 x 13 in . Y Y (105 x 148.5 mm) 7.17 x 10.1 in . 3 Loading Print Media Print ...

Owners Manual
Page 38
... Y - - indicates Support Print Media Size Envelope 7-3/4 (Monarch) Envelope COM-10 Envelope DL Envelope C5 Envelope C6 Custom Dimensions Paper Tray (tray 1 and optional tray 2) 3.875 x 7.5 in. - (98.4 x 190.5 mm) 4.12 x 9.5 in. - (105 x 241 mm) 4.33 x 8.66 in. - (110 x 220 mm) 6.38 x 9.01 in. - (162 x ...
... Y - - indicates Support Print Media Size Envelope 7-3/4 (Monarch) Envelope COM-10 Envelope DL Envelope C5 Envelope C6 Custom Dimensions Paper Tray (tray 1 and optional tray 2) 3.875 x 7.5 in. - (98.4 x 190.5 mm) 4.12 x 9.5 in. - (105 x 241 mm) 4.33 x 8.66 in. - (110 x 220 mm) 6.38 x 9.01 in. - (162 x ...

Owners Manual
Page 39
... 163 g/m2 (43 lb bond). Integrated Forms Pressure- sensitive area (must enter the printer first) Paper base (grain long) Envelopes 100% Cotton Sulfite, wood-free - Polyester - Content Maximum or up to 36 lb bond) 120 g/m2 (31 lb) 120 g/...100% Weight- 24 lb cotton bonds a. Print Media Types and Weights Print Media Type Paper Xerographic or business paper Card stock-maximum Index Bristol (grain long)a Tag Cover Card stock-maximum Index Bristol (grain short)a Tag Cover Transparencies Laser printer Print Media Weight Tray 1 and Optional Tray 2 60-90 g/m2 grain long (...
... 163 g/m2 (43 lb bond). Integrated Forms Pressure- sensitive area (must enter the printer first) Paper base (grain long) Envelopes 100% Cotton Sulfite, wood-free - Polyester - Content Maximum or up to 36 lb bond) 120 g/m2 (31 lb) 120 g/...100% Weight- 24 lb cotton bonds a. Print Media Types and Weights Print Media Type Paper Xerographic or business paper Card stock-maximum Index Bristol (grain long)a Tag Cover Card stock-maximum Index Bristol (grain short)a Tag Cover Transparencies Laser printer Print Media Weight Tray 1 and Optional Tray 2 60-90 g/m2 grain long (...

Owners Manual
Page 40
NOTE: Set the paper type and size after loading paper into the paper tray. See "Setting the Paper Size and Type" on the User's Guide for the paper used in the paper tray. To load paper: 1 Pull open the paper tray and remove it from the printer. 2 If you load paper that is longer than a standard (Letter or A4) size, such...
NOTE: Set the paper type and size after loading paper into the paper tray. See "Setting the Paper Size and Type" on the User's Guide for the paper used in the paper tray. To load paper: 1 Pull open the paper tray and remove it from the printer. 2 If you load paper that is longer than a standard (Letter or A4) size, such...

Owners Manual
Page 41
Align the edges on a level surface. 4 Insert the paper stack into the paper tray with the side to loosen them, and then fan them out. NOTE: Overloading the paper tray may cause paper jams. Loading Print Media 41 Do not fold or crease the print media. 3 Flex the sheets back and forth to be printed on, facing down. 5 Do not exceed the maximum stack height indicated by the paper limit marks on the both inside walls of the tray.
Align the edges on a level surface. 4 Insert the paper stack into the paper tray with the side to loosen them, and then fan them out. NOTE: Overloading the paper tray may cause paper jams. Loading Print Media 41 Do not fold or crease the print media. 3 Flex the sheets back and forth to be printed on, facing down. 5 Do not exceed the maximum stack height indicated by the paper limit marks on the both inside walls of the tray.

Owners Manual
Page 42
NOTE: Improper adjustment of paper guides can result in the paper length guide until it lightly touches the end of the stack. For paper smaller than Letter size, adjust the front paper length guide so that it lightly touches the paper stack. 7 Pinch the paper width guide, as shown, and move it towards the stack of paper until it lightly touches the side of the paper stack. 6 Slide in paper jams. 42 Loading Print Media
NOTE: Improper adjustment of paper guides can result in the paper length guide until it lightly touches the end of the stack. For paper smaller than Letter size, adjust the front paper length guide so that it lightly touches the paper stack. 7 Pinch the paper width guide, as shown, and move it towards the stack of paper until it lightly touches the side of the paper stack. 6 Slide in paper jams. 42 Loading Print Media
Owners Manual
Page 43
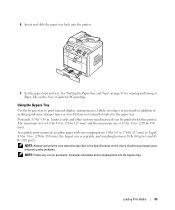
...Use the bypass tray to print manual duplex, transparencies, labels, envelopes or postcards in addition to making quick runs of paper types or sizes that are plain paper with this printer. Acceptable print materials are not currently loaded in the Specifications on the User's Guide to Legal, 8.5 by 14 in ...by 127 mm) to avoid paper jams and print quality problems. NOTE: Flatten any curl on the User's Guide for copying and faxing or Paper Tab on postcards, envelopes and labels before loading them into the printer. 9 Set the paper type and size. See "Setting the Paper Size and Type" on ...
...Use the bypass tray to print manual duplex, transparencies, labels, envelopes or postcards in addition to making quick runs of paper types or sizes that are plain paper with this printer. Acceptable print materials are not currently loaded in the Specifications on the User's Guide to Legal, 8.5 by 14 in ...by 127 mm) to avoid paper jams and print quality problems. NOTE: Flatten any curl on the User's Guide for copying and faxing or Paper Tab on postcards, envelopes and labels before loading them into the printer. 9 Set the paper type and size. See "Setting the Paper Size and Type" on ...

Owners Manual
Page 44
Oils from your fingers can cause print quality problems. 3 Load the print material with the side to separate the pages before loading. To use the bypass tray: 1 Open the bypass tray and unfold the paper support extension, as shown. 2 If you are using paper, flex or fan the edge of the paper stack to be printed on facing up. 44 Loading Print Media For transparencies, hold them by the edges and avoid touching the print side.
Oils from your fingers can cause print quality problems. 3 Load the print material with the side to separate the pages before loading. To use the bypass tray: 1 Open the bypass tray and unfold the paper support extension, as shown. 2 If you are using paper, flex or fan the edge of the paper stack to be printed on facing up. 44 Loading Print Media For transparencies, hold them by the edges and avoid touching the print side.
Owners Manual
Page 45
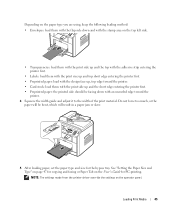
... short edge entering the printer first. • Preprinted paper: load with the design face up and the short edge entering the printer first. • Preprinted paper: the printed side should be bent, which will result in a paper jam or skew. 5 After loading paper, set the paper type and size for ...PC-printing. Depending on the paper type you are using, keep the following ...
... short edge entering the printer first. • Preprinted paper: load with the design face up and the short edge entering the printer first. • Preprinted paper: the printed side should be bent, which will result in a paper jam or skew. 5 After loading paper, set the paper type and size for ...PC-printing. Depending on the paper type you are using, keep the following ...

Owners Manual
Page 46
...bypass tray • The card stock is designed for use with laser printers. • The thickness should not exceed 0.025 inches. 5 sheets of envelope in the bypass tray Make sure: The paper is designed for use with laser printers. • The stamp location is in the • The transparency... is designed for use with laser printers. • Squeeze and slide the paper guide to open the rear cover when you . 46 Loading ...
...bypass tray • The card stock is designed for use with laser printers. • The thickness should not exceed 0.025 inches. 5 sheets of envelope in the bypass tray Make sure: The paper is designed for use with laser printers. • The stamp location is in the • The transparency... is designed for use with laser printers. • Squeeze and slide the paper guide to open the rear cover when you . 46 Loading ...

Owners Manual
Page 47
... copying, printing, or printing received faxes, refer to the table below about how much paper the printer output trays can load up ) Capacity 150 sheets of plain paper 1 sheet of custom sized paper Your paper size should fit within these dimensions: in the bypass tray Width Length 3.0-8.5 in. (76...-216 mm) 5.0-14.0 in. (127-356 mm) Your printer has two output locations; Loading Print Media 47 ...
... copying, printing, or printing received faxes, refer to the table below about how much paper the printer output trays can load up ) Capacity 150 sheets of plain paper 1 sheet of custom sized paper Your paper size should fit within these dimensions: in the bypass tray Width Length 3.0-8.5 in. (76...-216 mm) 5.0-14.0 in. (127-356 mm) Your printer has two output locations; Loading Print Media 47 ...

Owners Manual
Page 51
... printer supports Linux systems with Dell's MFP driver package. Using Your Multi-Function Printer 51 See page 40. 2 With your program or operating system. 4 For details about the printer properties tabs, please refer to the User's Guide. The Print dialog box appears. 2 Select the printer ...→ Print. Printing in USB interface or 10/100 Base-TX network interface card. Refer to the User's Guide. Accessing Printer Properties Change printer settings in Windows 1 Load paper. NOTE: Press the Cancel ( ) button on your operating system. 1 With your document open , click File → ...
... printer supports Linux systems with Dell's MFP driver package. Using Your Multi-Function Printer 51 See page 40. 2 With your program or operating system. 4 For details about the printer properties tabs, please refer to the User's Guide. The Print dialog box appears. 2 Select the printer ...→ Print. Printing in USB interface or 10/100 Base-TX network interface card. Refer to the User's Guide. Accessing Printer Properties Change printer settings in Windows 1 Load paper. NOTE: Press the Cancel ( ) button on your operating system. 1 With your document open , click File → ...

Owners Manual
Page 54
... and using the operator panel buttons. Clone Copying (available via scanner glass only): Automatically reduces or enlarges the A original image to fit on the paper loaded in first into the ADF. NOTE: You cannot adjust the copy size using Layout of copies, copy size, the contrast, and the image... text. • Text & Photo: Use for documents with both text and photo/gray tones. • Photo: Use for documents with top edge in the printer. For details about loading a document, see "Placing Documents on the Scanner Glass" on page 48 or "Loading Documents Into the ADF" on page 49. 2...
... and using the operator panel buttons. Clone Copying (available via scanner glass only): Automatically reduces or enlarges the A original image to fit on the paper loaded in first into the ADF. NOTE: You cannot adjust the copy size using Layout of copies, copy size, the contrast, and the image... text. • Text & Photo: Use for documents with both text and photo/gray tones. • Photo: Use for documents with top edge in the printer. For details about loading a document, see "Placing Documents on the Scanner Glass" on page 48 or "Loading Documents Into the ADF" on page 49. 2...


