
User's Guide (HTML)
Page 21
... the printer to the setting you need. Operator Panel Menus Network Menu Parallel Menu Setup Menu USB Menu Utilities Menu Menus are indicated by Ready , Toner Low/Replace Drum / , Load Paper/Remove Output / , and Paper Jam light sequences.
... the printer to the setting you need. Operator Panel Menus Network Menu Parallel Menu Setup Menu USB Menu Utilities Menu Menus are indicated by Ready , Toner Low/Replace Drum / , Load Paper/Remove Output / , and Paper Jam light sequences.
User's Guide (HTML)
Page 25
...Toner Cartridge Replacing the Imaging Drum Cleaning the Printhead Lens Ordering Supplies Printer Attached to launch the Dell Configuration Web Tool. 2. Click Start® Programs or All Programs® Dell Printers® Dell Laser Printer 1720. For Windows Vista™ (default Start menu): a. Click Dell Laser Printer 1720. 2. Click ® Programs. b. Click Dell...printer IP address in your Dell printer Service Tag number. Click www.dell.com/supplies. Choose your printer. 5. The Order Toner Cartridges window opens. 3. Click Visit Dell's cartridge ordering website. ...
...Toner Cartridge Replacing the Imaging Drum Cleaning the Printhead Lens Ordering Supplies Printer Attached to launch the Dell Configuration Web Tool. 2. Click Start® Programs or All Programs® Dell Printers® Dell Laser Printer 1720. For Windows Vista™ (default Start menu): a. Click Dell Laser Printer 1720. 2. Click ® Programs. b. Click Dell...printer IP address in your Dell printer Service Tag number. Click www.dell.com/supplies. Choose your printer. 5. The Order Toner Cartridges window opens. 3. Click Visit Dell's cartridge ordering website. ...
User's Guide (HTML)
Page 27
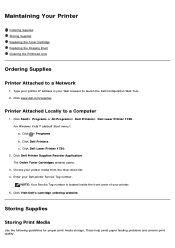
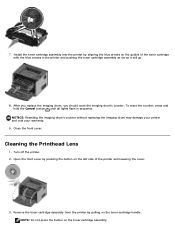
.... Rotate the cartridge in all directions to direct light for an extended period of the imaging drum and pushing the toner cartridge in as far as it and continue printing. Pull the toner cartridge up and out using the handle. 4. Firmly shake it side-to-side and front-to-back several...Repeat this procedure multiple times until print remains faded. Open the front cover by aligning the white rollers on the toner cartridge with the arrows on the tracks of time. Install the new toner cartridge by pressing the button on the base of the printer and lowering the cover. 2. When the...
.... Rotate the cartridge in all directions to direct light for an extended period of the imaging drum and pushing the toner cartridge in as far as it and continue printing. Pull the toner cartridge up and out using the handle. 4. Firmly shake it side-to-side and front-to-back several...Repeat this procedure multiple times until print remains faded. Open the front cover by aligning the white rollers on the toner cartridge with the arrows on the tracks of time. Install the new toner cartridge by pressing the button on the base of the printer and lowering the cover. 2. When the...
User's Guide (HTML)
Page 28
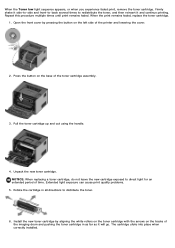
.... The printer automatically notifies you should immediately order a new imaging drum. This helps you decide when you might need to direct light for an extended period of 40,000 pages. NOTICE: When replacing a toner cartridge, do not leave the new cartridge exposed to order replacement ...supplies. While the printer may continue to the printer, the printer stops operating after the imaging drum has reached its official end-of-life (approximately 30...
.... The printer automatically notifies you should immediately order a new imaging drum. This helps you decide when you might need to direct light for an extended period of 40,000 pages. NOTICE: When replacing a toner cartridge, do not leave the new cartridge exposed to order replacement ...supplies. While the printer may continue to the printer, the printer stops operating after the imaging drum has reached its official end-of-life (approximately 30...

User's Guide (HTML)
Page 29
... printer by aligning the white rollers on the toner cartridge with the white arrows on the tracks of the toner cartridge assembly. 4. Place the toner cartridge assembly on the toner cartridge handle. NOTE: Do not press the button on the base of the imaging drum and pushing the toner cartridge in as far as it will...
... printer by aligning the white rollers on the toner cartridge with the white arrows on the tracks of the toner cartridge assembly. 4. Place the toner cartridge assembly on the toner cartridge handle. NOTE: Do not press the button on the base of the imaging drum and pushing the toner cartridge in as far as it will...
User's Guide (HTML)
Page 30
After you replace the imaging drum, you should reset the imaging drum's counter. Close the front cover. Remove the toner cartridge assembly from the printer by pulling on the toner cartridge assembly. NOTE: Do not press the button on the toner cartridge handle. 7. NOTICE: Resetting the imaging drum's counter without replacing the imaging drum may damage your printer...
After you replace the imaging drum, you should reset the imaging drum's counter. Close the front cover. Remove the toner cartridge assembly from the printer by pulling on the toner cartridge assembly. NOTE: Do not press the button on the toner cartridge handle. 7. NOTICE: Resetting the imaging drum's counter without replacing the imaging drum may damage your printer...
User's Guide (HTML)
Page 32
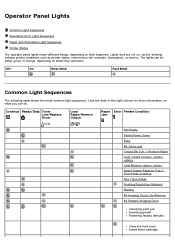
... Then Press Continue Hex Trace Ready Flushing/Resolution Reduced Waiting 84 Imaging Drum Life Warning 84 Replace Imaging Drum Canceling print job Resetting printer Restoring factory defaults Close the font cover Insert toner cartridge The lights can do. Remove Paper Load Load Manual Insert Duplex... Pages in the right column for example, load paper), or service. Continue Ready/Data Toner Low/Replace Drum / Load Paper/Remove Output / Paper ...
... Then Press Continue Hex Trace Ready Flushing/Resolution Reduced Waiting 84 Imaging Drum Life Warning 84 Replace Imaging Drum Canceling print job Resetting printer Restoring factory defaults Close the font cover Insert toner cartridge The lights can do. Remove Paper Load Load Manual Insert Duplex... Pages in the right column for example, load paper), or service. Continue Ready/Data Toner Low/Replace Drum / Load Paper/Remove Output / Paper ...

User's Guide (HTML)
Page 33
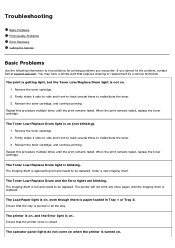
The following table shows the secondary error light sequences. The following table shows the paper jam light sequences. Continue Ready/Data Toner Low/Replace Drum / Load Paper/Remove Paper Output Jam / Error Printer Condition 30 Invalid Refilled Cartridge 31 Missing or Defective Cartridge 32 Unsupported Print Cartridge ...Service error Secondary Error Light Sequences When the Error and Continue lights are both on , a secondary error has occurred. Continue Ready/Data Toner Low/Replace Drum / Load Paper/Remove Paper Output Jam / Error Printer Condition 200 Paper Jam -
The following table shows the secondary error light sequences. The following table shows the paper jam light sequences. Continue Ready/Data Toner Low/Replace Drum / Load Paper/Remove Paper Output Jam / Error Printer Condition 30 Invalid Refilled Cartridge 31 Missing or Defective Cartridge 32 Unsupported Print Cartridge ...Service error Secondary Error Light Sequences When the Error and Continue lights are both on , a secondary error has occurred. Continue Ready/Data Toner Low/Replace Drum / Load Paper/Remove Paper Output Jam / Error Printer Condition 200 Paper Jam -
User's Guide (HTML)
Page 36
....dell.com. When the print remains faded, replace the toner cartridge. Firmly shake it side-to-side and front-to-back several times to be replaced. The imaging drum is replaced. The printer will not print any more pages until the imaging drum is approaching full and needs to redistribute the toner. 3. The Toner Low/Replace Drum...
....dell.com. When the print remains faded, replace the toner cartridge. Firmly shake it side-to-side and front-to-back several times to be replaced. The imaging drum is replaced. The printer will not print any more pages until the imaging drum is approaching full and needs to redistribute the toner. 3. The Toner Low/Replace Drum...
User's Guide (HTML)
Page 45
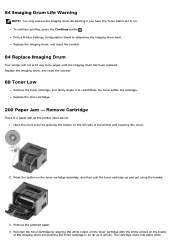
... with the white arrows on the left side of the imaging drum and pushing the toner cartridge in as far as it to redistribute the toner within the cartridge. Replace the toner cartridge. 200 Paper Jam - Reinstall the toner cartridge by pressing the button on the tracks of the printer and ... 1. Replace the imaging drum, and reset the counter. 84 Replace Imaging Drum Your printer will go. 84 Imaging Drum Life Warning NOTE: You only receive the imaging drum life warning if you have the Toner Alarm set to on the toner cartridge assembly, and then pull the toner cartridge up and out ...
... with the white arrows on the left side of the imaging drum and pushing the toner cartridge in as far as it to redistribute the toner within the cartridge. Replace the toner cartridge. 200 Paper Jam - Reinstall the toner cartridge by pressing the button on the tracks of the printer and ... 1. Replace the imaging drum, and reset the counter. 84 Replace Imaging Drum Your printer will go. 84 Imaging Drum Life Warning NOTE: You only receive the imaging drum life warning if you have the Toner Alarm set to on the toner cartridge assembly, and then pull the toner cartridge up and out ...

User's Guide (HTML)
Page 46
Open the front cover by aligning the white rollers on the toner cartridge with the white arrows on the tracks of the printer and lowering the cover. 2. Remove Cartridge There is a paper jam between the printer input ... cartridge clicks into place when correctly installed. Remove the jammed paper. 4. Press the Continue button . Press the button on the left side of the imaging drum and pushing the toner cartridge in as far as it will go. correctly installed. 5. Close the front cover. 6. Reinstall the...
Open the front cover by aligning the white rollers on the toner cartridge with the white arrows on the tracks of the printer and lowering the cover. 2. Remove Cartridge There is a paper jam between the printer input ... cartridge clicks into place when correctly installed. Remove the jammed paper. 4. Press the Continue button . Press the button on the left side of the imaging drum and pushing the toner cartridge in as far as it will go. correctly installed. 5. Close the front cover. 6. Reinstall the...


