User's Guide (HTML)
Page 1
...Server and Windows NT are trademarks of Microsoft Corporation in this text: Dell, the DELL logo, OpenManage, and Dell Toner Management System are registered trademarks of data and tells you have the Dell printer Service Tag available. Use, duplication or disclosure by phone. ...Visit Dell's website, or order Dell printer supplies by the Government is subject to restrictions as set forth in applicable FAR provisions: Dell Inc., One Dell Way, Round Rock, Texas, 78682, USA. Dell™ Laser Printer 1720/1720dn User's Guide To order toner cartridges and supplies from Dell: ...
...Server and Windows NT are trademarks of Microsoft Corporation in this text: Dell, the DELL logo, OpenManage, and Dell Toner Management System are registered trademarks of data and tells you have the Dell printer Service Tag available. Use, duplication or disclosure by phone. ...Visit Dell's website, or order Dell printer supplies by the Government is subject to restrictions as set forth in applicable FAR provisions: Dell Inc., One Dell Way, Round Rock, Texas, 78682, USA. Dell™ Laser Printer 1720/1720dn User's Guide To order toner cartridges and supplies from Dell: ...
User's Guide (HTML)
Page 5
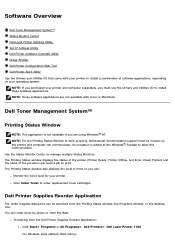
... NOTE: This application is added to the Windows® Firewall to print. Use the Status Monitor Center to order replacement toner cartridges. Click Start® Programs or All Programs® Dell Printers® Dell Laser Printer 1720. NOTE: If you purchased your printer to install these software applications. For Windows Vista (default Start menu...
... NOTE: This application is added to the Windows® Firewall to print. Use the Status Monitor Center to order replacement toner cartridges. Click Start® Programs or All Programs® Dell Printers® Dell Laser Printer 1720. NOTE: If you purchased your printer to install these software applications. For Windows Vista (default Start menu...

User's Guide (HTML)
Page 7
Mode Quiet Mode Printer Language Power Saver Resource Save Download Target Print Timeout Wait Timeout Auto Continue Jam Recovery Page Protect Print Area Display Language Toner Alarm Orientation Lines Per Page A4 Width Tray Renumber1 Auto CR after LF Auto LF after CR Print PS Error Font Priority PCL SmartSwitch PS ... Paper Texture3 Paper Weight3 Duplex Duplex Bind Copies Blank Pages Collation Separator Sheets Separator Source Multipage Print Multipage Order Multipage View Multipage Border Print Resolution Toner Darkness Small Font Enh Eco -
Mode Quiet Mode Printer Language Power Saver Resource Save Download Target Print Timeout Wait Timeout Auto Continue Jam Recovery Page Protect Print Area Display Language Toner Alarm Orientation Lines Per Page A4 Width Tray Renumber1 Auto CR after LF Auto LF after CR Print PS Error Font Priority PCL SmartSwitch PS ... Paper Texture3 Paper Weight3 Duplex Duplex Bind Copies Blank Pages Collation Separator Sheets Separator Source Multipage Print Multipage Order Multipage View Multipage Border Print Resolution Toner Darkness Small Font Enh Eco -
User's Guide (HTML)
Page 9
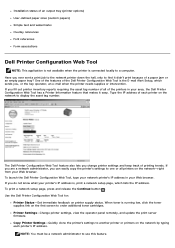
... to use this feature. Copy Printer Settings-Quickly clone the printer's settings to another printer or printers on the network to order additional toner cartridges. To print a network setup page, press and release the Continue button . Type the IP address of a paper jam or an...sizes (custom papers) Simple text and watermarks Overlay references Font references Form associations Dell Printer Configuration Web Tool NOTE: This application is not available when the printer is running low, click the toner supplies link on printer supply status. Have you fill out printer inventory reports ...
... to use this feature. Copy Printer Settings-Quickly clone the printer's settings to another printer or printers on the network to order additional toner cartridges. To print a network setup page, press and release the Continue button . Type the IP address of a paper jam or an...sizes (custom papers) Simple text and watermarks Overlay references Font references Form associations Dell Printer Configuration Web Tool NOTE: This application is not available when the printer is running low, click the toner supplies link on printer supply status. Have you fill out printer inventory reports ...
User's Guide (HTML)
Page 11
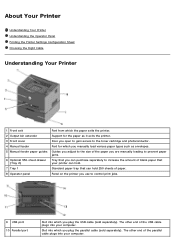
... cable (sold separately). The other end of the paper you are manually loading to prevent paper jams. Tray that you can purchase separately to the toner cartridge and photoconductor. Guides you adjust to the size of the USB cable plugs into your computer. The other end of paper. Door you open...
... cable (sold separately). The other end of the paper you are manually loading to prevent paper jams. Tray that you can purchase separately to the toner cartridge and photoconductor. Guides you adjust to the size of the USB cable plugs into your computer. The other end of paper. Door you open...

User's Guide (HTML)
Page 21
... jobs sent from computers using standard protocol. Operator Panel Menus Network Menu Parallel Menu Setup Menu USB Menu Utilities Menu Menus are indicated by Ready , Toner Low/Replace Drum / , Load Paper/Remove Output / , and Paper Jam light sequences. Turn off the printer to the setting you need. Press the Cancel button...
... jobs sent from computers using standard protocol. Operator Panel Menus Network Menu Parallel Menu Setup Menu USB Menu Utilities Menu Menus are indicated by Ready , Toner Low/Replace Drum / , Load Paper/Remove Output / , and Paper Jam light sequences. Turn off the printer to the setting you need. Press the Cancel button...
User's Guide (HTML)
Page 25
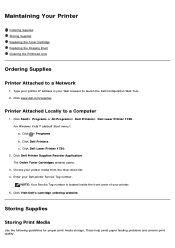
.... Click Start® Programs or All Programs® Dell Printers® Dell Laser Printer 1720. NOTE: Your Service Tag number is located inside the front cover of your printer model from the drop-down list. 4. Maintaining Your Printer Ordering Supplies Storing Supplies Replacing the Toner Cartridge Replacing the Imaging Drum Cleaning the Printhead Lens...
.... Click Start® Programs or All Programs® Dell Printers® Dell Laser Printer 1720. NOTE: Your Service Tag number is located inside the front cover of your printer model from the drop-down list. 4. Maintaining Your Printer Ordering Supplies Storing Supplies Replacing the Toner Cartridge Replacing the Imaging Drum Cleaning the Printhead Lens...
User's Guide (HTML)
Page 26
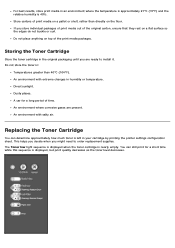
... is left in your cartridge by printing the printer settings configuration sheet. You can determine approximately how much toner is nearly empty. For best results, store print media in an environment where the temperature is approximately 21°C (70°F) and ...the relative humidity is displayed, but print quality decreases as the toner level decreases. Do not store the toner in: Temperatures greater than directly on a pallet or shelf, rather than 40°C (104°F). An environment where corrosive gases...
... is left in your cartridge by printing the printer settings configuration sheet. You can determine approximately how much toner is nearly empty. For best results, store print media in an environment where the temperature is approximately 21°C (70°F) and ...the relative humidity is displayed, but print quality decreases as the toner level decreases. Do not store the toner in: Temperatures greater than directly on a pallet or shelf, rather than 40°C (104°F). An environment where corrosive gases...
User's Guide (HTML)
Page 27
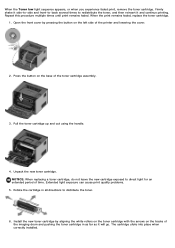
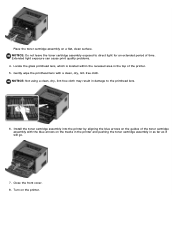
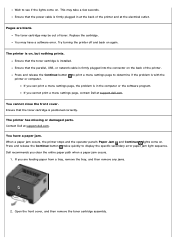
... base of the printer and lowering the cover. 2. Rotate the cartridge in as far as it and continue printing. Install the new toner cartridge by pressing the button on the left side of the toner cartridge assembly. 3. Repeat this procedure multiple times until print remains faded. Pull the... to direct light for an extended period of the imaging drum and pushing the toner cartridge in all directions to redistribute the toner, and then reinsert it will go. When the print remains faded, replace the toner cartridge. 1. Firmly shake it side-to-side and front-to-back several times...
... base of the printer and lowering the cover. 2. Rotate the cartridge in as far as it and continue printing. Install the new toner cartridge by pressing the button on the left side of the toner cartridge assembly. 3. Repeat this procedure multiple times until print remains faded. Pull the... to direct light for an extended period of the imaging drum and pushing the toner cartridge in all directions to redistribute the toner, and then reinsert it will go. When the print remains faded, replace the toner cartridge. 1. Firmly shake it side-to-side and front-to-back several times...
User's Guide (HTML)
Page 28
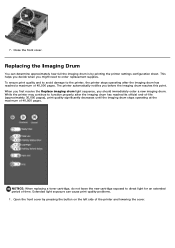
... exposure can determine approximately how full the imaging drum is by pressing the button on the left side of 40,000 pages. NOTICE: When replacing a toner cartridge, do not leave the new cartridge exposed to function properly after the imaging drum has reached a maximum of the printer and lowering the cover...
... exposure can determine approximately how full the imaging drum is by pressing the button on the left side of 40,000 pages. NOTICE: When replacing a toner cartridge, do not leave the new cartridge exposed to function properly after the imaging drum has reached a maximum of the printer and lowering the cover...

User's Guide (HTML)
Page 29
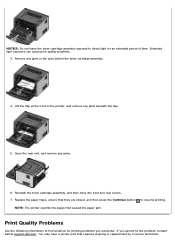
... the printer by aligning the white rollers on the toner cartridge with the white arrows on the tracks of the toner cartridge assembly. 4. The cartridge clicks into the new toner cartridge assembly by pulling on the base of the imaging drum and pushing the toner cartridge in as far as it will go. NOTE...: Do not press the button on a flat, clean surface. 3. Pull the toner cartridge up and out using the handle. 5. Unpack the new imaging drum. 6. 2. Press the button on the...
... the printer by aligning the white rollers on the toner cartridge with the white arrows on the tracks of the toner cartridge assembly. 4. The cartridge clicks into the new toner cartridge assembly by pulling on the base of the imaging drum and pushing the toner cartridge in as far as it will go. NOTE...: Do not press the button on a flat, clean surface. 3. Pull the toner cartridge up and out using the handle. 5. Unpack the new imaging drum. 6. 2. Press the button on the...
User's Guide (HTML)
Page 30
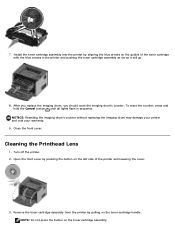
...replacing the imaging drum may damage your printer and void your warranty. 9. NOTE: Do not press the button on the left side of the toner cartridge with the blue arrows in sequence. Cleaning the Printhead Lens 1. Turn off the printer. 2. Open the front cover by pressing the ...button on the toner cartridge assembly. Remove the toner cartridge assembly from the printer by aligning the blue arrows on the toner cartridge handle. After you replace the imaging drum, you should reset the imaging drum's counter. ...
...replacing the imaging drum may damage your printer and void your warranty. 9. NOTE: Do not press the button on the left side of the toner cartridge with the blue arrows in sequence. Cleaning the Printhead Lens 1. Turn off the printer. 2. Open the front cover by pressing the ...button on the toner cartridge assembly. Remove the toner cartridge assembly from the printer by aligning the blue arrows on the toner cartridge handle. After you replace the imaging drum, you should reset the imaging drum's counter. ...
User's Guide (HTML)
Page 31
... lens, which is located within the recessed area in the top of the toner cartridge assembly with a clean, dry, lint-free cloth. Turn on a flat, clean surface. Extended light exposure can cause print quality problems. 4. Install the toner cartridge assembly into the printer by aligning the blue arrows on the tracks in... the printer and pushing the toner cartridge assembly in damage to direct light for an extended period of time. NOTICE: Not using a clean, dry, lint-free cloth may result in as ...
... lens, which is located within the recessed area in the top of the toner cartridge assembly with a clean, dry, lint-free cloth. Turn on a flat, clean surface. Extended light exposure can cause print quality problems. 4. Install the toner cartridge assembly into the printer by aligning the blue arrows on the tracks in... the printer and pushing the toner cartridge assembly in damage to direct light for an extended period of time. NOTICE: Not using a clean, dry, lint-free cloth may result in as ...
User's Guide (HTML)
Page 32
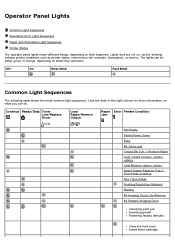
... Reduced Waiting 84 Imaging Drum Life Warning 84 Replace Imaging Drum Canceling print job Resetting printer Restoring factory defaults Close the font cover Insert toner cartridge The lights can be either green or orange, depending on what they represent. Remove Paper Load Load Manual Insert Duplex Pages in ...the right column for example, load paper), or service. Continue Ready/Data Toner Low/Replace Drum / Load Paper/Remove Output / Paper Error Printer Condition Jam Not Ready Ready/Power Saver Busy 88...
... Reduced Waiting 84 Imaging Drum Life Warning 84 Replace Imaging Drum Canceling print job Resetting printer Restoring factory defaults Close the font cover Insert toner cartridge The lights can be either green or orange, depending on what they represent. Remove Paper Load Load Manual Insert Duplex Pages in ...the right column for example, load paper), or service. Continue Ready/Data Toner Low/Replace Drum / Load Paper/Remove Output / Paper Error Printer Condition Jam Not Ready Ready/Power Saver Busy 88...

User's Guide (HTML)
Page 33
Continue Ready/Data Toner Low/Replace Drum / Load Paper/Remove Paper Output Jam / Error Printer Condition 30 Invalid Refilled Cartridge 31 Missing or Defective Cartridge 32 Unsupported Print Cartridge ... occurred. Remove Press the Continue button twice to display secondary code light sequences. The following table shows the secondary error light sequences. Continue Ready/Data Toner Low/Replace Drum / Load Paper/Remove Paper Output Jam / Error Printer Condition 200 Paper Jam - Paper jam1 Printer error2 Service error Secondary Error Light Sequences...
Continue Ready/Data Toner Low/Replace Drum / Load Paper/Remove Paper Output Jam / Error Printer Condition 30 Invalid Refilled Cartridge 31 Missing or Defective Cartridge 32 Unsupported Print Cartridge ... occurred. Remove Press the Continue button twice to display secondary code light sequences. The following table shows the secondary error light sequences. Continue Ready/Data Toner Low/Replace Drum / Load Paper/Remove Paper Output Jam / Error Printer Condition 200 Paper Jam - Paper jam1 Printer error2 Service error Secondary Error Light Sequences...
User's Guide (HTML)
Page 36
... tray is paper loaded in all the way. Reinsert the toner cartridge, and continue printing. Firmly shake it side-to-side and front-to-back several times to find solutions for printing problems you cannot fix the problem, contact Dell at support.dell.com. The printer will not print any more pages until...
... tray is paper loaded in all the way. Reinsert the toner cartridge, and continue printing. Firmly shake it side-to-side and front-to-back several times to find solutions for printing problems you cannot fix the problem, contact Dell at support.dell.com. The printer will not print any more pages until...
User's Guide (HTML)
Page 37
... take a few seconds. You have a software error. Ensure that the toner cartridge is installed. When a paper jam occurs, the printer stops and the operator panel's Paper Jam and Continue lights come on. Dell recommends you cannot print a menu settings page, contact Dell at the electrical outlet. Replace the cartridge. The printer is firmly...prints. This may have a paper jam. The printer has missing or damaged parts. Wait to display the specific secondary error paper jam light sequence. The toner cartridge may be out of the printer. Contact Dell at support.dell.com.
... take a few seconds. You have a software error. Ensure that the toner cartridge is installed. When a paper jam occurs, the printer stops and the operator panel's Paper Jam and Continue lights come on. Dell recommends you cannot print a menu settings page, contact Dell at the electrical outlet. Replace the cartridge. The printer is firmly...prints. This may have a paper jam. The printer has missing or damaged parts. Wait to display the specific secondary error paper jam light sequence. The toner cartridge may be out of the printer. Contact Dell at support.dell.com.
User's Guide (HTML)
Page 38
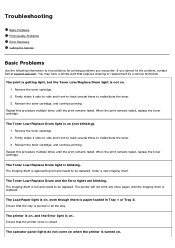
If you encounter. Lift the flap at support.dell.com. Print Quality Problems Use the following information to resume printing. Replace the paper trays, ensure that they are closed, and then press the Continue ... jams beneath the flap. 5. NOTICE: Do not leave the toner cartridge assembly exposed to direct light for printing problems you cannot fix the problem, contact Dell at the front of time. Remove any jams in the area behind the toner cartridge assembly. 4. Reinstall the toner cartridge assembly, and then close the front and rear...
If you encounter. Lift the flap at support.dell.com. Print Quality Problems Use the following information to resume printing. Replace the paper trays, ensure that they are closed, and then press the Continue ... jams beneath the flap. 5. NOTICE: Do not leave the toner cartridge assembly exposed to direct light for printing problems you cannot fix the problem, contact Dell at the front of time. Remove any jams in the area behind the toner cartridge assembly. 4. Reinstall the toner cartridge assembly, and then close the front and rear...
User's Guide (HTML)
Page 39
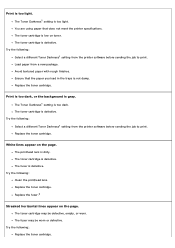
... setting from the printer software before sending the job to print. Try the following : Replace the toner cartridge. Replace the fuser.2 Streaked horizontal lines appear on toner. The toner cartridge is too dark. Ensure that does not meet the printer specifications. Print is too dark, or... the background is not damp. Replace the toner cartridge. The toner cartridge is dirty. The printhead lens is defective. The toner cartridge may be defective, empty, or worn. The toner cartridge is low on the page. Load paper from the printer software ...
... setting from the printer software before sending the job to print. Try the following : Replace the toner cartridge. Replace the fuser.2 Streaked horizontal lines appear on toner. The toner cartridge is too dark. Ensure that does not meet the printer specifications. Print is too dark, or... the background is not damp. Replace the toner cartridge. The toner cartridge is dirty. The printhead lens is defective. The toner cartridge may be defective, empty, or worn. The toner cartridge is low on the page. Load paper from the printer software ...

User's Guide (HTML)
Page 40
...meet the printer specifications. Try the following : Replace the toner cartridge. Replace the fuser.2 Try the following : Use only transparencies recommended by Dell. Replace the fuser.2 Streaked vertical lines appear on the page. The toner cartridge is smeared, or horizontal or vertical light bands appear.)...is worn or defective. Replace the fuser.2 The transparency print quality is poor. (Print has inappropriate light or dark spots, toner is defective. Paper has absorbed moisture due to something other than Transparency. Avoid textured paper with rough finishes. Ensure that do...
...meet the printer specifications. Try the following : Replace the toner cartridge. Replace the fuser.2 Try the following : Use only transparencies recommended by Dell. Replace the fuser.2 Streaked vertical lines appear on the page. The toner cartridge is smeared, or horizontal or vertical light bands appear.)...is worn or defective. Replace the fuser.2 The transparency print quality is poor. (Print has inappropriate light or dark spots, toner is defective. Paper has absorbed moisture due to something other than Transparency. Avoid textured paper with rough finishes. Ensure that do...

