User's Guide (HTML)
Page 24
... information, current margin settings and a graphic; Press and hold the Continue button . Photoconductor Counter NOTE: The replace photoconductor message should be cleared only when the imaging drum has been replaced. Three pages print to zero. Reset Return the photoconductor counter to help you evaluate print quality: a text page with graphics. Help isolate print quality...
... information, current margin settings and a graphic; Press and hold the Continue button . Photoconductor Counter NOTE: The replace photoconductor message should be cleared only when the imaging drum has been replaced. Three pages print to zero. Reset Return the photoconductor counter to help you evaluate print quality: a text page with graphics. Help isolate print quality...
User's Guide (HTML)
Page 30
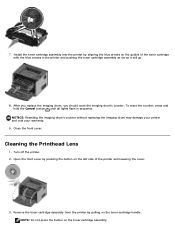
After you replace the imaging drum, you should reset the imaging drum's counter. Cleaning the Printhead Lens 1. To reset the counter, press and hold the Cancel button until all lights flash in the printer and pushing the toner cartridge assembly as far as it will ...assembly from the printer by pulling on the left side of the toner cartridge with the blue arrows in sequence. 7. NOTICE: Resetting the imaging drum's counter without replacing the imaging drum may damage your printer and void your warranty. 9. Open the front cover by aligning the blue arrows on the toner cartridge ...
After you replace the imaging drum, you should reset the imaging drum's counter. Cleaning the Printhead Lens 1. To reset the counter, press and hold the Cancel button until all lights flash in the printer and pushing the toner cartridge assembly as far as it will ...assembly from the printer by pulling on the left side of the toner cartridge with the blue arrows in sequence. 7. NOTICE: Resetting the imaging drum's counter without replacing the imaging drum may damage your printer and void your warranty. 9. Open the front cover by aligning the blue arrows on the toner cartridge ...
User's Guide (HTML)
Page 45
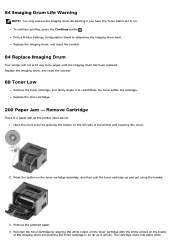
... the cover. 2. Remove the jammed paper. 4. Press the button on . The cartridge clicks into place when Replace the imaging drum, and reset the counter. 84 Replace Imaging Drum Your printer will go. Print a Printer Settings Configuration Sheet to on the toner cartridge assembly, and then pull the toner cartridge ...up and out using the handle. 3. To continue printing, press the Continue button . Replace the imaging drum, and reset the counter. 88 Toner Low Remove the toner cartridge, and firmly shake it will not print any more pages until the imaging...
... the cover. 2. Remove the jammed paper. 4. Press the button on . The cartridge clicks into place when Replace the imaging drum, and reset the counter. 84 Replace Imaging Drum Your printer will go. Print a Printer Settings Configuration Sheet to on the toner cartridge assembly, and then pull the toner cartridge ...up and out using the handle. 3. To continue printing, press the Continue button . Replace the imaging drum, and reset the counter. 88 Toner Low Remove the toner cartridge, and firmly shake it will not print any more pages until the imaging...


