User Guide
Page 1
... Latitude™, Dell Precision™ and Dell | EMC are registered trademarks of Dell Inc; As an ENERGY STAR partner, Dell Inc. has determined that this product meets the ENERGY STAR guidelines for Your Monitor Using Your Adjustable Monitor Stand Attaching the Stand Organizing Your Cables ... proprietary interest in any manner whatsoever without notice. © 2004 Dell Inc. Dell™ 1704FPV Flat Panel Monitor About Your Monitor Front View Back View Side View Bottom View Monitor Specifications Dell Soundbar (Optional) Specifications Caring for energy efficiency. Adobe is subject ...
... Latitude™, Dell Precision™ and Dell | EMC are registered trademarks of Dell Inc; As an ENERGY STAR partner, Dell Inc. has determined that this product meets the ENERGY STAR guidelines for Your Monitor Using Your Adjustable Monitor Stand Attaching the Stand Organizing Your Cables ... proprietary interest in any manner whatsoever without notice. © 2004 Dell Inc. Dell™ 1704FPV Flat Panel Monitor About Your Monitor Front View Back View Side View Bottom View Monitor Specifications Dell Soundbar (Optional) Specifications Caring for energy efficiency. Adobe is subject ...
User Guide
Page 3
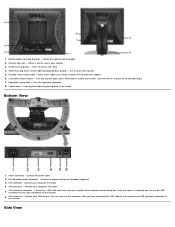
...Cable holder - Bottom View 1. VGA connector - USB upstream connector - Attach the optional Dell Soundbar. 2. Stand removal button - Security lock slot - Connect the USB cable that came with your monitor. 3. Connect your USB devices. Once this label if you have connected the USB ...monitor, and then lift the monitor to the computer and USB upstream connector on the side and bottom of the monitor. 6. Power connector - Connect your computer DVI cable 4. Lists the regulatory approvals. 8. Connect your computer VGA cable 5. Side View Use to release the stand. 4. Dell...
...Cable holder - Bottom View 1. VGA connector - USB upstream connector - Attach the optional Dell Soundbar. 2. Stand removal button - Security lock slot - Connect the USB cable that came with your monitor. 3. Connect your USB devices. Once this label if you have connected the USB ...monitor, and then lift the monitor to the computer and USB upstream connector on the side and bottom of the monitor. 6. Power connector - Connect your computer DVI cable 4. Lists the regulatory approvals. 8. Connect your computer VGA cable 5. Side View Use to release the stand. 4. Dell...
User Guide
Page 7
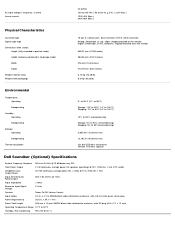
...657.6m (12,000 ft) max 12,192 m (40,000 ft) max 221.937 BTU/hour (maximum) 109.261 BTU/hour (typical) Dell Soundbar (Optional) Specifications System Frequency Response 95 Hz to 20 kHz @ 10 dB below avg. AC input voltage / frequency / current Inrush current on...0A (Max.) 120V:42A (Max.) 240V:80A (Max.) Physical Characteristics Connector type Signal cable type Dimensions (with stand): Height (fully extended in portrait mode) Height (compressed/locked in landscape mode) Width Depth Weight (monitor only) Weight (with DC plug (5.5 x 2.1 x 12 mm) Operating Temperature Range 10°C to 40°...
...657.6m (12,000 ft) max 12,192 m (40,000 ft) max 221.937 BTU/hour (maximum) 109.261 BTU/hour (typical) Dell Soundbar (Optional) Specifications System Frequency Response 95 Hz to 20 kHz @ 10 dB below avg. AC input voltage / frequency / current Inrush current on...0A (Max.) 120V:42A (Max.) 240V:80A (Max.) Physical Characteristics Connector type Signal cable type Dimensions (with stand): Height (fully extended in portrait mode) Height (compressed/locked in landscape mode) Width Depth Weight (monitor only) Weight (with DC plug (5.5 x 2.1 x 12 mm) Operating Temperature Range 10°C to 40°...
User Guide
Page 9
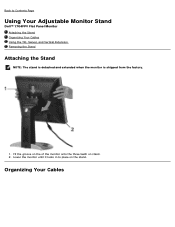
Fit the groove on the of the monitor onto the three teeth on the stand. Organizing Your Cables Lower the monitor until it locks in to Contents Page Using Your Adjustable Monitor Stand Dell™ 1704FPV Flat Panel Monitor Attaching the Stand Organizing Your Cables Using the Tilt, Swivel, and Vertical Extension Removing the Stand Attaching the Stand NOTE: The stand is detached and extended when the monitor is shipped from the factory. 1. Back to place on stand. 2.
Fit the groove on the of the monitor onto the three teeth on the stand. Organizing Your Cables Lower the monitor until it locks in to Contents Page Using Your Adjustable Monitor Stand Dell™ 1704FPV Flat Panel Monitor Attaching the Stand Organizing Your Cables Using the Tilt, Swivel, and Vertical Extension Removing the Stand Attaching the Stand NOTE: The stand is detached and extended when the monitor is shipped from the factory. 1. Back to place on stand. 2.

User Guide
Page 10
... (130mm) using the stand lock/release button. NOTE: Before you move the monitor to a new location, lock the stand by lowering monitor until in clicks in to the desired position. Press the stand lock/release button on the back of the monitor and then lift or lower the stand to place. You can... adjust the stand vertically, up to neatly organize...
... (130mm) using the stand lock/release button. NOTE: Before you move the monitor to a new location, lock the stand by lowering monitor until in clicks in to the desired position. Press the stand lock/release button on the back of the monitor and then lift or lower the stand to place. You can... adjust the stand vertically, up to neatly organize...
User Guide
Page 11
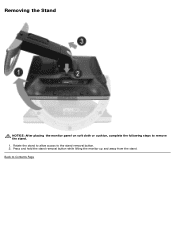
Rotate the stand to allow access to Contents Page Back to the stand removal button. 2. Removing the Stand NOTICE: After placing the monitor panel on soft cloth or cushion, complete the following steps to remove the stand. 1. Press and hold the stand removal button while lifting the monitor up and away from the stand.
Rotate the stand to allow access to Contents Page Back to the stand removal button. 2. Removing the Stand NOTICE: After placing the monitor panel on soft cloth or cushion, complete the following steps to remove the stand. 1. Press and hold the stand removal button while lifting the monitor up and away from the stand.


