
Owner's Manual
Page 3
... on the scanner glass for copying, scanning and sending faxes. 12 Cover Open to direct your multi-function printer when you want to: 1 Automatic Document Load the document for copying, scanning, or sending faxes. Feeder (ADF) 2 Operator Panel Operate the multi-function printer. 3 Paper Output Extension Keep print...Tray 2. 8 Front Cover Access the toner cartridge. 9 Front Output Tray Hold paper as it exits the front of the multi-function printer. 10 ADF Output Tray Hold the document as it exit the ADF. 11 Scanner Glass Place a document on the scanner glass. Understanding...
... on the scanner glass for copying, scanning and sending faxes. 12 Cover Open to direct your multi-function printer when you want to: 1 Automatic Document Load the document for copying, scanning, or sending faxes. Feeder (ADF) 2 Operator Panel Operate the multi-function printer. 3 Paper Output Extension Keep print...Tray 2. 8 Front Cover Access the toner cartridge. 9 Front Output Tray Hold paper as it exits the front of the multi-function printer. 10 ADF Output Tray Hold the document as it exit the ADF. 11 Scanner Glass Place a document on the scanner glass. Understanding...

Owner's Manual
Page 4
... as it exits at the rear of the multi-function printer. 17 Power Switch and AC Supply power to the multi-function printer. # Use the: When you want to: 13 Document Input Tray Load the document for copying, scanning and sending faxes. 14 Document Guides Ensure proper document feeding... print the documents from the Phone connector ( ) and insert the supplied terminator. 19 Wall Jack Connector Connect the telephone line to your multi-function printer. 20 Optional Tray 2 Cable Connect the optional Tray 2 to your country (such as Germany, Sweden, Denmark, Austria, Belgium, Italy, France and...
... as it exits at the rear of the multi-function printer. 17 Power Switch and AC Supply power to the multi-function printer. # Use the: When you want to: 13 Document Input Tray Load the document for copying, scanning and sending faxes. 14 Document Guides Ensure proper document feeding... print the documents from the Phone connector ( ) and insert the supplied terminator. 19 Wall Jack Connector Connect the telephone line to your multi-function printer. 20 Optional Tray 2 Cable Connect the optional Tray 2 to your country (such as Germany, Sweden, Denmark, Austria, Belgium, Italy, France and...

Owner's Manual
Page 7
Assigning an IP Address 20 Installing Dell Software For Network Printing 20 Uninstalling Software 22 3 Loading Print Media Print Media Guidelines 24 Loading Paper and Transparencies 27 Loading Paper Into the Paper ... the Scanner Glass 36 Loading Documents Into the ADF 37 4 Using Your Multi-Function Printer Printing 40 Accessing Printer Properties 40 Copying 41 Making Copies 41 Using Copy Features With the Button 41 Copy Menu Options 43 Scanning 44 Scanning from Operator Panel 45 Scanning Using the Windows Image Acquisition (WIA) Driver . . . 46 Contents vii
Assigning an IP Address 20 Installing Dell Software For Network Printing 20 Uninstalling Software 22 3 Loading Print Media Print Media Guidelines 24 Loading Paper and Transparencies 27 Loading Paper Into the Paper ... the Scanner Glass 36 Loading Documents Into the ADF 37 4 Using Your Multi-Function Printer Printing 40 Accessing Printer Properties 40 Copying 41 Making Copies 41 Using Copy Features With the Button 41 Copy Menu Options 43 Scanning 44 Scanning from Operator Panel 45 Scanning Using the Windows Image Acquisition (WIA) Driver . . . 46 Contents vii

Owner's Manual
Page 14
The scan unlock switch automatically moves FORWARD to the unlock position. NOTE: When you are moving the multi-function printer or do not intend to use it . www.dell.com/supplies | support.dell.com Unlocking the Scanner 1 Remove the label completely from the scanner module by gently pulling it for a long period of time, move the switch BACKWARD to the lock position, as shown. To scan or copy a document, the switch must be unlocked. 4 Pr eparing Yo ur Multi-Fu nction Pr inter
The scan unlock switch automatically moves FORWARD to the unlock position. NOTE: When you are moving the multi-function printer or do not intend to use it . www.dell.com/supplies | support.dell.com Unlocking the Scanner 1 Remove the label completely from the scanner module by gently pulling it for a long period of time, move the switch BACKWARD to the lock position, as shown. To scan or copy a document, the switch must be unlocked. 4 Pr eparing Yo ur Multi-Fu nction Pr inter

Owner's Manual
Page 15
...; ➏ To: Use copy layout features, such as Auto Fit, Clone, Collation, 2-sided, 2/4 Up (multiple pages on the Setup Diagram (poster) to scan, copy, and fax. Reduce or enlarge a copy. Adjust the contrastof the output copy for documents containing photos, text, or mixed photos and text. Optimize the... copy quality for the current copy job. Start a copy. Use the multi-function printer operator panel to complete the hardware installation. Using the Operator Panel If you have not already done so, follow the steps on a sheet...
...; ➏ To: Use copy layout features, such as Auto Fit, Clone, Collation, 2-sided, 2/4 Up (multiple pages on the Setup Diagram (poster) to scan, copy, and fax. Reduce or enlarge a copy. Adjust the contrastof the output copy for documents containing photos, text, or mixed photos and text. Optimize the... copy quality for the current copy job. Start a copy. Use the multi-function printer operator panel to complete the hardware installation. Using the Operator Panel If you have not already done so, follow the steps on a sheet...

Owner's Manual
Page 16
... ➍ ➎ ➏ ➐ Press: ➊ To: Store, edit and search frequently-dialed fax numbers for automatic speed dialing. Start a scan. www.dell.com/supplies | support.dell.com Common Keys ➋ ➊ ➌➍ ➎ Fax Keys Press: ➊ ➋ ➌ ➍ ➎ To: Enter Menu ...mode and scroll through the options available for the current fax job. Send a fax. You must create the scan list using the Dell software (Printer Settings Utility) provided with your PC software programs that an image can be...
... ➍ ➎ ➏ ➐ Press: ➊ To: Store, edit and search frequently-dialed fax numbers for automatic speed dialing. Start a scan. www.dell.com/supplies | support.dell.com Common Keys ➋ ➊ ➌➍ ➎ Fax Keys Press: ➊ ➋ ➌ ➍ ➎ To: Enter Menu ...mode and scroll through the options available for the current fax job. Send a fax. You must create the scan list using the Dell software (Printer Settings Utility) provided with your PC software programs that an image can be...

Owner's Manual
Page 26
... SystemTM- HTML documentation provides detailed information about installing the printer drivers in Windows, you purchased a Dell TM computer and your multi-function printer at the same time, the drivers and utilities are available for scanning documents on your multi-function printer. www.dell.com/supplies | support.dell.com Software Overview After setting up fax phonebook and the...
... SystemTM- HTML documentation provides detailed information about installing the printer drivers in Windows, you purchased a Dell TM computer and your multi-function printer at the same time, the drivers and utilities are available for scanning documents on your multi-function printer. www.dell.com/supplies | support.dell.com Software Overview After setting up fax phonebook and the...

Owner's Manual
Page 27
... screens. 3 The scanner driver is automatically loaded first from D:\1600n\Scan\WINXP2K\p3scan.inf, where "D" is your computer using a USB cable. Click Finish to install the User's Guide, the printer drivers, scanner driver and PaperPort as the default settings. If your...printer cable while your computer when you may print a test page. NOTE: For each wizard that the multi-function printer is connected to your computer, skip this step and go to "Installing Dell Software For Network Printing" on . Installing Dell Software For Local Printing A local printer is a printer...
... screens. 3 The scanner driver is automatically loaded first from D:\1600n\Scan\WINXP2K\p3scan.inf, where "D" is your computer using a USB cable. Click Finish to install the User's Guide, the printer drivers, scanner driver and PaperPort as the default settings. If your...printer cable while your computer when you may print a test page. NOTE: For each wizard that the multi-function printer is connected to your computer, skip this step and go to "Installing Dell Software For Network Printing" on . Installing Dell Software For Local Printing A local printer is a printer...

Owner's Manual
Page 28
.... 2 When the hardware wizard screen appears, insert the Drivers and Utilities CD and click Next. www.dell.com/supplies | support.dell.com 5 Click Finish, and a second hardware wizard appears. The printer driver is automatically loaded from D:\1600n\Printer\GDI\WinXP\delr1.inf, where "D" is selected. 18 Understanding the Software Search for the best driver for.... The driver installs. 7 Click Finish, and a second wizard appears. 8 If the CD menu screen appears above the wizard, click Add New Hardware Wizard from D:\1600n\Scan\WINXP2K\p3scan.inf, where "D" is selected. 10 Click Next.
.... 2 When the hardware wizard screen appears, insert the Drivers and Utilities CD and click Next. www.dell.com/supplies | support.dell.com 5 Click Finish, and a second hardware wizard appears. The printer driver is automatically loaded from D:\1600n\Printer\GDI\WinXP\delr1.inf, where "D" is selected. 18 Understanding the Software Search for the best driver for.... The driver installs. 7 Click Finish, and a second wizard appears. 8 If the CD menu screen appears above the wizard, click Add New Hardware Wizard from D:\1600n\Scan\WINXP2K\p3scan.inf, where "D" is selected. 10 Click Next.

Owner's Manual
Page 29
... Drivers and Utilities CD and click Next. The driver installs. 7 Click Finish. Windows Me: 1 Make sure that the multi-function printer is selected. 14 Click Next, click Browse, select the location D:\1600n\Scan\WIN98ME, and click OK. 15 Click Next two times. Automatic search for a better driver for your CD drive). 2 Select Setup...
... Drivers and Utilities CD and click Next. The driver installs. 7 Click Finish. Windows Me: 1 Make sure that the multi-function printer is selected. 14 Click Next, click Browse, select the location D:\1600n\Scan\WIN98ME, and click OK. 15 Click Next two times. Automatic search for a better driver for your CD drive). 2 Select Setup...
Owner's Manual
Page 44
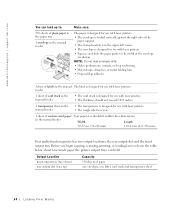
... rear output slot and the front output tray. www.dell.com/supplies | support.dell.com You can load up to: 250 sheets of plain paper in the paper tray 1 envelope in the manual feeder Make sure: The paper is designed for use with laser printers. • The envelope is loaded vertically against the ...right side of the paper support. • The stamp location is in the upper left corner. • The envelope is designed for use with laser printers. • The rough side faces you begin copying, scanning, printing, or sending faxes, refer to the width of the envelope (as shown).
... rear output slot and the front output tray. www.dell.com/supplies | support.dell.com You can load up to: 250 sheets of plain paper in the paper tray 1 envelope in the manual feeder Make sure: The paper is designed for use with laser printers. • The envelope is loaded vertically against the ...right side of the paper support. • The stamp location is in the upper left corner. • The envelope is designed for use with laser printers. • The rough side faces you begin copying, scanning, printing, or sending faxes, refer to the width of the envelope (as shown).

Owner's Manual
Page 46
www.dell.com/supplies | support.dell.com Placing Documents on the Scanner Glass NOTE: Contaminants on the scanner glass may cause black spots on the top left corner of the glass. 3 Close the document cover. 36 Loading Print Media See page 63. NOTE: To get the best scan quality, especially for color or gray scale images, use . For best results, clean the scanner glass before use the scanner glass instead of the ADF. 1 Lift and open the document cover. 2 Place the document face down on the scanner glass and align it with the registration guide on the printout.
www.dell.com/supplies | support.dell.com Placing Documents on the Scanner Glass NOTE: Contaminants on the scanner glass may cause black spots on the top left corner of the glass. 3 Close the document cover. 36 Loading Print Media See page 63. NOTE: To get the best scan quality, especially for color or gray scale images, use . For best results, clean the scanner glass before use the scanner glass instead of the ADF. 1 Lift and open the document cover. 2 Place the document face down on the scanner glass and align it with the registration guide on the printout.

Owner's Manual
Page 47
The ADF is recommended for scanning, copying, and faxing. Then adjust the document guides to 50 sheets of the documents in first. You can load up to the correct document size. 2 ...
The ADF is recommended for scanning, copying, and faxing. Then adjust the document guides to 50 sheets of the documents in first. You can load up to the correct document size. 2 ...

Owner's Manual
Page 49
SECTION 4 Using Your Multi-Function Printer Printing Copying Scanning Faxing
SECTION 4 Using Your Multi-Function Printer Printing Copying Scanning Faxing

Owner's Manual
Page 52
...feature to fit onto one sheet of 3 page documents, one . or 4-up copy. 1 2 3 4 ▲4-up copying Poster Copying (available via ADF scanning only): Prints two original images to fit onto one sheet of paper or prints four original images to print one poster-size document. For best... the cover open while copying may affect the copy quality and toner consumption. 4 2 Using Yo ur Multi-Function Pr inter www.dell.com/supplies | support.dell.com Collation Copying (available via scanner glass only): Prints a two-sided original document on the scanner glass may not be printed if...
...feature to fit onto one sheet of 3 page documents, one . or 4-up copy. 1 2 3 4 ▲4-up copying Poster Copying (available via ADF scanning only): Prints two original images to fit onto one sheet of paper or prints four original images to print one poster-size document. For best... the cover open while copying may affect the copy quality and toner consumption. 4 2 Using Yo ur Multi-Function Pr inter www.dell.com/supplies | support.dell.com Collation Copying (available via scanner glass only): Prints a two-sided original document on the scanner glass may not be printed if...

Owner's Manual
Page 54
... any text editing, word processing, or spreadsheet program. Item Type Documents Documents of poor quality or that you can start scanning. www.dell.com/supplies | support.dell.com Scanning Use your Dell Laser Multi-Function Printer 1600n to turn pictures and text into editable images on the item type and how you plan to the button, PaperPort is...
... any text editing, word processing, or spreadsheet program. Item Type Documents Documents of poor quality or that you can start scanning. www.dell.com/supplies | support.dell.com Scanning Use your Dell Laser Multi-Function Printer 1600n to turn pictures and text into editable images on the item type and how you plan to the button, PaperPort is...

Owner's Manual
Page 55
...directly to PaperPort or other programs on your computer without first running PaperPort. Scanning from the Windows Start Menu and displays the Dell ScanCenter bar. Dell ScanCenter automatically starts the selected program when the scan is a PaperPort application that are limited to PaperPort and to be copied... into the ADF. To scan and send an item to PaperPort's Help menu. For details about using Dell ScanCenter, refer to a program, click the program icon and then scan the item. Adjust the scan settings and start scan. For details, please refer to send the scanned image. 3 Press ....
...directly to PaperPort or other programs on your computer without first running PaperPort. Scanning from the Windows Start Menu and displays the Dell ScanCenter bar. Dell ScanCenter automatically starts the selected program when the scan is a PaperPort application that are limited to PaperPort and to be copied... into the ADF. To scan and send an item to PaperPort's Help menu. For details about using Dell ScanCenter, refer to a program, click the program icon and then scan the item. Adjust the scan settings and start scan. For details, please refer to send the scanned image. 3 Press ....

Owner's Manual
Page 56
... to see page 36-37. 2 Click Start → Control Panel → Printers and Other Hardware → Scanners and Cameras. 3 Double-click the printer icon. OR Load the document(s) to scan an image and easily manipulate those images without using additional software. NOTE: The WIA...see how your computer. 4 6 Using Yo ur Multi-Function Pr inter www.dell.com/supplies | support.dell.com Scanning Using the Windows Image Acquisition (WIA) Driver Your multi-function printer also supports the WIA driver for scanning images. WIA is copied to your preferences affect the picture. 5 Enter a...
... to see page 36-37. 2 Click Start → Control Panel → Printers and Other Hardware → Scanners and Cameras. 3 Double-click the printer icon. OR Load the document(s) to scan an image and easily manipulate those images without using additional software. NOTE: The WIA...see how your computer. 4 6 Using Yo ur Multi-Function Pr inter www.dell.com/supplies | support.dell.com Scanning Using the Windows Image Acquisition (WIA) Driver Your multi-function printer also supports the WIA driver for scanning images. WIA is copied to your preferences affect the picture. 5 Enter a...

Owner's Manual
Page 57
...pitched fax tone from the scanner glass. Press when you are faxed. Using Yo ur Multi-Function Pr inter 4 7 Press , and the multi-function printer scans and stores the document into the ADF. NOTE: Use the ADF when manually sending multiple-page faxes. You can send color faxes if the machine...(s) face up into its memory. Select "2:No" when all pages are faxing multiple pages automatically from the fax queue. Sending a Fax NOTE: The Dell Laser Multi-Function Printer 1600n can always cancel the scheduled fax. Faxing NOTE: A computer connection is stored, the multi-function...
...pitched fax tone from the scanner glass. Press when you are faxed. Using Yo ur Multi-Function Pr inter 4 7 Press , and the multi-function printer scans and stores the document into the ADF. NOTE: Use the ADF when manually sending multiple-page faxes. You can send color faxes if the machine...(s) face up into its memory. Select "2:No" when all pages are faxing multiple pages automatically from the fax queue. Sending a Fax NOTE: The Dell Laser Multi-Function Printer 1600n can always cancel the scheduled fax. Faxing NOTE: A computer connection is stored, the multi-function...

Owner's Manual
Page 61
Create a cover page using the Printer Settings Utility. To print received documents, access Secure Receive and select "Print" with your fax. Using Yo ur Multi-Function Pr inter 5 1 When a fax is ...: A list of numbers for blocking any unwanted faxes. • Secure Receive: Set Secure Receive option with no error. • Toll Save: Set to store ALL scanned faxes in this mode, the machine stores it into memory and displays "Secure Receive". Advanced fax The following reports are printed. • Prefix Dial: Set...
Create a cover page using the Printer Settings Utility. To print received documents, access Secure Receive and select "Print" with your fax. Using Yo ur Multi-Function Pr inter 5 1 When a fax is ...: A list of numbers for blocking any unwanted faxes. • Secure Receive: Set Secure Receive option with no error. • Toll Save: Set to store ALL scanned faxes in this mode, the machine stores it into memory and displays "Secure Receive". Advanced fax The following reports are printed. • Prefix Dial: Set...


