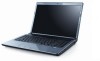
Setup Guide
Page 4
... Celeron are not applicable. Bluetooth is a trademark of Dell Inc.; CAUTION: A CAUTION indicates either potential damage to Microsoft® Windows® operating systems are registered trademarks and Core is a registered trademark owned by Dell under license. Information in this document to hardware or... loss of Dell Inc. Trademarks used in this document to ...
... Celeron are not applicable. Bluetooth is a trademark of Dell Inc.; CAUTION: A CAUTION indicates either potential damage to Microsoft® Windows® operating systems are registered trademarks and Core is a registered trademark owned by Dell under license. Information in this document to hardware or... loss of Dell Inc. Trademarks used in this document to ...
Setup Guide
Page 5
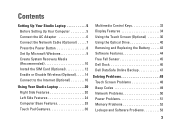
... (Optional 7 Press the Power Button 8 Set Up Microsoft Windows 9 Create System Recovery Media (Recommended 10 Install the SIM Card (Optional 12 Enable or Disable Wireless (Optional 14 Connect to the Internet (Optional 16 Using Your Studio Laptop 20 Right Side Features 20 Left Side Features 24 Computer...Screen (Optional 36 Using the Optical Drive 40 Removing and Replacing the Battery 42 Software Features 44 Free Fall Sensor 45 Dell Dock 46 Dell DataSafe Online Backup 47 Solving Problems 48 Touch Screen Problems 48 Beep Codes 49 Network Problems 50 Power Problems 51 Memory ...
... (Optional 7 Press the Power Button 8 Set Up Microsoft Windows 9 Create System Recovery Media (Recommended 10 Install the SIM Card (Optional 12 Enable or Disable Wireless (Optional 14 Connect to the Internet (Optional 16 Using Your Studio Laptop 20 Right Side Features 20 Left Side Features 24 Computer...Screen (Optional 36 Using the Optical Drive 40 Removing and Replacing the Battery 42 Software Features 44 Free Fall Sensor 45 Dell Dock 46 Dell DataSafe Online Backup 47 Solving Problems 48 Touch Screen Problems 48 Beep Codes 49 Network Problems 50 Power Problems 51 Memory ...
Setup Guide
Page 11
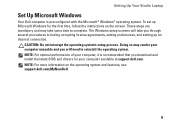
... need to complete. Setting Up Your Studio Laptop Set Up Microsoft Windows Your Dell computer is recommended that you download and install the latest BIOS and drivers for the first time, follow the instructions on the operating system and features, see support.dell.com/MyNewDell. 9 These steps are... mandatory and may render your computer, it is preconfigured with the Microsoft® Windows® operating system. Doing so may take you will take some time to...
... need to complete. Setting Up Your Studio Laptop Set Up Microsoft Windows Your Dell computer is recommended that you download and install the latest BIOS and drivers for the first time, follow the instructions on the operating system and features, see support.dell.com/MyNewDell. 9 These steps are... mandatory and may render your computer, it is preconfigured with the Microsoft® Windows® operating system. Doing so may take you will take some time to...
Setup Guide
Page 12
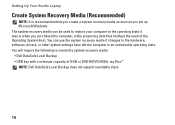
You can be used to restore your computer to create the system recovery media: • Dell DataSafe Local Backup • USB key with a minimum capacity of the Operating System disc). Setting Up Your Studio Laptop Create System Recovery Media (Recommended) NOTE: It is recommended that you create a system recovery media as soon as... the system recovery media if changes to the hardware, software, drivers, or other system settings have left the computer in when you set up Microsoft Windows.
You can be used to restore your computer to create the system recovery media: • Dell DataSafe Local Backup • USB key with a minimum capacity of the Operating System disc). Setting Up Your Studio Laptop Create System Recovery Media (Recommended) NOTE: It is recommended that you create a system recovery media as soon as... the system recovery media if changes to the hardware, software, drivers, or other system settings have left the computer in when you set up Microsoft Windows.
Setup Guide
Page 19
... instructions on the screen to complete the setup. 17 Windows Vista® 1. Save and close any open files, and exit any open programs. 3. Follow the instructions on the screen to your computer (see "Enable or Disable Wireless" on your router. Setting Up Your Studio Laptop Setting Up a Wireless Connection NOTE: To set...
... instructions on the screen to complete the setup. 17 Windows Vista® 1. Save and close any open files, and exit any open programs. 3. Follow the instructions on the screen to your computer (see "Enable or Disable Wireless" on your router. Setting Up Your Studio Laptop Setting Up a Wireless Connection NOTE: To set...

Setup Guide
Page 20
... service status, or try connecting again later. Follow the instructions on the screen and use the setup information provided by country. Contact your Internet connection: Windows 7 1. If you do not know which type of connection to select, click Help me choose or contact your ISP. 4. To set up a new ...connection or network→ Connect to the Internet. Setting Up Your Studio Laptop Setting Up Your Internet Connection ISPs and ISP offerings vary by your ISP to complete the setup. 18 If you get one. NOTE: If...
... service status, or try connecting again later. Follow the instructions on the screen and use the setup information provided by country. Contact your Internet connection: Windows 7 1. If you do not know which type of connection to select, click Help me choose or contact your ISP. 4. To set up a new ...connection or network→ Connect to the Internet. Setting Up Your Studio Laptop Setting Up Your Internet Connection ISPs and ISP offerings vary by your ISP to complete the setup. 18 If you get one. NOTE: If...
Setup Guide
Page 21
In the search box, type network, and then click Network and Sharing Center→ Set up a connection or network→ Connect to the Internet window appears. Follow the instructions on the screen and use the setup information provided by your ISP. 4. Setting Up Your Studio Laptop 19 Windows Vista 1. The Connect to the Internet. Save and close any open files, and exit any open programs. 2. Click Start → Control Panel. 3. NOTE: If you do not know which type of connection to select, click Help me choose or contact your ISP to complete the setup.
In the search box, type network, and then click Network and Sharing Center→ Set up a connection or network→ Connect to the Internet window appears. Follow the instructions on the screen and use the setup information provided by your ISP. 4. Setting Up Your Studio Laptop 19 Windows Vista 1. The Connect to the Internet. Save and close any open files, and exit any open programs. 2. Click Start → Control Panel. 3. NOTE: If you do not know which type of connection to select, click Help me choose or contact your ISP to complete the setup.
Setup Guide
Page 32
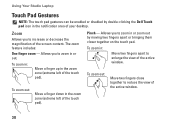
... the zoom zone (extreme left of the touch pad). Pinch - To zoom out: Move two fingers close together to reduce the view of the active window. 30 Allows you to increase or decrease the magnification of the screen content. To zoom in: Move a finger up in or zoom out by double...-clicking the Dell Touch pad icon in : Move two fingers apart to enlarge the view of the active window. To zoom in the notification area of your desktop. Using Your Studio Laptop Touch Pad Gestures NOTE: The touch pad gestures can be enabled...
... the zoom zone (extreme left of the touch pad). Pinch - To zoom out: Move two fingers close together to reduce the view of the active window. 30 Allows you to increase or decrease the magnification of the screen content. To zoom in: Move a finger up in or zoom out by double...-clicking the Dell Touch pad icon in : Move two fingers apart to enlarge the view of the active window. To zoom in the notification area of your desktop. Using Your Studio Laptop Touch Pad Gestures NOTE: The touch pad gestures can be enabled...
Setup Guide
Page 33
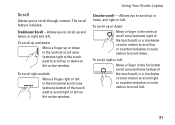
... right and left: Move a finger right or left in a clockwise circular motion to scroll right or counterclockwise circular motion to scroll left on the active window. To scroll right or left: Move a finger in the horizontal scroll zone (extreme bottom of the touch pad), in the horizontal scroll zone (extreme ...bottom of the touch pad) to scroll up or counterclockwise circular motion to scroll right or left . 31 Using Your Studio Laptop Circular scroll - To scroll up and down: Move a finger up or down in a clockwise circular motion to scroll up or down .
... right and left: Move a finger right or left in a clockwise circular motion to scroll right or counterclockwise circular motion to scroll left on the active window. To scroll right or left: Move a finger in the horizontal scroll zone (extreme bottom of the touch pad), in the horizontal scroll zone (extreme ...bottom of the touch pad) to scroll up or counterclockwise circular motion to scroll right or left . 31 Using Your Studio Laptop Circular scroll - To scroll up and down: Move a finger up or down in a clockwise circular motion to scroll up or down .
Setup Guide
Page 34
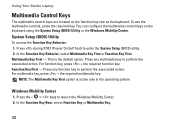
...+ the required multimedia key. This is active only in the operating system. Press any function key to launch the Windows Mobility Center. 2. Using Your Studio Laptop Multimedia Control Keys The multimedia control keys are located on the function key row on the keyboard using the System... Setup (BIOS) Utility or the Windows Mobility Center. Windows Mobility Center 1. You can configure the multimedia control keys on the ...
...+ the required multimedia key. This is active only in the operating system. Press any function key to launch the Windows Mobility Center. 2. Using Your Studio Laptop Multimedia Control Keys The multimedia control keys are located on the function key row on the keyboard using the System... Setup (BIOS) Utility or the Windows Mobility Center. Windows Mobility Center 1. You can configure the multimedia control keys on the ...
Setup Guide
Page 38
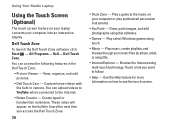
... Zone software click Start → All Programs→ Dell→ Dell Touch Zone. Capture home videos with the built-in the Dell Touch Zone: • Picture Viewer - Touch a link you access the Dell Touch Zone. 36 • Drum Zone - These notes will appear on your laptop converts ...the music on how to follow. • Help - Play select Windows games using multi-touch technology. View, organize, and edit pictures. • Dell Touch Cam - Browse the Internet using touch. • Music - Using Your Studio Laptop Using the Touch Screen (Optional) The touch screen feature on ...
... Zone software click Start → All Programs→ Dell→ Dell Touch Zone. Capture home videos with the built-in the Dell Touch Zone: • Picture Viewer - Touch a link you access the Dell Touch Zone. 36 • Drum Zone - These notes will appear on your laptop converts ...the music on how to follow. • Help - Play select Windows games using multi-touch technology. View, organize, and edit pictures. • Dell Touch Cam - Browse the Internet using touch. • Music - Using Your Studio Laptop Using the Touch Screen (Optional) The touch screen feature on ...
Setup Guide
Page 39
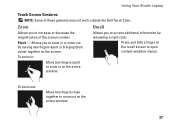
To zoom in: Allows you to increase or decrease the magnification of these gestures may not work outside the Dell Touch Zone. Using Your Studio Laptop Touch Screen Gestures NOTE: Some of the screen content. Move two fingers apart to zoom in or zoom out by simulating a right-click. Zoom... menus. Press and hold a finger on the active window. To zoom out: Move two fingers close together to zoom in on the touch screen to access additional information by moving two fingers apart or bringing them closer together on the active window. 37 Allows you to zoom out on the screen...
To zoom in: Allows you to increase or decrease the magnification of these gestures may not work outside the Dell Touch Zone. Using Your Studio Laptop Touch Screen Gestures NOTE: Some of the screen content. Move two fingers apart to zoom in or zoom out by simulating a right-click. Zoom... menus. Press and hold a finger on the active window. To zoom out: Move two fingers close together to zoom in on the touch screen to access additional information by moving two fingers apart or bringing them closer together on the active window. 37 Allows you to zoom out on the screen...

Setup Guide
Page 40
Scroll Vertical - Move two fingers in the desired direction to activate vertical scrolling. 38 Using Your Studio Laptop Scroll Allows you to scroll left or right to activate horizontal scrolling. Pan - Allows you to the left or right on the active window. Move a finger to scroll through content. Allows you to scroll up or down on the selected object when the entire object is not visible. Allows you to move the focus on the active window. Scroll Horizontal - Move a finger up or down to pan scroll the selected object.
Scroll Vertical - Move two fingers in the desired direction to activate vertical scrolling. 38 Using Your Studio Laptop Scroll Allows you to scroll left or right to activate horizontal scrolling. Pan - Allows you to the left or right on the active window. Move a finger to scroll through content. Allows you to scroll up or down on the selected object when the entire object is not visible. Allows you to move the focus on the active window. Scroll Horizontal - Move a finger up or down to pan scroll the selected object.

Setup Guide
Page 41
... flip content forward or backward based on the screen. Using Your Studio Laptop Flick Allows you to rotate the active content on the direction of the flick. Move a finger quickly in the desired direction to flip through content in the active window, like pages in an arced direction to rotate the active...
... flip content forward or backward based on the screen. Using Your Studio Laptop Flick Allows you to rotate the active content on the direction of the flick. Move a finger quickly in the desired direction to flip through content in the active window, like pages in an arced direction to rotate the active...
Setup Guide
Page 46
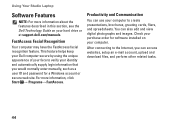
Using Your Studio Laptop Software Features NOTE: For more information, click Start → Programs→ FastAccess. You can use your computer to create presentations, brochures, greeting cards, fliers, and spreadsheets. Check your hard drive or at support.dell.com/manuals. After connecting to verify ..., you would normally enter manually, such as a user ID and password for software installed on your purchase order for a Windows account or secure web site. Productivity and Communication You can also edit and view digital photographs and images. FastAccess Facial Recognition ...
Using Your Studio Laptop Software Features NOTE: For more information, click Start → Programs→ FastAccess. You can use your computer to create presentations, brochures, greeting cards, fliers, and spreadsheets. Check your hard drive or at support.dell.com/manuals. After connecting to verify ..., you would normally enter manually, such as a user ID and password for software installed on your purchase order for a Windows account or secure web site. Productivity and Communication You can also edit and view digital photographs and images. FastAccess Facial Recognition ...
Setup Guide
Page 48
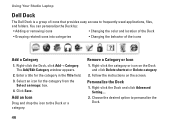
... to frequently-used applications, files, and folders. Add an Icon Drag and drop the icon to personalize the Dock. 46 The Add/Edit Category window appears. 2. Personalize the Dock 1. Enter a title for the category from the Select an image: box. 4. Select an icon for the category... in the Title field. 3. Click Save. Right-click the category or icon on the screen. Using Your Studio Laptop Dell Dock The Dell Dock is a group of the icons Add a Category 1. Right-click the Dock, click Add→ Category. Follow the instructions on the ...
... to frequently-used applications, files, and folders. Add an Icon Drag and drop the icon to personalize the Dock. 46 The Add/Edit Category window appears. 2. Personalize the Dock 1. Enter a title for the category from the Select an image: box. 4. Select an icon for the category... in the Title field. 3. Click Save. Right-click the category or icon on the screen. Using Your Studio Laptop Dell Dock The Dell Dock is a group of the icons Add a Category 1. Right-click the Dock, click Add→ Category. Follow the instructions on the ...

Setup Guide
Page 55
...least 8 to 10 seconds until the computer turns off and then restart your mouse, press the power button for an earlier Microsoft® Windows® operating system - Ensure that the power cable is no longer responding 4. CAUTION: You might lose data if you are unable ...computer. Solving Problems If the computer stops responding or a solid blue screen appears - If you are unable to an earlier version of Microsoft Windows operating system environments. 53 Press simultaneously. 2. Lockups and Software Problems If the computer does not start up - Click End Task. NOTE: ...
...least 8 to 10 seconds until the computer turns off and then restart your mouse, press the power button for an earlier Microsoft® Windows® operating system - Ensure that the power cable is no longer responding 4. CAUTION: You might lose data if you are unable ...computer. Solving Problems If the computer stops responding or a solid blue screen appears - If you are unable to an earlier version of Microsoft Windows operating system environments. 53 Press simultaneously. 2. Lockups and Software Problems If the computer does not start up - Click End Task. NOTE: ...
Setup Guide
Page 56
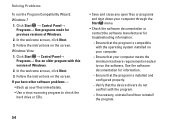
... information: --Ensure that the program is installed and configured properly. --Verify that the device drivers do not conflict with this version of Windows. 2. Click Start → Control Panel→ Programs→ Use an older program with the program. --If necessary, uninstall and then... reinstall the program. 54 Follow the instructions on the screen. See the software documentation for previous versions of Windows. 2. If you have other software problems - • Back up your files immediately. • Use a virus-scanning program to check the...
... information: --Ensure that the program is installed and configured properly. --Verify that the device drivers do not conflict with this version of Windows. 2. Click Start → Control Panel→ Programs→ Use an older program with the program. --If necessary, uninstall and then... reinstall the program. 54 Follow the instructions on the screen. See the software documentation for previous versions of Windows. 2. If you have other software problems - • Back up your files immediately. • Use a virus-scanning program to check the...
Setup Guide
Page 57
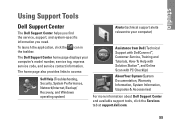
... (System Documentation, Warranty Information, System Information, Upgrades & Accessories) For more information about Dell Support Center and available support tools, click the Services tab at support.dell.com. 55 To launch the application, click the icon in the taskbar. Using Support ...Tools Dell Support Center The Dell Support Center helps you find the service, support, and system-specific information you need. The home page also provides links to access: Self Help (Troubleshooting, Security, System Performance, Network/Internet, Backup/ Recovery, and Windows operating system...
... (System Documentation, Warranty Information, System Information, Upgrades & Accessories) For more information about Dell Support Center and available support tools, click the Services tab at support.dell.com. 55 To launch the application, click the icon in the taskbar. Using Support ...Tools Dell Support Center The Dell Support Center helps you find the service, support, and system-specific information you need. The home page also provides links to access: Self Help (Troubleshooting, Security, System Performance, Network/Internet, Backup/ Recovery, and Windows operating system...

Setup Guide
Page 62
...and Utilities disc. If PSA is displayed: "Booting Dell Diagnostic Utility Partition. b. Select the test you are experiencing memory issues press , otherwise press . If you want to continue? (Recommended)." Press any key to go to the Choose An Option window. 4. Write down your hard drive and to ...go to the Choose An Option window. Using Support Tools NOTE: If you wait too long and the operating system logo appears, continue to wait until you see "Contacting Dell" on your computer and try again. The following message is encountered during a test...
...and Utilities disc. If PSA is displayed: "Booting Dell Diagnostic Utility Partition. b. Select the test you are experiencing memory issues press , otherwise press . If you want to continue? (Recommended)." Press any key to go to the Choose An Option window. 4. Write down your hard drive and to ...go to the Choose An Option window. Using Support Tools NOTE: If you wait too long and the operating system logo appears, continue to wait until you see "Contacting Dell" on your computer and try again. The following message is encountered during a test...


