Setup Guide
Page 16
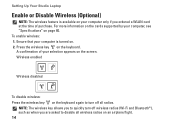
Setting Up Your Studio Laptop Enable or Disable Wireless (Optional) NOTE: The wireless feature is turned on an airplane flight. 14 To enable wireless: 1. Press the wireless key on the keyboard again to disable all radios. A confirmation of purchase. Wireless enabled Wireless disabled To disable wireless: Press the wireless key on the keyboard. Ensure...
Setting Up Your Studio Laptop Enable or Disable Wireless (Optional) NOTE: The wireless feature is turned on an airplane flight. 14 To enable wireless: 1. Press the wireless key on the keyboard again to disable all radios. A confirmation of purchase. Wireless enabled Wireless disabled To disable wireless: Press the wireless key on the keyboard. Ensure...
Setup Guide
Page 24
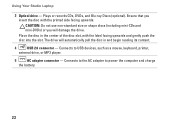
... and gently push the disc into the slot. The drive will damage the drive. Connects to the AC adapter to USB devices, such as a mouse, keyboard, printer, external drive, or MP3 player. 5 AC adapter connector - Using Your Studio Laptop 3 Optical drive - Plays or records CDs, DVDs, and Blu-ray Discs (optional).
... and gently push the disc into the slot. The drive will damage the drive. Connects to the AC adapter to USB devices, such as a mouse, keyboard, printer, external drive, or MP3 player. 5 AC adapter connector - Using Your Studio Laptop 3 Optical drive - Plays or records CDs, DVDs, and Blu-ray Discs (optional).
Setup Guide
Page 27
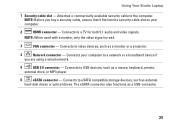
Connects to a TV for both 5.1 audio and video signals. Connects to video devices, such as a mouse, keyboard, printer, external drive, or MP3 player. 6 eSATA connector - Connects to a network or a broadband device if you buy a security cable, ensure that it fits ...functions as external hard-disk drives or optical drives. NOTE: When used with a monitor, only the video signal is read. 3 VGA connector - Using Your Studio Laptop 1 Security cable slot - Attaches a commercially available security cable to eSATA compatible storage devices, such as a USB connector. 25
Connects to a TV for both 5.1 audio and video signals. Connects to video devices, such as a mouse, keyboard, printer, external drive, or MP3 player. 6 eSATA connector - Connects to a network or a broadband device if you buy a security cable, ensure that it fits ...functions as external hard-disk drives or optical drives. NOTE: When used with a monitor, only the video signal is read. 3 VGA connector - Using Your Studio Laptop 1 Security cable slot - Attaches a commercially available security cable to eSATA compatible storage devices, such as a USB connector. 25
Setup Guide
Page 31
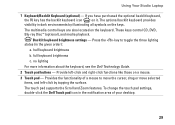
... on a mouse. 3 Touch pad - The multimedia control keys are also located on it. Backlit keyboard brightness settings - To change the touch pad settings, double-click the Dell Touch pad icon in the given order): a. Using Your Studio Laptop 1 Keyboard/Backlit Keyboard (optional) - Press the key to move the cursor, drag or move selected items, and...
... on a mouse. 3 Touch pad - The multimedia control keys are also located on it. Backlit keyboard brightness settings - To change the touch pad settings, double-click the Dell Touch pad icon in the given order): a. Using Your Studio Laptop 1 Keyboard/Backlit Keyboard (optional) - Press the key to move the cursor, drag or move selected items, and...
Setup Guide
Page 34
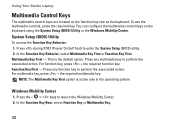
...First. Function Key First - NOTE: The Multimedia Key First option is the default option. You can configure the multimedia control keys on the keyboard. Press any function key to enter the System Setup (BIOS) utility. 2. In the Function Key Row, select Function Key or Multimedia Key...Behavior: 1. This is active only in the operating system. Windows Mobility Center 1. Using Your Studio Laptop Multimedia Control Keys The multimedia control keys are located on the function key row on the keyboard using the System Setup (BIOS) Utility or the Windows Mobility Center. For function key, ...
...First. Function Key First - NOTE: The Multimedia Key First option is the default option. You can configure the multimedia control keys on the keyboard. Press any function key to enter the System Setup (BIOS) utility. 2. In the Function Key Row, select Function Key or Multimedia Key...Behavior: 1. This is active only in the operating system. Windows Mobility Center 1. Using Your Studio Laptop Multimedia Control Keys The multimedia control keys are located on the function key row on the keyboard using the System Setup (BIOS) Utility or the Windows Mobility Center. For function key, ...
Setup Guide
Page 43
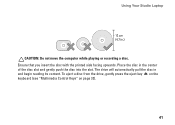
Ensure that you insert the disc with the printed side facing upwards. Place the disc in and begin reading its content. To eject a disc from the drive, gently press the eject key on the keyboard (see "Multimedia Control Keys" on page 32). 41 The drive will automatically pull the disc in the center of the disc slot and gently push the disc into the slot. Using Your Studio Laptop CAUTION: Do not move the computer while playing or recording a disc.
Ensure that you insert the disc with the printed side facing upwards. Place the disc in and begin reading its content. To eject a disc from the drive, gently press the eject key on the keyboard (see "Multimedia Control Keys" on page 32). 41 The drive will automatically pull the disc in the center of the disc slot and gently push the disc into the slot. Using Your Studio Laptop CAUTION: Do not move the computer while playing or recording a disc.
Setup Guide
Page 54
... page 59). • If the problem persists, contact Dell (see "Contacting Dell" on page 76). 52 Memory Problems If you receive an insufficient memory message - • Save and close any open files and exit any open programs you are : • Power, keyboard, and mouse extension cables. • Too many devices ...If the display is blinking white - The computer is in standby state or the display may not be responding. • Press a key on the keyboard, move the connected mouse or a finger on the touch pad, or press the power button to see if that hinders reception on your computer - ...
... page 59). • If the problem persists, contact Dell (see "Contacting Dell" on page 76). 52 Memory Problems If you receive an insufficient memory message - • Save and close any open files and exit any open programs you are : • Power, keyboard, and mouse extension cables. • Too many devices ...If the display is blinking white - The computer is in standby state or the display may not be responding. • Press a key on the keyboard, move the connected mouse or a finger on the touch pad, or press the power button to see if that hinders reception on your computer - ...

Setup Guide
Page 55
... necessary, uninstall and then reinstall the program. If a program is no longer responding 4. Click the program that it runs in its documentation or on your keyboard or moving your mouse, press the power button for an earlier Microsoft® Windows® operating system - Solving Problems If the computer stops responding or...
... necessary, uninstall and then reinstall the program. If a program is no longer responding 4. Click the program that it runs in its documentation or on your keyboard or moving your mouse, press the power button for an earlier Microsoft® Windows® operating system - Solving Problems If the computer stops responding or...
Setup Guide
Page 59
...the CPU fan (see "Contacting Dell" on page 76). Hard-disk drive read failure - Keyboard failure or loose cable. Replace the battery (see the Service Manual at support.dell.com/manuals) or contact Dell (see the Service Manual at support.dell.com/manuals). 57 Possible system ...board failure or RTC battery low. Using Support Tools Keyboard failure - No boot device available - Possible hard drive failure during POST. Contact Dell (see the Dell Technology Guide available on page 76). No bootable partition on hard drive, the hard ...
...the CPU fan (see "Contacting Dell" on page 76). Hard-disk drive read failure - Keyboard failure or loose cable. Replace the battery (see the Service Manual at support.dell.com/manuals) or contact Dell (see the Service Manual at support.dell.com/manuals). 57 Possible system ...board failure or RTC battery low. Using Support Tools Keyboard failure - No boot device available - Possible hard drive failure during POST. Contact Dell (see the Dell Technology Guide available on page 76). No bootable partition on hard drive, the hard ...
Setup Guide
Page 71
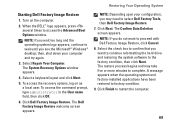
...continue to wait until you may take five or more minutes to complete. Select Repair Your Computer. The Dell Factory Image Restore welcome screen appears. Click Next. Select a keyboard layout and click Next. 5. NOTE: Depending upon your computer and try again. 3. To access the... recovery options, log on the computer. 2. Click Dell Factory Image Restore. The Confirm Data Deletion screen appears. To ...
...continue to wait until you may take five or more minutes to complete. Select Repair Your Computer. The Dell Factory Image Restore welcome screen appears. Click Next. Select a keyboard layout and click Next. 5. NOTE: Depending upon your computer and try again. 3. To access the... recovery options, log on the computer. 2. Click Dell Factory Image Restore. The Confirm Data Deletion screen appears. To ...

Setup Guide
Page 77
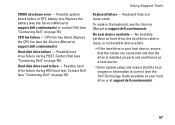
... of your Service Tag (located at the bottom of the computer): • Express Service Code: • Return Material Authorization Number (if provided by Dell support technician): • Operating system and version: • Devices: • Expansion cards: • Are you call. Yes /No • ...8226; Programs and versions: 75 Ensure that the computer documentation is available. You may be asked to type some commands at the keyboard, relay detailed information during operations, or try other troubleshooting steps possible only at or near the computer. Remember to a network? You...
... of your Service Tag (located at the bottom of the computer): • Express Service Code: • Return Material Authorization Number (if provided by Dell support technician): • Operating system and version: • Devices: • Expansion cards: • Are you call. Yes /No • ...8226; Programs and versions: 75 Ensure that the computer documentation is available. You may be asked to type some commands at the keyboard, relay detailed information during operations, or try other troubleshooting steps possible only at or near the computer. Remember to a network? You...
Setup Guide
Page 88
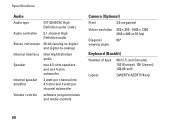
... program menus and media controls Camera (Optional) Pixel 2.0 megapixel Video resolution 320 x 240 ~1600 x 1200 (640 x 480 at 30 fps) Diagonal 66° viewing angle Keyboard (Backlit) Number of keys 86 (U.S. and Canada); 102 (Europe); 105 (Japan); 104 (Brazil) Layout QWERTY/AZERTY/Kanji 86
... program menus and media controls Camera (Optional) Pixel 2.0 megapixel Video resolution 320 x 240 ~1600 x 1200 (640 x 480 at 30 fps) Diagonal 66° viewing angle Keyboard (Backlit) Number of keys 86 (U.S. and Canada); 102 (Europe); 105 (Japan); 104 (Brazil) Layout QWERTY/AZERTY/Kanji 86

Setup Guide
Page 89
.../30 HD+/FHD: 50/50 Pixel pitch HD: 0.252 x 0.252 mm HD+: 0.215 x 0.215 mm FHD: 0.18 x 0.18 mm Controls brightness can be controlled through keyboard shortcuts (see the Dell Technology Guide for more information) 87
.../30 HD+/FHD: 50/50 Pixel pitch HD: 0.252 x 0.252 mm HD+: 0.215 x 0.215 mm FHD: 0.18 x 0.18 mm Controls brightness can be controlled through keyboard shortcuts (see the Dell Technology Guide for more information) 87


