
Setup Guide
Page 5
...6 Connect the Network Cable (optional 7 Press the Power Button 7 Microsoft® Windows® Setup 8 Connect to the Internet (Optional 8 Using Your Inspiron Laptop 12 Device Status Lights 12 Right Side Features 14 Left Side Features 16 Front Side Features 18 Computer Base and Keyboard Features 19 Media... Features 21 Removing and Replacing the Battery 22 Software Features 23 Solving Problems 26 Network Problems 26 Power Problems 28 Memory Problems 29 Lockups and Software Problems 30 Dell Support Center 33 System Messages 33 Using Support Tools 33 Hardware Troubleshooter 35...
...6 Connect the Network Cable (optional 7 Press the Power Button 7 Microsoft® Windows® Setup 8 Connect to the Internet (Optional 8 Using Your Inspiron Laptop 12 Device Status Lights 12 Right Side Features 14 Left Side Features 16 Front Side Features 18 Computer Base and Keyboard Features 19 Media... Features 21 Removing and Replacing the Battery 22 Software Features 23 Solving Problems 26 Network Problems 26 Power Problems 28 Memory Problems 29 Lockups and Software Problems 30 Dell Support Center 33 System Messages 33 Using Support Tools 33 Hardware Troubleshooter 35...

Setup Guide
Page 21
xD 8-in-1 Media card reader - H) Using Your Inspiron Laptop Computer Base and Keyboard Features 2 1 1 Keyboard - Controls CD, DVD, and media playback. 19 M and type - The settings for this keyboard can be personalized by using Dell QuickSet. MS/Pro - 7 SD/MMC - Provides a fast and ...convenient way to view and share digital photos, music, videos, and documents stored on the following digital memory cards: • Secure digital (SD) memory card • SDHC (Secure Digital High...
xD 8-in-1 Media card reader - H) Using Your Inspiron Laptop Computer Base and Keyboard Features 2 1 1 Keyboard - Controls CD, DVD, and media playback. 19 M and type - The settings for this keyboard can be personalized by using Dell QuickSet. MS/Pro - 7 SD/MMC - Provides a fast and ...convenient way to view and share digital photos, music, videos, and documents stored on the following digital memory cards: • Secure digital (SD) memory card • SDHC (Secure Digital High...

Setup Guide
Page 30
The display may have to remove and then reinstall the memory modules (for information on removing and replacing memory modules, see "Contacting Dell" on the trackpad or a connected mouse, or press the power button to verify that the computer turns on properly. • Ensure that ... computer is blinking white - Press a key on the keyboard, move the pointer on page 50. For assistance contact Dell, see the Service Manual on the Dell Support website at support.dell.com). 28 The computer is solid amber - If the power light is receiving electrical power, but a device might be...
The display may have to remove and then reinstall the memory modules (for information on removing and replacing memory modules, see "Contacting Dell" on the trackpad or a connected mouse, or press the power button to verify that the computer turns on properly. • Ensure that ... computer is blinking white - Press a key on the keyboard, move the pointer on page 50. For assistance contact Dell, see the Service Manual on the Dell Support website at support.dell.com). 28 The computer is solid amber - If the power light is receiving electrical power, but a device might be...
Setup Guide
Page 31
...interference that hinders reception on the Dell Support website at support.dell.com) to ensure that resolves the problem. • See the software documentation for minimum memory requirements. Some possible causes of memory supported by interrupting or blocking other memory problems - • Ensure ...computer. For more information about the type of interference are following the memory installation guidelines (see the Service Manual on the Dell Support website at support.dell.com). • Reseat the memory modules (See the Service Manual on your computer - If necessary, ...
...interference that hinders reception on the Dell Support website at support.dell.com) to ensure that resolves the problem. • See the software documentation for minimum memory requirements. Some possible causes of memory supported by interrupting or blocking other memory problems - • Ensure ...computer. For more information about the type of interference are following the memory installation guidelines (see the Service Manual on the Dell Support website at support.dell.com). • Reseat the memory modules (See the Service Manual on your computer - If necessary, ...
Setup Guide
Page 32
End the program: 1. If a program crashes repeatedly - Then restart your computer is successfully communicating with the memory. Click End Task. NOTICE: You might lose data if you are unable to perform an operating system shutdown. Click the program that the power ... on your keyboard or moving your mouse, press and hold the power button for at support.dell.com) to ensure that your computer. 30 Solving Problems • Reseat the memory modules (see the Service Manual on the Dell Support website at least 8 to 10 seconds until the computer turns off . If necessary, ...
End the program: 1. If a program crashes repeatedly - Then restart your computer is successfully communicating with the memory. Click End Task. NOTICE: You might lose data if you are unable to perform an operating system shutdown. Click the program that the power ... on your keyboard or moving your mouse, press and hold the power button for at support.dell.com) to ensure that your computer. 30 Solving Problems • Reseat the memory modules (see the Service Manual on the Dell Support website at least 8 to 10 seconds until the computer turns off . If necessary, ...
Setup Guide
Page 54
...NOTE: Drivers and documentation updates can be found on the Dell™ Support website at support.dell.com. upgrade your computer. 52 Check your warranty and return policies before working inside your computer with new or additional memory, or a new hard drive. NOTE: In some countries,... opening and replacing parts of your computer may void your operating system. INSPIRON Finding ...
...NOTE: Drivers and documentation updates can be found on the Dell™ Support website at support.dell.com. upgrade your computer. 52 Check your warranty and return policies before working inside your computer with new or additional memory, or a new hard drive. NOTE: In some countries,... opening and replacing parts of your computer may void your operating system. INSPIRON Finding ...

Setup Guide
Page 57
... 2 GB 667 MHz DDR2 SODIMM 1 GB, 1.5 GB, 2 GB, 3 GB, 4 GB 4 GB NOTE: For instructions on upgrading your memory, see the Service Manual on the Dell Support website at support.dell.com. NOTE: In order to take advantage of the dual channel bandwidth capability, both memory slots must be populated and must match in size. 55
... 2 GB 667 MHz DDR2 SODIMM 1 GB, 1.5 GB, 2 GB, 3 GB, 4 GB 4 GB NOTE: For instructions on upgrading your memory, see the Service Manual on the Dell Support website at support.dell.com. NOTE: In order to take advantage of the dual channel bandwidth capability, both memory slots must be populated and must match in size. 55

Setup Guide
Page 59
Video video controller video memory LCD interface TV support ATI Radeon® X1270 Graphics Controller (AMD) or Intel 965 GM (Intel) dynamic based on system memory capacity LVDS NTSC or PAL in S-video, composite, and component modes Basic Specifications Camera (optional) Pixel Video resolution Diagonal viewing angle Audio Audio type Audio controller Internal Interface External Interface 2.0 megapixel 640x480 at 30fps 66° 2 channel High Definition Audio Sigmatel STAC9228 Codec Intel High Definition Audio microphone-in connector, stereo headphones/ speakers connector 57
Video video controller video memory LCD interface TV support ATI Radeon® X1270 Graphics Controller (AMD) or Intel 965 GM (Intel) dynamic based on system memory capacity LVDS NTSC or PAL in S-video, composite, and component modes Basic Specifications Camera (optional) Pixel Video resolution Diagonal viewing angle Audio Audio type Audio controller Internal Interface External Interface 2.0 megapixel 640x480 at 30fps 66° 2 channel High Definition Audio Sigmatel STAC9228 Codec Intel High Definition Audio microphone-in connector, stereo headphones/ speakers connector 57
Setup Guide
Page 67
Dell support website 53 Dell Technology Guide for further information 52 Diagnostic Checklist 49 drivers and downloads 53 DVDs, playing and creating 23 E email addresses for technical support 47 energy conserving 24 expansion bus 56 F finding more information 52 FTP login, anonymous 47 H hardware problems diagnosing 35 Hardware Troubleshooter 35 help getting assistance and support 46 I Internet connection 8 ISP Internet Service Provider 8 M memory problems solving 29 memory support 55 Index 65
Dell support website 53 Dell Technology Guide for further information 52 Diagnostic Checklist 49 drivers and downloads 53 DVDs, playing and creating 23 E email addresses for technical support 47 energy conserving 24 expansion bus 56 F finding more information 52 FTP login, anonymous 47 H hardware problems diagnosing 35 Hardware Troubleshooter 35 help getting assistance and support 46 I Internet connection 8 ISP Internet Service Provider 8 M memory problems solving 29 memory support 55 Index 65
Service Manual
Page 1
... your computer. is subject to change without the written permission of Dell Inc.; Trademarks used in the United States and/or other than its own. Dell™ Inspiron™ 1525/1526 Service Manual Before You Begin Subscriber Identity Module (Optional) ExpressCards Using the Memory Card Reader Optical Drive Hard Drive Center Control Cover Internal Card...
... your computer. is subject to change without the written permission of Dell Inc.; Trademarks used in the United States and/or other than its own. Dell™ Inspiron™ 1525/1526 Service Manual Before You Begin Subscriber Identity Module (Optional) ExpressCards Using the Memory Card Reader Optical Drive Hard Drive Center Control Cover Internal Card...
Service Manual
Page 2
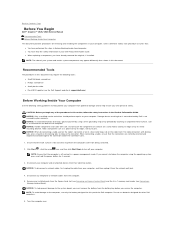
...must remove the battery from the ExpressCard slot (see Removing an ExpressCard or Blank) and the 8-in-1 memory card reader (see the Dell Support website at support.dell.com) Before Working Inside Your Computer Use the following safety guidelines to help protect your system and certain system... then click Shut Down to turn off and not in a power management mode. Back to Contents Page Before You Begin Dell™ Inspiron™ 1525/1526 Service Manual Recommended Tools Before Working Inside Your Computer This document provides procedures for removing and installing the components in your...
...must remove the battery from the ExpressCard slot (see Removing an ExpressCard or Blank) and the 8-in-1 memory card reader (see the Dell Support website at support.dell.com) Before Working Inside Your Computer Use the following safety guidelines to help protect your system and certain system... then click Shut Down to turn off and not in a power management mode. Back to Contents Page Before You Begin Dell™ Inspiron™ 1525/1526 Service Manual Recommended Tools Before Working Inside Your Computer This document provides procedures for removing and installing the components in your...

Service Manual
Page 8
... to Contents Page Using the Memory Card Reader Dell™ Inspiron™ 1525/1526 Service Manual Removing a Memory Card or Blank CAUTION: Before you begin any of the procedures in this section, follow the safety instructions in the Product Information Guide. NOTICE: Use the memory card configuration utility (click the... as a triangle or an arrow) or a label to indicate which end to release it from the card reader. You can install a memory card in its connector. If card orientation is partially ejected, remove the card. If you encounter too much resistance, do not stop it ...
... to Contents Page Using the Memory Card Reader Dell™ Inspiron™ 1525/1526 Service Manual Removing a Memory Card or Blank CAUTION: Before you begin any of the procedures in this section, follow the safety instructions in the Product Information Guide. NOTICE: Use the memory card configuration utility (click the... as a triangle or an arrow) or a label to indicate which end to release it from the card reader. You can install a memory card in its connector. If card orientation is partially ejected, remove the card. If you encounter too much resistance, do not stop it ...
Service Manual
Page 11
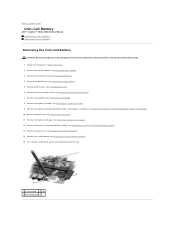
... the system board (see Removing the Hard Drive). 4. Remove the center control cover (see Removing Mini-Card). 6. Remove all memory module (see Removing the Internal Card With Bluetooth® Wireless Technology). 10. Remove the display assembly (see Removing the ExpressCard Cage...see Removing Memory Module). 3. Remove all Mini-Cards (see Removing the Center Control Cover). 7. Remove the processor thermal-cooling assembly (see Removing the Processor Thermal-Cooling Assembly). 13. Use a plastic scribe to Contents Page Coin-Cell Battery Dell™ Inspiron™ 1525/1526 ...
... the system board (see Removing the Hard Drive). 4. Remove the center control cover (see Removing Mini-Card). 6. Remove all memory module (see Removing the Internal Card With Bluetooth® Wireless Technology). 10. Remove the display assembly (see Removing the ExpressCard Cage...see Removing Memory Module). 3. Remove all Mini-Cards (see Removing the Center Control Cover). 7. Remove the processor thermal-cooling assembly (see Removing the Processor Thermal-Cooling Assembly). 13. Use a plastic scribe to Contents Page Coin-Cell Battery Dell™ Inspiron™ 1525/1526 ...
Service Manual
Page 29
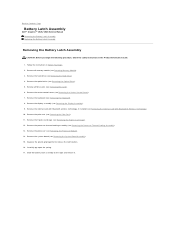
... Remove the palm rest (see Removing the System Board Assembly). 15. Follow the instructions in the Product Information Guide. 1. Remove all memory module (see Removing the ExpressCard Cage). 12. Remove the keyboard (see Removing the Hard Drive). 4. Remove the hard drive (see ...Assembly). 9. Remove the display assembly (see Removing the Processor Module). 14. Back to Contents Page Battery Latch Assembly Dell™ Inspiron™ 1525/1526 Service Manual Removing the Battery Latch Assembly Replacing the Battery Latch Assembly Removing the Battery Latch Assembly CAUTION: Before ...
... Remove the palm rest (see Removing the System Board Assembly). 15. Follow the instructions in the Product Information Guide. 1. Remove all memory module (see Removing the ExpressCard Cage). 12. Remove the keyboard (see Removing the Hard Drive). 4. Remove the hard drive (see ...Assembly). 9. Remove the display assembly (see Removing the Processor Module). 14. Back to Contents Page Battery Latch Assembly Dell™ Inspiron™ 1525/1526 Service Manual Removing the Battery Latch Assembly Replacing the Battery Latch Assembly Removing the Battery Latch Assembly CAUTION: Before ...

Service Manual
Page 31
Back to Contents Page Memory Dell™ Inspiron™ 1525/1526 Service Manual CAUTION: Before you install a module in the connector labeled "DIMMB." NOTE: Memory modules purchased from Dell are intended for information on the memory supported by installing memory modules on the system board. Removing Memory Module The memory modules are located under your Owner's Manual for your computer. Follow...
Back to Contents Page Memory Dell™ Inspiron™ 1525/1526 Service Manual CAUTION: Before you install a module in the connector labeled "DIMMB." NOTE: Memory modules purchased from Dell are intended for information on the memory supported by installing memory modules on the system board. Removing Memory Module The memory modules are located under your Owner's Manual for your computer. Follow...

Service Manual
Page 32
NOTE: If the memory module is difficult to your computer. 3. Align the notch in the module edge connector with the tab in the computer, click Start ® Help and Support® Dell System Information. No error message indicates this failure. 1 tab 2 notch NOTICE: If ... battery bay, or connect the AC adapter to close may not boot. As the computer boots, it . 1 securing clips (2) 2 memory module Replacing Memory Module NOTICE: To avoid electrostatic discharge, ground yourself by using a wrist grounding strap or by periodically touching an unpainted metal surface (such ...
NOTE: If the memory module is difficult to your computer. 3. Align the notch in the module edge connector with the tab in the computer, click Start ® Help and Support® Dell System Information. No error message indicates this failure. 1 tab 2 notch NOTICE: If ... battery bay, or connect the AC adapter to close may not boot. As the computer boots, it . 1 securing clips (2) 2 memory module Replacing Memory Module NOTICE: To avoid electrostatic discharge, ground yourself by using a wrist grounding strap or by periodically touching an unpainted metal surface (such ...
Service Manual
Page 46
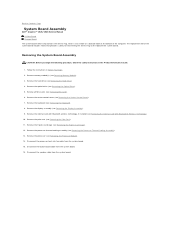
... the Service Tag to Contents Page System Board Assembly Dell™ Inspiron™ 1525/1526 Service Manual S-Video Board Charger Board The system board's BIOS chip contains the Service Tag, which is also visible on a barcode label on the bottom of the computer. Remove memory module(s) (see Removing the Processor Module). 14. Remove all...
... the Service Tag to Contents Page System Board Assembly Dell™ Inspiron™ 1525/1526 Service Manual S-Video Board Charger Board The system board's BIOS chip contains the Service Tag, which is also visible on a barcode label on the bottom of the computer. Remove memory module(s) (see Removing the Processor Module). 14. Remove all...
Service Manual
Page 48
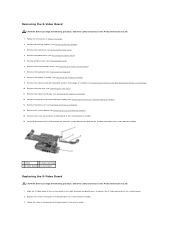
...Remove all Mini-Cards (see Removing the Internal Card With Bluetooth® Wireless Technology). 10. Remove the optical drive (see Removing Memory Module). 3. Remove the ExpressCard cage (see Removing the Center Control Cover). 7. Remove the center control cover (see Removing the ...in Removing the S-Video Board in the right direction and gently press to connect the S-Video connector to the system board. 2. Remove all memory modules (see Removing the Optical Drive). 5. Remove the system board (see Removing the Hard Drive). 4. Follow the instructions in Before You Begin...
...Remove all Mini-Cards (see Removing the Internal Card With Bluetooth® Wireless Technology). 10. Remove the optical drive (see Removing Memory Module). 3. Remove the ExpressCard cage (see Removing the Center Control Cover). 7. Remove the center control cover (see Removing the ...in Removing the S-Video Board in the right direction and gently press to connect the S-Video connector to the system board. 2. Remove all memory modules (see Removing the Optical Drive). 5. Remove the system board (see Removing the Hard Drive). 4. Follow the instructions in Before You Begin...
Service Manual
Page 49
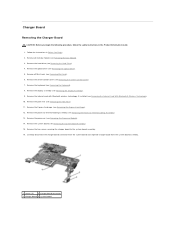
...following procedure, follow the safety instructions in Before You Begin. 2. Follow the instructions in the Product Information Guide. 1. Remove all memory module (see Removing the Processor Thermal-Cooling Assembly). 13. Remove the palm rest (see Removing the System Board Assembly). 15.... Remove the processor thermal-cooling assembly (see Removing Memory Module). 3. Carefully disconnect the charger board connector from the system board and seperate charger board from the system board assembly. 1 screws ...
...following procedure, follow the safety instructions in Before You Begin. 2. Follow the instructions in the Product Information Guide. 1. Remove all memory module (see Removing the Processor Thermal-Cooling Assembly). 13. Remove the palm rest (see Removing the System Board Assembly). 15.... Remove the processor thermal-cooling assembly (see Removing Memory Module). 3. Carefully disconnect the charger board connector from the system board and seperate charger board from the system board assembly. 1 screws ...


