User Guide
Page 4
Adjusting Projection Image Size 18 Using the Control Panel 20 Using the Remote Control 22 Installing the Remote Control Batteries 24 Operating Range With Remote Control 25 Using the On-Screen Display 26 Input Source 26 Auto Adjust 27 Brightness/Contrast 28 Video Mode 28 Volume 29 Advanced Settings 29 Language 43 Help 43 4 Troubleshooting Your Projector 44 Guiding Signals 48 Changing the Lamp 49 5 Specifications 51 6 Contacting Dell 57 7 Appendix: Glossary 58 4 Contents
Adjusting Projection Image Size 18 Using the Control Panel 20 Using the Remote Control 22 Installing the Remote Control Batteries 24 Operating Range With Remote Control 25 Using the On-Screen Display 26 Input Source 26 Auto Adjust 27 Brightness/Contrast 28 Video Mode 28 Volume 29 Advanced Settings 29 Language 43 Help 43 4 Troubleshooting Your Projector 44 Guiding Signals 48 Changing the Lamp 49 5 Specifications 51 6 Contacting Dell 57 7 Appendix: Glossary 58 4 Contents
User Guide
Page 7
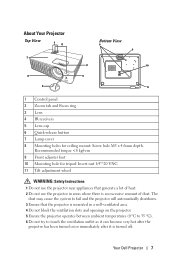
Recommended torque About Your Projector Top View 1 4 7 Bottom View 8 9 2 10 6 3 5 11 1 Control panel 2 Zoom tab and Focus ring 3 Lens 4 IR receivers 5 Lens cap 6 Quick-release button 7 Lamp cover 8 Mounting holes for ceiling mount: Screw hole M3 x 4.6mm depth.
Recommended torque About Your Projector Top View 1 4 7 Bottom View 8 9 2 10 6 3 5 11 1 Control panel 2 Zoom tab and Focus ring 3 Lens 4 IR receivers 5 Lens cap 6 Quick-release button 7 Lamp cover 8 Mounting holes for ceiling mount: Screw hole M3 x 4.6mm depth.
User Guide
Page 15
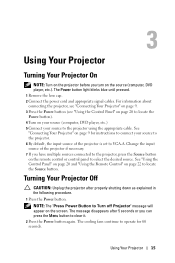
Change the input source of the projector is set to VGA-A. See "Using the Control Panel" on page 20 and "Using the Remote Control" on the source (computer, DVD player, etc.). Using Your Projector 15 The cooling fans continue to operate for instructions to connect your source to the projector using the appropriate cable. 3 Using Your Projector Turning Your Projector On NOTE: Turn on the projector before you turn on page 22 to locate the Source button. For information about connecting the projector, see "Connecting Your Projector" on...
Change the input source of the projector is set to VGA-A. See "Using the Control Panel" on page 20 and "Using the Remote Control" on the source (computer, DVD player, etc.). Using Your Projector 15 The cooling fans continue to operate for instructions to connect your source to the projector using the appropriate cable. 3 Using Your Projector Turning Your Projector On NOTE: Turn on the projector before you turn on page 22 to locate the Source button. For information about connecting the projector, see "Connecting Your Projector" on...
User Guide
Page 20
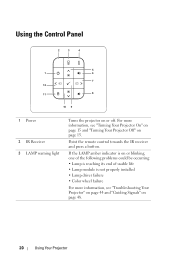
... life • Lamp module is not properly installed • Lamp driver failure • Color wheel failure For more information, see "Troubleshooting Your Projector" on page 44 and "Guiding Signals" on page 48. 20 Using Your Projector For more information, see "Turning Your Projector On" on page 15 and "Turning Your Projector Off" on or off. Point the remote control towards the IR receiver and press a button. Using the Control Panel 2 3 4 5 1 6 7 12 11 8 10 9 1 Power 2 IR Receiver 3 LAMP warning light Turns...
... life • Lamp module is not properly installed • Lamp driver failure • Color wheel failure For more information, see "Troubleshooting Your Projector" on page 44 and "Guiding Signals" on page 48. 20 Using Your Projector For more information, see "Turning Your Projector On" on page 15 and "Turning Your Projector Off" on or off. Point the remote control towards the IR receiver and press a button. Using the Control Panel 2 3 4 5 1 6 7 12 11 8 10 9 1 Power 2 IR Receiver 3 LAMP warning light Turns...
User Guide
Page 21
... On-Screen Display (OSD) Menu items. Press to synchronize the projector to the input source. 8 Volume down 9 Enter 10 Down / Keystone adjustment 11 Menu 12 Left / Source NOTE: Auto Adjust does not operate if the on-screen display (OSD) is too high • Color wheel failure For more information, see "Troubleshooting Your Projector" on page 44 and "Guiding Signals" on page 48. 5 Up / Keystone adjustment Press to navigate through the On-Screen Display (OSD) Menu items. Press to adjust image...
... On-Screen Display (OSD) Menu items. Press to synchronize the projector to the input source. 8 Volume down 9 Enter 10 Down / Keystone adjustment 11 Menu 12 Left / Source NOTE: Auto Adjust does not operate if the on-screen display (OSD) is too high • Color wheel failure For more information, see "Troubleshooting Your Projector" on page 44 and "Guiding Signals" on page 48. 5 Up / Keystone adjustment Press to navigate through the On-Screen Display (OSD) Menu items. Press to adjust image...

User Guide
Page 26
... the or buttons on the control panel or the remote control. Input Source The Input Source menu allows you 26 Using Your Projector Menu Input Source Auto Adjust Brightness/Contrast Video Mode Volume Advanced Settings Language Help Auto Source VGA-A VGA-B Composite S-Video Dell 1420X Resolution: 1400x1050 AUTO SOURCE-Select Off (the default) to dark blue. NOTE: OSD structure and set to Off, you press the Source button when the Auto Source mode is selected, the color changes to dark blue. • Use the or buttons on the control panel or remote control to adjust the settings. •...
... the or buttons on the control panel or the remote control. Input Source The Input Source menu allows you 26 Using Your Projector Menu Input Source Auto Adjust Brightness/Contrast Video Mode Volume Advanced Settings Language Help Auto Source VGA-A VGA-B Composite S-Video Dell 1420X Resolution: 1400x1050 AUTO SOURCE-Select Off (the default) to dark blue. NOTE: OSD structure and set to Off, you press the Source button when the Auto Source mode is selected, the color changes to dark blue. • Use the or buttons on the control panel or remote control to adjust the settings. •...
User Guide
Page 31
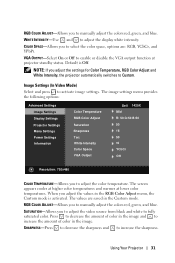
..., RGB Color Adjust and White Intensity, the projector automatically switches to adjust the color temperature. The image settings menu provides the following options: Advanced Settings Image Settings Display Settings Projector Settings Menu Settings Power Settings Information Color Temperature RGB Color Adjust Saturation Sharpness Tint White Intensity Color Space VGA Output Dell 1420X Mid R: 50 G:50 B:50 50 16 50 10 YCbCr Off Resolution: 720x480 COLOR TEMPERATURE-Allows you to Custom. The screen appears cooler at higher color temperatures and warmer at projector standby status. Press...
..., RGB Color Adjust and White Intensity, the projector automatically switches to adjust the color temperature. The image settings menu provides the following options: Advanced Settings Image Settings Display Settings Projector Settings Menu Settings Power Settings Information Color Temperature RGB Color Adjust Saturation Sharpness Tint White Intensity Color Space VGA Output Dell 1420X Mid R: 50 G:50 B:50 50 16 50 10 YCbCr Off Resolution: 720x480 COLOR TEMPERATURE-Allows you to Custom. The screen appears cooler at higher color temperatures and warmer at projector standby status. Press...

User Guide
Page 36
...can project from behind a translucent screen with a ceiling-mounted projection. The Projector settings menu provides the following options: Advanced Settings Image Settings Display Settings Projector Settings Menu Settings Power Settings Information Auto Source Projector Mode Speaker Closed Caption Startup Screen High Altitude Mode Test Pattern 2 Factory Reset Dell 1420X Off Front On Off Dell Off Off Press Resolution: 1440x1050 AUTO SOURCE-Select Off (the default) to enable the speaker. This is the default option. • Front Ceiling - The projector turns the image upside down...
...can project from behind a translucent screen with a ceiling-mounted projection. The Projector settings menu provides the following options: Advanced Settings Image Settings Display Settings Projector Settings Menu Settings Power Settings Information Auto Source Projector Mode Speaker Closed Caption Startup Screen High Altitude Mode Test Pattern 2 Factory Reset Dell 1420X Off Front On Off Dell Off Off Press Resolution: 1440x1050 AUTO SOURCE-Select Off (the default) to enable the speaker. This is the default option. • Front Ceiling - The projector turns the image upside down...
User Guide
Page 38
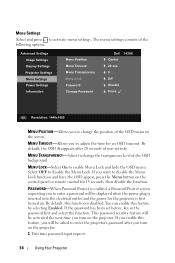
... time password input request: 38 Using Your Projector MENU LOCK-Select On to disable the Menu Lock. By default, this feature, by selecting Enabled. By default, the OSD disappears after you want to change the position of non-activity. If you turn on the control panel or remote control for 15 seconds, then disable the function. This password security feature will be activated the next time you to activate menu settings. Menu Settings...
... time password input request: 38 Using Your Projector MENU LOCK-Select On to disable the Menu Lock. By default, this feature, by selecting Enabled. By default, the OSD disappears after you want to change the position of non-activity. If you turn on the control panel or remote control for 15 seconds, then disable the function. This password security feature will be activated the next time you to activate menu settings. Menu Settings...
User Guide
Page 39
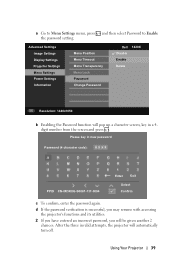
... the screen and press . Advanced Settings Image Settings Display Settings Projector Settings Menu Settings Power Settings Information Menu Position Menu Timeout Menu Transparency Menu Lock Password Change Password Dell 1420X Disable Enable Delete Resolution: 1440x1050 b Enabling the Password function will pop up a character screen, key in new password Password (4 character code): PPID CN-0R3KXG-S0081-137-0004 Enter Exit Select Confirm c To confirm, enter the password again. a Go to Menu Settings menu, press and then select Password to Enable the password setting. Using Your Projector...
... the screen and press . Advanced Settings Image Settings Display Settings Projector Settings Menu Settings Power Settings Information Menu Position Menu Timeout Menu Transparency Menu Lock Password Change Password Dell 1420X Disable Enable Delete Resolution: 1440x1050 b Enabling the Password function will pop up a character screen, key in new password Password (4 character code): PPID CN-0R3KXG-S0081-137-0004 Enter Exit Select Confirm c To confirm, enter the password again. a Go to Menu Settings menu, press and then select Password to Enable the password setting. Using Your Projector...

User Guide
Page 44
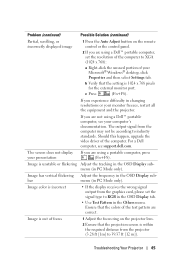
... that the lens cap is removed and the projector is turned on. • Ensure that the Input Source is enabled. See "Connecting Your Projector" on page 49). • Use Test Pattern in the OSD menu. • Ensure the external graphics port is set to Enable. 44 Troubleshooting Your Projector For Dell computer, see "Changing the Lamp" on page 9. • Ensure that the lamp is securely installed (see support.dell.com. •...
... that the lens cap is removed and the projector is turned on. • Ensure that the Input Source is enabled. See "Connecting Your Projector" on page 49). • Use Test Pattern in the OSD menu. • Ensure the external graphics port is set to Enable. 44 Troubleshooting Your Projector For Dell computer, see "Changing the Lamp" on page 9. • Ensure that the lamp is securely installed (see support.dell.com. •...
User Guide
Page 45
... not be according to industry standards. c Press (Fn+F8). Should this happen, upgrade the video driver of focus Possible Solution (continued) 1 Press the Auto Adjust button on the remote control or the control panel. 2 If you are using a portable computer, press (Fn+F8). Troubleshooting Your Projector 45 Adjust the tracking in the OSD Display submenu (in changing resolutions or your monitor freezes, restart all the equipment and the...
... not be according to industry standards. c Press (Fn+F8). Should this happen, upgrade the video driver of focus Possible Solution (continued) 1 Press the Auto Adjust button on the remote control or the control panel. 2 If you are using a portable computer, press (Fn+F8). Troubleshooting Your Projector 45 Adjust the tracking in the OSD Display submenu (in changing resolutions or your monitor freezes, restart all the equipment and the...
User Guide
Page 46
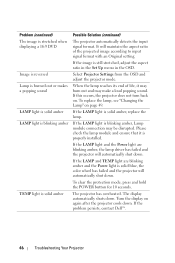
... properly installed. To replace the lamp, see "Changing the Lamp" on page 49. To clear the protection mode, press and hold the POWER button for 10 seconds. Problem (continued) The image is stretched when displaying a 16:9 DVD Image is reversed Lamp is burned out or makes a popping sound LAMP light is solid amber LAMP light is blinking amber TEMP light is solid blue, the color wheel has failed and the projector will automatically shut down. Select Projector Settings...
... properly installed. To replace the lamp, see "Changing the Lamp" on page 49. To clear the protection mode, press and hold the POWER button for 10 seconds. Problem (continued) The image is stretched when displaying a 16:9 DVD Image is reversed Lamp is burned out or makes a popping sound LAMP light is solid amber LAMP light is blinking amber TEMP light is solid blue, the color wheel has failed and the projector will automatically shut down. Select Projector Settings...
User Guide
Page 47
Check the Menu Lock on the screen The remote control is blinking amber The OSD does not appear on page 38. Try to clear the projector protection mode by the battery manufacturer. Try to power up again. Problem (continued) TEMP light is not operating smoothly or works only within a limited range Possible Solution (continued) A projector fan has failed and the projector will automatically shut down. If so, replace with the same...
Check the Menu Lock on the screen The remote control is blinking amber The OSD does not appear on page 38. Try to clear the projector protection mode by the battery manufacturer. Try to power up again. Problem (continued) TEMP light is not operating smoothly or works only within a limited range Possible Solution (continued) A projector fan has failed and the projector will automatically shut down. If so, replace with the same...
User Guide
Page 48
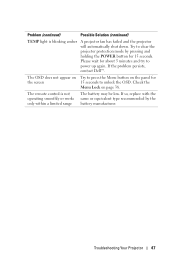
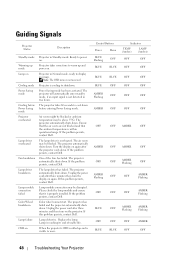
...ºC. The projector automatically shuts down . Please check the lamp module and ensure that the ambient temperature is reaching its end of the fans has failed. Unplug the power cord after three minutes then turn on the projector. Lamp is within operational range. Note: The OSD menu is overheated. The projector automatically shuts down . The projector automatically shuts down . If this problem persists, contact Dell. Lamp defective. Control Buttons Power Menu BLUE Flashing OFF BLUE BLUE BLUE BLUE AMBER Flashing BLUE OFF OFF...
...ºC. The projector automatically shuts down . Please check the lamp module and ensure that the ambient temperature is reaching its end of the fans has failed. Unplug the power cord after three minutes then turn on the projector. Lamp is within operational range. Note: The OSD menu is overheated. The projector automatically shuts down . The projector automatically shuts down . If this problem persists, contact Dell. Lamp defective. Control Buttons Power Menu BLUE Flashing OFF BLUE BLUE BLUE BLUE AMBER Flashing BLUE OFF OFF...
User Guide
Page 49
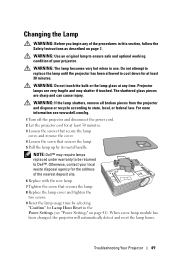
... any time. When a new lamp module has been changed, the projector will automatically detect and reset the lamp hours. WARNING: Use an original lamp to Dell™. WARNING: The lamp becomes very hot when in the Power Settings (see www.dell.com/hg. 1 Turn off the projector and disconnect the power cord. 2 Let the projector cool for Lamp Hour Reset in use. Otherwise, contact your projector. Projector lamps are sharp and can cause injury. Do not attempt to replace the lamp...
... any time. When a new lamp module has been changed, the projector will automatically detect and reset the lamp hours. WARNING: Use an original lamp to Dell™. WARNING: The lamp becomes very hot when in the Power Settings (see www.dell.com/hg. 1 Turn off the projector and disconnect the power cord. 2 Let the projector cool for Lamp Hour Reset in use. Otherwise, contact your projector. Projector lamps are sharp and can cause injury. Do not attempt to replace the lamp...
User Guide
Page 53
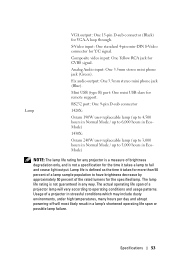
... high temperatures, many hours per day and abrupt powering-off will vary according to have brightness decrease by approximately 50 percent of the rated lumens for any way. Specifications 53 Lamp VGA output: One 15-pin D-sub connector (Black) for CVBS signal. Fix audio output: One 3.5mm stereo mini phone jack (Blue). Composite video input: One Yellow RCA jack for VGA-A loop through. The actual operating life...
... high temperatures, many hours per day and abrupt powering-off will vary according to have brightness decrease by approximately 50 percent of the rated lumens for any way. Specifications 53 Lamp VGA output: One 15-pin D-sub connector (Black) for CVBS signal. Fix audio output: One 3.5mm stereo mini phone jack (Blue). Composite video input: One Yellow RCA jack for VGA-A loop through. The actual operating life...
User Guide
Page 60
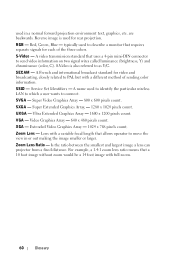
... used for video and broadcasting, closely related to move the view in a normal forward projection environment text, graphics, etc. XGA - are backwards. Reverse image is also referred to describe a monitor that allows operator to PAL but with a different method of the three colors. Service Set Identifiers - SXGA - Red, Green, Blue - typically used in or out making the image smaller or larger. Lens with full zoom. 60 Glossary Zoom Lens - used...
... used for video and broadcasting, closely related to move the view in a normal forward projection environment text, graphics, etc. XGA - are backwards. Reverse image is also referred to describe a monitor that allows operator to PAL but with a different method of the three colors. Service Set Identifiers - SXGA - Red, Green, Blue - typically used in or out making the image smaller or larger. Lens with full zoom. 60 Glossary Zoom Lens - used...

User Guide
Page 61
... A Adjusting the Projected Image 16 Adjusting the Projector Height 16 lower the projector Elevator button 16 Elevator foot 16 Adjusting the Projector Zoom and Focus 17 Focus ring 17 Zoom tab 17 C Changing the Lamp 49 Connecting the Projector Composite video cable 13 Connecting with a Component Cable 14 Connecting with a Composite Cable 13 Connecting with an S-video Cable 12 Power cord 10, 11, 12, 13, 14 S-video cable 12 To Computer 10 USB to USB cable 10 VGA to VGA cable 10, 11 VGA to YPbPr cable 14 Connection Ports Audio...
... A Adjusting the Projected Image 16 Adjusting the Projector Height 16 lower the projector Elevator button 16 Elevator foot 16 Adjusting the Projector Zoom and Focus 17 Focus ring 17 Zoom tab 17 C Changing the Lamp 49 Connecting the Projector Composite video cable 13 Connecting with a Component Cable 14 Connecting with a Composite Cable 13 Connecting with an S-video Cable 12 Power cord 10, 11, 12, 13, 14 S-video cable 12 To Computer 10 USB to USB cable 10 VGA to VGA cable 10, 11 VGA to YPbPr cable 14 Connection Ports Audio...

User Guide
Page 62
... Powering On the Projector 15 Q Quick Shutdown 41 R Remote Control 22 IR receiver 20 Reset, Factory 37 RS232 control port 9 S Security Settings 42 Specifications Audio 52 Brightness 51 Color Wheel Speed 51 Contrast Ratio 51 Dimensions 52 Displayable Color 51 Environmental 52 I/O Connectors 52 Light Valve 51 Noise Level 52 Power Consumption 52 Power Supply 51 Projection Distance 51 Projection Lens 51 Projection Screen Size 51 Uniformity 51 Video Compatibility 51 Weight 52 support contacting Dell 57 T telephone numbers 57 Troubleshooting...
... Powering On the Projector 15 Q Quick Shutdown 41 R Remote Control 22 IR receiver 20 Reset, Factory 37 RS232 control port 9 S Security Settings 42 Specifications Audio 52 Brightness 51 Color Wheel Speed 51 Contrast Ratio 51 Dimensions 52 Displayable Color 51 Environmental 52 I/O Connectors 52 Light Valve 51 Noise Level 52 Power Consumption 52 Power Supply 51 Projection Distance 51 Projection Lens 51 Projection Screen Size 51 Uniformity 51 Video Compatibility 51 Weight 52 support contacting Dell 57 T telephone numbers 57 Troubleshooting...


