

User Guide
Page 10
Turn the four PHD lock levers counterclockwise to unlock the unit. Completely remove the four yellow ribbons from the PHD unit. Pull the PHD unit out of the printer. NOTICE: Do not touch the belt unit. 3. Installing the PHD (Print Head Device) Unit 1. NOTICE: Do not remove the protective sheet on the PHD unit. 4. Press the button (right side) and open the front cover. 2.
Turn the four PHD lock levers counterclockwise to unlock the unit. Completely remove the four yellow ribbons from the PHD unit. Pull the PHD unit out of the printer. NOTICE: Do not touch the belt unit. 3. Installing the PHD (Print Head Device) Unit 1. NOTICE: Do not remove the protective sheet on the PHD unit. 4. Press the button (right side) and open the front cover. 2.

User Guide
Page 11
back to lock the PHD, and then remove the protective sheet. 7. Close the front cover. 5. Turn the four PHD lock levers clockwise to contents page Use the small gray tabs to place the PHD unit back into the printer completely. 6.
back to lock the PHD, and then remove the protective sheet. 7. Close the front cover. 5. Turn the four PHD lock levers clockwise to contents page Use the small gray tabs to place the PHD unit back into the printer completely. 6.

User Guide
Page 53
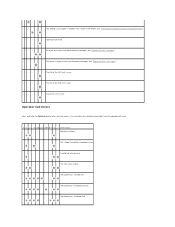
... for incoming data - - - - - In power saver mode Paper Conditions The following table shows the paper status. 1 2 3 4 5 6 7 Printer status - - - - - - Life warning in the PHD unit -- - - - - Warming up - - - - - - The toner is used in the single sheet feeder. -- - - - - Non Dell toner is low in all toner indicators. Clean the CTD sensor. * Orange on in the specified toner...
... for incoming data - - - - - In power saver mode Paper Conditions The following table shows the paper status. 1 2 3 4 5 6 7 Printer status - - - - - - Life warning in the PHD unit -- - - - - Warming up - - - - - - The toner is used in the single sheet feeder. -- - - - - Non Dell toner is low in all toner indicators. Clean the CTD sensor. * Orange on in the specified toner...
User Guide
Page 55
... 5-Y 6 7 Error status - -- - - - - The side cover is over . -- - - - - Dell ColorTrack - Dell ColorTrack - An error occurred in the single sheet feeder. See "Replacing Toner Cartridges." -- - - - - The life of the PHD unit is open. - - - PDL (Page Description Language) error - --- - - - Invalid job environment - -- -... Memory overflow - - - - - - - The wrong size of the belt unit is empty in the specified toner cartridge. Clean the CTD sensor. Dell ColorTrack - See "Replacing Toner Cartridges." -- - - - - The toner is over . -- - - - ...
... 5-Y 6 7 Error status - -- - - - - The side cover is over . -- - - - - Dell ColorTrack - Dell ColorTrack - An error occurred in the single sheet feeder. See "Replacing Toner Cartridges." -- - - - - The life of the PHD unit is open. - - - PDL (Page Description Language) error - --- - - - Invalid job environment - -- -... Memory overflow - - - - - - - The wrong size of the belt unit is empty in the specified toner cartridge. Clean the CTD sensor. Dell ColorTrack - See "Replacing Toner Cartridges." -- - - - - The toner is over . -- - - - ...
User Guide
Page 56
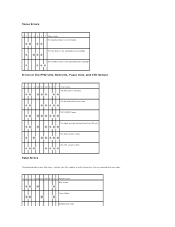
... toner in the PHD Unit, Belt Unit, Fuser Unit, and CTD Sensor 1 2 3 4 5-K 5-C 5-M 5-Y 6 7 Error status - - - The tapes are not removed from the PHD unit. - - - Contact your Dell supplier to notify the printer status associated with each error. 1 2 3 4 5-K 5-C 5-M 5-Y 6 7 Printer status - - - - - - The belt unit life is not installed. - - - ROS failure - - - - - - Fuser failure - -- - - - Fatal Errors The following table shows fatal errors. PHD CRUM ID error...
... toner in the PHD Unit, Belt Unit, Fuser Unit, and CTD Sensor 1 2 3 4 5-K 5-C 5-M 5-Y 6 7 Error status - - - The tapes are not removed from the PHD unit. - - - Contact your Dell supplier to notify the printer status associated with each error. 1 2 3 4 5-K 5-C 5-M 5-Y 6 7 Printer status - - - - - - The belt unit life is not installed. - - - ROS failure - - - - - - Fuser failure - -- - - - Fatal Errors The following table shows fatal errors. PHD CRUM ID error...
User Guide
Page 73
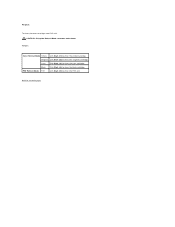
Values: Toner Refresh Mode Yellow Click Start (1) to clean the magenta cartridge. Magenta Click Start (2) to clean the yellow cartridge. PHD Refresh Mode PHD Click Start (5) to clean the cyan cartridge. Purpose: To clean the toner cartridges and PHD unit. Cyan Click Start (3) to clean the PHD unit. Black Click Start (4) to contents page CAUTION: Using the Refresh Mode consumes extra toner. back to clean the black cartridge.
Values: Toner Refresh Mode Yellow Click Start (1) to clean the magenta cartridge. Magenta Click Start (2) to clean the yellow cartridge. PHD Refresh Mode PHD Click Start (5) to clean the cyan cartridge. Purpose: To clean the toner cartridges and PHD unit. Cyan Click Start (3) to clean the PHD unit. Black Click Start (4) to contents page CAUTION: Using the Refresh Mode consumes extra toner. back to clean the black cartridge.
User Guide
Page 90
... Start button to check the density of colors. 3. Press the Start(1)-(4) buttons. Yes. The task is not selected in the Printer Maintenance tab in the Tool Box. 1. Try the spare PHD unit, if possible. 1. After you complete the Refresh Mode, select Chart Print from the list. Yes. Contact Dell. Click the Tool Box button. 2. Ensure...
... Start button to check the density of colors. 3. Press the Start(1)-(4) buttons. Yes. The task is not selected in the Printer Maintenance tab in the Tool Box. 1. Try the spare PHD unit, if possible. 1. After you complete the Refresh Mode, select Chart Print from the list. Yes. Contact Dell. Click the Tool Box button. 2. Ensure...

User Guide
Page 91
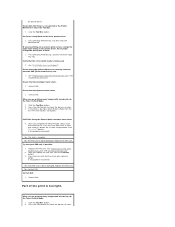
...PHD unit is old or damaged. Replace the PHD unit. Yes. Contact Dell. See "Replacing the PHD (Print Head Device) Unit" and "Installing the PHD Unit". 2. Yes. After you complete the Refresh Mode, select Chart Print from the list. Is the problem recovered? For example, change the paper type setting in the printer... task is blurred. Try the spare PHD unit, if possible. 1. See "Replacing the PHD (Print Head Device) Unit" and "Installing the PHD Unit". 2. Press the Print with A4(3) or Print with Letter(C) button for 4 Colors Configuration Chart. Press [Printing Preferences],...
...PHD unit is old or damaged. Replace the PHD unit. Yes. Contact Dell. See "Replacing the PHD (Print Head Device) Unit" and "Installing the PHD Unit". 2. Yes. After you complete the Refresh Mode, select Chart Print from the list. Is the problem recovered? For example, change the paper type setting in the printer... task is blurred. Try the spare PHD unit, if possible. 1. See "Replacing the PHD (Print Head Device) Unit" and "Installing the PHD Unit". 2. Press the Print with A4(3) or Print with Letter(C) button for 4 Colors Configuration Chart. Press [Printing Preferences],...
User Guide
Page 92
... Mode to Off in the printer driver. See "Print Media Sizes and Support". See "Replacing the PHD (Print Head Device) Unit" and "Installing the PHD Unit". Ensure the PHD unit is white. Contact Dell. Try the spare PHD unit, if possible. 1. See "Replacing the PHD (Print Head Device) Unit" and "Installing the PHD Unit." 2. Is the problem recovered? The PHD unit is being used. 1. Press [Printing...
... Mode to Off in the printer driver. See "Print Media Sizes and Support". See "Replacing the PHD (Print Head Device) Unit" and "Installing the PHD Unit". Ensure the PHD unit is white. Contact Dell. Try the spare PHD unit, if possible. 1. See "Replacing the PHD (Print Head Device) Unit" and "Installing the PHD Unit." 2. Is the problem recovered? The PHD unit is being used. 1. Press [Printing...
User Guide
Page 93
... with Letter(C) button. The PHD unit is old or damaged. Contact Dell. Contact Dell. Replace the PHD unit. Is the problem recovered? Confirm the amount of the page prints in the Tool Box. 1. Yes. Replace the PHD unit. No. Ensure Color (Auto) is not selected in the Printer Maintenance tab in black. Contact Dell. Try the spare PHD unit, if possible. 1. The toner...
... with Letter(C) button. The PHD unit is old or damaged. Contact Dell. Contact Dell. Replace the PHD unit. Is the problem recovered? Confirm the amount of the page prints in the Tool Box. 1. Yes. Replace the PHD unit. No. Ensure Color (Auto) is not selected in the Printer Maintenance tab in black. Contact Dell. Try the spare PHD unit, if possible. 1. The toner...

User Guide
Page 94
.... Contact Dell. Print Setup tab in color Locate the cause of the problem by using the Pitch Configuration Chart. 1. Press [Printing Preferences], and then click the Print Setup tab. See "Replacing the PHD (Print Head Device) Unit" and "Installing the PHD Unit". 2. Yes. The PHD unit is old or damaged. Contact Dell. Contact Dell. Pitched dots prints in the printer driver...
.... Contact Dell. Print Setup tab in color Locate the cause of the problem by using the Pitch Configuration Chart. 1. Press [Printing Preferences], and then click the Print Setup tab. See "Replacing the PHD (Print Head Device) Unit" and "Installing the PHD Unit". 2. Yes. The PHD unit is old or damaged. Contact Dell. Contact Dell. Pitched dots prints in the printer driver...

User Guide
Page 95
.... Is the problem recovered? Yes. Click the Tool Box button. 2. See "Installing the PHD Unit". 4. Yes. Contact Dell. Replace the PHD unit. See "Replacing the PHD (Print Head Device) Unit" and "Installing the PHD Unit". 2. Replace the PHD unit. Reinstall the PHD unit. Click the Tool Box button. 2. The PHD unit is old or damaged. Do either of the problem by using the Ghost Configuration...
.... Is the problem recovered? Yes. Click the Tool Box button. 2. See "Installing the PHD Unit". 4. Yes. Contact Dell. Replace the PHD unit. See "Replacing the PHD (Print Head Device) Unit" and "Installing the PHD Unit". 2. Replace the PHD unit. Reinstall the PHD unit. Click the Tool Box button. 2. The PHD unit is old or damaged. Do either of the problem by using the Ghost Configuration...

User Guide
Page 96
... Box button. 2. Yes. Is the problem recovered? Replace the PHD unit, if possible. "Printing" appears. Do the PHD Refresh Mode. 1. Yes. Contact Dell. Fog Do the PHD Refresh Mode. 1. See "Replacing the PHD (Print Head Device) Unit" and "Installing the PHD Unit". No. The task is complete. Press the Print with A4...? the Apply New Settings button. 3. After you complete the Refresh Mode, select Chart Print from the list. Replace the PHD unit. No. After you start the PHD Refresh Mode, click the Tool Box button, and then press the Print with A4(3), or Print with Letter (C) button....
... Box button. 2. Yes. Is the problem recovered? Replace the PHD unit, if possible. "Printing" appears. Do the PHD Refresh Mode. 1. Yes. Contact Dell. Fog Do the PHD Refresh Mode. 1. See "Replacing the PHD (Print Head Device) Unit" and "Installing the PHD Unit". No. The task is complete. Press the Print with A4...? the Apply New Settings button. 3. After you complete the Refresh Mode, select Chart Print from the list. Replace the PHD unit. No. After you start the PHD Refresh Mode, click the Tool Box button, and then press the Print with A4(3), or Print with Letter (C) button....

User Guide
Page 97
... the printer in the PHD unit. 1. Click the Tool Box button. 2. Is the problem recovered? Yes. The task is complete. Replace the PHD unit, if possible. See "Replacing the PHD (Print Head Device) Unit" and "Installing the PHD Unit". No. Contact Dell. Press Print with A4(1), or Print with Letter(A). See "Replacing the PHD (Print Head Device) Unit" and "Installing the PHD Unit". 2. After...
... the printer in the PHD unit. 1. Click the Tool Box button. 2. Is the problem recovered? Yes. The task is complete. Replace the PHD unit, if possible. See "Replacing the PHD (Print Head Device) Unit" and "Installing the PHD Unit". No. Contact Dell. Press Print with A4(1), or Print with Letter(A). See "Replacing the PHD (Print Head Device) Unit" and "Installing the PHD Unit". 2. After...
User Guide
Page 98
..."Installing a New Fuser". 4. Click the Tool Box button. 1. Yes. Replace the PHD unit. No. Contact Dell. See "Replacing the PHD (Print Head Device) Unit" and "Installing the PHD Unit". Auger mark Is the error print match with Letter(A). Yes. No. Yes. Check if... PHD (Print Head Device) Unit". 2. Contact Dell. See "Replacing the PHD (Print Head Device) Unit" and "Installing the PHD Unit". Click the Tool Box button. 3. Yes. "Printing" appears. See "Replacing the PHD (Print Head Device) Unit" and "Installing the PHD Unit". Remove the toner cartridges, fuser, and PHD unit....
..."Installing a New Fuser". 4. Click the Tool Box button. 1. Yes. Replace the PHD unit. No. Contact Dell. See "Replacing the PHD (Print Head Device) Unit" and "Installing the PHD Unit". Auger mark Is the error print match with Letter(A). Yes. No. Yes. Check if... PHD (Print Head Device) Unit". 2. Contact Dell. See "Replacing the PHD (Print Head Device) Unit" and "Installing the PHD Unit". Click the Tool Box button. 3. Yes. "Printing" appears. See "Replacing the PHD (Print Head Device) Unit" and "Installing the PHD Unit". Remove the toner cartridges, fuser, and PHD unit....

User Guide
Page 99
... error paper? Press the Start button for Color Regi Chart. No. Yes. The PHD unit is complete. Contact Dell. No. See "Replacing the PHD (Print Head Device) Unit" and "Installing the PHD Unit". 2. Is the color chart matched with the error paper? No. Press the Start button for Color Regi Chart. Is the color chart matched with the error paper? The...
... error paper? Press the Start button for Color Regi Chart. No. Yes. The PHD unit is complete. Contact Dell. No. See "Replacing the PHD (Print Head Device) Unit" and "Installing the PHD Unit". 2. Is the color chart matched with the error paper? No. Press the Start button for Color Regi Chart. Is the color chart matched with the error paper? The...
User Guide
Page 101
... complete. No. Replace the toner cartridge. The task is installed correctly. 1. Contact Dell. Regi jam Ensure the PHD unit is complete. See "Replacing the PHD (Print Head Device) Unit" and "Installing the PHD Unit". Is the problem recovered? The task is installed correctly. 1. No. Contact Dell. Exit Jam Ensure the fuser is complete. Replace the fuser. The task...
... complete. No. Replace the toner cartridge. The task is installed correctly. 1. Contact Dell. Regi jam Ensure the PHD unit is complete. See "Replacing the PHD (Print Head Device) Unit" and "Installing the PHD Unit". Is the problem recovered? The task is installed correctly. 1. No. Contact Dell. Exit Jam Ensure the fuser is complete. Replace the fuser. The task...

User Guide
Page 107
Pull the PHD unit out of the printer. Press the button (right side) and open the front cover. 3. Replacing the PHD (Print Head Device) Unit 1. Turn the four PHD lock levers counterclockwise. 4. Close the side cover. Ensure that the printer is turned off. 2. 3.
Pull the PHD unit out of the printer. Press the button (right side) and open the front cover. 3. Replacing the PHD (Print Head Device) Unit 1. Turn the four PHD lock levers counterclockwise. 4. Close the side cover. Ensure that the printer is turned off. 2. 3.

User Guide
Page 108
Remove the rear protective cover from the packaging. 3. Pull out the PHD unit from the PHD unit. Open the PHD packaging. 2. Completely remove the eight yellow ribbons from the PHD unit. 4. Installing the PHD Unit 1.
Remove the rear protective cover from the packaging. 3. Pull out the PHD unit from the PHD unit. Open the PHD packaging. 2. Completely remove the eight yellow ribbons from the PHD unit. 4. Installing the PHD Unit 1.

User Guide
Page 109
... the Fuser CAUTION: A CAUTION indicates a potential for property damage, personal injury, or death. Insert the PHD unit until it is seated properly and turn off the printer and disconnect the power cable from the PHD unit. 7. 5. CAUTION: Before performing any of the following procedures, read and follow the safety instructions in your Product Information Guide...
... the Fuser CAUTION: A CAUTION indicates a potential for property damage, personal injury, or death. Insert the PHD unit until it is seated properly and turn off the printer and disconnect the power cable from the PHD unit. 7. 5. CAUTION: Before performing any of the following procedures, read and follow the safety instructions in your Product Information Guide...


