User's Guide
Page 8
... your new laser printer 5 Safety information INTRODUCTION 10 Printer overview 10 10 10 Front view Rear view 11 Control panel overview 12 Understanding the control panel 12 LEDs 12 Stop button 13 Supplied software 13 Printer driver features 13 Printer driver GETTING ... reports 24 24 Cleaning your printer 24 Cleaning the outside 24 Cleaning the inside 26 Maintaining the cartridge 26 Toner cartridge storage 26 Expected cartridge life 26 Redistributing toner 27 Replacing the toner cartridge 28 Replacing the Imaging Unit 29 Replacing the waste toner container 30 Maintenance parts 8 | ...
... your new laser printer 5 Safety information INTRODUCTION 10 Printer overview 10 10 10 Front view Rear view 11 Control panel overview 12 Understanding the control panel 12 LEDs 12 Stop button 13 Supplied software 13 Printer driver features 13 Printer driver GETTING ... reports 24 24 Cleaning your printer 24 Cleaning the outside 24 Cleaning the inside 26 Maintaining the cartridge 26 Toner cartridge storage 26 Expected cartridge life 26 Redistributing toner 27 Replacing the toner cartridge 28 Replacing the Imaging Unit 29 Replacing the waste toner container 30 Maintenance parts 8 | ...

User's Guide
Page 10
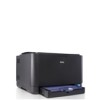
introduction These are the main components of your printer: This chapter includes: • Printer overview • Control panel overview • Understanding the control panel PRINTER OVERVIEW Front view • Supplied software • Printer driver features Rear view 1 Top cover 2 Output tray (face down) 3 Control panel 4 Tray 5 Output support 6 Front cover release button 7 Front cover 8 Toner cartridge 9 Waste toner container ' 10 Imaging unit 10 | Introduction 1 Rear cover release button 2 Power switch 3 USB port 4 Power receptacle 5 Rear cover
introduction These are the main components of your printer: This chapter includes: • Printer overview • Control panel overview • Understanding the control panel PRINTER OVERVIEW Front view • Supplied software • Printer driver features Rear view 1 Top cover 2 Output tray (face down) 3 Control panel 4 Tray 5 Output support 6 Front cover release button 7 Front cover 8 Toner cartridge 9 Waste toner container ' 10 Imaging unit 10 | Introduction 1 Rear cover release button 2 Power switch 3 USB port 4 Power receptacle 5 Rear cover

User's Guide
Page 12
... each LED blinks red in a The printer is printing data. each LED blinks red Each toner cartridge is receiving data from both the printer and the computer, and then the printer returns to print. You cannot print anymore. • Each toner cartridge is almost empty. Press this case, open...cover and close it as an error such as open cover, empty paper, not installed waste toner container, or full waste toner container. • The printer is totally exhausted. UNDERSTANDING THE CONTROL PANEL The color of its life. The red LED blinks while the print job is ready to Ready ...
... each LED blinks red in a The printer is printing data. each LED blinks red Each toner cartridge is receiving data from both the printer and the computer, and then the printer returns to print. You cannot print anymore. • Each toner cartridge is almost empty. Press this case, open...cover and close it as an error such as open cover, empty paper, not installed waste toner container, or full waste toner container. • The printer is totally exhausted. UNDERSTANDING THE CONTROL PANEL The color of its life. The red LED blinks while the print job is ready to Ready ...

User's Guide
Page 24
.... Use the configuration page to view the current settings, to cool down. 2. This chapter includes: • Printing reports • Cleaning your printer • Maintaining the cartridge • Replacing the toner cartridge • Replacing the Imaging Unit • Replacing the waste toner container • Maintenance parts PRINTING REPORTS You can discolor or distort the cabinet. • If your...
.... Use the configuration page to view the current settings, to cool down. 2. This chapter includes: • Printing reports • Cleaning your printer • Maintaining the cartridge • Replacing the toner cartridge • Replacing the Imaging Unit • Replacing the waste toner container • Maintenance parts PRINTING REPORTS You can discolor or distort the cabinet. • If your...

User's Guide
Page 25
... ensure that it to dry completely. 10. Insert the waste toner container into the printer. • If toner gets on the front of the printer using the groove on your printer or its surrounding is not completely closed, the printer will cause damage to light. 5. Slide the toner cartridge back into position and then push it is firmly seated in...
... ensure that it to dry completely. 10. Insert the waste toner container into the printer. • If toner gets on the front of the printer using the groove on your printer or its surrounding is not completely closed, the printer will cause damage to light. 5. Slide the toner cartridge back into position and then push it is firmly seated in...

User's Guide
Page 28
... unit package. Holding the groove on the front of paper to remove the cartridge from the printer. 6. Otherwise your printer stops printing. 1. Pull the waste toner container out of the imaging unit has expired, the Dell Toner Management System™ program window appears on the toner cartridge and pull to protect it with a piece of the imaging unit. 3. REPLACING THE...
... unit package. Holding the groove on the front of paper to remove the cartridge from the printer. 6. Otherwise your printer stops printing. 1. Pull the waste toner container out of the imaging unit has expired, the Dell Toner Management System™ program window appears on the toner cartridge and pull to protect it with a piece of the imaging unit. 3. REPLACING THE...

User's Guide
Page 29
... waste toner container out of its handle. 10. Turn the printer on the computer, indicating the waste toner container needs to close . 11. Ensure that you lay the waste toner container on a flat surface so that all toner cartridges are installed properly. Maintenance | 29 Insert the waste toner container into the printer. 3. If the front cover is installed improperly, the front cover do not close the waste toner container...
... waste toner container out of its handle. 10. Turn the printer on the computer, indicating the waste toner container needs to close . 11. Ensure that you lay the waste toner container on a flat surface so that all toner cartridges are installed properly. Maintenance | 29 Insert the waste toner container into the printer. 3. If the front cover is installed improperly, the front cover do not close the waste toner container...

User's Guide
Page 38
... toner cartridge continuous color cartridge yield: 1,000 standard pages (Yellow/ Magenta/Cyan) Y924J (Black) C815K (Cyan) D593K (Magenta) F479K (Yellow) Standard yield Imaging Unit Approx. 24,000 imagesb C920K Waste toner container Approx. 10,000 imagesc F562K a. Declared yield value in the same country you must purchase them in accordance with your printer. HOW TO PURCHASE To order Dell...
... toner cartridge continuous color cartridge yield: 1,000 standard pages (Yellow/ Magenta/Cyan) Y924J (Black) C815K (Cyan) D593K (Magenta) F479K (Yellow) Standard yield Imaging Unit Approx. 24,000 imagesb C920K Waste toner container Approx. 10,000 imagesc F562K a. Declared yield value in the same country you must purchase them in accordance with your printer. HOW TO PURCHASE To order Dell...

User's Guide
Page 39
...Power off mode: 0 WH Noise Levela Ready mode: Background noise level Printing mode Black & White: Less than 47 dBA Color: Less than 45 dBA Default time to power save mode from ready mode 15 Minutes Warm-up time Less than 35 seconds ... Printer specifications GENERAL SPECIFICATIONS The symbol * optional feature depending on page 18. Specifications_ 39 If you about paper input capacity. specifications This chapter guides you print documents in accordance with 700 pages Starter toner cartridge.) Imaging Unit life Approx. 24,000 imagesc ITEM DESCRIPTION Waste toner container ...
...Power off mode: 0 WH Noise Levela Ready mode: Background noise level Printing mode Black & White: Less than 47 dBA Color: Less than 45 dBA Default time to power save mode from ready mode 15 Minutes Warm-up time Less than 35 seconds ... Printer specifications GENERAL SPECIFICATIONS The symbol * optional feature depending on page 18. Specifications_ 39 If you about paper input capacity. specifications This chapter guides you print documents in accordance with 700 pages Starter toner cartridge.) Imaging Unit life Approx. 24,000 imagesc ITEM DESCRIPTION Waste toner container ...

