User Guide
Page 4
Adjusting Projection Image Size 18 Using the Control Panel 20 Using the Remote Control 22 Installing the Remote Control Batteries 25 Operating Range With Remote Control 26 Using the On-Screen Display 27 Main Menu 27 AUTO-ADJUST 27 INPUT SELECT 28 PICTURE (in PC Mode 29 PICTURE (in Video Mode 29 DISPLAY (in PC Mode 31 DISPLAY (in Video Mode 33 LAMP 34 SET UP 34 INFORMATION 36 OTHERS 36 4 Troubleshooting Your Projector 42 Guiding Signals 46 Changing the Lamp 47 4 Contents
Adjusting Projection Image Size 18 Using the Control Panel 20 Using the Remote Control 22 Installing the Remote Control Batteries 25 Operating Range With Remote Control 26 Using the On-Screen Display 27 Main Menu 27 AUTO-ADJUST 27 INPUT SELECT 28 PICTURE (in PC Mode 29 PICTURE (in Video Mode 29 DISPLAY (in PC Mode 31 DISPLAY (in Video Mode 33 LAMP 34 SET UP 34 INFORMATION 36 OTHERS 36 4 Troubleshooting Your Projector 42 Guiding Signals 46 Changing the Lamp 47 4 Contents
User Guide
Page 7
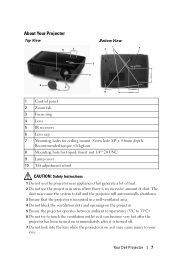
Recommended torque About Your Projector Top View 5 1 Bottom View 7 9 8 2 14.00±0.10 82.30±0.15 3 6 4 10 55.00±0.10 110.00±0.15 1 Control panel 2 Zoom tab 3 Focus ring 4 Lens 5 IR receivers 6 Lens cap 7 Mounting holes for ceiling mount: Screw hole M3 x 4.6mm depth.
Recommended torque About Your Projector Top View 5 1 Bottom View 7 9 8 2 14.00±0.10 82.30±0.15 3 6 4 10 55.00±0.10 110.00±0.15 1 Control panel 2 Zoom tab 3 Focus ring 4 Lens 5 IR receivers 6 Lens cap 7 Mounting holes for ceiling mount: Screw hole M3 x 4.6mm depth.

User Guide
Page 8
8 Do not place any objects near or in front of the projector or cover its lens while the projector is on as the heat may cause the object to ceiling mount the projector yourself. For more information, see the Dell Support website at support.dell.com. • For more information, see the Safety Information that shipped with your projector. 8 Your Dell Projector It should be installed by a qualified technician. • Recommended Projector Ceiling Mount Kit (P/N: C3505). NOTE: • Do not attempt to melt or burn.
8 Do not place any objects near or in front of the projector or cover its lens while the projector is on as the heat may cause the object to ceiling mount the projector yourself. For more information, see the Dell Support website at support.dell.com. • For more information, see the Safety Information that shipped with your projector. 8 Your Dell Projector It should be installed by a qualified technician. • Recommended Projector Ceiling Mount Kit (P/N: C3505). NOTE: • Do not attempt to melt or burn.
User Guide
Page 15
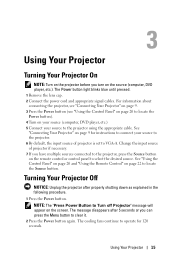
... control panel to VGA-A. The cooling fans continue to the projector using the appropriate cable. The message disappears after properly shutting down as explained in the following procedure. 1 Press the Power button. Using Your Projector 15 Turning Your Projector Off NOTICE: Unplug the projector after 5 seconds or you have multiple sources connected to the projector, press the Source button on page 9 for instructions to connect your source to operate for 120 seconds. The Power button light blinks blue until pressed. 1 Remove...
... control panel to VGA-A. The cooling fans continue to the projector using the appropriate cable. The message disappears after properly shutting down as explained in the following procedure. 1 Press the Power button. Using Your Projector 15 Turning Your Projector Off NOTICE: Unplug the projector after 5 seconds or you have multiple sources connected to the projector, press the Source button on page 9 for instructions to connect your source to operate for 120 seconds. The Power button light blinks blue until pressed. 1 Remove...
User Guide
Page 20
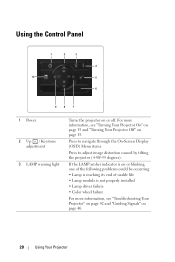
...; Color wheel failure For more information, see "Troubleshooting Your Projector" on page 42 and "Guiding Signals" on page 46. 20 Using Your Projector Press to navigate through the On-Screen Display (OSD) Menu items. Press to adjust image distortion caused by tilting the projector (+40/-35 degrees). For more information, see "Turning Your Projector On" on page 15 and "Turning Your Projector Off" on or off. Using the Control Panel 1 2 3 4 10 5 6 9 8 7 1 Power 2 Up / Keystone adjustment 3 LAMP warning light Turns...
...; Color wheel failure For more information, see "Troubleshooting Your Projector" on page 42 and "Guiding Signals" on page 46. 20 Using Your Projector Press to navigate through the On-Screen Display (OSD) Menu items. Press to adjust image distortion caused by tilting the projector (+40/-35 degrees). For more information, see "Turning Your Projector On" on page 15 and "Turning Your Projector Off" on or off. Using the Control Panel 1 2 3 4 10 5 6 9 8 7 1 Power 2 Up / Keystone adjustment 3 LAMP warning light Turns...
User Guide
Page 21
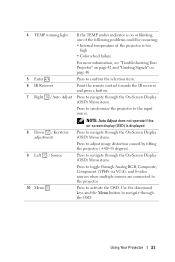
... via VGA), and S-video sources when multiple sources are connected to the projector. 10 Menu Press to activate the OSD. Using Your Projector 21 Use the directional keys and the Menu button to navigate through the OSD. 4 TEMP warning light If the TEMP amber indicator is on page 46. 5 Enter Press to confirm the selection item. 6 IR Receiver Point the remote control towards the IR receiver and press a button. 7 Right / Auto Adjust...
... via VGA), and S-video sources when multiple sources are connected to the projector. 10 Menu Press to activate the OSD. Using Your Projector 21 Use the directional keys and the Menu button to navigate through the OSD. 4 TEMP warning light If the TEMP amber indicator is on page 46. 5 Enter Press to confirm the selection item. 6 IR Receiver Point the remote control towards the IR receiver and press a button. 7 Right / Auto Adjust...

User Guide
Page 28
... the Source button when the projector is set to detect VGA-B signal. S-VIDEO-Press to enable or disable Composite Video input. 28 Using Your Projector and to detect S-Video signal. AUTO SOURCE-Select Off (the default) to activate Input Select Advanced menu. ADVANCED-Press to lock the current input signal. INPUT SELECT ADVANCED The Input Select Advanced menu allows you to enable or disable VGA-B input. to enable or disable input sources. VGA-A-Use and VGA-B-Use and S-VIDEO-Use and COMPOSITE VIDEO-Use to detect VGA-A signal. VGA...
... the Source button when the projector is set to detect VGA-B signal. S-VIDEO-Press to enable or disable Composite Video input. 28 Using Your Projector and to detect S-Video signal. AUTO SOURCE-Select Off (the default) to activate Input Select Advanced menu. ADVANCED-Press to lock the current input signal. INPUT SELECT ADVANCED The Input Select Advanced menu allows you to enable or disable VGA-B input. to enable or disable input sources. VGA-A-Use and VGA-B-Use and S-VIDEO-Use and COMPOSITE VIDEO-Use to detect VGA-A signal. VGA...
User Guide
Page 30
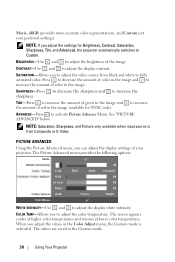
... adjust the display settings of red in the Color Adjust menu, the Custom mode is from black and white to adjust the video source from Composite or S-Video. NOTE: Saturation, Sharpness, and Tint are saved in the image. PICTURE ADVANCED Using the Picture Advanced menu, you adjust the values in the image (available for Brightness, Contrast, Saturation, Sharpness, Tint, and Advanced, the projector automatically switches to adjust the color temperature. The screen appears cooler at higher color temperatures...
... adjust the display settings of red in the Color Adjust menu, the Custom mode is from black and white to adjust the video source from Composite or S-Video. NOTE: Saturation, Sharpness, and Tint are saved in the image. PICTURE ADVANCED Using the Picture Advanced menu, you adjust the values in the image (available for Brightness, Contrast, Saturation, Sharpness, Tint, and Advanced, the projector automatically switches to adjust the color temperature. The screen appears cooler at higher color temperatures...
User Guide
Page 37
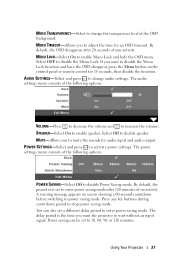
... adjust the time for an OSD timeout. MUTE-Allows you to mute the sounds for 15 seconds, then disable the function. Select OFF to activate power settings. Using Your Projector 37 A warning message appears on screen showing a 60-second countdown before switching to disable the Menu Lock function and have the OSD disappear, press the Menu button on the control panel or remote control for audio input and audio output. By default, the projector...
... adjust the time for an OSD timeout. MUTE-Allows you to mute the sounds for 15 seconds, then disable the function. Select OFF to activate power settings. Using Your Projector 37 A warning message appears on screen showing a 60-second countdown before switching to disable the Menu Lock function and have the OSD disappear, press the Menu button on the control panel or remote control for audio input and audio output. By default, the projector...

User Guide
Page 42
...+F8). If the problem persists, contact Dell™ (see "Changing the Lamp" on page 47). • Use Test Pattern in the OSD menu. • Ensure the external graphics port is securely installed (see Contacting Dell™ on . • Ensure that particular Input Source is set correctly in the Others menu. See "Connecting Your Projector" on the screen Missing Input Source. Cannot switch to Enable. 42 Troubleshooting Your Projector Go to Advanced...
...+F8). If the problem persists, contact Dell™ (see "Changing the Lamp" on page 47). • Use Test Pattern in the OSD menu. • Ensure the external graphics port is securely installed (see Contacting Dell™ on . • Ensure that particular Input Source is set correctly in the Others menu. See "Connecting Your Projector" on the screen Missing Input Source. Cannot switch to Enable. 42 Troubleshooting Your Projector Go to Advanced...

User Guide
Page 43
Should this happen, upgrade the video driver of the computer to RGB in the OSD Display tab. • Use Test Pattern in changing resolutions or your computer's documentation. Image has vertical flickering Adjust the frequency in PC Mode only). Image is out of focus 1 Adjust the focus ring on the remote control or the control panel. 2 If you are using a Dell™ portable computer, set the signal type to XGA (1024 x 768): a Right-click the...
Should this happen, upgrade the video driver of the computer to RGB in the OSD Display tab. • Use Test Pattern in changing resolutions or your computer's documentation. Image has vertical flickering Adjust the frequency in PC Mode only). Image is out of focus 1 Adjust the focus ring on the remote control or the control panel. 2 If you are using a Dell™ portable computer, set the signal type to XGA (1024 x 768): a Right-click the...

User Guide
Page 44
... the projector will automatically shut down . If the LAMP light and the Power light are blinking amber and the Power light is properly installed. It will automatically shut down . The projector has overheated. If the LAMP light is still stretched, adjust the aspect ratio in the Set Up menu in the OSD. If the image is blinking amber, Lamp module connection may make a loud popping sound. To replace the lamp, see "Changing the Lamp" on . Turn the display on...
... the projector will automatically shut down . If the LAMP light and the Power light are blinking amber and the Power light is properly installed. It will automatically shut down . The projector has overheated. If the LAMP light is still stretched, adjust the aspect ratio in the Set Up menu in the OSD. If the image is blinking amber, Lamp module connection may make a loud popping sound. To replace the lamp, see "Changing the Lamp" on . Turn the display on...

User Guide
Page 45
... OSD. The remote control is too dim. Problem (continued) Possible Solution (continued) TEMP light is blinking amber A projector fan has failed and the projector will automatically shut down. Please wait for the screen 15 seconds to press the Menu button on page 37. Troubleshooting Your Projector 45 Check the Menu Lock on the panel for about 5 minutes and try to clear the projector mode by pressing and holding the POWER button for 10...
... OSD. The remote control is too dim. Problem (continued) Possible Solution (continued) TEMP light is blinking amber A projector fan has failed and the projector will automatically shut down. Please wait for the screen 15 seconds to press the Menu button on page 37. Troubleshooting Your Projector 45 Check the Menu Lock on the panel for about 5 minutes and try to clear the projector mode by pressing and holding the POWER button for 10...

User Guide
Page 46
...Color wheel cannot start. If this problem persists, contact Dell. Unplug the power cord after the projector cools down . The projector takes 60 seconds to cool down . If the problem persists, contact Dell. If the problem persists, contact Dell. If this problem persists, contact Dell. The projector automatically shuts down before Power Saving mode Projector overheated Lamp driver overheated Fan breakdown Lamp driver breakdown Color Wheel breakdown Fault - BLUE Flashing BLUE BLUE BLUE AMBER Flashing AMBER OFF AMBER ÒFF AMBER Flashing BLUE AMBER Flashing Indicator TEMP...
...Color wheel cannot start. If this problem persists, contact Dell. Unplug the power cord after the projector cools down . The projector takes 60 seconds to cool down . If the problem persists, contact Dell. If the problem persists, contact Dell. If this problem persists, contact Dell. The projector automatically shuts down before Power Saving mode Projector overheated Lamp driver overheated Fan breakdown Lamp driver breakdown Color Wheel breakdown Fault - BLUE Flashing BLUE BLUE BLUE AMBER Flashing AMBER OFF AMBER ÒFF AMBER Flashing BLUE AMBER Flashing Indicator TEMP...

User Guide
Page 47
... Instructions as described on page 7. For more information see Contacting Dell™on the screen. Projector lamps are sharp and can cause injury. Replace the lamp when the message "Lamp is approaching the end of the procedures in this problem persists after replacing the lamp, contact Dell™. Replacement suggested! For more information, see www.dell.com/hg. 1 Turn off the projector and disconnect the power cord. 2 Let the projector...
... Instructions as described on page 7. For more information see Contacting Dell™on the screen. Projector lamps are sharp and can cause injury. Replace the lamp when the message "Lamp is approaching the end of the procedures in this problem persists after replacing the lamp, contact Dell™. Replacement suggested! For more information, see www.dell.com/hg. 1 Turn off the projector and disconnect the power cord. 2 Let the projector...

User Guide
Page 49
5 Specifications Light Valve Brightness Contrast Ratio Uniformity Number of Pixels Displayable Color Color Wheel Speed Projection Lens Projection Screen Size Projection Distance Video Compatibility Power Supply Power Consumption Audio Noise Level Weight 0.55" SVGA S450 DMD, DarkChip3™ 2500 ANSI Lumens (Max.) 2200:1 Typical (Full On/Full Off) 90% Typical (Japan Standard - JBMA) 800 x 600 (SVGA) 1.07 billion colors 2X F-Stop: F/ 2.41~2.55 Focal length, f=21.8~24 mm 1.1X manual Zoom Lens Throw ratio =1.95~2.15 wide and...
5 Specifications Light Valve Brightness Contrast Ratio Uniformity Number of Pixels Displayable Color Color Wheel Speed Projection Lens Projection Screen Size Projection Distance Video Compatibility Power Supply Power Consumption Audio Noise Level Weight 0.55" SVGA S450 DMD, DarkChip3™ 2500 ANSI Lumens (Max.) 2200:1 Typical (Full On/Full Off) 90% Typical (Japan Standard - JBMA) 800 x 600 (SVGA) 1.07 billion colors 2X F-Stop: F/ 2.41~2.55 Focal length, f=21.8~24 mm 1.1X manual Zoom Lens Throw ratio =1.95~2.15 wide and...

User Guide
Page 51
... fail and cease light output. Specifications 51 Lamp life is not guaranteed in any projector is a measure of a projector lamp will most likely result in stressful conditions which may include dusty environments, under high temperatures, many hours per day and abrupt powering-off will vary according to operating conditions and usage patterns. The lamp life rating is defined as the time it takes a lamp to have...
... fail and cease light output. Specifications 51 Lamp life is not guaranteed in any projector is a measure of a projector lamp will most likely result in stressful conditions which may include dusty environments, under high temperatures, many hours per day and abrupt powering-off will vary according to operating conditions and usage patterns. The lamp life rating is defined as the time it takes a lamp to have...

User Guide
Page 55
... RGB colors into a picture projected onto screen, also known as per second. Red, Green, Blue - Diagonal Screen - A 9FT high, 12FT wide, screen has a diagonal of frequency. Light passes through a color filter is the rate of 625 lines at 30 frames per the example above. Digital Micro-Mirror Device - It is sent to flip the image horizontally. Unit of 15FT. The largest image a projector can focus an image onto a screen. RGB - A video transmission...
... RGB colors into a picture projected onto screen, also known as per second. Red, Green, Blue - Diagonal Screen - A 9FT high, 12FT wide, screen has a diagonal of frequency. Light passes through a color filter is the rate of 625 lines at 30 frames per the example above. Digital Micro-Mirror Device - It is sent to flip the image horizontally. Unit of 15FT. The largest image a projector can focus an image onto a screen. RGB - A video transmission...

User Guide
Page 57
... A Adjusting the Projected Image 16 Adjusting the Projector Height 16 lower the projector Elevator button 16 Elevator foot 16 Adjusting the Projector Zoom and Focus 17 Focus ring 17 Zoom tab 17 Audio Input 37 Audio Settings 37 C Changing the Lamp 47 Closed Caption 40 Connecting the Projector Composite video cable 13 Connecting with a Component Cable 14 Connecting with a Composite Cable 13 Connecting with an S-video Cable 12 Power cord 10, 11, 12, 13, 14 S-video cable 12 To Computer 10 USB to USB cable 10 VGA to VGA cable...
... A Adjusting the Projected Image 16 Adjusting the Projector Height 16 lower the projector Elevator button 16 Elevator foot 16 Adjusting the Projector Zoom and Focus 17 Focus ring 17 Zoom tab 17 Audio Input 37 Audio Settings 37 C Changing the Lamp 47 Closed Caption 40 Connecting the Projector Composite video cable 13 Connecting with a Component Cable 14 Connecting with a Composite Cable 13 Connecting with an S-video Cable 12 Power cord 10, 11, 12, 13, 14 S-video cable 12 To Computer 10 USB to USB cable 10 VGA to VGA cable...

User Guide
Page 58
...-Screen Display 27 Auto-Adjust 29 Display (in PC Mode) 31 Display (in Video Mode) 33 Input Select 28 Lamp 34 Main Menu 27 Others 36 Picture (in PC Mode) 29 Picture (in Video Mode) 29 Set Up 34 P Password 38 phone numbers 53 Power Saving 37 Power Settings 37 Powering On/Off the Projector Powering Off the Projector 15 Powering On the Projector 15 Q Quick Shutdown 38 R Remote Control 22 IR receiver 21 Reset, Factory 41 S Screen Settings 37 Security Settings 38 Speaker 37 Specifications Audio 49...
...-Screen Display 27 Auto-Adjust 29 Display (in PC Mode) 31 Display (in Video Mode) 33 Input Select 28 Lamp 34 Main Menu 27 Others 36 Picture (in PC Mode) 29 Picture (in Video Mode) 29 Set Up 34 P Password 38 phone numbers 53 Power Saving 37 Power Settings 37 Powering On/Off the Projector Powering Off the Projector 15 Powering On the Projector 15 Q Quick Shutdown 38 R Remote Control 22 IR receiver 21 Reset, Factory 41 S Screen Settings 37 Security Settings 38 Speaker 37 Specifications Audio 49...


