Owner Manual
Page 2
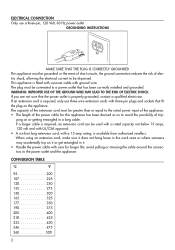
... amp rating, is required, only use a three-pin, 120 Volt, 60 Hz power outlet GROUNDING INSTRUCTIONS MAKE SURE THAT THE PLUG IS CORRECTLY GROUNDED This appliance must be connected to a power outlet that fit the plug on or getting entangled in the event of short circuits, the ground connection reduces the risk of trip- ELECTRICAL CONNECTION Only use three-wire...
... amp rating, is required, only use a three-pin, 120 Volt, 60 Hz power outlet GROUNDING INSTRUCTIONS MAKE SURE THAT THE PLUG IS CORRECTLY GROUNDED This appliance must be connected to a power outlet that fit the plug on or getting entangled in the event of short circuits, the ground connection reduces the risk of trip- ELECTRICAL CONNECTION Only use three-wire...
Owner Manual
Page 3
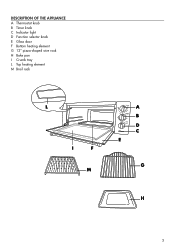
DESCRIPTION OF THE APPLIANCE A Thermostat knob B Timer knob C Indicator light D Function selector knob E Glass door F Bottom heating element G 12" pizza-shaped wire rack H Bake pan I Crumb tray L Top heating element M Broil rack L I F M A B D C E G H 3
DESCRIPTION OF THE APPLIANCE A Thermostat knob B Timer knob C Indicator light D Function selector knob E Glass door F Bottom heating element G 12" pizza-shaped wire rack H Bake pan I Crumb tray L Top heating element M Broil rack L I F M A B D C E G H 3
Owner Manual
Page 4
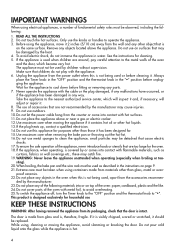
.... To switch the appliance off, turn the Timer knob to the "OFF" position and the thermostat knob to the metal walls of the oven and the door, which will inspect it and, if necessary, will adjust or repair it has been designed for household use of accessories that are not recommended by children without supervision. Do not cover parts of the oven with...
.... To switch the appliance off, turn the Timer knob to the "OFF" position and the thermostat knob to the metal walls of the oven and the door, which will inspect it and, if necessary, will adjust or repair it has been designed for household use of accessories that are not recommended by children without supervision. Do not cover parts of the oven with...
Owner Manual
Page 5
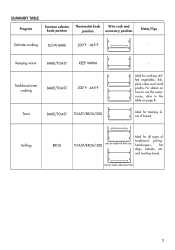
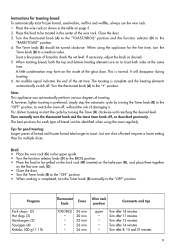
... model without broil rack 5 and toasting bread. SUMMARY TABLE Program Function selector knob position Thermostat knob Wire rack and position accessory position Notes/Tips Delicate cooking SLOW BAKE 200°F - 465°F - Ideal for all types of bread. Grilling BROIL TOAST/BROIL/500 only for model with broil rack Ideal for toasting slices of traditional grilling: hamburgers, hot dogs, kebabs, etc. For details on how to use the accessories, refer to the table on page 8. only for cooking...
... model without broil rack 5 and toasting bread. SUMMARY TABLE Program Function selector knob position Thermostat knob Wire rack and position accessory position Notes/Tips Delicate cooking SLOW BAKE 200°F - 465°F - Ideal for all types of bread. Grilling BROIL TOAST/BROIL/500 only for model with broil rack Ideal for toasting slices of traditional grilling: hamburgers, hot dogs, kebabs, etc. For details on how to use the accessories, refer to the table on page 8. only for cooking...
Owner Manual
Page 6
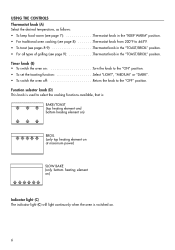
... the cooking functions available, that is: BAKE/TOAST (top heating element and bottom heating element on) BROIL (only top heating element on at maximum power) SLOW BAKE (only bottom heating element on) Indicator light (C) The indicator light (C) will light continuosly when the oven is switched on Turn the knob to the "ON" position. • To set the toasting function Select "LIGHT", "MEDIUM" or "DARK". • To switch the oven off Return the knob to the "OFF" position. USING THE CONTROLS Thermostat knob (A) Select...
... the cooking functions available, that is: BAKE/TOAST (top heating element and bottom heating element on) BROIL (only top heating element on at maximum power) SLOW BAKE (only bottom heating element on) Indicator light (C) The indicator light (C) will light continuosly when the oven is switched on Turn the knob to the "ON" position. • To set the toasting function Select "LIGHT", "MEDIUM" or "DARK". • To switch the oven off Return the knob to the "OFF" position. USING THE CONTROLS Thermostat knob (A) Select...
Owner Manual
Page 7
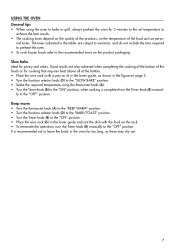
... the rack. • To terminate the operation, turn the Timer knob (B) manually to the "OFF" position. Slow bake Ideal for 5 minutes to the set temperature to the "OFF" position. The times indicated in the tables are also achieved when completing the cooking of the bottom of the food and on page 5. • Turn the function selector knob (D) to the "SLOW BAKE" position. • Select the required temperature using the oven...
... the rack. • To terminate the operation, turn the Timer knob (B) manually to the "OFF" position. Slow bake Ideal for 5 minutes to the set temperature to the "OFF" position. The times indicated in the tables are also achieved when completing the cooking of the bottom of the food and on page 5. • Turn the function selector knob (D) to the "SLOW BAKE" position. • Select the required temperature using the oven...
Owner Manual
Page 8
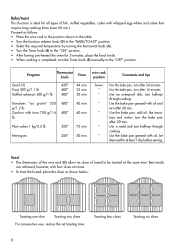
.... turn the Timer knob (B) manually to the "ON" position. • After having pre-heated the oven for 5 minutes, place the food inside. • When cooking is ideal for at the same time. Let them rest for all types of bread to be toasted at least 1 day before serving. Toasting four slices Toasting six slices 8 Bake/toast This function is completed, turn the bake pan after 20 min. Program Thermostat knob Times wire rack position Comments...
.... turn the Timer knob (B) manually to the "ON" position. • After having pre-heated the oven for 5 minutes, place the food inside. • When cooking is ideal for at the same time. Let them rest for all types of bread to be toasted at least 1 day before serving. Toasting four slices Toasting six slices 8 Bake/toast This function is completed, turn the bake pan after 20 min. Program Thermostat knob Times wire rack position Comments...
Owner Manual
Page 9
..., lighter toasting is completed, turn the thermostat knob and the toast timer knob off . The best positions for multiple slices. Then manually turn the Timer knob (B) manually to the "BAKE/TOAST" position. 4. Tips for toasting bread To automatically toast frozen bread, sandwiches, muffins and waffles, always use the wire rack. 1. For darker toasting re-start the cycle by turning the Timer knob (B) to the "OFF" position, to the "•" position. This is complete and the heating elements automatically switch off , as desired. 5. When toasting bread...
..., lighter toasting is completed, turn the thermostat knob and the toast timer knob off . The best positions for multiple slices. Then manually turn the Timer knob (B) manually to the "BAKE/TOAST" position. 4. Tips for toasting bread To automatically toast frozen bread, sandwiches, muffins and waffles, always use the wire rack. 1. For darker toasting re-start the cycle by turning the Timer knob (B) to the "OFF" position, to the "•" position. This is complete and the heating elements automatically switch off , as desired. 5. When toasting bread...
Owner Manual
Page 10
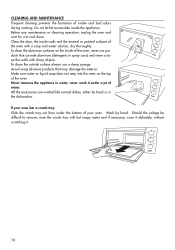
... surfaces of the oven, never use a damp sponge. Before any maintenance or cleaning operation, unplug the oven and wait for it to remove, rinse the crumb tray with hot soapy water and if necessary, scour it delicately, without scratching it under the bottom of water. Clean the door, the inside the appliance. To clean the outside surface always use products that may damage...
... surfaces of the oven, never use a damp sponge. Before any maintenance or cleaning operation, unplug the oven and wait for it to remove, rinse the crumb tray with hot soapy water and if necessary, scour it delicately, without scratching it under the bottom of water. Clean the door, the inside the appliance. To clean the outside surface always use products that may damage...
Owner Manual
Page 11
... are limited to the applicable warranty period set forth above exclusions may not apply to you . Also, consequential and incidental damage resulting from the use of this warranty. For all accessories, spare parts or replacement parts, please contact our parts division at our factory or authorized service center of any defective parts or part thereof, other person or company to...
... are limited to the applicable warranty period set forth above exclusions may not apply to you . Also, consequential and incidental damage resulting from the use of this warranty. For all accessories, spare parts or replacement parts, please contact our parts division at our factory or authorized service center of any defective parts or part thereof, other person or company to...

