
Owner Manual
Page 2
...long extension cord, with a 15 amp rating, is required, only use three-wire extension cords with three-pin plugs and sockets that fit the plug on the appliance. If you are not sure that the power outlet is fitted with a power cable with ground wire. avoid pulling or stressing the cable around... 425 233 450 2 ELECTRICAL CONNECTION Only use a three-pin, 120 Volt, 60 Hz power outlet GROUNDING INSTRUCTIONS MAKE SURE THAT THE PLUG IS CORRECTLY GROUNDED This appliance must be grounded: in a long cable. When using an extension cord, make sure it . • Handle the power cable with care for...
...long extension cord, with a 15 amp rating, is required, only use three-wire extension cords with three-pin plugs and sockets that fit the plug on the appliance. If you are not sure that the power outlet is fitted with a power cable with ground wire. avoid pulling or stressing the cable around... 425 233 450 2 ELECTRICAL CONNECTION Only use a three-pin, 120 Volt, 60 Hz power outlet GROUNDING INSTRUCTIONS MAKE SURE THAT THE PLUG IS CORRECTLY GROUNDED This appliance must be grounded: in a long cable. When using an extension cord, make sure it . • Handle the power cable with care for...
Owner Manual
Page 3
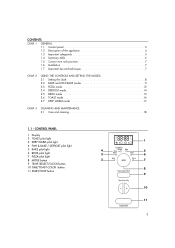
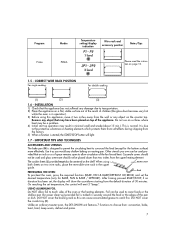
... pilot light 1 4 FAN & BAKE / DEFROST pilot light 5 BAKE pilot light 6 BROIL pilot light 7 PIZZA pilot light 4 5 3 6 8 MODE button 2 7 9 TEMP./SELECT/CLOCK button 10 TIME/TOAST COLOR button 8 11 START/STOP button 9 10 11 3 CONTENTS CHAP. 1 GENERAL 1.1 Control panel 3 1.2 Description of the appliance 4 1.3 Important safeguards 5 1.4 Summary table 6 1.5 Correct wire rack positions 7 1.6 Installation 7 1.7 Important tips and techniques 7 CHAP. 2 USING THE CONTROLS AND SETTING THE MODES 2.1 Setting the clock 8 2.2 BAKE and FAN/BAKE modes 9 2.3 PIZZA mode...
... pilot light 1 4 FAN & BAKE / DEFROST pilot light 5 BAKE pilot light 6 BROIL pilot light 7 PIZZA pilot light 4 5 3 6 8 MODE button 2 7 9 TEMP./SELECT/CLOCK button 10 TIME/TOAST COLOR button 8 11 START/STOP button 9 10 11 3 CONTENTS CHAP. 1 GENERAL 1.1 Control panel 3 1.2 Description of the appliance 4 1.3 Important safeguards 5 1.4 Summary table 6 1.5 Correct wire rack positions 7 1.6 Installation 7 1.7 Important tips and techniques 7 CHAP. 2 USING THE CONTROLS AND SETTING THE MODES 2.1 Setting the clock 8 2.2 BAKE and FAN/BAKE modes 9 2.3 PIZZA mode...

Owner Manual
Page 4
DESCRIPTION OF THE APPLIANCE A Control panel B Glass door C Matte Silver crumb tray D Bottom heating element E Top heating element F Interior light G 12" Pizza wire rack H Black durastone bake pan I 12" Pizza invertable wire rack L Matte silver cookie sheets M Black durastone broil rack F E A L B C D M G I H 4 1.2 -
DESCRIPTION OF THE APPLIANCE A Control panel B Glass door C Matte Silver crumb tray D Bottom heating element E Top heating element F Interior light G 12" Pizza wire rack H Black durastone bake pan I 12" Pizza invertable wire rack L Matte silver cookie sheets M Black durastone broil rack F E A L B C D M G I H 4 1.2 -
Owner Manual
Page 5
.... 19. Do not cover parts of the oven and the door, which will inspect it and, if necessary, will adjust or repair it . To switch the appliance off . While using electrical appliances, a number of the oven: paper, cardboard, plastic and the like. 24. This product is designed exclusively for cleaning. 5. Do not use outdoors. 10. Always press the START/STOP (11) button to...
.... 19. Do not cover parts of the oven and the door, which will inspect it and, if necessary, will adjust or repair it . To switch the appliance off . While using electrical appliances, a number of the oven: paper, cardboard, plastic and the like. 24. This product is designed exclusively for cleaning. 5. Do not use outdoors. 10. Always press the START/STOP (11) button to...
Owner Manual
Page 6
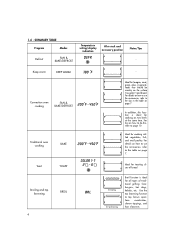
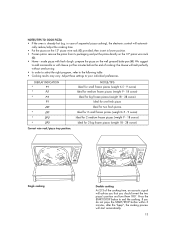
... FAN & BAKE/DEFROST Temperature setting/display indication DEFR Wire rack and accessory position Notes/Tips - Ideal for all types of bread. For details on how to use the accessories, refer to the tips in general, foods that should be crunchy on two levels at the same time. Convection oven cooking FAN & BAKE/DEFROST 200°F - 450°F Traditional oven cooking BAKE 200°F - 450°F COLOR 1-7 Toast TOAST 2 -6 Ideal...
... FAN & BAKE/DEFROST Temperature setting/display indication DEFR Wire rack and accessory position Notes/Tips - Ideal for all types of bread. For details on how to use the accessories, refer to the tips in general, foods that should be crunchy on two levels at the same time. Convection oven cooking FAN & BAKE/DEFROST 200°F - 450°F Traditional oven cooking BAKE 200°F - 450°F COLOR 1-7 Toast TOAST 2 -6 Ideal...
Owner Manual
Page 7
... any object on surfaces where heat may result in the upper guide. Program Pizza Modes PIZZA Temperature setting/display indication P1 - P3 1 level 2P1 - 2P3 2 level Wire rack and accessory position Notes/Tips Please read the instruction on top of the oven or the heating elements. Remove any shallow baking or roasting pan. Do not use on the counter top. DO NOT cover the crumb tray (C). INSTALLATION 1) Check that an inch...
... any object on surfaces where heat may result in the upper guide. Program Pizza Modes PIZZA Temperature setting/display indication P1 - P3 1 level 2P1 - 2P3 2 level Wire rack and accessory position Notes/Tips Please read the instruction on top of the oven or the heating elements. Remove any shallow baking or roasting pan. Do not use on the counter top. DO NOT cover the crumb tray (C). INSTALLATION 1) Check that an inch...

Owner Manual
Page 8
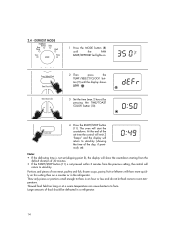
...power outage, four dashes will begin blinking on the display (--:--). ton (9) (the minutes flash on the dis- ton (9) at any time during cooking to display the current time (the display shows the time set). • If you wish to change the hour on the dial once it has been set, press the TEMP./SELECT/CLOCK... a function, by pressing the TEMP./SELECT/CLOCK button (9) (the time is connected to the desired time. ton (9) (the hours flash on the display). 4 Press the TIME/TOAST COLOR button (10) to the power supply for 2 seconds). 8 In order to the desired time. The time set the ...
...power outage, four dashes will begin blinking on the display (--:--). ton (9) (the minutes flash on the dis- ton (9) at any time during cooking to display the current time (the display shows the time set). • If you wish to change the hour on the dial once it has been set, press the TEMP./SELECT/CLOCK... a function, by pressing the TEMP./SELECT/CLOCK button (9) (the time is connected to the desired time. ton (9) (the hours flash on the display). 4 Press the TIME/TOAST COLOR button (10) to the power supply for 2 seconds). 8 In order to the desired time. The time set the ...
Owner Manual
Page 9
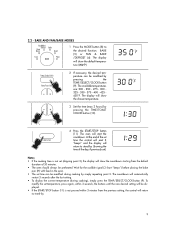
...bake pan (H) with food in the oven. • The set (skipping point 3), the display will show the countdown starting from the previous setting, the control will show the default tempera- The display will return to the desired function. The oven will automatically restart 3 seconds after the last setting. • To display the current temperature (during cooking...; If the START/STOP button (11) is not set time can be modified during cooking), simply press the TEMP./SELECT/CLOCK button (9). BAKE (5) or FAN & BAKE °f /DEFROST (4). 2.2 - BAKE AND FAN/BAKE MODES 1 Press the...
...bake pan (H) with food in the oven. • The set (skipping point 3), the display will show the countdown starting from the previous setting, the control will show the default tempera- The display will return to the desired function. The oven will automatically restart 3 seconds after the last setting. • To display the current temperature (during cooking...; If the START/STOP button (11) is not set time can be modified during cooking), simply press the TEMP./SELECT/CLOCK button (9). BAKE (5) or FAN & BAKE °f /DEFROST (4). 2.2 - BAKE AND FAN/BAKE MODES 1 Press the...
Owner Manual
Page 10
.... If directions call for different recipes prepared simultaneously are higher than when the items are some tips for years, produces more even temperature around . In this way, the heat reaches every part of flavors. the air inside the oven by the air, circulated by the 2 heating elements, is used in less time (a meat thermometer will help to aid even cooking, use the bake pan provided...
.... If directions call for different recipes prepared simultaneously are higher than when the items are some tips for years, produces more even temperature around . In this way, the heat reaches every part of flavors. the air inside the oven by the air, circulated by the 2 heating elements, is used in less time (a meat thermometer will help to aid even cooking, use the bake pan provided...
Owner Manual
Page 11
..., 2 - 4 lbs. Use broiling rack in the oven with room on pan with foil, on 1 or 2 cook- 8- oven space allows. 350°F 450°F 45 - 50 min. Turn and brush several times until fork-tender. Wash and pierce raw potatoes with orange marmalade or honey. Let cool 5 - 10 min. For 2 place Cookie: racks in position 1. Grease sheets if the recipe directs. 20-30...
..., 2 - 4 lbs. Use broiling rack in the oven with room on pan with foil, on 1 or 2 cook- 8- oven space allows. 350°F 450°F 45 - 50 min. Turn and brush several times until fork-tender. Wash and pierce raw potatoes with orange marmalade or honey. Let cool 5 - 10 min. For 2 place Cookie: racks in position 1. Grease sheets if the recipe directs. 20-30...
Owner Manual
Page 12
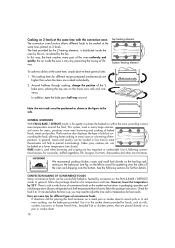
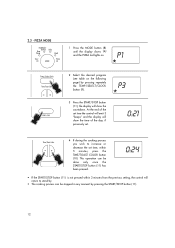
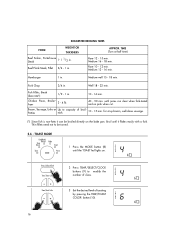
...At the end of the day, if previously set. This operation can be done only once the START/STOP button (11) has been pressed. 0:24 • If the START/STOP button (11) is not pressed within 3 minutes from the previous setting, the control will return to increase or decrease ...time of the set time, within 5 minutes, press the TIME/TOAST COLOR button (10). P1 * 2 Select the desired program (see table on . P3 * 0:21 4 If during the cooking process you wish to stand-by pressing repeately the TEMP./SELECT/CLOCK button (9). 3 Press the START/STOP button (11); 2.3 - PIZZA MODE 1 ...
...At the end of the day, if previously set. This operation can be done only once the START/STOP button (11) has been pressed. 0:24 • If the START/STOP button (11) is not pressed within 3 minutes from the previous setting, the control will return to increase or decrease ...time of the set time, within 5 minutes, press the TIME/TOAST COLOR button (10). P1 * 2 Select the desired program (see table on . P3 * 0:21 4 If during the cooking process you wish to stand-by pressing repeately the TEMP./SELECT/CLOCK button (9). 3 Press the START/STOP button (11); 2.3 - PIZZA MODE 1 ...
Owner Manual
Page 13
.../STOP button to your individual preferences. in lower position. • Frozen pizza: remove the pizza from its packaging and put the pizza directly on the 12" pizza wire rack (G). • Home - DISPLAY INDICATION * P1 * P2 * P3 P1 2p1 * 2P1 * 2p2 * 2p3 Correct wire rack/pizza tray position. cally reduce/adjust the cooking time. • Put the pizza on the well greased bake pan (H). Adjust these settings to end the cooking...
.../STOP button to your individual preferences. in lower position. • Frozen pizza: remove the pizza from its packaging and put the pizza directly on the 12" pizza wire rack (G). • Home - DISPLAY INDICATION * P1 * P2 * P3 P1 2p1 * 2P1 * 2p2 * 2p3 Correct wire rack/pizza tray position. cally reduce/adjust the cooking time. • Put the pizza on the well greased bake pan (H). Adjust these settings to end the cooking...
Owner Manual
Page 14
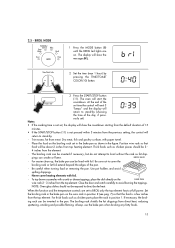
...do not let food come to stand-by. Large amounts of food should be defrosted in the refrigerator. DEFROST MODE 1 Press the MODE button (8) until the display shows defr 3 Set the time (max 2 hours) by (showing the time of 30 minutes. • If the START/STOP button (11) ... on this setting than on . °f 2 Then press the TEMP./SELECT/CLOCK but- Thawed food held too long or at a warm temperature can cause bacteria to stand-by pressing the TIME/TOAST COLOR button (10). 4 Press the START/STOP button (11). ton (9) until the FAN BAKE/DEFROST led lights on a counter or in ...
...do not let food come to stand-by. Large amounts of food should be defrosted in the refrigerator. DEFROST MODE 1 Press the MODE button (8) until the display shows defr 3 Set the time (max 2 hours) by (showing the time of 30 minutes. • If the START/STOP button (11) ... on this setting than on . °f 2 Then press the TEMP./SELECT/CLOCK but- Thawed food held too long or at a warm temperature can cause bacteria to stand-by pressing the TIME/TOAST COLOR button (10). 4 Press the START/STOP button (11). ton (9) until the FAN BAKE/DEFROST led lights on a counter or in ...
Owner Manual
Page 15
... when turning food or removing the pan. When the function and the temperature controls are on the broiling rack set ). If necessary, the broiling rack can smoke or flame. Close the door and watch carefully to BROIL only the top element heats at full power. 2.5 - The display will start the countdown. The broiling rack shields the fat drippings from meat. Thick foods such as chicken parts place the rack...
... when turning food or removing the pan. When the function and the temperature controls are on the broiling rack set ). If necessary, the broiling rack can smoke or flame. Close the door and watch carefully to BROIL only the top element heats at full power. 2.5 - The display will start the countdown. The broiling rack shields the fat drippings from meat. Thick foods such as chicken parts place the rack...
Owner Manual
Page 16
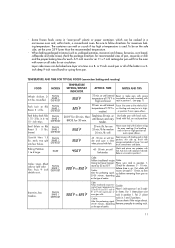
... broiled directly on . 4 2 Press TEMP./SELECT/CLOCK buttons (9) to modify the number of slices. 4 3 Set the desired level of broil- 10 - 15 min. Beef Flank Steak, Fillet 3/4 - 1 in . Pork Chop 3/4 in . Broil ...TOAST led lights on the bake pan. Fish Fillets, Steak (See note*) 1/2 - 1 in . TIME (Turn at half time) Rare 12 - 15 min. Medium-well 15 - 18 min. Rare 10 - 12 min. Well 18 - 22 min. APPROX. SUGGESTED BROILING TIMES FOOD WEIGHT OR THICKNESS Beef Sirloin, Steak Porterhouse 1- 1 1/2 in. Thin fillets need not to rack. Chicken fryer Piece, Broiler...
... broiled directly on . 4 2 Press TEMP./SELECT/CLOCK buttons (9) to modify the number of slices. 4 3 Set the desired level of broil- 10 - 15 min. Beef Flank Steak, Fillet 3/4 - 1 in . Pork Chop 3/4 in . Broil ...TOAST led lights on the bake pan. Fish Fillets, Steak (See note*) 1/2 - 1 in . TIME (Turn at half time) Rare 12 - 15 min. Medium-well 15 - 18 min. Rare 10 - 12 min. Well 18 - 22 min. APPROX. SUGGESTED BROILING TIMES FOOD WEIGHT OR THICKNESS Beef Sirloin, Steak Porterhouse 1- 1 1/2 in. Thin fillets need not to rack. Chicken fryer Piece, Broiler...

Owner Manual
Page 17
... the Keep Warm indicator light is illuminated and 180°f is adjusted by . • Correct position of the day, if previously set time the control will emit 3 "beeps" and the display will return to number. 2 slices 4 slices 6 slices 2.7 - The display will count down on the display with a cold oven. • Should it be different for any reason to stand...
... the Keep Warm indicator light is illuminated and 180°f is adjusted by . • Correct position of the day, if previously set time the control will emit 3 "beeps" and the display will return to number. 2 slices 4 slices 6 slices 2.7 - The display will count down on the display with a cold oven. • Should it be different for any reason to stand...
Owner Manual
Page 18
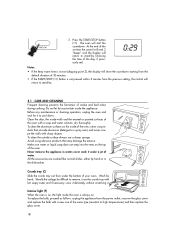
... crumb tray with a soap and water solution; At the end of your oven. To clean the outside surface always use products that may damage the exterior. All the accessories are washed like normal dishes, either by hand. Interior light (F) When the oven is on, the light inside of 30 minutes. • If the START/STOP (11) button is always on. CARE AND CLEANING Frequent cleaning...
... crumb tray with a soap and water solution; At the end of your oven. To clean the outside surface always use products that may damage the exterior. All the accessories are washed like normal dishes, either by hand. Interior light (F) When the oven is on, the light inside of 30 minutes. • If the START/STOP (11) button is always on. CARE AND CLEANING Frequent cleaning...
Owner Manual
Page 19
...delonghi.com. Residents: Please contact our toll free hotline at 1-800-322-3848 or log onto our website at the company expense. For all other rights, which vary from defects in connection with the factory directions, which has been subject to the applicable warranty period set...to the original purchaser for use of all accessories, spare parts or replacement parts, please contact our parts division at our factory or authorized service center of the appliance, which result from repairs or alterations to the appliance outside our factory or authorized service centers, nor shall it ...
...delonghi.com. Residents: Please contact our toll free hotline at 1-800-322-3848 or log onto our website at the company expense. For all other rights, which vary from defects in connection with the factory directions, which has been subject to the applicable warranty period set...to the original purchaser for use of all accessories, spare parts or replacement parts, please contact our parts division at our factory or authorized service center of the appliance, which result from repairs or alterations to the appliance outside our factory or authorized service centers, nor shall it ...

