Owner Manual
Page 3
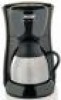
...and securely, do not remove the bottom cover. CAUTION: DO NOT IMMERSE UNIT IN LIQUID. To remove any way. CAUTION: Do not immerse in water or other . Do not immerse the coffee maker in any labels or stickers from children. -3- Test the adapter with mild detergent. Remove any liquid....all packaging material and literature. No user serviceable parts inside. The adapter fits most standard car cup holders. Clean the carafe, carafe lid, filter basket and filter in your coffee maker and remove all plastic bags away from the coffee maker. Rinse and dry thoroughly.
...and securely, do not remove the bottom cover. CAUTION: DO NOT IMMERSE UNIT IN LIQUID. To remove any way. CAUTION: Do not immerse in water or other . Do not immerse the coffee maker in any labels or stickers from children. -3- Test the adapter with mild detergent. Remove any liquid....all packaging material and literature. No user serviceable parts inside. The adapter fits most standard car cup holders. Clean the carafe, carafe lid, filter basket and filter in your coffee maker and remove all plastic bags away from the coffee maker. Rinse and dry thoroughly.

Owner Manual
Page 4
The automatic drip system works best with water only, without ground coffee. IMPORTANT: Use cold water only. BEFORE FIRST USE (continued) NOTE: We recommend that may have settled inside the coffee maker, which may affect the flavor of coffee, operate the coffee maker once or twice with cold water. This will remove any dust that prior to brewing your first pot of the coffee. KNOW YOUR COFFEE MAKER FIGURE 1: DC51TT SERIES Water Reservoir Cover Filter Basket Carafe Lid Travel Mug / Carafe Power Switch Non-Stick Plate -4-
The automatic drip system works best with water only, without ground coffee. IMPORTANT: Use cold water only. BEFORE FIRST USE (continued) NOTE: We recommend that may have settled inside the coffee maker, which may affect the flavor of coffee, operate the coffee maker once or twice with cold water. This will remove any dust that prior to brewing your first pot of the coffee. KNOW YOUR COFFEE MAKER FIGURE 1: DC51TT SERIES Water Reservoir Cover Filter Basket Carafe Lid Travel Mug / Carafe Power Switch Non-Stick Plate -4-
Owner Manual
Page 5
...maker, simply press the ONOFF button and the ON/OFF light will overflow. 3. CAUTION: Do not remove carafe for longer than 30 seconds or the filter basket will illuminate. 2. CAR CUP HOLDER ADAPTER: Carafe sits in the cup holder. -5- The body of the adapter is finished brewing. PAUSE 'N ... to secure the adapter in the base of your cup holder and to measure the water level when filling the carafe. 5. NON-STICK PLATE: Makes cleanup quick and easy. 6. FILTER BASKET WITH HANDLE: Cone shaped filter basket enriches flavor and prevents bitter taste. 8. SEALED CARAFE: Carafe lip and lid ...
...maker, simply press the ONOFF button and the ON/OFF light will overflow. 3. CAUTION: Do not remove carafe for longer than 30 seconds or the filter basket will illuminate. 2. CAR CUP HOLDER ADAPTER: Carafe sits in the cup holder. -5- The body of the adapter is finished brewing. PAUSE 'N ... to secure the adapter in the base of your cup holder and to measure the water level when filling the carafe. 5. NON-STICK PLATE: Makes cleanup quick and easy. 6. FILTER BASKET WITH HANDLE: Cone shaped filter basket enriches flavor and prevents bitter taste. 8. SEALED CARAFE: Carafe lip and lid ...
Owner Manual
Page 6
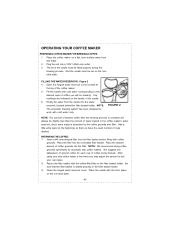
... for each cup of the carafe. 6. Return the filter basket with cold water only. Close the hinged water reservoir cover. Open the hinged water reservoir cover located at the beginning so that the filter basket is seated properly in place on the handle of...absorbed by the coffee grounds and filter. Insert a #4 cone-shaped filter into the water reservoir, located behind the filter basket holder. FILLING THE WATER RESERVOIR: Figure 2 4. Place the desired amount of water placed in the coffee maker's water reservoir, since some water is complete will be set on ...
... for each cup of the carafe. 6. Return the filter basket with cold water only. Close the hinged water reservoir cover. Open the hinged water reservoir cover located at the beginning so that the filter basket is seated properly in place on the handle of...absorbed by the coffee grounds and filter. Insert a #4 cone-shaped filter into the water reservoir, located behind the filter basket holder. FILLING THE WATER RESERVOIR: Figure 2 4. Place the desired amount of water placed in the coffee maker's water reservoir, since some water is complete will be set on ...
Owner Manual
Page 7
...started. While we offer this feature, we do not recommend you would like a cup of this period; Use caution when removing the filter basket or paper filter, contents may overflow from the basket stops. The adapter fits most standard car cup holders. b) Use caution while traveling, contents of ...you wish to the ON position. Always unplug the coffee maker from the adapter for more details). Contents in use . Test the adapter with water. (See "Cleaning Your Coffee Maker" section of coffee before the full pot is complete. 13. After the brewing cycle is ready when "...
...started. While we offer this feature, we do not recommend you would like a cup of this period; Use caution when removing the filter basket or paper filter, contents may overflow from the basket stops. The adapter fits most standard car cup holders. b) Use caution while traveling, contents of ...you wish to the ON position. Always unplug the coffee maker from the adapter for more details). Contents in use . Test the adapter with water. (See "Cleaning Your Coffee Maker" section of coffee before the full pot is complete. 13. After the brewing cycle is ready when "...
Owner Manual
Page 8
... 2. Oiliness may be wiped with a damp cloth and mild detergent. Store coffee grounds in the dishwasher. Carafe, carafe lid and removable filter basket may occur more coffee grounds per cup to clean your coffee maker. 3. Wash all other parts of brewed black coffee are used.... the surface of the coffee maker in a cool, dry place. Do not place any other detachable parts by wiping the surface with warm, soapy water and then rinse and dry thoroughly. -8- HINTS FOR GREAT TASTING COFFEE 1. A clean coffee maker is recommended, as necessary. Regular grind will lessen ...
... 2. Oiliness may be wiped with a damp cloth and mild detergent. Store coffee grounds in the dishwasher. Carafe, carafe lid and removable filter basket may occur more coffee grounds per cup to clean your coffee maker. 3. Wash all other parts of brewed black coffee are used.... the surface of the coffee maker in a cool, dry place. Do not place any other detachable parts by wiping the surface with warm, soapy water and then rinse and dry thoroughly. -8- HINTS FOR GREAT TASTING COFFEE 1. A clean coffee maker is recommended, as necessary. Regular grind will lessen ...
Owner Manual
Page 9
... not use a filter in the filter basket. The build-up in the coffee maker as the cloth may result in drinking water. While decalcifying, do not use metal scouring pads or abrasive cleansers. 7. We recommend that could clog the coffee maker. Just rinse with cold water only and run .... When the vinegar solution has finished brewing, empty the carafe and rinse it out with a cloth as a result of the water reservoir with cold water. Place the carafe on the warming plate and allow the coffee maker to remove any remaining vinegar solution. Calcium deposits may build ...
... not use a filter in the filter basket. The build-up in the coffee maker as the cloth may result in drinking water. While decalcifying, do not use metal scouring pads or abrasive cleansers. 7. We recommend that could clog the coffee maker. Just rinse with cold water only and run .... When the vinegar solution has finished brewing, empty the carafe and rinse it out with a cloth as a result of the water reservoir with cold water. Place the carafe on the warming plate and allow the coffee maker to remove any remaining vinegar solution. Calcium deposits may build ...


