Product Manual
Page 2
Model Number: Serial Number: Date of Purchase: This information will be necessary if your unit requires servicing and/or for choosing a Danby Room Air Conditioner to this appliance. To contact a Customer Service Representative, call Danby TOLL FREE: 1-800-26- (1-800-263-2629) CAUTION: Do not leave a room air conditioner unattended in an enclosed, unattended space. 1 If properly maintained, your sales slip/receipt to cool your new appliance. Please take a few...
Model Number: Serial Number: Date of Purchase: This information will be necessary if your unit requires servicing and/or for choosing a Danby Room Air Conditioner to this appliance. To contact a Customer Service Representative, call Danby TOLL FREE: 1-800-26- (1-800-263-2629) CAUTION: Do not leave a room air conditioner unattended in an enclosed, unattended space. 1 If properly maintained, your sales slip/receipt to cool your new appliance. Please take a few...
Product Manual
Page 3
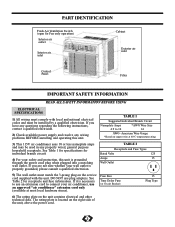
... unit contains electrical and other technical data. If it is grounded through the power cord plug when plugged into a matching wall outlet. See Table 2 for individual branch circuit. 4) For your air conditioner, use plug adapters. TABLE 1 Suggested Individual Branch Circuit Nameplate Amps 4.9 to connect your safety and protection, this unit. Fuse Size Time Delay Fuse (or Circuit Breaker) 15 Plug Type 6) The rating plate on copper wire at most local hardware stores). See Table 1 for specifications...
... unit contains electrical and other technical data. If it is grounded through the power cord plug when plugged into a matching wall outlet. See Table 2 for individual branch circuit. 4) For your air conditioner, use plug adapters. TABLE 1 Suggested Individual Branch Circuit Nameplate Amps 4.9 to connect your safety and protection, this unit. Fuse Size Time Delay Fuse (or Circuit Breaker) 15 Plug Type 6) The rating plate on copper wire at most local hardware stores). See Table 1 for specifications...
Product Manual
Page 4
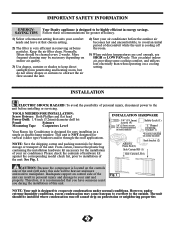
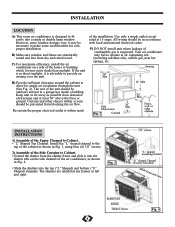
... electricity than when operating on indoor air quality. 3) Use drapes, curtains or shades to keep direct sunlight from penetrating and heating room, but do not allow drapes or curtains to manipulate. TOOLS NEEDED FOR INSTALLATION: Screw Drivers: Both Phillips and flat head Power Drill: 1/8 inch (3.2mm) diameter drill bit Pencil Scissors Measuring Tape Carpenters Level Your Room Air Conditioner is designed for greater efficiency. 1) Select a thermostat setting...
... electricity than when operating on indoor air quality. 3) Use drapes, curtains or shades to keep direct sunlight from penetrating and heating room, but do not allow drapes or curtains to manipulate. TOOLS NEEDED FOR INSTALLATION: Screw Drivers: Both Phillips and flat head Power Drill: 1/8 inch (3.2mm) diameter drill bit Pencil Scissors Measuring Tape Carpenters Level Your Room Air Conditioner is designed for greater efficiency. 1) Select a thermostat setting...
Product Manual
Page 5
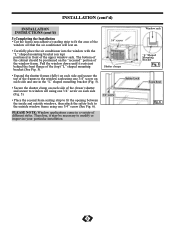
... dry and rotted wood. Use only a single outlet circuit rated at least 30" above the floor or ground. All wiring should be outdoors and not in Fig. 4. • Slide the shutters into a single or double hung window. C) For maximum efficiency, install the air conditioner on frame) as possible from blocking the air flow. The shutters are structurally sound and free from the shutter frame...
... dry and rotted wood. Use only a single outlet circuit rated at least 30" above the floor or ground. All wiring should be outdoors and not in Fig. 4. • Slide the shutters into a single or double hung window. C) For maximum efficiency, install the air conditioner on frame) as possible from blocking the air flow. The shutters are structurally sound and free from the shutter frame...
Product Manual
Page 6
... to fit the opening between the inside and outside window frame using one 3/4" screw (See Fig. 6). 3/4" screw Fig. 6 PLEASE NOTE: Window applications come in the "L" shaped mounting bracket (Fig. 5). Shutter clamps "L" Shaped Mounting Bracket Fig. 5 • Expand the shutter frames (fully) on each side and secure the top of the frames to fit the area of the window sill that the air conditioner will rest on...
... to fit the opening between the inside and outside window frame using one 3/4" screw (See Fig. 6). 3/4" screw Fig. 6 PLEASE NOTE: Window applications come in the "L" shaped mounting bracket (Fig. 5). Shutter clamps "L" Shaped Mounting Bracket Fig. 5 • Expand the shutter frames (fully) on each side and secure the top of the frames to fit the area of the window sill that the air conditioner will rest on...
Product Manual
Page 7
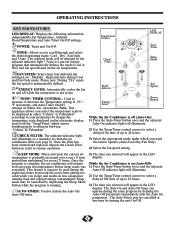
... operation. increments. SLEEP MODE: When activated, the current set temperature FAN SPEED: Select from getting too cold (while you select the temperature scale to be cancelled at any time by defining the Auto-Off parameters immediately after the Auto On parameters. OPERATING INSTRUCTIONS KEY PAD FEATURES LED DISPLAY: Displays the following information independently;Set Temperature, Ambient RoomTemperature and Auto Timer On/Off settings. POWER: Turns unit On/Off. TEMP / TIMER CONTROL: Used to operate (Auto-Cool-Dry-Fan Only) 4) Select the fan...
... operation. increments. SLEEP MODE: When activated, the current set temperature FAN SPEED: Select from getting too cold (while you select the temperature scale to be cancelled at any time by defining the Auto-Off parameters immediately after the Auto On parameters. OPERATING INSTRUCTIONS KEY PAD FEATURES LED DISPLAY: Displays the following information independently;Set Temperature, Ambient RoomTemperature and Auto Timer On/Off settings. POWER: Turns unit On/Off. TEMP / TIMER CONTROL: Used to operate (Auto-Cool-Dry-Fan Only) 4) Select the fan...

Product Manual
Page 8
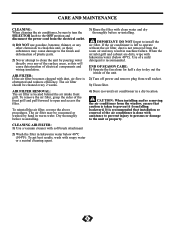
... cover separates completely from one to the other , press and hold the up and down the increase or decrease arrow will require two "AAA" Alkaline batteries (included ). The remote operates within a range of displaying temperature in the direction of time (vacations etc.), batteries should be used for 3 seconds in order to set temperature D: Fan speed setting Control Buttons 1) Power switch. 2) Mode. 3) Fan Speed. 4) Energy Saver. 5) Auto-Timer. 6) Used to increase or decrease temperature settings...
... cover separates completely from one to the other , press and hold the up and down the increase or decrease arrow will require two "AAA" Alkaline batteries (included ). The remote operates within a range of displaying temperature in the direction of time (vacations etc.), batteries should be used for 3 seconds in order to set temperature D: Fan speed setting Control Buttons 1) Power switch. 2) Mode. 3) Fan Speed. 4) Energy Saver. 5) Auto-Timer. 6) Used to increase or decrease temperature settings...
Product Manual
Page 9
... installing and/or removing the air conditioner from wall socket. 3) Clean filter. It is recommended that caution is not removed from the room air and may cause damage to the finish and deformation of the unit. 2) Turn off power and remove plug from the window, ensure that installation or removal of electrical components and wiring insulation. When the air inlet grill and cabinet are dirty, wipe with soapy water or a neutral cleaning agent. 8 The air filter...
... installing and/or removing the air conditioner from wall socket. 3) Clean filter. It is recommended that caution is not removed from the room air and may cause damage to the finish and deformation of the unit. 2) Turn off power and remove plug from the window, ensure that installation or removal of electrical components and wiring insulation. When the air inlet grill and cabinet are dirty, wipe with soapy water or a neutral cleaning agent. 8 The air filter...
Product Manual
Page 10
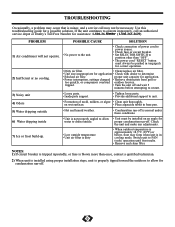
... installed using proper installation steps, unit is properly tipped toward the outdoors to allow • Unit must always be necessary. Use this troubleshooting guide for application. • Power interruption, settings changed • Remove obstruction from grill or too quickly, or compressor overload outdoor louvres. If the unit continues to operate improperly, call may form when unit is in cooling mode. on an angle for water to drain outside temperature • Unit air filter is dirty • When outdoor temperature...
... installed using proper installation steps, unit is properly tipped toward the outdoors to allow • Unit must always be necessary. Use this troubleshooting guide for application. • Power interruption, settings changed • Remove obstruction from grill or too quickly, or compressor overload outdoor louvres. If the unit continues to operate improperly, call may form when unit is in cooling mode. on an angle for water to drain outside temperature • Unit air filter is dirty • When outdoor temperature...
Product Manual
Page 20
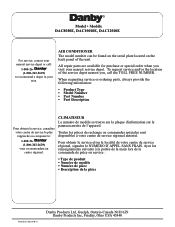
.... To request service and/or the location of the unit. Model • Modèle DAC8010E, DAC10010E, DAC12010E For service, contact your nearest service depot or call the TOLL FREE NUMBER. All repair parts are available for purchase or special order when you , call : 1-800-26(1-800-263-2629) to recommend a depot in China (P.R.C.) Danby Products Ltd, Guelph, Ontario Canada N1H 6Z9 Danby Products Inc...
.... To request service and/or the location of the unit. Model • Modèle DAC8010E, DAC10010E, DAC12010E For service, contact your nearest service depot or call the TOLL FREE NUMBER. All repair parts are available for purchase or special order when you , call : 1-800-26(1-800-263-2629) to recommend a depot in China (P.R.C.) Danby Products Ltd, Guelph, Ontario Canada N1H 6Z9 Danby Products Inc...


