Quick Install Guide
Page 3
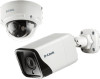
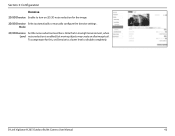
... D-Link support website. Tighten it to lock the camera angle. Loosen the screw with the 2 Adjustable Mount included Allen key to configure the device using the associated Setup Wizard. Note: Using a power supply with a different voltage than the one recommended for the device will cause damage and void the warranty for installing and configuring your camera. ENGLISH Before You Begin Hardware Overview This installation guide...
... D-Link support website. Tighten it to lock the camera angle. Loosen the screw with the 2 Adjustable Mount included Allen key to configure the device using the associated Setup Wizard. Note: Using a power supply with a different voltage than the one recommended for the device will cause damage and void the warranty for installing and configuring your camera. ENGLISH Before You Begin Hardware Overview This installation guide...
Quick Install Guide
Page 4
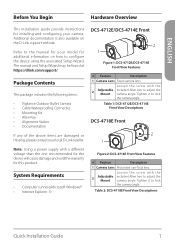
... instructions to an optional 12 V / 1.5 A Connector power adapter (not included) 3 Reset Button Press and hold for a microSD card. Table 3: Cable Interface Descriptions 1 Figure 5: DCS-4718E Bottom Panel Interfaces # Feature Description 1 microSD Slot for Ethernet. On the product page, click the Download button next to perform a factory reset. Can also be used to power the camera using Power over Ethernet (PoE) 2 Power Connects to install the Setup Wizard. 2 Quick Installation Guide Table 4: DCS-4712E/DCS-4714E Rear Panel Interface Descriptions Installing...
... instructions to an optional 12 V / 1.5 A Connector power adapter (not included) 3 Reset Button Press and hold for a microSD card. Table 3: Cable Interface Descriptions 1 Figure 5: DCS-4718E Bottom Panel Interfaces # Feature Description 1 microSD Slot for Ethernet. On the product page, click the Download button next to perform a factory reset. Can also be used to power the camera using Power over Ethernet (PoE) 2 Power Connects to install the Setup Wizard. 2 Quick Installation Guide Table 4: DCS-4712E/DCS-4714E Rear Panel Interface Descriptions Installing...
Quick Install Guide
Page 5
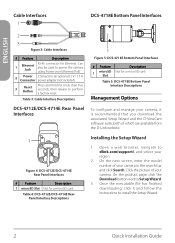
... network, this is plugged in (either using a 12 V 1.5 A power adapter or a PoE-enabled device) and connected Wizard, then select your camera and click the Link button to open a web browser and type the camera's IP address (displayed in , you have a DHCP server on the main screen of your computer with an Ethernet cable. Once the file has finished downloading, unzip it, and click the executable file SetupTool.exe. Press Save...
... network, this is plugged in (either using a 12 V 1.5 A power adapter or a PoE-enabled device) and connected Wizard, then select your camera and click the Link button to open a web browser and type the camera's IP address (displayed in , you have a DHCP server on the main screen of your computer with an Ethernet cable. Once the file has finished downloading, unzip it, and click the executable file SetupTool.exe. Press Save...

Quick Install Guide
Page 6
... wall anchors into the holes. Connect the power and Ethernet cables, or just the Ethernet cable if you are running the camera cables through the wall, drill a hole in the center and pull the cables through the cable channel on the base. 6. If you are using a PoE connection. 3. ENGLISH Mounting the Camera Note: It is highly recommended that the cable channel is also recommended to do...
... wall anchors into the holes. Connect the power and Ethernet cables, or just the Ethernet cable if you are running the camera cables through the wall, drill a hole in the center and pull the cables through the cable channel on the base. 6. If you are using a PoE connection. 3. ENGLISH Mounting the Camera Note: It is highly recommended that the cable channel is also recommended to do...

Quick Install Guide
Page 7
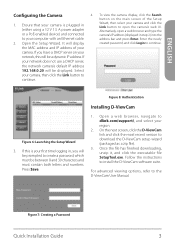
... turning it clockwise about one half-turn. 1. Figure 15: Attaching the RJ-45 Connector Quick Installation Guide Figure 18: Wrapping the Power Connector and Reset Button 5 Place the washer around the base of the Ethernet connector as shown. Figure 13: Attaching the Washer Ring Figure 16: Attaching the Waterproof Connector 2. Thread the bare Ethernet cable through 5. Screw the back part of the cable using...
... turning it clockwise about one half-turn. 1. Figure 15: Attaching the RJ-45 Connector Quick Installation Guide Figure 18: Wrapping the Power Connector and Reset Button 5 Place the washer around the base of the Ethernet connector as shown. Figure 13: Attaching the Washer Ring Figure 16: Attaching the Waterproof Connector 2. Thread the bare Ethernet cable through 5. Screw the back part of the cable using...
Quick Install Guide
Page 10
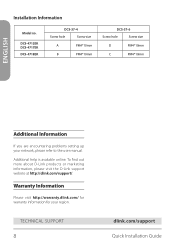
... Screw size D PM4*10mm C PM4*10mm ENGLISH Additional Information If you are encountering problems setting up your region. Installation Information Model no. Additional help is available online. Warranty Information Please visit http://warranty.dlink.com/ for warranty information for your network, please refer to the user manual. To find out more about D-Link products or marketing information, please visit the D-Link support website...
... Screw size D PM4*10mm C PM4*10mm ENGLISH Additional Information If you are encountering problems setting up your region. Installation Information Model no. Additional help is available online. Warranty Information Please visit http://warranty.dlink.com/ for warranty information for your network, please refer to the user manual. To find out more about D-Link products or marketing information, please visit the D-Link support website...

Datasheet
Page 2
... Configurable privacy mask zones Auto White Balance (AWB) Auto Gain Control (AGC) Wide Dynamic Range (WDR) Corridor mode Simultaneous H.265/H.264/MJPEG format compression JPEG for still images 2592 x 1520 at up to 30 fps microSD card slot1 Reset button 10/100 Base-TX Fast Ethernet port (supports 802.3af PoE Class 3) PoE Port Power Reset Connector Button IPv4 HTTP/HTTPS RTSP/RTP/RTCP TCP UDP DHCP DNS DDNS NTP...
... Configurable privacy mask zones Auto White Balance (AWB) Auto Gain Control (AGC) Wide Dynamic Range (WDR) Corridor mode Simultaneous H.265/H.264/MJPEG format compression JPEG for still images 2592 x 1520 at up to 30 fps microSD card slot1 Reset button 10/100 Base-TX Fast Ethernet port (supports 802.3af PoE Class 3) PoE Port Power Reset Connector Button IPv4 HTTP/HTTPS RTSP/RTP/RTCP TCP UDP DHCP DNS DDNS NTP...
User Manual 1.30 WW
Page 3
... Specifications - Table of Contents Product Overview 4 Package Contents 4 Introduction 5 System Requirements 5 Features 6 Hardware Overview (DCS-4712E/DCS-4714E 7 Hardware Overview (DCS-4718E 8 Installation 9 Mounting the Camera 9 Waterproofing Your Installation 11 Inserting the MicroSD Card 14 Configuration 15 Installing the Setup Wizard 15 Accessing the Admin Interface 16 Live Video 17 Playback 18 Controlling the Playback 19 Setup Wizard 21 Network Setup Wizard 22 Motion Detection Setup Wizard 28 Settings...
... Specifications - Table of Contents Product Overview 4 Package Contents 4 Introduction 5 System Requirements 5 Features 6 Hardware Overview (DCS-4712E/DCS-4714E 7 Hardware Overview (DCS-4718E 8 Installation 9 Mounting the Camera 9 Waterproofing Your Installation 11 Inserting the MicroSD Card 14 Configuration 15 Installing the Setup Wizard 15 Accessing the Admin Interface 16 Live Video 17 Playback 18 Controlling the Playback 19 Setup Wizard 21 Network Setup Wizard 22 Motion Detection Setup Wizard 28 Settings...
User Manual 1.30 WW
Page 4
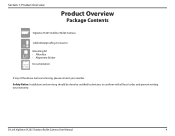
Section 1: Product Overview Product Overview Package Contents Vigilance H.265 Outdoor Bullet Camera Cable Waterproofing Connector Mounting Kit • Allen Key • Alignment Sticker Documentation If any of the above items are missing, please contact your warranty. D-Link Vigilance H.265 Outdoor Bullet Camera User Manual 4 Safety Notice: Installation and servicing should be done by certified technicians to conform with all local codes and prevent voiding your reseller.
Section 1: Product Overview Product Overview Package Contents Vigilance H.265 Outdoor Bullet Camera Cable Waterproofing Connector Mounting Kit • Allen Key • Alignment Sticker Documentation If any of the above items are missing, please contact your warranty. D-Link Vigilance H.265 Outdoor Bullet Camera User Manual 4 Safety Notice: Installation and servicing should be done by certified technicians to conform with all local codes and prevent voiding your reseller.

User Manual 1.30 WW
Page 5
... H.265 Outdoor Bullet Camera User Manual 5 It offers a complete surveillance solution featuring a built-in smart IR function, preventing overexposure of near objects at night, allowing 24/7 real-time full-HD video streaming and recording. This camera can be easily installed in a variety of its advanced feature set and make it to be remotely accessed, controlled, and configured from any computer over Ethernet (PoE...
... H.265 Outdoor Bullet Camera User Manual 5 It offers a complete surveillance solution featuring a built-in smart IR function, preventing overexposure of near objects at night, allowing 24/7 real-time full-HD video streaming and recording. This camera can be easily installed in a variety of its advanced feature set and make it to be remotely accessed, controlled, and configured from any computer over Ethernet (PoE...

User Manual 1.30 WW
Page 10
D-Link Vigilance H.265 Outdoor Bullet Camera User Manual 10 Section 2: Installation Step 4 Connect the power and Ethernet cables, or just the Ethernet cable if you are using a PoE connection. When you are finished, turn the adjustment screw counterclockwise to loosen it, then move the camera to tighten it. Step 5 To adjust the camera's monitoring direction, use the Allen key to turn the adjustment screw clockwise to the desired position and angle.
D-Link Vigilance H.265 Outdoor Bullet Camera User Manual 10 Section 2: Installation Step 4 Connect the power and Ethernet cables, or just the Ethernet cable if you are using a PoE connection. When you are finished, turn the adjustment screw counterclockwise to loosen it, then move the camera to tighten it. Step 5 To adjust the camera's monitoring direction, use the Allen key to turn the adjustment screw clockwise to the desired position and angle.

User Manual 1.30 WW
Page 12
Step 4 Screw the back part of the waterproof connector clockwise until there is a tight seal around the Ethernet cable. Section 2: Installation Step 3 Connect the RJ-45 plug into the Ethernet connector, then screw the waterproof connector to the Ethernet connector by turning it about a half-turn clockwise. D-Link Vigilance H.265 Outdoor Bullet Camera User Manual 12
Step 4 Screw the back part of the waterproof connector clockwise until there is a tight seal around the Ethernet cable. Section 2: Installation Step 3 Connect the RJ-45 plug into the Ethernet connector, then screw the waterproof connector to the Ethernet connector by turning it about a half-turn clockwise. D-Link Vigilance H.265 Outdoor Bullet Camera User Manual 12

User Manual 1.30 WW
Page 16
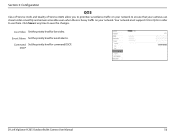
... an Ethernet cable. 2. D-Link Vigilance H.265 Outdoor Bullet Camera User Manual 16 Section 3: Configuration Accessing the Admin Interface 1. Ensure that your camera is your camera. Open the Setup Wizard. If this will display the MAC address and IP address of the Setup Wizard, click the Search button, then select your camera and click the Link button to your network, this is plugged in (either using a 12 V 1.5 A power adapter or a PoEenabled device) and connected...
... an Ethernet cable. 2. D-Link Vigilance H.265 Outdoor Bullet Camera User Manual 16 Section 3: Configuration Accessing the Admin Interface 1. Ensure that your camera is your camera. Open the Setup Wizard. If this will display the MAC address and IP address of the Setup Wizard, click the Search button, then select your camera and click the Link button to your network, this is plugged in (either using a 12 V 1.5 A power adapter or a PoEenabled device) and connected...
User Manual 1.30 WW
Page 17
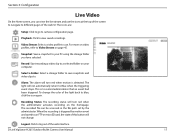
... a video clip to a selected folder on the homepage. Alarm: The alarm will turn red when motion is to your computer. Snapshot: Save a snapshot to remind administrator that an event had been triggered. D-Link Vigilance H.265 Outdoor Bullet Camera User Manual 17 The light will not change the color of the web interface. The icons are: Setup: Click to go to view saved recordings.
... a video clip to a selected folder on the homepage. Alarm: The alarm will turn red when motion is to your computer. Snapshot: Save a snapshot to remind administrator that an event had been triggered. D-Link Vigilance H.265 Outdoor Bullet Camera User Manual 17 The light will not change the color of the web interface. The icons are: Setup: Click to go to view saved recordings.

User Manual 1.30 WW
Page 23
... address settings. Primary DNS Enter the primary domain name server for translating domain names to obtain an IP address automatically. Section 3: Configuration Step 1: Configure LAN Settings DHCP Select this field. IP Address Enter the fixed IP address in a different Gateway subnet. MTU (1280- The default value is 1500. 1500) D-Link Vigilance H.265 Outdoor Bullet Camera User Manual 23 If you choose DHCP, you have a DHCP server running on your network...
... address settings. Primary DNS Enter the primary domain name server for translating domain names to obtain an IP address automatically. Section 3: Configuration Step 1: Configure LAN Settings DHCP Select this field. IP Address Enter the fixed IP address in a different Gateway subnet. MTU (1280- The default value is 1500. 1500) D-Link Vigilance H.265 Outdoor Bullet Camera User Manual 23 If you choose DHCP, you have a DHCP server running on your network...
User Manual 1.30 WW
Page 42
Section 3: Configuration Denoise 2D/3D Denoise Enable to turn on 2D/3D noise reduction for this, set Denoise to a lower level or disable completely. Mode 2D/3D Denoise Set the noise reduction level here. To compensate for the image. 2D/3D Denoise Select automatically or manually configure the denoise settings . D-Link Vigilance H.265 Outdoor Bullet Camera User Manual 42 Note that in low-light environment, when Level noise reduction is enabled, fast moving objects may create an afterimage trail.
Section 3: Configuration Denoise 2D/3D Denoise Enable to turn on 2D/3D noise reduction for this, set Denoise to a lower level or disable completely. Mode 2D/3D Denoise Set the noise reduction level here. To compensate for the image. 2D/3D Denoise Select automatically or manually configure the denoise settings . D-Link Vigilance H.265 Outdoor Bullet Camera User Manual 42 Note that in low-light environment, when Level noise reduction is enabled, fast moving objects may create an afterimage trail.
User Manual 1.30 WW
Page 56
... network. Event Alarm Set the priority level for event alarms. Command Set the priority level for live video. DSCP D-Link Vigilance H.265 Outdoor Bullet Camera User Manual 56 Click Save at any time to ensure that your cameras can stream video smoothly and remain accessible even when there is heavy traffic on your network to save the changes. Your network must support CoS or QoS in order to use...
... network. Event Alarm Set the priority level for event alarms. Command Set the priority level for live video. DSCP D-Link Vigilance H.265 Outdoor Bullet Camera User Manual 56 Click Save at any time to ensure that your cameras can stream video smoothly and remain accessible even when there is heavy traffic on your network to save the changes. Your network must support CoS or QoS in order to use...
User Manual 1.30 WW
Page 60
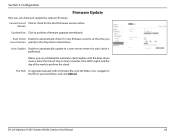
Section 3: Configuration Firmware Update Here you can check and update the camera's firmware. Current/Latest Click to perform a firmware upgrade immediately. D-Link Vigilance H.265 Outdoor Bullet Camera User Manual 60 Version Update Now Click to check for new firmware versions at the time you Latest Version specify in the drop-down menus. File Path To upgrade manually with the drop-down menu below. Auto Update Enable to automatically update to the file on your hard drive, and click Upload...
Section 3: Configuration Firmware Update Here you can check and update the camera's firmware. Current/Latest Click to perform a firmware upgrade immediately. D-Link Vigilance H.265 Outdoor Bullet Camera User Manual 60 Version Update Now Click to check for new firmware versions at the time you Latest Version specify in the drop-down menus. File Path To upgrade manually with the drop-down menu below. Auto Update Enable to automatically update to the file on your hard drive, and click Upload...

User Manual 1.30 WW
Page 63
... Daylight Saving settings for accessing the NTP server. NTP Port Enter the port for your camera. Check time Enter an interval (in seconds) at which the camera checks its time against interval the NTP server. Daylight If your region uses Daylight Saving time, you can enable it manually. Time Set Manually Enter a time and click Save to set it here. Section 3: Configuration Date and Time Time Settings This section allows you set your camera's time using an NTP server, then select an NTP server to use from...
... Daylight Saving settings for accessing the NTP server. NTP Port Enter the port for your camera. Check time Enter an interval (in seconds) at which the camera checks its time against interval the NTP server. Daylight If your region uses Daylight Saving time, you can enable it manually. Time Set Manually Enter a time and click Save to set it here. Section 3: Configuration Date and Time Time Settings This section allows you set your camera's time using an NTP server, then select an NTP server to use from...

User Manual 1.30 WW
Page 71
... images • Supports 802.3af PoE • Reset button • IPv4 • HTTP/HTTPS • RTSP/RTP/RTCP • TCPL • UDP • DHCP • DNS • DDNS • NTP • FTP • SMTP Client • ONVIF Profile S compliant • ARP • ICMP • PPPoE • SNMP v1/v2c/v3 D-Link Vigilance H.265 Outdoor Bullet Camera User Manual 71 Appendix A: Technical Specifications Technical Specifications -
... images • Supports 802.3af PoE • Reset button • IPv4 • HTTP/HTTPS • RTSP/RTP/RTCP • TCPL • UDP • DHCP • DNS • DDNS • NTP • FTP • SMTP Client • ONVIF Profile S compliant • ARP • ICMP • PPPoE • SNMP v1/v2c/v3 D-Link Vigilance H.265 Outdoor Bullet Camera User Manual 71 Appendix A: Technical Specifications Technical Specifications -


