Product Manual
Page 2
Contents Package Contents 3 Introduction 4 Connections 5 Outdoor Installation 6 Grounding 6 Features 7 Network Layout 8 Using the Configuration Utility 10 Networking Basics 30 Frequently Asked Questions 45 Troubleshooting 47 Appendix I: Telnet Configuration (optional 52 Appendix 2: Boot Code Firmware Upgrade 61 Appendix 3: Wireless Basics 71 Technical Specifications 73 Contacting Technical Support 76 Warranty and Registration 77 2
Contents Package Contents 3 Introduction 4 Connections 5 Outdoor Installation 6 Grounding 6 Features 7 Network Layout 8 Using the Configuration Utility 10 Networking Basics 30 Frequently Asked Questions 45 Troubleshooting 47 Appendix I: Telnet Configuration (optional 52 Appendix 2: Boot Code Firmware Upgrade 61 Appendix 3: Wireless Basics 71 Technical Specifications 73 Contacting Technical Support 76 Warranty and Registration 77 2
Product Manual
Page 27
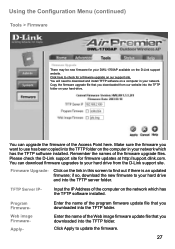
...the D-Link support site. Please check the D-Link support site for firmware updates at http://support.dlink.com. Click on the link in ... of the Access Point here. You will need to find out if there is an updated firmware; TFTP Server IP- Web image Firmware- Apply- ...Firmware There may be new firmware for your hard drive from our website into the TFTP server folder. You can upgrade the firmware of the program firmware update file that you downloaded into the TFTP folder. if so, download the new firmware to your DWL-1700AP...
...the D-Link support site. Please check the D-Link support site for firmware updates at http://support.dlink.com. Click on the link in ... of the Access Point here. You will need to find out if there is an updated firmware; TFTP Server IP- Web image Firmware- Apply- ...Firmware There may be new firmware for your hard drive from our website into the TFTP server folder. You can upgrade the firmware of the program firmware update file that you downloaded into the TFTP folder. if so, download the new firmware to your DWL-1700AP...
Product Manual
Page 61
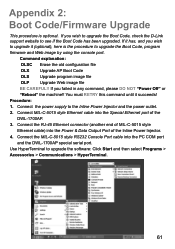
...Code/Firmware Upgrade This procedure is the procedure to see if the Boot Code has been upgraded. Connect the MIL-C-5015 style RS232 Console Port cable into the Special Ethernet port of the Inline Power Injector. 4. Connect MIL-C-5015 style Ethernet cable into the PC COM port and the DWL-1700AP ...special serial port. If it has, and you wish to upgrade the Boot Code, check the D-Link support website to upgrade the Boot Code, program firmware and Web image by using the console...
...Code/Firmware Upgrade This procedure is the procedure to see if the Boot Code has been upgraded. Connect the MIL-C-5015 style RS232 Console Port cable into the Special Ethernet port of the Inline Power Injector. 4. Connect MIL-C-5015 style Ethernet cable into the PC COM port and the DWL-1700AP ...special serial port. If it has, and you wish to upgrade the Boot Code, check the D-Link support website to upgrade the Boot Code, program firmware and Web image by using the console...
Product Manual
Page 62
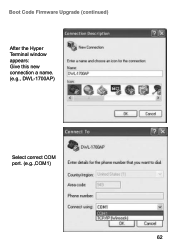
Boot Code Firmware Upgrade (continued) After the Hyper Terminal window appears: Give this new connection a name. (e.g., DWL-1700AP) Select correct COM port. (e.g.,COM1) 62
Boot Code Firmware Upgrade (continued) After the Hyper Terminal window appears: Give this new connection a name. (e.g., DWL-1700AP) Select correct COM port. (e.g.,COM1) 62
Product Manual
Page 63
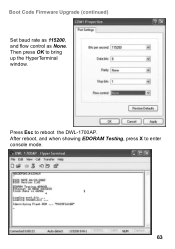
Boot Code Firmware Upgrade (continued) Set baud rate as 115200, and flow control as None. After reboot, and when showing EDORAM Testing, press X to bring up the HyperTerminal window. Then press OK to enter console mode. 63 Press Esc to reboot the DWL-1700AP.
Boot Code Firmware Upgrade (continued) Set baud rate as 115200, and flow control as None. After reboot, and when showing EDORAM Testing, press X to bring up the HyperTerminal window. Then press OK to enter console mode. 63 Press Esc to reboot the DWL-1700AP.
Product Manual
Page 64
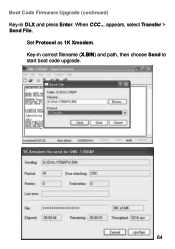
appears, select Transfer > Send File. Key-in DLX and press Enter. Set Protocol as 1K Xmodem. Boot Code Firmware Upgrade (continued) Key-in correct filename (X.BIN) and path, then choose Send to start boot code upgrade. 64 When CCC...
appears, select Transfer > Send File. Key-in DLX and press Enter. Set Protocol as 1K Xmodem. Boot Code Firmware Upgrade (continued) Key-in correct filename (X.BIN) and path, then choose Send to start boot code upgrade. 64 When CCC...

Product Manual
Page 65
Upon completion, you will see X.BIN Upgrade Complete! displayed on the screen. 65 Boot Code Firmware Upgrade (continued) When XMODEM End of Transfer & ERASE ROOT FW (X.BIN) NOW (Y/y): appears, type Y to update Flash.
Upon completion, you will see X.BIN Upgrade Complete! displayed on the screen. 65 Boot Code Firmware Upgrade (continued) When XMODEM End of Transfer & ERASE ROOT FW (X.BIN) NOW (Y/y): appears, type Y to update Flash.
Product Manual
Page 66
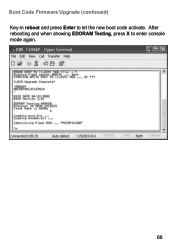
After rebooting and when showing EDORAM Testing, press X to let the new boot code activate. Boot Code Firmware Upgrade (continued) Key-in reboot and press Enter to enter console mode again. 66
After rebooting and when showing EDORAM Testing, press X to let the new boot code activate. Boot Code Firmware Upgrade (continued) Key-in reboot and press Enter to enter console mode again. 66
Product Manual
Page 67
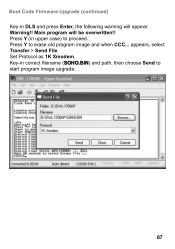
Main program will appear: Warning!! Set Protocol as 1K Xmodem. Boot Code Firmware Upgrade (continued) Key-in DLS and press Enter, the following warning will be overwritten!! Press Y (in correct filename (SOHO.BIN) and path, then choose Send to start program image upgrade. 67 Press Y to proceed... Key-in upper case) to erase old program image and when CCC... appears, select Transfer > Send File.
Main program will appear: Warning!! Set Protocol as 1K Xmodem. Boot Code Firmware Upgrade (continued) Key-in DLS and press Enter, the following warning will be overwritten!! Press Y (in correct filename (SOHO.BIN) and path, then choose Send to start program image upgrade. 67 Press Y to proceed... Key-in upper case) to erase old program image and when CCC... appears, select Transfer > Send File.
Product Manual
Page 68
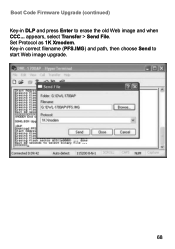
Set Protocol as 1K Xmodem. Key-in DLP and press Enter to start Web image upgrade. 68 appears, select Transfer > Send File. Boot Code Firmware Upgrade (continued) Key-in correct filename (PFS.IMG) and path, then choose Send to erase the old Web image and when CCC...
Set Protocol as 1K Xmodem. Key-in DLP and press Enter to start Web image upgrade. 68 appears, select Transfer > Send File. Boot Code Firmware Upgrade (continued) Key-in correct filename (PFS.IMG) and path, then choose Send to erase the old Web image and when CCC...
Product Manual
Page 69
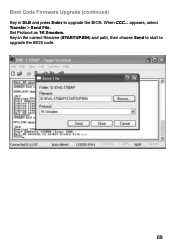
Key-in DLB and press Enter to upgrade the BIOS code. 69 appears, select Transfer > Send File. Set Protocol as 1K Xmodem. When CCC... Boot Code Firmware Upgrade (continued) Key in the correct filename (STARTUP.BIN) and path, then choose Send to start to upgrade the BIOS.
Key-in DLB and press Enter to upgrade the BIOS code. 69 appears, select Transfer > Send File. Set Protocol as 1K Xmodem. When CCC... Boot Code Firmware Upgrade (continued) Key in the correct filename (STARTUP.BIN) and path, then choose Send to start to upgrade the BIOS.
Product Manual
Page 70
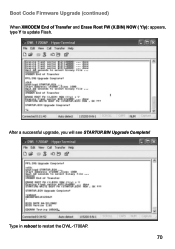
Type in reboot to update Flash. After a successful upgrade, you will see STARTUP.BIN Upgrade Complete! Boot Code Firmware Upgrade (continued) When XMODEM End of Transfer and Erase Root FW (X.BIN) NOW ( Y/y): appears, type Y to restart the DWL-1700AP. 70
Type in reboot to update Flash. After a successful upgrade, you will see STARTUP.BIN Upgrade Complete! Boot Code Firmware Upgrade (continued) When XMODEM End of Transfer and Erase Root FW (X.BIN) NOW ( Y/y): appears, type Y to restart the DWL-1700AP. 70

Product Manual
Page 74
Technical Specifications (continued) Receiver Sensitivity:
Technical Specifications (continued) Receiver Sensitivity:


