
User Guide
Page 30
Figure 2-10. Settings Tab 3. Click the User Accounts button on the left side of the Settings tab: The Settings tab displays your user account settings (an example is shown in Figure 2-11). 20 Chapter 2 Getting Started
Figure 2-10. Settings Tab 3. Click the User Accounts button on the left side of the Settings tab: The Settings tab displays your user account settings (an example is shown in Figure 2-11). 20 Chapter 2 Getting Started

User Guide
Page 32
...the Confirm New Password field, re-enter the same case-sensitive login password that this admin must specify to log in Figure 2-11 on page 20). 3. Click the Add button. The Settings tab appears in the Detail Tabs area (see Figure 2-10 on page 21). 4. In the...Settings tab. For security, each typed password character appears as a bullet (●). The admin account is added to the xStack Storage Management Center. Click the User Accounts button on page 20). 3. Click the Settings tab. To add admin accounts: 1. Click System Administration in the View panel. 2. Click ...
...the Confirm New Password field, re-enter the same case-sensitive login password that this admin must specify to log in Figure 2-11 on page 20). 3. Click the Add button. The Settings tab appears in the Detail Tabs area (see Figure 2-10 on page 21). 4. In the...Settings tab. For security, each typed password character appears as a bullet (●). The admin account is added to the xStack Storage Management Center. Click the User Accounts button on page 20). 3. Click the Settings tab. To add admin accounts: 1. Click System Administration in the View panel. 2. Click ...
User Guide
Page 34
... the account before deleting it . In the View panel, click System Administration. 2. Click the Settings tab. Click the User Accounts button on page 20). 3. The Settings tab appears in the Old Password field. 7. To change the login password for the new account, you lose the password for...it . Therefore, be sure you no longer need a user account, use the following procedure to contact D-Link Systems Inc technical support. 1. The Settings tab appears in Figure 2-11 on page 20). 24 Chapter 2 Getting Started In the left side of the Settings tab: The Settings tab displays your ...
... the account before deleting it . In the View panel, click System Administration. 2. Click the Settings tab. Click the User Accounts button on page 20). 3. The Settings tab appears in the Old Password field. 7. To change the login password for the new account, you lose the password for...it . Therefore, be sure you no longer need a user account, use the following procedure to contact D-Link Systems Inc technical support. 1. The Settings tab appears in Figure 2-11 on page 20). 24 Chapter 2 Getting Started In the left side of the Settings tab: The Settings tab displays your ...

User Guide
Page 50
... that is created, a message similar to the one or more iSCSI initiators listed in the screen, grant access to an initiator not in Figure 3-20 appears. 40 Chapter 3 Managing Volumes If you decide to select multiple iSCSI initiators from the list, you are satisfied with your selections click ... 3.3). For non-adjacent initiators, click the first one . Figure 3-19. 8. By default, all the initiators between them, get selected. - For adjacent iSCSI initiators, click the first one, then hold down the Shift key and click the last one , then hold down the Ctrl key and click each...
... that is created, a message similar to the one or more iSCSI initiators listed in the screen, grant access to an initiator not in Figure 3-20 appears. 40 Chapter 3 Managing Volumes If you decide to select multiple iSCSI initiators from the list, you are satisfied with your selections click ... 3.3). For non-adjacent initiators, click the first one . Figure 3-19. 8. By default, all the initiators between them, get selected. - For adjacent iSCSI initiators, click the first one, then hold down the Shift key and click the last one , then hold down the Ctrl key and click each...

User Guide
Page 51
... Show advanced extents in Table C-2. 1. Click Grant/Revoke Access in the Main Display. 2. See section 3.4.2. 3.3.1 Granting or Revoking iSCSI Access to Volumes During the volume creation process, you can grant or revoke volume access to the Volume View. 3.3 Performing Volume Actions After you... create volumes, you can use the following steps: - Figure 3-20. xStack Storage Management Center Software User's Guide 41 See section 3.3.2. Destroy a volume. In the Volume View, click a volume in...
... Show advanced extents in Table C-2. 1. Click Grant/Revoke Access in the Main Display. 2. See section 3.4.2. 3.3.1 Granting or Revoking iSCSI Access to Volumes During the volume creation process, you can grant or revoke volume access to the Volume View. 3.3 Performing Volume Actions After you... create volumes, you can use the following steps: - Figure 3-20. xStack Storage Management Center Software User's Guide 41 See section 3.3.2. Destroy a volume. In the Volume View, click a volume in...

User Guide
Page 67
... 262,144 bytes. Range is 2 seconds. Default is 0 - 3600 seconds. Default is 8. Length of input (DataIn) PDUs or solicited output (Data-Out) PDUs. Default is 8. xStack Storage Management Center Software User's Guide 57 Default is...
... 262,144 bytes. Range is 2 seconds. Default is 0 - 3600 seconds. Default is 8. Length of input (DataIn) PDUs or solicited output (Data-Out) PDUs. Default is 8. xStack Storage Management Center Software User's Guide 57 Default is...
User Guide
Page 122
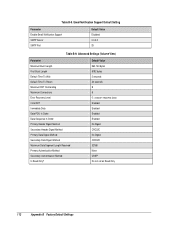
... Support Default Setting Parameter Enable Email Notification Support SMTP Server SMTP Port Default Value Disabled 0.0.0.0 25 Table B-9. Default Value 262,144 bytes 8192 bytes 2 seconds 20 seconds 8 8 0 = session recovery class Enabled Enabled Enabled Enabled No Digest CRC32C No Digest CRC32C 32768 None CHAP Do not set as Read Only 112 Appendix...
... Support Default Setting Parameter Enable Email Notification Support SMTP Server SMTP Port Default Value Disabled 0.0.0.0 25 Table B-9. Default Value 262,144 bytes 8192 bytes 2 seconds 20 seconds 8 8 0 = session recovery class Enabled Enabled Enabled Enabled No Digest CRC32C No Digest CRC32C 32768 None CHAP Do not set as Read Only 112 Appendix...