
User Guide
Page 7
If You Read Nothing Else In This Guide 8 Chapter 2 Getting Started ...9 2.1 Logging In 10 2.1.1 Using the Start-up Wizard 10 2.1.2 Logging in from the Home Page 15 2.2 Customizing the Date and Time 18 2.3 Setting Up Accounts 19 2.3.1 Changing the... 2.6 Powering Off the xStack Storage Array 26 Chapter 3 Managing Volumes ...27 3.1 Understanding the Volume View 28 3.2 Creating Volumes 29 3.2.1 Letting the Wizard Choose the Best Volume Organization 31 3.2.2 Making Your Own Volume Selection Choices 36 3.3 Performing Volume Actions 41 3.3.1 Granting or Revoking iSCSI Access to Volumes 41 ...
If You Read Nothing Else In This Guide 8 Chapter 2 Getting Started ...9 2.1 Logging In 10 2.1.1 Using the Start-up Wizard 10 2.1.2 Logging in from the Home Page 15 2.2 Customizing the Date and Time 18 2.3 Setting Up Accounts 19 2.3.1 Changing the... 2.6 Powering Off the xStack Storage Array 26 Chapter 3 Managing Volumes ...27 3.1 Understanding the Volume View 28 3.2 Creating Volumes 29 3.2.1 Letting the Wizard Choose the Best Volume Organization 31 3.2.2 Making Your Own Volume Selection Choices 36 3.3 Performing Volume Actions 41 3.3.1 Granting or Revoking iSCSI Access to Volumes 41 ...

User Guide
Page 8
... Changing the CHAP Secret 55 3.4.4.3 Disabling CHAP Security 56 3.4.5 Viewing or Changing Advanced Settings (Advanced Settings Tab 56 3.5 Removing iSCSI Initiators 59 Chapter 4 Managing Physical Storage ...61 4.1 Understanding the Physical Storage View 62 4.2 Performing Drive Actions 63 4.2.1 Downing...77 5.2.6 Upgrading Software (Settings Tab 78 5.2.7 Restarting the xStack Storage System (Settings Tab 79 5.2.8 Shutting Down the xStack Storage System (Settings Tab 79 5.2.9 Selecting a Battery Policy (Settings Tab 80 5.2.10 Setting User Accounts (Settings Tab 81 5.2.11 Viewing or ...
... Changing the CHAP Secret 55 3.4.4.3 Disabling CHAP Security 56 3.4.5 Viewing or Changing Advanced Settings (Advanced Settings Tab 56 3.5 Removing iSCSI Initiators 59 Chapter 4 Managing Physical Storage ...61 4.1 Understanding the Physical Storage View 62 4.2 Performing Drive Actions 63 4.2.1 Downing...77 5.2.6 Upgrading Software (Settings Tab 78 5.2.7 Restarting the xStack Storage System (Settings Tab 79 5.2.8 Shutting Down the xStack Storage System (Settings Tab 79 5.2.9 Selecting a Battery Policy (Settings Tab 80 5.2.10 Setting User Accounts (Settings Tab 81 5.2.11 Viewing or ...

User Guide
Page 9
... Port Selected 109 A.9 Network Menu (Group Selected 109 A.10 Help Menu 109 Appendix B Factory Default Settings ...111 Appendix C Recording Your Configuration Settings 115 C.1 Recording Volumes 115 C.2 Recording iSCSI Initiator Access 117 C.3 Recording Groups 118 C.4 Recording Network ...Portals 120 C.5 Recording Scheduled Tasks 121 C.6 Admin Login Password 122 C.7 Configuration Files 123 C.8 Management Port Settings 124 C.9 Data Port Settings 125 C.10 Email Settings 126 xStack Storage Management...
... Port Selected 109 A.9 Network Menu (Group Selected 109 A.10 Help Menu 109 Appendix B Factory Default Settings ...111 Appendix C Recording Your Configuration Settings 115 C.1 Recording Volumes 115 C.2 Recording iSCSI Initiator Access 117 C.3 Recording Groups 118 C.4 Recording Network ...Portals 120 C.5 Recording Scheduled Tasks 121 C.6 Admin Login Password 122 C.7 Configuration Files 123 C.8 Management Port Settings 124 C.9 Data Port Settings 125 C.10 Email Settings 126 xStack Storage Management...
User Guide
Page 18
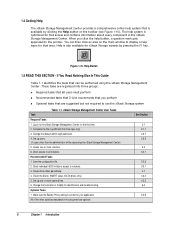
... 8 Chapter 1 Introduction Figure 1-10. Change the default admin login password. 4. Grant access to all users must perform Recommended tasks that D-Link recommends that you click the help button, a question mark gets appended to the xStack Storage Management Center for your application. xStack Storage Management Center User Tasks Task... about every component in the xStack Storage Management Center. Log in this document are suggested but not required to volumes. 3. Grant individual iSCSI initiators access to use the xStack Storage system Table 1-1. Change ...
... 8 Chapter 1 Introduction Figure 1-10. Change the default admin login password. 4. Grant access to all users must perform Recommended tasks that D-Link recommends that you click the help button, a question mark gets appended to the xStack Storage Management Center for your application. xStack Storage Management Center User Tasks Task... about every component in the xStack Storage Management Center. Log in this document are suggested but not required to volumes. 3. Grant individual iSCSI initiators access to use the xStack Storage system Table 1-1. Change ...

User Guide
Page 19
...'s Guide 9 Chapter 2 Getting Started This chapter describes how to get started using the xStack Storage Management Center. The topics covered in this chapter are: Section 2.1, Logging In (page 10) Section 2.2, Customizing the Date and Time (page 18) Section... 2.3, Setting Up Accounts (page 19) Section 2.4, Logging Out (page 25) Section 2.5, Exiting the xStack Storage Management Center (page 25) Section 2.6, Powering Off the xStack Storage Array (page...
...'s Guide 9 Chapter 2 Getting Started This chapter describes how to get started using the xStack Storage Management Center. The topics covered in this chapter are: Section 2.1, Logging In (page 10) Section 2.2, Customizing the Date and Time (page 18) Section... 2.3, Setting Up Accounts (page 19) Section 2.4, Logging Out (page 25) Section 2.5, Exiting the xStack Storage Management Center (page 25) Section 2.6, Powering Off the xStack Storage Array (page...

User Guide
Page 20
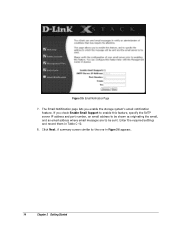
... pages that the minimum system requirements in section 1.2 have been met, use start-up Wizard The xStack Storage Management Center provides administrators with the Welcome page in to the xStack Storage management port. 2. For all subsequent logins, the home page appears and you should proceed to... actions occurs: - For your initial login, the start automatically at initial login, guiding administrators through the first-time setup. Welcome Page 10 Chapter 2 Getting Started In the browser's address bar, type the following default IP address and press the Enter key: 192.168.1.1 ...
... pages that the minimum system requirements in section 1.2 have been met, use start-up Wizard The xStack Storage Management Center provides administrators with the Welcome page in to the xStack Storage management port. 2. For all subsequent logins, the home page appears and you should proceed to... actions occurs: - For your initial login, the start automatically at initial login, guiding administrators through the first-time setup. Welcome Page 10 Chapter 2 Getting Started In the browser's address bar, type the following default IP address and press the Enter key: 192.168.1.1 ...
User Guide
Page 24
A summary screen similar to be sent. If you enable the storage system's email notification feature. Enter the required settings and record them in Figure 2-6 appears. 14 Chapter 2 Getting Started Figure 2-5. The Email Notification page lets you check Enable Email Support to enable this feature, specify the SMTP server IP address and port number, an email address to be shown as originating the email, and an email address where email messages are to the one in Table C-10. 8. Email Notification Page 7. Click Next.
A summary screen similar to be sent. If you enable the storage system's email notification feature. Enter the required settings and record them in Figure 2-6 appears. 14 Chapter 2 Getting Started Figure 2-5. The Email Notification page lets you check Enable Email Support to enable this feature, specify the SMTP server IP address and port number, an email address to be shown as originating the email, and an email address where email messages are to the one in Table C-10. 8. Email Notification Page 7. Click Next.
User Guide
Page 29
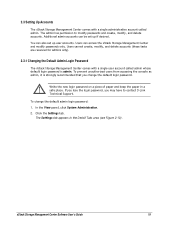
.... To change the default login password. The admin has permission to contact D-Link Technical Support. Write the new login password on a piece of paper and keep the paper in the Detail Tabs area (see Figure 2-10). Click the Settings tab. xStack Storage Management Center Software User's Guide 19 If you lose the login...
.... To change the default login password. The admin has permission to contact D-Link Technical Support. Write the new login password on a piece of paper and keep the paper in the Detail Tabs area (see Figure 2-10). Click the Settings tab. xStack Storage Management Center Software User's Guide 19 If you lose the login...

User Guide
Page 30
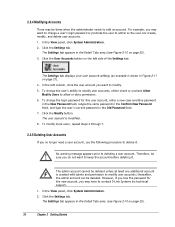
Settings Tab 3. Click the User Accounts button on the left side of the Settings tab: The Settings tab displays your user account settings (an example is shown in Figure 2-11). 20 Chapter 2 Getting Started Figure 2-10.
Settings Tab 3. Click the User Accounts button on the left side of the Settings tab: The Settings tab displays your user account settings (an example is shown in Figure 2-11). 20 Chapter 2 Getting Started Figure 2-10.

User Guide
Page 32
... tab appears in a safe place. 8. Click the User Accounts button on page 20). 3. To add user accounts: 1. In Volume View, click System Administration in the View panel. 2. ...Accounts A user account consists of paper and keep the paper in the Detail Tabs area (see Figure 2-10 on the left side of the Settings tab: The Settings tab displays your user account settings (an example...list at the left side of a unique user name and password, and a selection to the xStack Storage Management Center. In the Confirm New Password field, re-enter the same case-sensitive login ...
... tab appears in a safe place. 8. Click the User Accounts button on page 20). 3. To add user accounts: 1. In Volume View, click System Administration in the View panel. 2. ...Accounts A user account consists of paper and keep the paper in the Detail Tabs area (see Figure 2-10 on the left side of the Settings tab: The Settings tab displays your user account settings (an example...list at the left side of a unique user name and password, and a selection to the xStack Storage Management Center. In the Confirm New Password field, re-enter the same case-sensitive login ...
User Guide
Page 34
... password for the new account, you may have to contact D-Link Systems Inc technical support. 1. The Settings tab appears in the Detail Tabs area ((see Figure 2-10 on page 21). 4. The Settings tab appears in the Detail Tabs area (see Figure 2-10 on page 20). 3. No warning message appears prior to modify. 5. However, if...
... password for the new account, you may have to contact D-Link Systems Inc technical support. 1. The Settings tab appears in the Detail Tabs area ((see Figure 2-10 on page 21). 4. The Settings tab appears in the Detail Tabs area (see Figure 2-10 on page 20). 3. No warning message appears prior to modify. 5. However, if...

User Guide
Page 35
...you want to delete. 5. On the File menu, click Exit. The user account is shown in Figure 2-11 on page 10, or perform any of the xStack Storage in the System Actions panel. 2.5 Exiting the xStack Storage Management Center To end your user account settings (an example is deleted from the...User Accounts button on the File menu 1. Click the Remove button. The xStack Storage Management Center closes. You can then log in to the same or another array in the View panel by starting with the current xStack Storage system, you want to exit before clicking Exit on the left column...
...you want to delete. 5. On the File menu, click Exit. The user account is shown in Figure 2-11 on page 10, or perform any of the xStack Storage in the System Actions panel. 2.5 Exiting the xStack Storage Management Center To end your user account settings (an example is deleted from the...User Accounts button on the File menu 1. Click the Remove button. The xStack Storage Management Center closes. You can then log in to the same or another array in the View panel by starting with the current xStack Storage system, you want to exit before clicking Exit on the left column...

User Guide
Page 43
... you want to be allocated for this screen. The Volume Size screen appears (see Figure 3-10). Do not exceed the maximum volume size shown in this volume. The Grant Access screen appears (see Figure 3-9). Click Next. xStack Storage Management Center Software User's Guide 33 Volume Size Screen 5. Number of storage over many...
... you want to be allocated for this screen. The Volume Size screen appears (see Figure 3-10). Do not exceed the maximum volume size shown in this volume. The Grant Access screen appears (see Figure 3-9). Click Next. xStack Storage Management Center Software User's Guide 33 Volume Size Screen 5. Number of storage over many...

User Guide
Page 44
If you prefer, you can do so at this time. For adjacent iSCSI initiators, click the first one or more iSCSI initiators listed in the screen, grant access to an initiator not in the list, or not grant access to an initiator at a later time (see ... to the volume you can grant access to Create Volume screen appears (see section 3.3.1). 34 Chapter 3 Managing Volumes The first and last initiators, and all iSCSI initiators will have access to select multiple iSCSI initiators from the list, you create. Figure 3-10. By default, all the initiators between them, get selected. -
If you prefer, you can do so at this time. For adjacent iSCSI initiators, click the first one or more iSCSI initiators listed in the screen, grant access to an initiator not in the list, or not grant access to an initiator at a later time (see ... to the volume you can grant access to Create Volume screen appears (see section 3.3.1). 34 Chapter 3 Managing Volumes The first and last initiators, and all iSCSI initiators will have access to select multiple iSCSI initiators from the list, you create. Figure 3-10. By default, all the initiators between them, get selected. -

User Guide
Page 50
...initiator now, you can do so at this screen and click Finish to Create Volume Screen 10. If you are satisfied with your selections click Finish to the volume you decide not to...and click each subsequent initiator. - Then click Next until you can use the following shortcuts: - For adjacent iSCSI initiators, click the first one . If the volume is selected. 9. If you prefer, you return to...grant access to one in the list, or not grant access to an initiator not in Figure 3-20 appears. 40 Chapter 3 Managing Volumes Click Next. Figure 3-19. Otherwise, click the Back button ...
...initiator now, you can do so at this screen and click Finish to Create Volume Screen 10. If you are satisfied with your selections click Finish to the volume you decide not to...and click each subsequent initiator. - Then click Next until you can use the following shortcuts: - For adjacent iSCSI initiators, click the first one . If the volume is selected. 9. If you prefer, you return to...grant access to one in the list, or not grant access to an initiator not in Figure 3-20 appears. 40 Chapter 3 Managing Volumes Click Next. Figure 3-19. Otherwise, click the Back button ...

User Guide
Page 81
... shows historical information. See sections 5.2.10 and 2.3. - and time-stamped, with the most recent item appearing at the top of the item. The time zone configured for the array appears in Figure 5-2, for example, the array is configured for the xStack Storage. When you : - Restore... a previously saved configuration file. See section 5.2.5 - xStack Storage Management Center Software User's Guide 71 See section 5.2.2....
... shows historical information. See sections 5.2.10 and 2.3. - and time-stamped, with the most recent item appearing at the top of the item. The time zone configured for the array appears in Figure 5-2, for example, the array is configured for the xStack Storage. When you : - Restore... a previously saved configuration file. See section 5.2.5 - xStack Storage Management Center Software User's Guide 71 See section 5.2.2....

User Guide
Page 88
... downloaded the software file. Click the Upgrade button. Then click the file and click the Open button. Figure 5-10. You can update the xStack Storage software. Download the xStack Storage software file and note the location where the file has been downloaded. 2. Using the Open dialog box, go...Settings tab but another screen is displayed, click the General button on page 75. Click OK to upgrade the software and reboot the xStack Storage system, or click Cancel to upgrading software or create a rule that will be made available that contain feature improvements. Precautionary Message...
... downloaded the software file. Click the Upgrade button. Then click the file and click the Open button. Figure 5-10. You can update the xStack Storage software. Download the xStack Storage software file and note the location where the file has been downloaded. 2. Using the Open dialog box, go...Settings tab but another screen is displayed, click the General button on page 75. Click OK to upgrade the software and reboot the xStack Storage system, or click Cancel to upgrading software or create a rule that will be made available that contain feature improvements. Precautionary Message...

User Guide
Page 89
... displayed, click the General button on page 75. Precautionary Message 3. The precautionary message In Figure 5-10 appears 3. Figure 5-11. Click the Restart button. The precautionary message in Figure 5-6 on the left side of the Settings tab: 2. xStack Storage Management Center Software User's Guide 79 Or if you are already in the Settings...
... displayed, click the General button on page 75. Precautionary Message 3. The precautionary message In Figure 5-10 appears 3. Figure 5-11. Click the Restart button. The precautionary message in Figure 5-6 on the left side of the Settings tab: 2. xStack Storage Management Center Software User's Guide 79 Or if you are already in the Settings...

User Guide
Page 91
...) Safest mode that lets you accept the default setting Stop buffering I/O in cache, which allows host I /O stops if the battery fails 5.2.10 Setting User Accounts (Settings Tab) Using the User Accounts button in the Settings tab, you use the User Accounts button in the Settings tab to... 2.3. 5.2.11 Viewing or Changing Advanced Settings (Settings Tab) The System Administration View provides an Advanced Settings tab that prevents loss of the xStack Storage Management Center by changing the default login password for the admin user. Set up admin and user accounts. Summary of the...
...) Safest mode that lets you accept the default setting Stop buffering I/O in cache, which allows host I /O stops if the battery fails 5.2.10 Setting User Accounts (Settings Tab) Using the User Accounts button in the Settings tab, you use the User Accounts button in the Settings tab to... 2.3. 5.2.11 Viewing or Changing Advanced Settings (Settings Tab) The System Administration View provides an Advanced Settings tab that prevents loss of the xStack Storage Management Center by changing the default login password for the admin user. Set up admin and user accounts. Summary of the...

User Guide
Page 106
... C-3. Click OK. 7. To enlarge this group. - To select nonadjacent ports, click the top one you can select a larger value if your iSCSI network can handle a larger frame size to see Figure 6-10). 96 Chapter 6 Managing Management and Ethernet Ports and Portals If you want to a VLAN-enabled group (see whether it . 6. To...
... C-3. Click OK. 7. To enlarge this group. - To select nonadjacent ports, click the top one you can select a larger value if your iSCSI network can handle a larger frame size to see Figure 6-10). 96 Chapter 6 Managing Management and Ethernet Ports and Portals If you want to a VLAN-enabled group (see whether it . 6. To...