
Product Manual
Page 2
... Share 18 Using the D-Link® Media Server Software 22 Accessing the Media on your PCs 22 Sharing Media Content in Folders 23 Refreshing Folder Contents 23 Naming the Media Server 24 Upgrading the Media Server 25 Stopping the D-Link Media Server 26 Using Windows® Media Connect Software 27 Configuring Windows® Media Connect 27 Connecting the DSM-320...32 Video Connections...32...
... Share 18 Using the D-Link® Media Server Software 22 Accessing the Media on your PCs 22 Sharing Media Content in Folders 23 Refreshing Folder Contents 23 Naming the Media Server 24 Upgrading the Media Server 25 Stopping the D-Link Media Server 26 Using Windows® Media Connect Software 27 Configuring Windows® Media Connect 27 Connecting the DSM-320...32 Video Connections...32...

Product Manual
Page 7
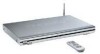
... with composite, coaxial digital or optical digital audio inputs. A wireless (802.11g or 802.11b) or Ethernet network. Package Contents D-Link DSM-320 Wireless Media Player Printed Quick Installation Guide CD-ROM with Manual (Contains D-Link Media Server Software, Quick Installation Guide, and Manual) 2dBi Wireless Antenna Ethernet (CAT5-UTP/Straight-Through) Cable Standard...
... with composite, coaxial digital or optical digital audio inputs. A wireless (802.11g or 802.11b) or Ethernet network. Package Contents D-Link DSM-320 Wireless Media Player Printed Quick Installation Guide CD-ROM with Manual (Contains D-Link Media Server Software, Quick Installation Guide, and Manual) 2dBi Wireless Antenna Ethernet (CAT5-UTP/Straight-Through) Cable Standard...
Product Manual
Page 8
... music. Supports DHCP for easy connection to your wireless network using 802.11g. 802.11b compatible. Connect using Windows® Media Connect software. Support for most popular digital media formats. Remote controlled TV interface for quick access to...; Optical and coaxial digital audio output. Component video output. 64- Features & Benefits Stream media content from a PC or D-Link Network Attached Storage to your entertainment center. Listen to digital music on your stereo system. View digital ...
... music. Supports DHCP for easy connection to your wireless network using 802.11g. 802.11b compatible. Connect using Windows® Media Connect software. Support for most popular digital media formats. Remote controlled TV interface for quick access to...; Optical and coaxial digital audio output. Component video output. 64- Features & Benefits Stream media content from a PC or D-Link Network Attached Storage to your entertainment center. Listen to digital music on your stereo system. View digital ...

Product Manual
Page 10
... port). The DSM-320 Media Server software installed on the PC you will be sharing files from an on -screen cursor is located in a field where text is entered by pressing Enter on the remote control whenever the on -screen keyboard. The on-screen keyboard is activated by using the DSM-320 Wireless Media Player, you will need...
... port). The DSM-320 Media Server software installed on the PC you will be sharing files from an on -screen cursor is located in a field where text is entered by pressing Enter on the remote control whenever the on -screen keyboard. The on-screen keyboard is activated by using the DSM-320 Wireless Media Player, you will need...
Product Manual
Page 13
... go into the setup and change the Default Server. Currently the DSM-320 only connects to your DSM-320 via your wired/wireless network connection. Note: If you can only connect to share files from computers that cannot run the D-Link® Media Server Software. 2. The D-Link® Media Server software then streams the information to one server at a time. This...
... go into the setup and change the Default Server. Currently the DSM-320 only connects to your DSM-320 via your wired/wireless network connection. Note: If you can only connect to share files from computers that cannot run the D-Link® Media Server Software. 2. The D-Link® Media Server software then streams the information to one server at a time. This...

Product Manual
Page 14
Click Next 14 The D-Link Media Server Setup Wizard will appear. The screen at right will appear. Installing the D-Link® Media Server Software (continued) Click on Install D-Link Media Server If the screen on the right does not appear, go to My Computer and double-click on the CD-ROM drive.
Click Next 14 The D-Link Media Server Setup Wizard will appear. The screen at right will appear. Installing the D-Link® Media Server Software (continued) Click on Install D-Link Media Server If the screen on the right does not appear, go to My Computer and double-click on the CD-ROM drive.

Product Manual
Page 15
Click Next 15 Click Next Choose a Destination location or accept the default location. Click Next Choose a Start Menu folder or accept the default location. This is where the D-Link Media Server software will be copied to on your system. Installing the D-Link® Media Server Software (continued) The D-Link license agreement screen appears.
Click Next 15 Click Next Choose a Destination location or accept the default location. Click Next Choose a Start Menu folder or accept the default location. This is where the D-Link Media Server software will be copied to on your system. Installing the D-Link® Media Server Software (continued) The D-Link license agreement screen appears.

Product Manual
Page 16
Click Install Check Launch D-Link Media Server Click Finish The D-Link® Media Server software installation has been completed! 16 Click Next The necessary software will be copied to the specified locations on startup. Select Create a Quick Launch icon to access the program from your desktop. Select Create a desktop icon to access the program from your taskbar. Installing the D-Link® Media Server Software (continued) Select the icons you want created. Select Create a startup icon so the program launches on your computer.
Click Install Check Launch D-Link Media Server Click Finish The D-Link® Media Server software installation has been completed! 16 Click Next The necessary software will be copied to the specified locations on startup. Select Create a Quick Launch icon to access the program from your desktop. Select Create a desktop icon to access the program from your taskbar. Installing the D-Link® Media Server Software (continued) Select the icons you want created. Select Create a startup icon so the program launches on your computer.
Product Manual
Page 17
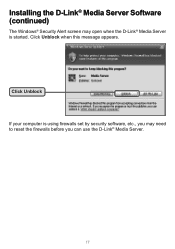
Installing the D-Link® Media Server Software (continued) The Windows® Security Alert screen may open when the D-Link® Media Server is using firewalls set by security software, etc., you may need to reset the firewalls before you can use the D-Link® Media Server. 17 Click Unblock when this message appears. Click Unblock If your computer is started.
Installing the D-Link® Media Server Software (continued) The Windows® Security Alert screen may open when the D-Link® Media Server is using firewalls set by security software, etc., you may need to reset the firewalls before you can use the D-Link® Media Server. 17 Click Unblock when this message appears. Click Unblock If your computer is started.

Product Manual
Page 18
... files to share. By sharing the files, there is streamed directly from your DSM-320. If you chose to create a desktop or Quick Launch icon during the software installation, then you can play. Follow the steps on D-Link Media Server icon within the D-Link Media Server folder. 18 Choosing Music, Photo, and Video Files to Share The...
... files to share. By sharing the files, there is streamed directly from your DSM-320. If you chose to create a desktop or Quick Launch icon during the software installation, then you can play. Follow the steps on D-Link Media Server icon within the D-Link Media Server folder. 18 Choosing Music, Photo, and Video Files to Share The...

Product Manual
Page 21
The Media Files tab will show all of the folders containing audio, video, and photos you want to Share (continued) Repeat the steps until all your PC should look like when the D-Link® Media Server software configuration is what your audio, video, and photo files as well as display important file information. 21 Choosing Music, Photo, and Video Files to share have been added. This is complete!
The Media Files tab will show all of the folders containing audio, video, and photos you want to Share (continued) Repeat the steps until all your PC should look like when the D-Link® Media Server software configuration is what your audio, video, and photo files as well as display important file information. 21 Choosing Music, Photo, and Video Files to share have been added. This is complete!

Product Manual
Page 22
.... DSM-320 System Tray Icon 22 Whenever you close the Media Server configuration window, you can return to Create a startup icon during the Media Server software installation (See Page 16), the D-Link® Media Server software will automatically start whenever you must install the D-Link® Media Server software (See Page 13). Using the D-Link® Media Server Software Accessing the Media on the Media Server...
.... DSM-320 System Tray Icon 22 Whenever you close the Media Server configuration window, you can return to Create a startup icon during the Media Server software installation (See Page 16), the D-Link® Media Server software will automatically start whenever you must install the D-Link® Media Server software (See Page 13). Using the D-Link® Media Server Software Accessing the Media on the Media Server...

Product Manual
Page 23
...there may be refreshed by the DSM-320 when you refresh the folder contents. If you copy additional files into these folders, they will share media content from selected directory folders. Refreshing Folder Contents The D-Link Media Server software scans the folders you share when...refresh. Refresh multiple folders: Multiple folders can schedule the D-Link Media Server software to automatically refresh the contents of shared folders. Using the D-Link Media Server Software (continued) Sharing Media Content in Folders The D-Link Media Server will be selected if you hold down the Ctrl key...
...there may be refreshed by the DSM-320 when you refresh the folder contents. If you copy additional files into these folders, they will share media content from selected directory folders. Refreshing Folder Contents The D-Link Media Server software scans the folders you share when...refresh. Refresh multiple folders: Multiple folders can schedule the D-Link Media Server software to automatically refresh the contents of shared folders. Using the D-Link Media Server Software (continued) Sharing Media Content in Folders The D-Link Media Server will be selected if you hold down the Ctrl key...
Product Manual
Page 24
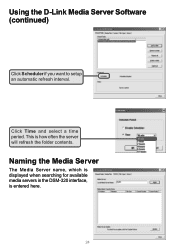
Click Time and select a time period. Naming the Media Server The Media Server name, which is displayed when searching for available media servers in the DSM-320 interface, is how often the server will refresh the folder contents. This is entered here. 24 Using the D-Link Media Server Software (continued) Click Scheduler if you want to setup an automatic refresh interval.
Click Time and select a time period. Naming the Media Server The Media Server name, which is displayed when searching for available media servers in the DSM-320 interface, is how often the server will refresh the folder contents. This is entered here. 24 Using the D-Link Media Server Software (continued) Click Scheduler if you want to setup an automatic refresh interval.

Product Manual
Page 25
This screen will appear only if a newer version is in progress. You have completed the process for updating the Media Server. The Media Server Update pop-up screen will appear to update the Media Server. Click Yes. Click OK. 25 Using the D-Link Media Server Software (continued) Upgrading the Media Server Click Update, near the lower right corner of this screen, to indicate that the update is available.
This screen will appear only if a newer version is in progress. You have completed the process for updating the Media Server. The Media Server Update pop-up screen will appear to update the Media Server. Click Yes. Click OK. 25 Using the D-Link Media Server Software (continued) Upgrading the Media Server Click Update, near the lower right corner of this screen, to indicate that the update is available.

Product Manual
Page 26
... accessed from the server menu. Using the D-Link Media Server Software (continued) Stopping the D-Link Media Server To stop the D-Link® Media Server (and stop sharing your photos, video and music on your DSM-320 only if the D-Link® Media Server is running the D-Link® Media Server software. D-Link Media Server Menu To open the D-Link Media Server menu, right click on the system tray...
... accessed from the server menu. Using the D-Link Media Server Software (continued) Stopping the D-Link Media Server To stop the D-Link® Media Server (and stop sharing your photos, video and music on your DSM-320 only if the D-Link® Media Server is running the D-Link® Media Server software. D-Link Media Server Menu To open the D-Link Media Server menu, right click on the system tray...

Product Manual
Page 27
The Windows® Media Connect software is where you are using the D-Link Media Server software. Click OK 27 Click Add Select your Media Player from the list. Configuring Windows® Media Connect Launch the Windows® Media Connect software and the window below will appear: The Devices tab is available via Windows® Update if you add the DSM-320 to playback...
The Windows® Media Connect software is where you are using the D-Link Media Server software. Click OK 27 Click Add Select your Media Player from the list. Configuring Windows® Media Connect Launch the Windows® Media Connect software and the window below will appear: The Devices tab is available via Windows® Update if you add the DSM-320 to playback...
Product Manual
Page 28
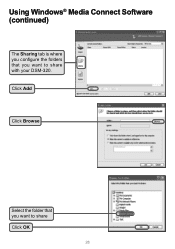
Click Add Click Browse Select the folder that you want to share Click OK 28 Using Windows® Media Connect Software (continued) The Sharing tab is where you configure the folders that you want to share with your DSM-320.
Click Add Click Browse Select the folder that you want to share Click OK 28 Using Windows® Media Connect Software (continued) The Sharing tab is where you configure the folders that you want to share with your DSM-320.
Product Manual
Page 29
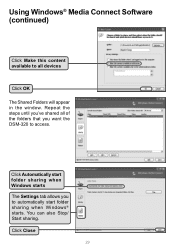
Click Close 29 Repeat the steps until you've shared all devices Click OK The Shared Folders will appear in the window. You can also Stop/ Start sharing. Click Automatically start folder sharing when Windows starts The Settings tab allows you to access. Using Windows® Media Connect Software (continued) Click Make this content available to all of the folders that you want the DSM-320 to automatically start folder sharing when Windows® starts.
Click Close 29 Repeat the steps until you've shared all devices Click OK The Shared Folders will appear in the window. You can also Stop/ Start sharing. Click Automatically start folder sharing when Windows starts The Settings tab allows you to access. Using Windows® Media Connect Software (continued) Click Make this content available to all of the folders that you want the DSM-320 to automatically start folder sharing when Windows® starts.
Product Manual
Page 30
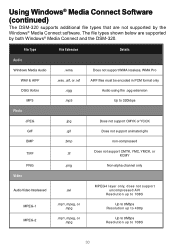
The file types shown below are not supported by both Windows® Media Connect and the DSM-320. File Type File Extension Details Audio Windows Media Audio .wma Does not support WMA lossless, WMA Pro WAV & AIFF .wav, .aif, or .ief AIFF files must be encoded in PCM format only OGG ..., or .mpg Up to 8Mbps Resolution up to 480p MPEG-2 .mp1, mpeg, or .mpg Up to 8Mbps Resolution up to 1080i 30 Using Windows® Media Connect Software (continued) The DSM-320 supports additional file types that are supported by the Windows®...
The file types shown below are not supported by both Windows® Media Connect and the DSM-320. File Type File Extension Details Audio Windows Media Audio .wma Does not support WMA lossless, WMA Pro WAV & AIFF .wav, .aif, or .ief AIFF files must be encoded in PCM format only OGG ..., or .mpg Up to 8Mbps Resolution up to 480p MPEG-2 .mp1, mpeg, or .mpg Up to 8Mbps Resolution up to 1080i 30 Using Windows® Media Connect Software (continued) The DSM-320 supports additional file types that are supported by the Windows®...


