
Product Manual
Page 2
......33 Network Address Translation Settings (MER/DHCP 34 WAN Setup - Table of Contents Table of Service 50 QoS Configuration 52 Queue Classification 54 Routing...58 D-Link DSL-520B ADSL2+ Modem User Manual 2
......33 Network Address Translation Settings (MER/DHCP 34 WAN Setup - Table of Contents Table of Service 50 QoS Configuration 52 Queue Classification 54 Routing...58 D-Link DSL-520B ADSL2+ Modem User Manual 2

Product Manual
Page 3
Table of Contents Default Gateway 58 Static Route 59 RIP...60 DNS...61 Server Configuration 61 Dynamic DNS 62 Add dynamic DNS 62 DSL...63 Advanced Settings 64 MAC Clone...65 Check your IP address 81 Check your MAC address 81 Statically Assign an IP address 82 Contacting Technical ... Access Control-Services 74 Access Control-IP Address 75 Access Control-Passwords 76 Update Software 77 Save and Reboot 78 Troubleshooting 79 Networking Basics 81 D-Link DSL-520B ADSL2+ Modem User Manual 3
Table of Contents Default Gateway 58 Static Route 59 RIP...60 DNS...61 Server Configuration 61 Dynamic DNS 62 Add dynamic DNS 62 DSL...63 Advanced Settings 64 MAC Clone...65 Check your IP address 81 Check your MAC address 81 Statically Assign an IP address 82 Contacting Technical ... Access Control-Services 74 Access Control-IP Address 75 Access Control-Passwords 76 Update Software 77 Save and Reboot 78 Troubleshooting 79 Networking Basics 81 D-Link DSL-520B ADSL2+ Modem User Manual 3

Product Manual
Page 4
General Information General Information The D-Link DSL-520B is an ADSL2+ modem that offers the convenience of this equipment into a surge protector to clean the equipment. Package Contents • ADSL2+ Modem • 12VDC, .... A damp cloth can be used to reduce the risk of damage from an electrical outlet with the DSL-520B will void any warranties on the adapter. • Do not open the cover of Ethernet connections. D-Link DSL-520B ADSL2+ Modem User Manual 4 Section 1 - Opening the cover will cause damage and void the warranty for this...
General Information General Information The D-Link DSL-520B is an ADSL2+ modem that offers the convenience of this equipment into a surge protector to clean the equipment. Package Contents • ADSL2+ Modem • 12VDC, .... A damp cloth can be used to reduce the risk of damage from an electrical outlet with the DSL-520B will void any warranties on the adapter. • Do not open the cover of Ethernet connections. D-Link DSL-520B ADSL2+ Modem User Manual 4 Section 1 - Opening the cover will cause damage and void the warranty for this...

Product Manual
Page 5
... data transmission. • A solid light indicates the DSL is synchronized 3 DSL LED • A flashing LED indicates the modem is attempting to synchronize with the DSL provider. • A solid green light indicates that an ADSL connection is not present or the modem is connected to an Ethernet-enabled computer. D-Link DSL-520B ADSL2+ Modem User Manual 5 Section 1 -
... data transmission. • A solid light indicates the DSL is synchronized 3 DSL LED • A flashing LED indicates the modem is attempting to synchronize with the DSL provider. • A solid green light indicates that an ADSL connection is not present or the modem is connected to an Ethernet-enabled computer. D-Link DSL-520B ADSL2+ Modem User Manual 5 Section 1 -

Product Manual
Page 6
D-Link DSL-520B ADSL2+ Modem User Manual 6 General Information Rear Panel View 1 2 34 5 1 DSL Line • Connect to an active telephone line (RJ-11). 2 LAN Port • Connect Ethernet devices such as computers, switches, and hubs. 3 Reset • Pressing the Reset button for 5 seconds restores the modem to its original factory default settings. 4 ON/OFF • Press this button to turn the unit ON or OFF. 5 Power Receptor • Receptor for the supplied power adapter. Section 1 -
D-Link DSL-520B ADSL2+ Modem User Manual 6 General Information Rear Panel View 1 2 34 5 1 DSL Line • Connect to an active telephone line (RJ-11). 2 LAN Port • Connect Ethernet devices such as computers, switches, and hubs. 3 Reset • Pressing the Reset button for 5 seconds restores the modem to its original factory default settings. 4 ON/OFF • Press this button to turn the unit ON or OFF. 5 Power Receptor • Receptor for the supplied power adapter. Section 1 -
Product Manual
Page 7
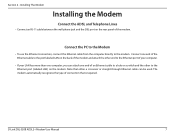
... directly to the Ethernet port (labeled LAN) on the rear panel of an Ethernet cable to a hub or a switch and the other to the modem. D-Link DSL-520B ADSL2+ Modem User Manual 7 Section 2 -
... directly to the Ethernet port (labeled LAN) on the rear panel of an Ethernet cable to a hub or a switch and the other to the modem. D-Link DSL-520B ADSL2+ Modem User Manual 7 Section 2 -

Product Manual
Page 8
Then turn on the back of the device and plug the adapter into a wall outlet or power strip. D-Link DSL-520B ADSL2+ Modem User Manual 8 Section 2 - Installing The Modem Connect the Power Adapter • Complete the process by connecting the supplied 12V, 500mA power adapter to the POWER connector on and boot up your PC and any LAN devices, such as hubs or switches, and any computers connected to them.
Then turn on the back of the device and plug the adapter into a wall outlet or power strip. D-Link DSL-520B ADSL2+ Modem User Manual 8 Section 2 - Installing The Modem Connect the Power Adapter • Complete the process by connecting the supplied 12V, 500mA power adapter to the POWER connector on and boot up your PC and any LAN devices, such as hubs or switches, and any computers connected to them.

Product Manual
Page 9
Installation Diagram Installation Diagram Desktop Computer DSL-520B Modem LAN LAN RESET ON/OFF 5V - - - 3A D-Link DSL-520B ADSL2+ Modem User Manual 9 Section 3 -
Installation Diagram Installation Diagram Desktop Computer DSL-520B Modem LAN LAN RESET ON/OFF 5V - - - 3A D-Link DSL-520B ADSL2+ Modem User Manual 9 Section 3 -

Product Manual
Page 10
... and Obtain DNS server address automatically. 5. In the Windows taskbar, click on Properties. 4. Listed in the Local Area Connection window are the installed network components. D-Link DSL-520B ADSL2+ Modem User Manual 10 Make sure the box for configuring your changes and then close the Control Panel. Section 4 - In the Network Connections window...
... and Obtain DNS server address automatically. 5. In the Windows taskbar, click on Properties. 4. Listed in the Local Area Connection window are the installed network components. D-Link DSL-520B ADSL2+ Modem User Manual 10 Make sure the box for configuring your changes and then close the Control Panel. Section 4 - In the Network Connections window...

Product Manual
Page 11
Under Internet & Network, click Network. In the Show menu, select Built-in Ethernet or Ethernet (Depending on the System Preferences icon. 2. D-Link DSL-520B ADSL2+ Modem User Manual 11 Quick Setup Mac These are instructions for configuring your computer prompts you to save changes. In the Mac OS X Dock, click on your Mac OS version.) 3. Click Apply Now and Save if your Mac OS X operating system 1. In the Configure menu, select Using DHCP. 5. Section 6 - Click the TCP/IP tab. 4.
Under Internet & Network, click Network. In the Show menu, select Built-in Ethernet or Ethernet (Depending on the System Preferences icon. 2. D-Link DSL-520B ADSL2+ Modem User Manual 11 Quick Setup Mac These are instructions for configuring your computer prompts you to save changes. In the Mac OS X Dock, click on your Mac OS version.) 3. Click Apply Now and Save if your Mac OS X operating system 1. In the Configure menu, select Using DHCP. 5. Section 6 - Click the TCP/IP tab. 4.

Product Manual
Page 12
... Enter. Note: Use admin/admin as a default for username and password. • The admin account can be displayed after you connect to the user interface. D-Link DSL-520B ADSL2+ Modem User Manual 12
... Enter. Note: Use admin/admin as a default for username and password. • The admin account can be displayed after you connect to the user interface. D-Link DSL-520B ADSL2+ Modem User Manual 12

Product Manual
Page 13
Verify the box is checked next to begin setup. Please prepare your account information provided by your Internet Service Provider (ISP). Note: Quick Setup will be the first page you see the Advanced Setup section in to configure a PPPoE connection. D-Link DSL-520B ADSL2+ Modem User Manual 13 For more information on PPPoE and other connection types, please see when you to the router. Section 6 - Quick Setup Quick Setup Quick Setup will allow you log in this user manual. Click Next to DSL Auto-connect.
Verify the box is checked next to begin setup. Please prepare your account information provided by your Internet Service Provider (ISP). Note: Quick Setup will be the first page you see the Advanced Setup section in to configure a PPPoE connection. D-Link DSL-520B ADSL2+ Modem User Manual 13 For more information on PPPoE and other connection types, please see when you to the router. Section 6 - Quick Setup Quick Setup Quick Setup will allow you log in this user manual. Click Next to DSL Auto-connect.

Product Manual
Page 14
For these settings, please refer to detect your ISP. Section 6 - D-Link DSL-520B ADSL2+ Modem User Manual 14 If the scan is unsuccessful, you must manually enter account settings. Quick Setup The router will automatically perform a PVC scan in order to your account information provided by your DSL connection.
For these settings, please refer to detect your ISP. Section 6 - D-Link DSL-520B ADSL2+ Modem User Manual 14 If the scan is unsuccessful, you must manually enter account settings. Quick Setup The router will automatically perform a PVC scan in order to your account information provided by your DSL connection.

Product Manual
Page 15
Click Next to enter your username and password as provided by your ISP. Section 6 - Quick Setup When the PVC scan is complete, you will be prompted to continue setup. D-Link DSL-520B ADSL2+ Modem User Manual 15 Advanced users can configure optional settings on this page.
Click Next to enter your username and password as provided by your ISP. Section 6 - Quick Setup When the PVC scan is complete, you will be prompted to continue setup. D-Link DSL-520B ADSL2+ Modem User Manual 15 Advanced users can configure optional settings on this page.

Product Manual
Page 16
Quick Setup The router will automatically verify your username and password. D-Link DSL-520B ADSL2+ Modem User Manual 16 Section 6 -
Quick Setup The router will automatically verify your username and password. D-Link DSL-520B ADSL2+ Modem User Manual 16 Section 6 -

Product Manual
Page 17
Section 6 - Quick Setup This page allows you to continue. No changes are required on this page. Click Next to adjust the Local Area Network settings. D-Link DSL-520B ADSL2+ Modem User Manual 17
Section 6 - Quick Setup This page allows you to continue. No changes are required on this page. Click Next to adjust the Local Area Network settings. D-Link DSL-520B ADSL2+ Modem User Manual 17

Product Manual
Page 18
The router will save your settings are correct and click Save/Reboot. Section 6 - Please do not unplug any cables during this process. Quick Setup Verify your settings and reboot itself. D-Link DSL-520B ADSL2+ Modem User Manual 18
The router will save your settings are correct and click Save/Reboot. Section 6 - Please do not unplug any cables during this process. Quick Setup Verify your settings and reboot itself. D-Link DSL-520B ADSL2+ Modem User Manual 18
Product Manual
Page 19
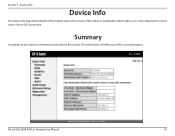
It also displays the current status of your DSL's connection status. D-Link DSL-520B ADSL2+ Modem User Manual 19 Device Info Device Info The Device Info page shows details of the modem such as the version of your device's information is provided in this section. The information will reflect your DSL connection. Summary A summary of the software, bootloader, LAN IP address, etc. Section 7 -
It also displays the current status of your DSL's connection status. D-Link DSL-520B ADSL2+ Modem User Manual 19 Device Info Device Info The Device Info page shows details of the modem such as the version of your device's information is provided in this section. The information will reflect your DSL connection. Summary A summary of the software, bootloader, LAN IP address, etc. Section 7 -

Product Manual
Page 20
Section 7 - Device Info WAN The WAN Info screen displays WAN connections previously set up in the Home section. D-Link DSL-520B ADSL2+ Modem User Manual 20 There is an extra "Status" column used for connection status information, displaying either ADSL Link Down or ADSL Link Up.
Section 7 - Device Info WAN The WAN Info screen displays WAN connections previously set up in the Home section. D-Link DSL-520B ADSL2+ Modem User Manual 20 There is an extra "Status" column used for connection status information, displaying either ADSL Link Down or ADSL Link Up.

Product Manual
Page 21
Click on Reset Statistics to renew the information. Section 7 - WAN The WAN section shows received and transmitted packet information for the Ethernet interface. D-Link DSL-520B ADSL2+ Modem User Manual 21 Click on Reset Statistics to renew the information. Device Info Statistics LAN The LAN section shows received and transmitted packet information for the WAN connections that you have set up.
Click on Reset Statistics to renew the information. Section 7 - WAN The WAN section shows received and transmitted packet information for the Ethernet interface. D-Link DSL-520B ADSL2+ Modem User Manual 21 Click on Reset Statistics to renew the information. Device Info Statistics LAN The LAN section shows received and transmitted packet information for the WAN connections that you have set up.


