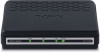

Product Manual
Page 2
...Installing the Modem 7 Installation Diagram 9 Configuring Your Computer 10 Windows® XP...10 Mac...11 Log in to the Modem 12 Quick Setup 13 Device Info 19 Summary...19 WAN...20 Statistics...21 LAN...21 WAN...21 ATM...22 ADSL...23 Route...24 ARP...25 DHCP...26 ... Connection Type 29 PPP over Ethernet (PPPoE 30 Network Address Translation Settings (PPPoE 31 WAN Setup - Table of Contents Table of Service 50 QoS Configuration 52 Queue Classification 54 Routing...58 D-Link DSL-520B ADSL2+ Modem User Manual 2 Summary (PPPoE 32 DHCP...33 Network Address Translation Settings (MER...
...Installing the Modem 7 Installation Diagram 9 Configuring Your Computer 10 Windows® XP...10 Mac...11 Log in to the Modem 12 Quick Setup 13 Device Info 19 Summary...19 WAN...20 Statistics...21 LAN...21 WAN...21 ATM...22 ADSL...23 Route...24 ARP...25 DHCP...26 ... Connection Type 29 PPP over Ethernet (PPPoE 30 Network Address Translation Settings (PPPoE 31 WAN Setup - Table of Contents Table of Service 50 QoS Configuration 52 Queue Classification 54 Routing...58 D-Link DSL-520B ADSL2+ Modem User Manual 2 Summary (PPPoE 32 DHCP...33 Network Address Translation Settings (MER...

Product Manual
Page 11
Under Internet & Network, click Network. In the Configure menu, select Using DHCP. 5. Click Apply Now and Save if your Mac OS X operating system 1. Click the TCP/IP tab. 4. D-Link DSL-520B ADSL2+ Modem User Manual 11 In the Mac OS X Dock, click on your Mac OS version.) 3. Section 6 - Quick Setup Mac These are instructions for configuring your computer prompts you to save changes. In the Show menu, select Built-in Ethernet or Ethernet (Depending on the System Preferences icon. 2.
Under Internet & Network, click Network. In the Configure menu, select Using DHCP. 5. Click Apply Now and Save if your Mac OS X operating system 1. Click the TCP/IP tab. 4. D-Link DSL-520B ADSL2+ Modem User Manual 11 In the Mac OS X Dock, click on your Mac OS version.) 3. Section 6 - Quick Setup Mac These are instructions for configuring your computer prompts you to save changes. In the Show menu, select Built-in Ethernet or Ethernet (Depending on the System Preferences icon. 2.

Product Manual
Page 12
Quick Setup Log in to the Modem This section will be changed at any time. 3. A login screen like the one below will explain how to your modem ... prepared using the following steps: 1. Enter the URL http://192.168.1.1 in to log in the address bar and press Enter. Enter your web browser. 2. D-Link DSL-520B ADSL2+ Modem User Manual 12 Note: Use admin/admin as a default for username and password. • The admin account can be displayed after you connect...
Quick Setup Log in to the Modem This section will be changed at any time. 3. A login screen like the one below will explain how to your modem ... prepared using the following steps: 1. Enter the URL http://192.168.1.1 in to log in the address bar and press Enter. Enter your web browser. 2. D-Link DSL-520B ADSL2+ Modem User Manual 12 Note: Use admin/admin as a default for username and password. • The admin account can be displayed after you connect...

Product Manual
Page 13
Click Next to the router. D-Link DSL-520B ADSL2+ Modem User Manual 13 Section 6 - Quick Setup Quick Setup Quick Setup will allow you log in this user manual. Please prepare your account information provided by your Internet Service Provider (ISP). Note: Quick Setup will be the first page you see the Advanced Setup section in to begin setup. Verify the box is checked next to configure a PPPoE connection. For more information on PPPoE and other connection types, please see when you to DSL Auto-connect.
Click Next to the router. D-Link DSL-520B ADSL2+ Modem User Manual 13 Section 6 - Quick Setup Quick Setup Quick Setup will allow you log in this user manual. Please prepare your account information provided by your Internet Service Provider (ISP). Note: Quick Setup will be the first page you see the Advanced Setup section in to begin setup. Verify the box is checked next to configure a PPPoE connection. For more information on PPPoE and other connection types, please see when you to DSL Auto-connect.

Product Manual
Page 14
Quick Setup The router will automatically perform a PVC scan in order to your account information provided by your DSL connection. For these settings, please refer to detect your ISP. If the scan is unsuccessful, you must manually enter account settings. D-Link DSL-520B ADSL2+ Modem User Manual 14 Section 6 -
Quick Setup The router will automatically perform a PVC scan in order to your account information provided by your DSL connection. For these settings, please refer to detect your ISP. If the scan is unsuccessful, you must manually enter account settings. D-Link DSL-520B ADSL2+ Modem User Manual 14 Section 6 -

Product Manual
Page 15
Advanced users can configure optional settings on this page. Click Next to enter your username and password as provided by your ISP. D-Link DSL-520B ADSL2+ Modem User Manual 15 Section 6 - Quick Setup When the PVC scan is complete, you will be prompted to continue setup.
Advanced users can configure optional settings on this page. Click Next to enter your username and password as provided by your ISP. D-Link DSL-520B ADSL2+ Modem User Manual 15 Section 6 - Quick Setup When the PVC scan is complete, you will be prompted to continue setup.

Product Manual
Page 16
Quick Setup The router will automatically verify your username and password. D-Link DSL-520B ADSL2+ Modem User Manual 16 Section 6 -
Quick Setup The router will automatically verify your username and password. D-Link DSL-520B ADSL2+ Modem User Manual 16 Section 6 -

Product Manual
Page 17
D-Link DSL-520B ADSL2+ Modem User Manual 17 Click Next to adjust the Local Area Network settings. No changes are required on this page. Section 6 - Quick Setup This page allows you to continue.
D-Link DSL-520B ADSL2+ Modem User Manual 17 Click Next to adjust the Local Area Network settings. No changes are required on this page. Section 6 - Quick Setup This page allows you to continue.

Product Manual
Page 18
The router will save your settings are correct and click Save/Reboot. Please do not unplug any cables during this process. D-Link DSL-520B ADSL2+ Modem User Manual 18 Quick Setup Verify your settings and reboot itself. Section 6 -
The router will save your settings are correct and click Save/Reboot. Please do not unplug any cables during this process. D-Link DSL-520B ADSL2+ Modem User Manual 18 Quick Setup Verify your settings and reboot itself. Section 6 -

Product Manual
Page 27
Advanced Setup Advanced Setup This section of the setup is an advanced version of the quick setup. Click the Add button if you want to make specific configurations to the ATM PVC Configuration screen on the following page. WAN Configure the DSL settings as provided by your modem such as... creating a SNMP, etc., consider going through this advanced setup for the WAN interface and to proceed to your ISP. If you to add a new connection for a more comprehensive configuration. D-Link DSL-520B ADSL2+ Modem User Manual 27 Section 9 - The ATM PVC Configuration screen...
Advanced Setup Advanced Setup This section of the setup is an advanced version of the quick setup. Click the Add button if you want to make specific configurations to the ATM PVC Configuration screen on the following page. WAN Configure the DSL settings as provided by your modem such as... creating a SNMP, etc., consider going through this advanced setup for the WAN interface and to proceed to your ISP. If you to add a new connection for a more comprehensive configuration. D-Link DSL-520B ADSL2+ Modem User Manual 27 Section 9 - The ATM PVC Configuration screen...

Product Manual
Page 28
Enable QoS: Use the default setting unless otherwise instructed by your ISP. For more information about QoS, see the Quality of Service section in this user manual. Service Category: Use the default setting unless otherwise instructed by your ISP. Advanced Setup ATM PVC Configuration VPI/VCI: These values are required for all DSL connection types and are provided by your ISP. Section 9 - Click Next D-Link DSL-520B ADSL2+ Modem User Manual 28
Enable QoS: Use the default setting unless otherwise instructed by your ISP. For more information about QoS, see the Quality of Service section in this user manual. Service Category: Use the default setting unless otherwise instructed by your ISP. Advanced Setup ATM PVC Configuration VPI/VCI: These values are required for all DSL connection types and are provided by your ISP. Section 9 - Click Next D-Link DSL-520B ADSL2+ Modem User Manual 28
Product Manual
Page 29
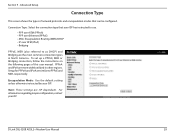
...PPPoA and IPoA are more widely utilized in North America. Encapsulation Mode: Use the default setting unless otherwise instructed by your ISP. D-Link DSL-520B ADSL2+ Modem User Manual 29 Advanced Setup Connection Type This screen shows the types of this user manual. To set up a PPPoE, MER or Bridging connection, follow the ... over ATM (IPoA) • Bridging PPPoE, MER (also referred to PPPoE and MER, respectively. Connection Type: Select the connection type that can be configured. Setup for PPPoA and IPoA are similar to as DHCP) and Bridging are ISP dependant. Section 9 -
...PPPoA and IPoA are more widely utilized in North America. Encapsulation Mode: Use the default setting unless otherwise instructed by your ISP. D-Link DSL-520B ADSL2+ Modem User Manual 29 Advanced Setup Connection Type This screen shows the types of this user manual. To set up a PPPoE, MER or Bridging connection, follow the ... over ATM (IPoA) • Bridging PPPoE, MER (also referred to PPPoE and MER, respectively. Connection Type: Select the connection type that can be configured. Setup for PPPoA and IPoA are similar to as DHCP) and Bridging are ISP dependant. Section 9 -

Product Manual
Page 30
... Select if you identify your PPPoE connection. Advanced Setup PPP over Ethernet (PPPoE) This page allows you will not affect your ISP. If selected, you to the Internet so you with your ISP. This option is included. Click Next. D-Link DSL-520B ADSL2+ Modem User Manual 30 Check with a ...by your connection. PPP Password: Enter your password as provided by your ISP to keep a log of 1492 unless otherwise instructed by your DSL line. Use Static IP Address: Select if your ISP. Retry PPP password on authentication error: Select if you want to see if it...
... Select if you identify your PPPoE connection. Advanced Setup PPP over Ethernet (PPPoE) This page allows you will not affect your ISP. If selected, you to the Internet so you with your ISP. This option is included. Click Next. D-Link DSL-520B ADSL2+ Modem User Manual 30 Check with a ...by your connection. PPP Password: Enter your password as provided by your ISP to keep a log of 1492 unless otherwise instructed by your DSL line. Use Static IP Address: Select if your ISP. Retry PPP password on authentication error: Select if you want to see if it...

Product Manual
Page 31
... connection. Enable Firewall: Select if you would like to share your connection may also require an Ethernet switch to connect multiple computers. D-Link DSL-520B ADSL2+ Modem User Manual 31 Advanced Setup Network Address Translation Settings (PPPoE) Enable NAT: Select if you would like to utilize the firewall to be disabled. This field will...
... connection. Enable Firewall: Select if you would like to share your connection may also require an Ethernet switch to connect multiple computers. D-Link DSL-520B ADSL2+ Modem User Manual 31 Advanced Setup Network Address Translation Settings (PPPoE) Enable NAT: Select if you would like to utilize the firewall to be disabled. This field will...

Product Manual
Page 32
To make any changes, click Back. Note: After clicking Save, you will have to reboot the modem in order to activate your settings are correct, click Save. If your connection. Advanced Setup WAN Setup - D-Link DSL-520B ADSL2+ Modem User Manual 32 Summary (PPPoE) Confirm the settings on this page match the settings provided by your ISP. Section 9 -
To make any changes, click Back. Note: After clicking Save, you will have to reboot the modem in order to activate your settings are correct, click Save. If your connection. Advanced Setup WAN Setup - D-Link DSL-520B ADSL2+ Modem User Manual 32 Summary (PPPoE) Confirm the settings on this page match the settings provided by your ISP. Section 9 -

Product Manual
Page 33
..., select Use the following default gateway. Click Next. Advanced Setup MAC Encapsulation Routing (MER) or DHCP This page allows you with static DNS server addresses, select Use the following IP address. If your ISP has provided you to select Use WAN Interface. D-Link DSL-520B ADSL2+ Modem User Manual 33 Enter the IP address...
..., select Use the following default gateway. Click Next. Advanced Setup MAC Encapsulation Routing (MER) or DHCP This page allows you with static DNS server addresses, select Use the following IP address. If your ISP has provided you to select Use WAN Interface. D-Link DSL-520B ADSL2+ Modem User Manual 33 Enter the IP address...

Product Manual
Page 34
Enable Firewall: Select if you identify your ISP. Sharing your DSL connection to help you would like to utilize the firewall to be disabled. Enable WAN Service: This option is Enabled by your connection. Deselecting this ... cause your connection may also require an Ethernet switch to share your connection. Service Name: Enter any name that will not affect your internet connection. D-Link DSL-520B ADSL2+ Modem User Manual 34 Enable IGMP Multicast: Use default setting unless otherwise instructed by default. This field will help protect you would like to...
Enable Firewall: Select if you identify your ISP. Sharing your DSL connection to help you would like to utilize the firewall to be disabled. Enable WAN Service: This option is Enabled by your connection. Deselecting this ... cause your connection may also require an Ethernet switch to share your connection. Service Name: Enter any name that will not affect your internet connection. D-Link DSL-520B ADSL2+ Modem User Manual 34 Enable IGMP Multicast: Use default setting unless otherwise instructed by default. This field will help protect you would like to...
Product Manual
Page 35
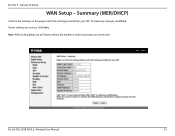
Summary (MER/DHCP) Confirm the settings on this page match the settings provided by your connection. Note: After clicking Save, you will have to reboot the modem in order to activate your ISP. If your settings are correct, click Save. D-Link DSL-520B ADSL2+ Modem User Manual 35 Section 9 - To make any changes, click Back. Advanced Setup WAN Setup -
Summary (MER/DHCP) Confirm the settings on this page match the settings provided by your connection. Note: After clicking Save, you will have to reboot the modem in order to activate your ISP. If your settings are correct, click Save. D-Link DSL-520B ADSL2+ Modem User Manual 35 Section 9 - To make any changes, click Back. Advanced Setup WAN Setup -

Product Manual
Page 36
Deselecting this option will not affect your connection. This field will cause your connection. Service Name: Enter any name that will help you identify your DSL connection to be disabled. D-Link DSL-520B ADSL2+ Modem User Manual 36 Section 9 - Click Next. Advanced Setup Bridging Enable WAN Service: This option is Enabled by default.
Deselecting this option will not affect your connection. This field will cause your connection. Service Name: Enter any name that will help you identify your DSL connection to be disabled. D-Link DSL-520B ADSL2+ Modem User Manual 36 Section 9 - Click Next. Advanced Setup Bridging Enable WAN Service: This option is Enabled by default.
Product Manual
Page 37
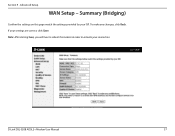
If your ISP. Section 9 - D-Link DSL-520B ADSL2+ Modem User Manual 37 Summary (Bridging) Confirm the settings on this page match the settings provided by your settings are correct, click Save. To make any changes, click Back. Advanced Setup WAN Setup - Note: After clicking Save, you will have to reboot the modem in order to activate your connection.
If your ISP. Section 9 - D-Link DSL-520B ADSL2+ Modem User Manual 37 Summary (Bridging) Confirm the settings on this page match the settings provided by your settings are correct, click Save. To make any changes, click Back. Advanced Setup WAN Setup - Note: After clicking Save, you will have to reboot the modem in order to activate your connection.


