Manual
Page 2
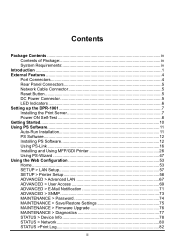
... of Package iv System Requirements iv Introduction ...1 External Features 4 Port Connectors 4 Rear Panel Connectors 5 Network Cable Connector 5 Reset Button ...5 DC Power Connector 5 LED Indicators 6 Setting up the DPR-1061 7 Installing the Print Server 7 Power ON Self-Test 8 Getting Started...10 Using PS ...Software 11 Auto-Run Installation 11 PS Software 12 Installing PS Software 12 Using PS-Link 16 Installing and Using MFP/GDI Printer ...
... of Package iv System Requirements iv Introduction ...1 External Features 4 Port Connectors 4 Rear Panel Connectors 5 Network Cable Connector 5 Reset Button ...5 DC Power Connector 5 LED Indicators 6 Setting up the DPR-1061 7 Installing the Print Server 7 Power ON Self-Test 8 Getting Started...10 Using PS ...Software 11 Auto-Run Installation 11 PS Software 12 Installing PS Software 12 Using PS-Link 16 Installing and Using MFP/GDI Printer ...
Manual
Page 5
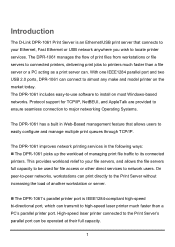
... printer much faster than a PC's parallel printer port. The DPR-1061 improves network printing services in Web-Based management feature that connects to your file servers, and allows the file servers full capacity to be operated at their full capacity. 1 Introduction The D-Link DPR-1061 Print Server is IEEE1284-compliant high-speed bi-directional port, which can transmit to its connected printers...
... printer much faster than a PC's parallel printer port. The DPR-1061 improves network printing services in Web-Based management feature that connects to your file servers, and allows the file servers full capacity to be operated at their full capacity. 1 Introduction The D-Link DPR-1061 Print Server is IEEE1284-compliant high-speed bi-directional port, which can transmit to its connected printers...
Manual
Page 8
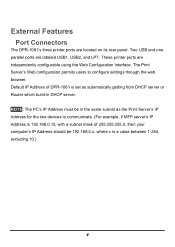
External Features Port Connectors The DPR-1061's three printer ports are independently configurable using the Web Configuration Interface. These printer ports are located on its rear panel. The Print Server's Web configuration permits users to communicate. (For example, if MFP server's IP Address is 192.168.0.10, with a subnet mask of DPR-1061 is a value between 1-254, excluding 10.) 4 NOTE: The...
External Features Port Connectors The DPR-1061's three printer ports are independently configurable using the Web Configuration Interface. These printer ports are located on its rear panel. The Print Server's Web configuration permits users to communicate. (For example, if MFP server's IP Address is 192.168.0.10, with a subnet mask of DPR-1061 is a value between 1-254, excluding 10.) 4 NOTE: The...
Manual
Page 9
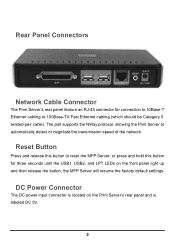
The port supports the NWay protocol, allowing the Print Server to 10Base-T Ethernet cabling or 100Base-TX Fast Ethernet cabling (which should be Category 5 twisted-pair cable). or press and hold this button to reset the MFP Server; Reset Button Press and release this button for connection to automatically ... the transmission speed of the network. Rear Panel Connectors Network Cable Connector The Print Server's rear panel feature an RJ-45 connector for three seconds until the USB1, USB2, and LPT LEDs on the Print Server's rear panel and is labeled DC 5V. 5 DC Power Connector The DC...
The port supports the NWay protocol, allowing the Print Server to 10Base-T Ethernet cabling or 100Base-TX Fast Ethernet cabling (which should be Category 5 twisted-pair cable). or press and hold this button to reset the MFP Server; Reset Button Press and release this button for connection to automatically ... the transmission speed of the network. Rear Panel Connectors Network Cable Connector The Print Server's rear panel feature an RJ-45 connector for three seconds until the USB1, USB2, and LPT LEDs on the Print Server's rear panel and is labeled DC 5V. 5 DC Power Connector The DC...
Manual
Page 11
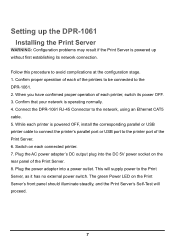
...the rear panel of the Print Server. 6. Setting up the DPR-1061 Installing the Print Server WARNING: Configuration problems may result if the Print Server is operating normally. 4. Connect the DPR-1061 RJ-45 Connector to the DPR-1061. 2. When you have ...confirmed proper operation of the printers to be connected to the network, using an Ethernet CAT5 cable. 5. Confirm proper operation of each of each printer is powered OFF, install the corresponding parallel or USB printer cable to connect the printer's parallel port...
...the rear panel of the Print Server. 6. Setting up the DPR-1061 Installing the Print Server WARNING: Configuration problems may result if the Print Server is operating normally. 4. Connect the DPR-1061 RJ-45 Connector to the DPR-1061. 2. When you have ...confirmed proper operation of the printers to be connected to the network, using an Ethernet CAT5 cable. 5. Confirm proper operation of each of each printer is powered OFF, install the corresponding parallel or USB printer cable to connect the printer's parallel port...
Manual
Page 59
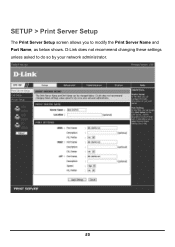
D-Link does not recommend changing these settings unless asked to modify the Print Server Name and Port Name, as below shows. SETUP > Print Server Setup The Print Server Setup screen allows you to do so by your network administrator. 55
D-Link does not recommend changing these settings unless asked to modify the Print Server Name and Port Name, as below shows. SETUP > Print Server Setup The Print Server Setup screen allows you to do so by your network administrator. 55
Manual
Page 60
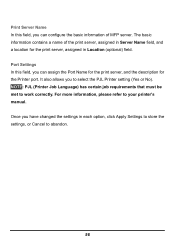
... the settings in Location (optional) field. For more information, please refer to work correctly. It also allows you can assign the Port Name for the print server, and the description for the print server, assigned in each option, click Apply Settings to store the settings, or Cancel to select the PJL Printer setting (Yes or...
... the settings in Location (optional) field. For more information, please refer to work correctly. It also allows you can assign the Port Name for the print server, and the description for the print server, assigned in each option, click Apply Settings to store the settings, or Cancel to select the PJL Printer setting (Yes or...
Manual
Page 72
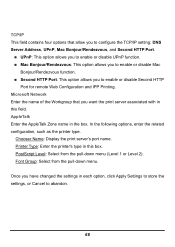
TCP/IP This field contains four options that you want the print server associated with in this box. In the following options, enter the related configuration, such as the printer type. Chooser Name: Display the print server's port name. Microsoft Network Enter the name of the Workgroup that ...allow you to configure the TCP/IP setting: DNS Server Address, UPnP, Mac Bonjour/Rendezvous, and Second HTTP Port. „ UPnP: This option allows you to enable...
TCP/IP This field contains four options that you want the print server associated with in this box. In the following options, enter the related configuration, such as the printer type. Chooser Name: Display the print server's port name. Microsoft Network Enter the name of the Workgroup that ...allow you to configure the TCP/IP setting: DNS Server Address, UPnP, Mac Bonjour/Rendezvous, and Second HTTP Port. „ UPnP: This option allows you to enable...

Manual
Page 145
◆ sd=dir The location of the printer's local spool directory. ◆ mx#blocks The limit for print job files in this case the D-Link print server. ◆ rp=printer The name of the printer on the remote host. For the D-Link print server, the port name should be used. Note: this entry is located, in the local spool directory; 0 means no limit. ◆ rm=address The host where the remote printer is case-sensitive. 141
◆ sd=dir The location of the printer's local spool directory. ◆ mx#blocks The limit for print job files in this case the D-Link print server. ◆ rp=printer The name of the printer on the remote host. For the D-Link print server, the port name should be used. Note: this entry is located, in the local spool directory; 0 means no limit. ◆ rm=address The host where the remote printer is case-sensitive. 141

Manual
Page 146
... /etc/hosts contains an IP address and one or more aliases for the print server's IP address. Login as the destination port name. 142 Change to your D-LINK network print server from SCO Unix System V/386 To allow printing to a printer attached to quit): Enter an alias for the printer on the local machine and press Enter...
... /etc/hosts contains an IP address and one or more aliases for the print server's IP address. Login as the destination port name. 142 Change to your D-LINK network print server from SCO Unix System V/386 To allow printing to a printer attached to quit): Enter an alias for the printer on the local machine and press Enter...
Manual
Page 148
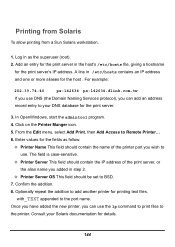
... to use the lp command to print files to BSD. 7. Enter values for printing text files, with_TEXT appended to Remote Printer... 6. Printing from Solaris To allow printing from a Sun Solaris workstation, 1. Add an entry for the print server's IP address. From the Edit menu, select Add Print, then Add Access to the port name. Confirm the addition. 8. Once...
... to use the lp command to print files to BSD. 7. Enter values for printing text files, with_TEXT appended to Remote Printer... 6. Printing from Solaris To allow printing from a Sun Solaris workstation, 1. Add an entry for the print server's IP address. From the Edit menu, select Add Print, then Add Access to the port name. Confirm the addition. 8. Once...
Manual
Page 152
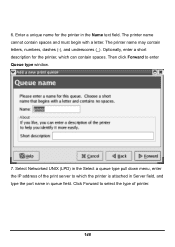
Enter a unique name for the printer, which the printer is attached in Server field, and type the port name in queue field. Optionally, enter a short description for the printer in the Select a queue type pull down menu, enter the IP address of printer. ... to enter Queue type window. 7. The printer name cannot contain spaces and must begin with a letter. Then click Forward to select the type of the print server to which can contain spaces. The printer name may contain letters, numbers, dashes (-), and underscores (_).
Enter a unique name for the printer, which the printer is attached in Server field, and type the port name in queue field. Optionally, enter a short description for the printer in the Select a queue type pull down menu, enter the IP address of printer. ... to enter Queue type window. 7. The printer name cannot contain spaces and must begin with a letter. Then click Forward to select the type of the print server to which can contain spaces. The printer name may contain letters, numbers, dashes (-), and underscores (_).
Manual
Page 166
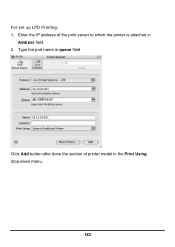
For set up LPD Printing: 1. Click Add button after done the section of the print server to which the printer is attached in Address field. 2. Type the port name in the Print Using drop-down menu. 162 Enter the IP address of printer model in queue field.
For set up LPD Printing: 1. Click Add button after done the section of the print server to which the printer is attached in Address field. 2. Type the port name in the Print Using drop-down menu. 162 Enter the IP address of printer model in queue field.
Manual
Page 167
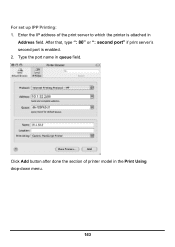
After that, type ": 80" or ": second port" if print server's second port is attached in Address field. Click Add button after done the section of the print server to which the printer is enabled. 2. For set up IPP Printing: 1. Type the port name in the Print Using drop-down menu. 163 Enter the IP address of printer model in queue field.
After that, type ": 80" or ": second port" if print server's second port is attached in Address field. Click Add button after done the section of the print server to which the printer is enabled. 2. For set up IPP Printing: 1. Type the port name in the Print Using drop-down menu. 163 Enter the IP address of printer model in queue field.
Manual
Page 168
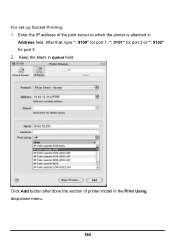
For set up Socket Printing: 1. Click Add button after done the section of the print server to which the printer is attached in Address field. Keep the blank in the Print Using drop-down menu. 164 Enter the IP address of printer model in queue field. After that, type ": 9100" for port 1, ": 9101" for port 2 or ": 9102" for port 3. 2.
For set up Socket Printing: 1. Click Add button after done the section of the print server to which the printer is attached in Address field. Keep the blank in the Print Using drop-down menu. 164 Enter the IP address of printer model in queue field. After that, type ": 9100" for port 1, ": 9101" for port 2 or ": 9102" for port 3. 2.

Manual
Page 174
Click on the Port to print your document. 170 Select the Printer Port just configured in the Print window. Click Add Printer and the Printer Port configuration is connected. Then select the printer model from the dialog box displayed here. Click Print to which the post-script printer is completed. AppleTalk protocol: After selecting AppleTalk, the Port Names of the Print Server will be displayed. The Port Names shown here are examples only.
Click on the Port to print your document. 170 Select the Printer Port just configured in the Print window. Click Add Printer and the Printer Port configuration is connected. Then select the printer model from the dialog box displayed here. Click Print to which the post-script printer is completed. AppleTalk protocol: After selecting AppleTalk, the Port Names of the Print Server will be displayed. The Port Names shown here are examples only.
Manual
Page 175
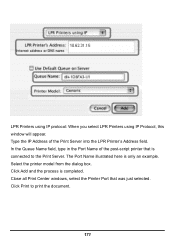
The Port Name illustrated here is completed. Click Add and the process is only an example. Select the printer model from the dialog box. LPR Printers using IP protocol: When you select LPR Printers using IP Protocol, this window will appear. Click Print to the Print Server. Close all Print Center windows, select the Printer Port that is connected to print the document. 171 In the Queue Name field, type in the Port Name of the Print Server into the LPR Printer's Address field. Type the IP Address of the post-script printer that was just selected.
The Port Name illustrated here is completed. Click Add and the process is only an example. Select the printer model from the dialog box. LPR Printers using IP protocol: When you select LPR Printers using IP Protocol, this window will appear. Click Print to the Print Server. Close all Print Center windows, select the Printer Port that is connected to print the document. 171 In the Queue Name field, type in the Port Name of the Print Server into the LPR Printer's Address field. Type the IP Address of the post-script printer that was just selected.

Manual
Page 176
... divided into AppleTalk zones, you will need to make sure that it can print from any MacOS computer connected to one of the Print Server's ports is the same as its Port Name. Setting up MFP server so that every Port Name is unique among all of the network printers in your AppleTalk zone.... You can be used with the Print Server's IP Address in the same segment for network printing to PostScript printers. If...
... divided into AppleTalk zones, you will need to make sure that it can print from any MacOS computer connected to one of the Print Server's ports is the same as its Port Name. Setting up MFP server so that every Port Name is unique among all of the network printers in your AppleTalk zone.... You can be used with the Print Server's IP Address in the same segment for network printing to PostScript printers. If...

Manual
Page 177
You should contain a single asterisk (*). If your network is not divided into zones, the AppleTalk Zone field should locate the Print Server in the same zone as below. 173 For each Printer Port that will be using it. which zone the Print Server should be in the Advanced LAN screen, shown as most of the users who will be used for AppleTalk printing, you may need to change the AppleTalk Port Settings in .
You should contain a single asterisk (*). If your network is not divided into zones, the AppleTalk Zone field should locate the Print Server in the same zone as below. 173 For each Printer Port that will be using it. which zone the Print Server should be in the Advanced LAN screen, shown as most of the users who will be used for AppleTalk printing, you may need to change the AppleTalk Port Settings in .

Manual
Page 178
Chooser Name: Display the print server's port name. 174 In the following options, enter the related configuration, such as the printer type. AppleTalk Enter the AppleTalk Zone name in the box.
Chooser Name: Display the print server's port name. 174 In the following options, enter the related configuration, such as the printer type. AppleTalk Enter the AppleTalk Zone name in the box.


