
Product Manual
Page 11
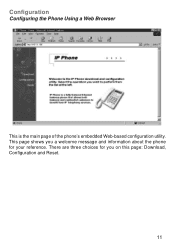
Configuration Configuring the Phone Using a Web Browser This is the main page of the phone's embedded Web-based configuration utility. There are three choices for you a welcome message and information about the phone for your reference. This page shows you on this page: Download, Configuration and Reset. 11
Configuration Configuring the Phone Using a Web Browser This is the main page of the phone's embedded Web-based configuration utility. There are three choices for you a welcome message and information about the phone for your reference. This page shows you on this page: Download, Configuration and Reset. 11
Product Manual
Page 12
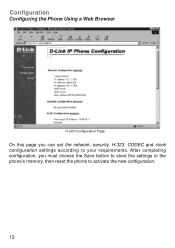
Configuration Configuring the Phone Using a Web Browser H.323 Configuration Page On this page you must choose the Save button to store the settings in the phone's memory, then reset the phone to your requirements. After completing configuration, you can set the network, security, H.323, CODEC and clock configuration settings according to activate the new configuration. 12
Configuration Configuring the Phone Using a Web Browser H.323 Configuration Page On this page you must choose the Save button to store the settings in the phone's memory, then reset the phone to your requirements. After completing configuration, you can set the network, security, H.323, CODEC and clock configuration settings according to activate the new configuration. 12
Product Manual
Page 20
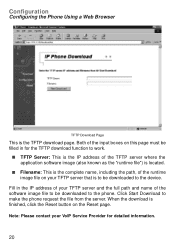
... in the IP address of your TFTP server and the full path and name of the runtime image file on the Reset page. When the download is finished, click the Reset button on your VoIP Service Provider for the TFTP download function to work. „ TFTP Server: This is the IP address...
... in the IP address of your TFTP server and the full path and name of the runtime image file on the Reset page. When the download is finished, click the Reset button on your VoIP Service Provider for the TFTP download function to work. „ TFTP Server: This is the IP address...
Product Manual
Page 21
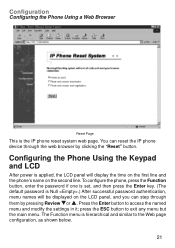
..., menu names will display the time on the first line and the phone's name on the LCD panel, and you can reset the IP phone device through them by clicking the "Reset" button. You can step through the web browser by pressing Review Tor S. Press the Enter button to exit any menu... to access the named menu and modify the settings in it; Configuring the Phone Using the Keypad and LCD After power is the IP phone reset system web page. Configuration Configuring the Phone Using a Web Browser Reset Page This is applied, the LCD panel will be displayed on the second line.
..., menu names will display the time on the first line and the phone's name on the LCD panel, and you can reset the IP phone device through them by clicking the "Reset" button. You can step through the web browser by pressing Review Tor S. Press the Enter button to exit any menu... to access the named menu and modify the settings in it; Configuring the Phone Using the Keypad and LCD After power is the IP phone reset system web page. Configuration Configuring the Phone Using a Web Browser Reset Page This is applied, the LCD panel will be displayed on the second line.
Product Manual
Page 23
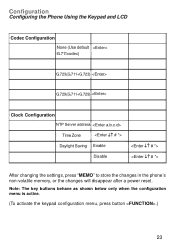
Note: The key buttons behave as shown below only when the configuration menu is active. (To activate the keypad configuration menu, press button .) 23 Configuration Configuring the Phone Using the Keypad and LCD Codec Configuration None (Use default G.711codec) G.723(G.711+G.723) G.729(G.711+G.729) Clock Configuration NTP Server address Time Zone Daylight Saving Enable Disable After changing the settings, press "MEMO" to store the changes in the phone's non-volatile memory, or the changes will disappear after a power reset.
Note: The key buttons behave as shown below only when the configuration menu is active. (To activate the keypad configuration menu, press button .) 23 Configuration Configuring the Phone Using the Keypad and LCD Codec Configuration None (Use default G.711codec) G.723(G.711+G.723) G.729(G.711+G.729) Clock Configuration NTP Server address Time Zone Daylight Saving Enable Disable After changing the settings, press "MEMO" to store the changes in the phone's non-volatile memory, or the changes will disappear after a power reset.

Product Manual
Page 24
T Configuration Configuring the Phone Using the Keypad and LCD „ FUNCTION: Inactivates the configuration menu. „ MEMO: Stores the configuration back to the Flash. „ FLASH: Clears user input string and resets the cursor to ignore user input. 24 same as . „ REVIEW : Scrolls menu items or option items. „ Enter : Goes to the submenu or confirms user input. „ ESC : Return to the upper menu or to the beginning. „ DELETE: Deletes user input character;
T Configuration Configuring the Phone Using the Keypad and LCD „ FUNCTION: Inactivates the configuration menu. „ MEMO: Stores the configuration back to the Flash. „ FLASH: Clears user input string and resets the cursor to ignore user input. 24 same as . „ REVIEW : Scrolls menu items or option items. „ Enter : Goes to the submenu or confirms user input. „ ESC : Return to the upper menu or to the beginning. „ DELETE: Deletes user input character;


