
Product Manual
Page 2
Contents Package Contents 3 Introduction 4 Wireless Basics 8 Setting up the DP-311U 10 Getting Started 12 Using the Web Configuration 13 TCP/IP Printing for Windows XP 21 TCP/IP Printing for Windows 2000 29 TCP/IP Printing for Windows 98SE/Me 38 Unix/Linux Printing (See PS Admin Manual on CD-ROM 49 Setting up AppleTalk or LPR Printing in MAC OSX 50 Setting up AppleTalk Printing in MAC OS9 55 Networking Basics 58 Technical Specifications 70 Contacting Technical Support 71 Warranty and Registration 72 Appendix: DP-311U Printer Compatibility List 75 2
Contents Package Contents 3 Introduction 4 Wireless Basics 8 Setting up the DP-311U 10 Getting Started 12 Using the Web Configuration 13 TCP/IP Printing for Windows XP 21 TCP/IP Printing for Windows 2000 29 TCP/IP Printing for Windows 98SE/Me 38 Unix/Linux Printing (See PS Admin Manual on CD-ROM 49 Setting up AppleTalk or LPR Printing in MAC OSX 50 Setting up AppleTalk Printing in MAC OS9 55 Networking Basics 58 Technical Specifications 70 Contacting Technical Support 71 Warranty and Registration 72 Appendix: DP-311U Printer Compatibility List 75 2

Product Manual
Page 4
...configure and manage print queues through the network, printers can be used for TCP/IP, NetBEUI, and AppleTalk are provided to ensure seamless connection to major networking Operating Systems. The DP-311U has a built in Web-Based management feature that also connects to high-speed ...laser printers much faster than a file server on most Windows-based networks. The DP-311U improves network printing services in your Ethernet/Fast Ethernet network. Introduction The D-Link DP-311U Print Server is very portable and inexpensive compared to a PC-based print server, and the...
...configure and manage print queues through the network, printers can be used for TCP/IP, NetBEUI, and AppleTalk are provided to ensure seamless connection to major networking Operating Systems. The DP-311U has a built in Web-Based management feature that also connects to high-speed ...laser printers much faster than a file server on most Windows-based networks. The DP-311U improves network printing services in your Ethernet/Fast Ethernet network. Introduction The D-Link DP-311U Print Server is very portable and inexpensive compared to a PC-based print server, and the...

Product Manual
Page 5
... USB can be 192.168.0.x, where x is a value between 1-254, excluding 10.) 5 The DP-311U offers extraordinary flexibility, operating with all major network operating systems and protocols: „ TCP/IP UNIX lpr/lpd Windows NT/2000, Windows 95/98SE/ME, Windows XP NetWare 5.x NDPS LPR Remote ...and administration software, PS Admin, is supplied with the DP-311U, for information about configuring the print server's ports.) The Print Server also supports web configuration permitting users to communicate. (For example, if your Print Server's IP Address is 192.168.0.10, with a subnet mask of...
... USB can be 192.168.0.x, where x is a value between 1-254, excluding 10.) 5 The DP-311U offers extraordinary flexibility, operating with all major network operating systems and protocols: „ TCP/IP UNIX lpr/lpd Windows NT/2000, Windows 95/98SE/ME, Windows XP NetWare 5.x NDPS LPR Remote ...and administration software, PS Admin, is supplied with the DP-311U, for information about configuring the print server's ports.) The Print Server also supports web configuration permitting users to communicate. (For example, if your Print Server's IP Address is 192.168.0.10, with a subnet mask of...

Product Manual
Page 12
..., may be connected to easily configure and manage their print queue through TCP/IP. Even if it is not included in this product. to the USB port of printers that allows users to the USB port of the DP-311U. Getting Started Below is not comprehensive. The compatibility list is a sample network using...
..., may be connected to easily configure and manage their print queue through TCP/IP. Even if it is not included in this product. to the USB port of printers that allows users to the USB port of the DP-311U. Getting Started Below is not comprehensive. The compatibility list is a sample network using...
Product Manual
Page 13
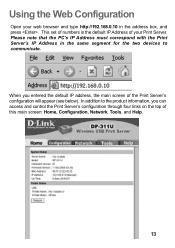
... note that the PC's IP Address must correspond with the Print Server's IP Address in the address box, and press . Using the Web Configuration Open your Print Server. In addition to communicate. When you can access and control the Print Server's configuration through four links on the top of your... web browser and type http://192.168.0.10 in the same segment for the two devices to the product information, you entered the default IP address, the main screen of the Print Server's configuration...
... note that the PC's IP Address must correspond with the Print Server's IP Address in the address box, and press . Using the Web Configuration Open your Print Server. In addition to communicate. When you can access and control the Print Server's configuration through four links on the top of your... web browser and type http://192.168.0.10 in the same segment for the two devices to the product information, you entered the default IP address, the main screen of the Print Server's configuration...

Product Manual
Page 14
Firmware Version: The version of the Print Server. IP Address: The IP Address of the firmware and release date on the Print Server. MAC Address: The MAC address of time the Print Server has been up. 14 ... name assigned to the Print Server, the Printer Status will show [Online]. Up Time: The length of the Ethernet port. Model: The model of the DP-311U's System Status and Printer Status. Home Click on Home tab from the tools bar of the main screen to display information of the Print Server...
Firmware Version: The version of the Print Server. IP Address: The IP Address of the firmware and release date on the Print Server. MAC Address: The MAC address of time the Print Server has been up. 14 ... name assigned to the Print Server, the Printer Status will show [Online]. Up Time: The length of the Ethernet port. Model: The model of the DP-311U's System Status and Printer Status. Home Click on Home tab from the tools bar of the main screen to display information of the Print Server...

Product Manual
Page 17
... main screen to ensure the settings are updated and saved. Network Click on your IP Address, you can use the PS Admin program to configure the DP-311U Print Server for TCP/IP printing. The default IP Address is 192.168.0.10. Click the button to enter the Network Page; If... you the settings required to configure the DP-311U Print Server. it provides network protocol configuration options that include TCP/IP, NetBEUI and AppleTalk TCP/IP Protocol The TCP/IP Protocol section will show you forget your web browser to ensure the settings are updated...
... main screen to ensure the settings are updated and saved. Network Click on your IP Address, you can use the PS Admin program to configure the DP-311U Print Server for TCP/IP printing. The default IP Address is 192.168.0.10. Click the button to enter the Network Page; If... you the settings required to configure the DP-311U Print Server. it provides network protocol configuration options that include TCP/IP, NetBEUI and AppleTalk TCP/IP Protocol The TCP/IP Protocol section will show you forget your web browser to ensure the settings are updated...
Product Manual
Page 19
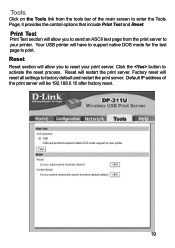
Tools Click on the Tools link from the print server to your print server. Print Test Print Test section will allow you to factory default and restart the print server. Reset ... settings to send an ASCII text page from the tools bar of the print server will be 192.168.0.10 after factory reset. 19 Default IP address of the main screen to print. it provides the control options that include Print Test and Reset. Reset will have to support native DOS...
Tools Click on the Tools link from the print server to your print server. Print Test Print Test section will allow you to factory default and restart the print server. Reset ... settings to send an ASCII text page from the tools bar of the print server will be 192.168.0.10 after factory reset. 19 Default IP address of the main screen to print. it provides the control options that include Print Test and Reset. Reset will have to support native DOS...

Product Manual
Page 21
D-Link DP-301U 21 Note: The PC's IP Address must be 192.168.0.x, where x is a value between 1-254, excluding 10.) See Networking Basics: Assigning a Static IP Address in the same subnet as the Print Server's IP Address for the two devices to communicate. (For example, if your computer's IP Address should be in this...out how to change an IP Address. Press the Enter or (Return) Key. TCP/IP Printing for Windows XP Open the web browser, and type in the IP Address of 255.255.255.0, then your Print Server's IP Address is 192.168.0.10, with a subnet mask of the DP-311U. For example, type ...
D-Link DP-301U 21 Note: The PC's IP Address must be 192.168.0.x, where x is a value between 1-254, excluding 10.) See Networking Basics: Assigning a Static IP Address in the same subnet as the Print Server's IP Address for the two devices to communicate. (For example, if your computer's IP Address should be in this...out how to change an IP Address. Press the Enter or (Return) Key. TCP/IP Printing for Windows XP Open the web browser, and type in the IP Address of 255.255.255.0, then your Print Server's IP Address is 192.168.0.10, with a subnet mask of the DP-311U. For example, type ...

Product Manual
Page 22
You will need this information later in the configuration process. TCP/IP Printing for Windows XP (continued) At the Configuration window, write down the Port Name for future reference. Click Save 22 Select your Connection Mode Enter the ESS-ID of the remote access point or wireless router you would like to . If you wish to connect to set WEP Encryption, select the encryption level and the key here.
You will need this information later in the configuration process. TCP/IP Printing for Windows XP (continued) At the Configuration window, write down the Port Name for future reference. Click Save 22 Select your Connection Mode Enter the ESS-ID of the remote access point or wireless router you would like to . If you wish to connect to set WEP Encryption, select the encryption level and the key here.
Product Manual
Page 23
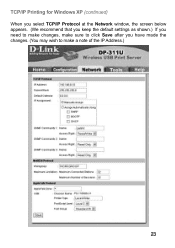
TCP/IP Printing for Windows XP (continued) When you select TCP/IP Protocol at the Network window, the screen below appears. (We recommend that you keep the default settings as shown.) If you need to make changes, make sure to click Save after you have made the changes. (You may wish to make a note of the IP Address.) 23
TCP/IP Printing for Windows XP (continued) When you select TCP/IP Protocol at the Network window, the screen below appears. (We recommend that you keep the default settings as shown.) If you need to make changes, make sure to click Save after you have made the changes. (You may wish to make a note of the IP Address.) 23
Product Manual
Page 24
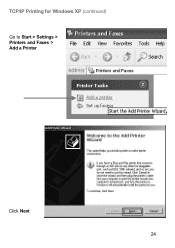
TCP/IP Printing for Windows XP (continued) Go to Start > Settings > Printers and Faxes > Add a Printer Click Next 24
TCP/IP Printing for Windows XP (continued) Go to Start > Settings > Printers and Faxes > Add a Printer Click Next 24
Product Manual
Page 25
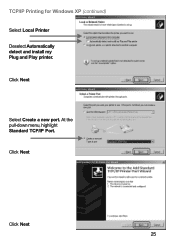
Click Next Click Next 25 Click Next Select Create a new port. TCP/IP Printing for Windows XP (continued) Select Local Printer Deselect Automatically detect and install my Plug and Play printer. At the pull-down menu, highlight Standard TCP/IP Port.
Click Next Click Next 25 Click Next Select Create a new port. TCP/IP Printing for Windows XP (continued) Select Local Printer Deselect Automatically detect and install my Plug and Play printer. At the pull-down menu, highlight Standard TCP/IP Port.
Product Manual
Page 26
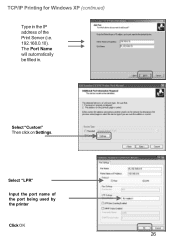
The Port Name will automatically be filled in the IP address of the port being used by the printer Click OK 26 Select "LPR" Input the port name of the Print Server (i.e. 192.168.0.10). TCP/IP Printing for Windows XP (continued) Type in . Select "Custom" Then click on Settings.
The Port Name will automatically be filled in the IP address of the port being used by the printer Click OK 26 Select "LPR" Input the port name of the Print Server (i.e. 192.168.0.10). TCP/IP Printing for Windows XP (continued) Type in . Select "Custom" Then click on Settings.
Product Manual
Page 27
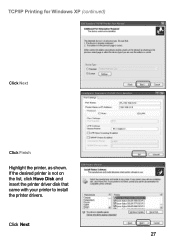
If the desired printer is not on the list, click Have Disk and insert the printer driver disk that came with your printer to install the printer drivers. Click Next 27 TCP/IP Printing for Windows XP (continued) Click Next Click Finish Highlight the printer, as shown.
If the desired printer is not on the list, click Have Disk and insert the printer driver disk that came with your printer to install the printer drivers. Click Next 27 TCP/IP Printing for Windows XP (continued) Click Next Click Finish Highlight the printer, as shown.

Product Manual
Page 28
TCP/IP Printing for Windows XP (continued) At this screen, you can input a name for the printer. Click Next Click Next Click Finish 28
TCP/IP Printing for Windows XP (continued) At this screen, you can input a name for the printer. Click Next Click Next Click Finish 28
Product Manual
Page 29
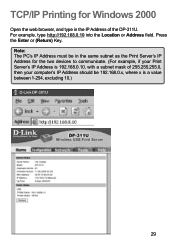
Press the Enter or (Return) Key. TCP/IP Printing for the two devices to communicate. (For example, if your computer's IP Address should be in the same subnet as the Print Server's IP Address for Windows 2000 Open the web browser, and type in the IP Address of 255.255.255.0, then your Print Server's IP Address is 192.168.0.10, with a subnet mask of the DP-311U. For example, type http://192.168.0.10 into the Location or Address field. Note: The PC's IP Address must be 192.168.0.x, where x is a value between 1-254, excluding 10.) D-Link DP-301U 29
Press the Enter or (Return) Key. TCP/IP Printing for the two devices to communicate. (For example, if your computer's IP Address should be in the same subnet as the Print Server's IP Address for Windows 2000 Open the web browser, and type in the IP Address of 255.255.255.0, then your Print Server's IP Address is 192.168.0.10, with a subnet mask of the DP-311U. For example, type http://192.168.0.10 into the Location or Address field. Note: The PC's IP Address must be 192.168.0.x, where x is a value between 1-254, excluding 10.) D-Link DP-301U 29
Product Manual
Page 30
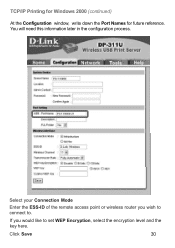
TCP/IP Printing for Windows 2000 (continued) At the Configuration window, write down the Port Names for future reference. Select your Connection Mode Enter the ESS-ID of the remote access point or wireless router you would like to . You will need this information later in the configuration process. Click Save 30 If you wish to connect to set WEP Encryption, select the encryption level and the key here.
TCP/IP Printing for Windows 2000 (continued) At the Configuration window, write down the Port Names for future reference. Select your Connection Mode Enter the ESS-ID of the remote access point or wireless router you would like to . You will need this information later in the configuration process. Click Save 30 If you wish to connect to set WEP Encryption, select the encryption level and the key here.

Product Manual
Page 31
TCP/IP Printing for Windows 2000 (continued) When you select TCP/IP Protocol at the Network window, the screen below appears. (We recommend that you keep the default settings as shown.) If you need to make changes, make sure to click Save after you have made the changes. (You may wish to make a note of the IP Address.) 31
TCP/IP Printing for Windows 2000 (continued) When you select TCP/IP Protocol at the Network window, the screen below appears. (We recommend that you keep the default settings as shown.) If you need to make changes, make sure to click Save after you have made the changes. (You may wish to make a note of the IP Address.) 31
Product Manual
Page 32
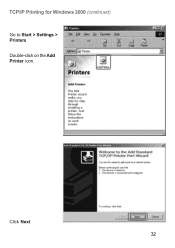
TCP/IP Printing for Windows 2000 (continued) Go to Start > Settings > Printers Double-click on the Add Printer icon. Click Next 32
TCP/IP Printing for Windows 2000 (continued) Go to Start > Settings > Printers Double-click on the Add Printer icon. Click Next 32


