Product Manual
Page 18
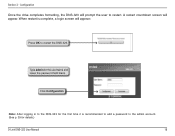
Configuration Once the drive completes formatting, the DNS-323 will prompt the user to restart the DNS-323. When restart is recommended to add a password to the admin account. (See p. 39 for details.) D-Link DNS-323 User Manual 18 Click Configuration Note: After logging in to the DNS-323 for the username and leave the password field blank. Type admin for the first time it is complete, a login screen will appear. A restart countdown screen will appear: Press OK to restart. Section 3 -
Configuration Once the drive completes formatting, the DNS-323 will prompt the user to restart the DNS-323. When restart is recommended to add a password to the admin account. (See p. 39 for details.) D-Link DNS-323 User Manual 18 Click Configuration Note: After logging in to the DNS-323 for the username and leave the password field blank. Type admin for the first time it is complete, a login screen will appear. A restart countdown screen will appear: Press OK to restart. Section 3 -
Product Manual
Page 27
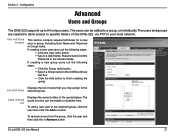
... current status of All Users selected group. The users can be added to the selected group, click the user then click the Add>> button. Users in the relevant fields. To add a new user to a group, or individually. If creating a new user carry out the following steps: • Click the Group radio button... can be enable or disabled here. The users and groups are created to allow access to 64 unique users. Configuration Advanced Users and Groups The DNS-323 supports up to specific folders on the DNS-323, via FTP or your local network.
... current status of All Users selected group. The users can be added to the selected group, click the user then click the Add>> button. Users in the relevant fields. To add a new user to a group, or individually. If creating a new user carry out the following steps: • Click the Group radio button... can be enable or disabled here. The users and groups are created to allow access to 64 unique users. Configuration Advanced Users and Groups The DNS-323 supports up to specific folders on the DNS-323, via FTP or your local network.

Product Manual
Page 29
The default quota setting is "Unlimited". D-Link DNS-323 User Manual 29 Configuration Configuring Quotas By default, all users and groups are automatically listed on this page, and cannot be deleted. Set a quota amount (MB) for the user and click Apply. To add a quota: Click the notepad icon of the user you want to add a quota to. Section 3 - Users and groups are displayed in the Quota Settings page.
The default quota setting is "Unlimited". D-Link DNS-323 User Manual 29 Configuration Configuring Quotas By default, all users and groups are automatically listed on this page, and cannot be deleted. Set a quota amount (MB) for the user and click Apply. To add a quota: Click the notepad icon of the user you want to add a quota to. Section 3 - Users and groups are displayed in the Quota Settings page.

Product Manual
Page 66
Section 3 - D-Link DNS-323 User Manual 66 Configuration On the following screen click on the BitTorrent option to access the BitTorrent settings: You can add Torrents from either a URL or from a file on your PC.
Section 3 - D-Link DNS-323 User Manual 66 Configuration On the following screen click on the BitTorrent option to access the BitTorrent settings: You can add Torrents from either a URL or from a file on your PC.

Product Manual
Page 67
The Torrent will now appear in the URL of the website where you will download the Torrent from and click the Add button. Configuration Adding a Torrent From URL To add a Torrent from a URL • Click the Add Torrent from URL checkbox. • Type in the Downloads list. D-Link DNS-323 User Manual 67 Section 3 -
The Torrent will now appear in the URL of the website where you will download the Torrent from and click the Add button. Configuration Adding a Torrent From URL To add a Torrent from a URL • Click the Add Torrent from URL checkbox. • Type in the Downloads list. D-Link DNS-323 User Manual 67 Section 3 -

Product Manual
Page 68
Section 3 - Configuration Adding a Torrent From File To add a Torrent from a File • Click the Add Torrent from File checkbox. • Click the Browse button. • Navigate to the folder where the Torrents are located on your PC and click the Add button. D-Link DNS-323 User Manual 68 The Torrent will now appear in the Downloads list.
Section 3 - Configuration Adding a Torrent From File To add a Torrent from a File • Click the Add Torrent from File checkbox. • Click the Browse button. • Navigate to the folder where the Torrents are located on your PC and click the Add button. D-Link DNS-323 User Manual 68 The Torrent will now appear in the Downloads list.
Product Manual
Page 71
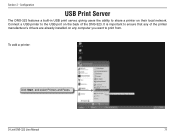
To add a printer: Click Start, and select Printers and Faxes. Connect a USB printer to the USB port on the back of the printer manufacturer's drivers are already installed on their local network. It is important to print from. Section 3 - D-Link DNS-323 User Manual 71 Configuration USB Print Server The DNS-323 features a built-in USB print server, giving users the ability to share a printer on any computer you want to ensure that any of the DNS-323.
To add a printer: Click Start, and select Printers and Faxes. Connect a USB printer to the USB port on the back of the printer manufacturer's drivers are already installed on their local network. It is important to print from. Section 3 - D-Link DNS-323 User Manual 71 Configuration USB Print Server The DNS-323 features a built-in USB print server, giving users the ability to share a printer on any computer you want to ensure that any of the DNS-323.

Product Manual
Page 72
Configuration Select Add a printer The Windows® Add Printer Wizard will launch: Click Next to continue. Section 3 - D-Link DNS-323 User Manual 72
Configuration Select Add a printer The Windows® Add Printer Wizard will launch: Click Next to continue. Section 3 - D-Link DNS-323 User Manual 72
Product Manual
Page 79
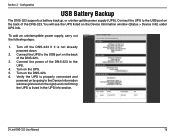
... 4. You will see the UPS listed on the DNS-323. 6. To add an uninterruptible power supply, carry out the following steps: 1. Turn on the Device Information window (Status > Device Info) under UPS Info. Configuration USB Battery Backup The DNS-323 supports a battery backup, or uninterruptible power supply (UPS... to the USB port on the back of the DNS-323. Connect the UPS to the USB port on the back of the DNS-323. 3. Connect the power of the DNS-323 to the Device Information window (pictured on the UPS. 5. D-Link DNS-323 User Manual 79 Verify the UPS is not already powered...
... 4. You will see the UPS listed on the DNS-323. 6. To add an uninterruptible power supply, carry out the following steps: 1. Turn on the Device Information window (Status > Device Info) under UPS Info. Configuration USB Battery Backup The DNS-323 supports a battery backup, or uninterruptible power supply (UPS... to the USB port on the back of the DNS-323. Connect the UPS to the USB port on the back of the DNS-323. 3. Connect the power of the DNS-323 to the Device Information window (pictured on the UPS. 5. D-Link DNS-323 User Manual 79 Verify the UPS is not already powered...

Product Manual
Page 82
D-Link DNS-323 User Manual 82 Section 3 - Click the Add exception... button Click the Get Certificate button. Click the buttons which are marked with a red frame to these depicted on the right. button. Configuration You will now see a series of pop-up warning messages that look similar to continue. Click the Or you can add an exception...
D-Link DNS-323 User Manual 82 Section 3 - Click the Add exception... button Click the Get Certificate button. Click the buttons which are marked with a red frame to these depicted on the right. button. Configuration You will now see a series of pop-up warning messages that look similar to continue. Click the Or you can add an exception...