User Manual
Page 1
USER MANUAL ShareCenter™ Pulse DNS-320 VERSION 1.1 Document Created by Nick Schuster
USER MANUAL ShareCenter™ Pulse DNS-320 VERSION 1.1 Document Created by Nick Schuster
User Manual
Page 2
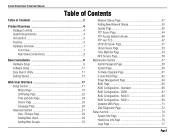
RAID 1 69 Dynamic DNS Page 71 Disk Diagnostic Page 72 Status Section 74 System Info Page 75 Hard Drive Info Page 76 Logs Page 77 Page 2 JBOD 67 RAID Configuration - RAID 0 68 RAID Configuration - D-Link ShareCenter Pulse User Manual Table of Contents Table of Contents 2 Product Overview 4 Package Contents 4 System Requirements 4 Introduction 5 Features 5 Hardware Overview...
RAID 1 69 Dynamic DNS Page 71 Disk Diagnostic Page 72 Status Section 74 System Info Page 75 Hard Drive Info Page 76 Logs Page 77 Page 2 JBOD 67 RAID Configuration - RAID 0 68 RAID Configuration - D-Link ShareCenter Pulse User Manual Table of Contents Table of Contents 2 Product Overview 4 Package Contents 4 System Requirements 4 Introduction 5 Features 5 Hardware Overview...
User Manual
Page 3
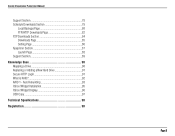
Auto Rebuilding 93 Yahoo! Widget Display 96 USB Copy 97 Technical Spesifications 98 Registration 99 Page 3 D-Link ShareCenter Pulse User Manual Support Section 78 Schedule Downloads Section 79 Local Backups Page 80 FTP/HTTP Downloads Page 82 P2P Downloads Section 84 Downloads Page 85 Setting Page 86 Ajaxplorer Section 87 Launch Page 88 Support Section 89 Knowledge Base 90 Mapping a Drive 90 Replacing or Adding a New Hard Drive 91 Secure HTTP Login 91 What is RAID 92 RAID 1 - Widget Installation 95 Yahoo!
Auto Rebuilding 93 Yahoo! Widget Display 96 USB Copy 97 Technical Spesifications 98 Registration 99 Page 3 D-Link ShareCenter Pulse User Manual Support Section 78 Schedule Downloads Section 79 Local Backups Page 80 FTP/HTTP Downloads Page 82 P2P Downloads Section 84 Downloads Page 85 Setting Page 86 Ajaxplorer Section 87 Launch Page 88 Support Section 89 Knowledge Base 90 Mapping a Drive 90 Replacing or Adding a New Hard Drive 91 Secure HTTP Login 91 What is RAID 92 RAID 1 - Widget Installation 95 Yahoo!
User Manual
Page 4
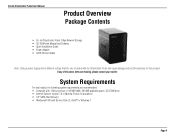
... version 7.0 or Mozilla Firefox 3.0 and above • 3.5" SATA Hard Drive(s) • Windows® XP (with the ShareCenter Pulse will cause damage and void the warranty for this product. D-Link ShareCenter Pulse User Manual Product Overview Package Contents • D-Link ShareCenter Pulse 2-Bay Network Storage • CD-ROM with Manual and Software • Quick Installation Guide • Power Adapter...
... version 7.0 or Mozilla Firefox 3.0 and above • 3.5" SATA Hard Drive(s) • Windows® XP (with the ShareCenter Pulse will cause damage and void the warranty for this product. D-Link ShareCenter Pulse User Manual Product Overview Package Contents • D-Link ShareCenter Pulse 2-Bay Network Storage • CD-ROM with Manual and Software • Quick Installation Guide • Power Adapter...
User Manual
Page 5
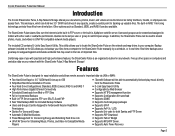
... Download • Supports Yahoo! The built-in the loss of any network. Backup software included on your computer. D-Link ShareCenter Pulse User Manual Introduction The D-Link ShareCenter Pulse, 2-Bay Network Storage shares your files from a computer to the ShareCenter Pulse manually, by Web Browser • Supports HTTPS management function • Supports Configuration file save/load • Supports DDNS...
... Download • Supports Yahoo! The built-in the loss of any network. Backup software included on your computer. D-Link ShareCenter Pulse User Manual Introduction The D-Link ShareCenter Pulse, 2-Bay Network Storage shares your files from a computer to the ShareCenter Pulse manually, by Web Browser • Supports HTTPS management function • Supports Configuration file save/load • Supports DDNS...
User Manual
Page 6
D-Link ShareCenter Pulse User Manual • Supports System Logging/FTP Logging • Supports Remote File Access via Built-in AjaXplorer or via FTP Server • Supports Apple Time Machine • USB port support External Storage Device, Printer Server, UPS Monitoring • Supports USB Copy Function • Supports RAID Migration: Standard to RAID1 • Supports Local Backup Page 6
D-Link ShareCenter Pulse User Manual • Supports System Logging/FTP Logging • Supports Remote File Access via Built-in AjaXplorer or via FTP Server • Supports Apple Time Machine • USB port support External Storage Device, Printer Server, UPS Monitoring • Supports USB Copy Function • Supports RAID Migration: Standard to RAID1 • Supports Local Backup Page 6
User Manual
Page 7
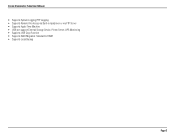
...it . USB Light: This light will be inserted here. Power Button: Press this ShareCenter Pulse is powered on the ShareCenter Pulse. The lights will illuminate when this button once to power down the ShareCenter Pulse. USB Port: This is inserted into the USB Port. Devices like a USB Print...pressing it begins to blink to power on . Press and hold 5 seconds to ShareCenter Pulse. Page 7 Power Light: This light will blink when the drives are connected but inactive. D-Link ShareCenter Pulse User Manual Hardware Overview Front View HDD2 Light Power Light USB Light Power Button ...
...it . USB Light: This light will be inserted here. Power Button: Press this ShareCenter Pulse is powered on the ShareCenter Pulse. The lights will illuminate when this button once to power down the ShareCenter Pulse. USB Port: This is inserted into the USB Port. Devices like a USB Print...pressing it begins to blink to power on . Press and hold 5 seconds to ShareCenter Pulse. Page 7 Power Light: This light will blink when the drives are connected but inactive. D-Link ShareCenter Pulse User Manual Hardware Overview Front View HDD2 Light Power Light USB Light Power Button ...
User Manual
Page 8
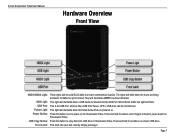
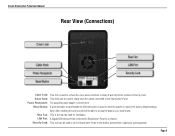
... prevent theft. Rear Fan: This is the rear fan used to access the data on your hard drives. D-Link ShareCenter Pulse User Manual Rear View (Connections) Cover Lock Cable Hook Power Receptacle Reset Button Rear Fan LAN Port Security Lock Cover Lock: This lock is used ... adapter connects here. Note: After resetting the unit you will restrict the removal of the top cover. Locking it will still be used to the ShareCenter Pulse.
... prevent theft. Rear Fan: This is the rear fan used to access the data on your hard drives. D-Link ShareCenter Pulse User Manual Rear View (Connections) Cover Lock Cable Hook Power Receptacle Reset Button Rear Fan LAN Port Security Lock Cover Lock: This lock is used ... adapter connects here. Note: After resetting the unit you will restrict the removal of the top cover. Locking it will still be used to the ShareCenter Pulse.
User Manual
Page 9
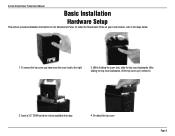
To install the ShareCenter Pulse on your local network, refer to the right. 2. Insert a 3.5" SATA hard drive into an available drive bay. 4. To remove the top cover you have move the cover lock to the steps below: 1. Re-attach the top cover. After sliding the top cover backwards, lift the top cover up to remove it. 3. While holding the cover lock, slide the top cover backwards. D-Link ShareCenter Pulse User Manual Basic Installation Hardware Setup This section provides installation information for the ShareCenter Pulse. Page 9
To install the ShareCenter Pulse on your local network, refer to the right. 2. Insert a 3.5" SATA hard drive into an available drive bay. 4. To remove the top cover you have move the cover lock to the steps below: 1. Re-attach the top cover. After sliding the top cover backwards, lift the top cover up to remove it. 3. While holding the cover lock, slide the top cover backwards. D-Link ShareCenter Pulse User Manual Basic Installation Hardware Setup This section provides installation information for the ShareCenter Pulse. Page 9
User Manual
Page 10
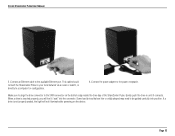
If a drive is inserted properly, you will not illuminate after powering on the bottom edge inside the drive bay of the ShareCenter Pulse. D-Link ShareCenter Pulse User Manual 5. Connect the power adapter to the available Ethernet port. Some hard drives that are thin or oddly shaped may need to be... seated, the light will feel it connects. Make sure to align the drive connector to a computer for configuration. 6. This cable should connect the ShareCenter Pulse to your local network via a router or switch, or directly to the SATA connector on the device. Page 10
If a drive is inserted properly, you will not illuminate after powering on the bottom edge inside the drive bay of the ShareCenter Pulse. D-Link ShareCenter Pulse User Manual 5. Connect the power adapter to the available Ethernet port. Some hard drives that are thin or oddly shaped may need to be... seated, the light will feel it connects. Make sure to align the drive connector to a computer for configuration. 6. This cable should connect the ShareCenter Pulse to your local network via a router or switch, or directly to the SATA connector on the device. Page 10
User Manual
Page 11
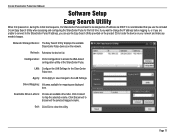
... to be assigned an IP address via DHCP. Click Connect to the LAN Settings. Click Disconnect to access the Web-based configuration utility of the ShareCenter Pulse. D-Link ShareCenter Pulse User Manual Software Setup Easy Search Utility When first powered on the network. Refresh: Refreshes the device list. LAN: Configure the LAN Settings for the...
... to be assigned an IP address via DHCP. Click Connect to the LAN Settings. Click Disconnect to access the Web-based configuration utility of the ShareCenter Pulse. D-Link ShareCenter Pulse User Manual Software Setup Easy Search Utility When first powered on the network. Refresh: Refreshes the device list. LAN: Configure the LAN Settings for the...

User Manual
Page 12
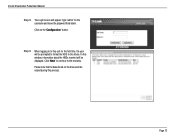
Page 12 D-Link ShareCenter Pulse User Manual Getting Started To run the Easy Search Utility, insert the ShareCenter Pulse CD into your CD-ROM drive: Step 1: Click Easy Search Utility. Step 2: Highlight an available ShareCenter Pulse and click Configuration to access the web-based utility.
Page 12 D-Link ShareCenter Pulse User Manual Getting Started To run the Easy Search Utility, insert the ShareCenter Pulse CD into your CD-ROM drive: Step 1: Click Easy Search Utility. Step 2: Highlight an available ShareCenter Pulse and click Configuration to access the web-based utility.
User Manual
Page 13
In this window, information about the HDDs inserted will be prompted to format the HDD in to the next step. Page 13 Step 4: When logging in the device. D-Link ShareCenter Pulse User Manual Step 3: The Login screen will appear: Type 'admin' for the first time, the user will be displayed. Please note that the data stored on the 'Configuration' button. Click 'Next' to continue to this process. Click on the drives will be erased during this unit for the username and leave the password field blank.
In this window, information about the HDDs inserted will be prompted to format the HDD in to the next step. Page 13 Step 4: When logging in the device. D-Link ShareCenter Pulse User Manual Step 3: The Login screen will appear: Type 'admin' for the first time, the user will be displayed. Please note that the data stored on the 'Configuration' button. Click 'Next' to continue to this process. Click on the drives will be erased during this unit for the username and leave the password field blank.

User Manual
Page 14
... create one large volume geared towards maximum available space. Each hard drive is a feature that allows the ShareCenter Pulse to initiate the rebuilding phase automatically. If this configuration we'll use RAID 1 as the example configuration. D-Link ShareCenter Pulse User Manual Step 5: The four options are: Standard, JBOD, RAID 0 and RAID 1. RAID 0 - When prompted to...
... create one large volume geared towards maximum available space. Each hard drive is a feature that allows the ShareCenter Pulse to initiate the rebuilding phase automatically. If this configuration we'll use RAID 1 as the example configuration. D-Link ShareCenter Pulse User Manual Step 5: The four options are: Standard, JBOD, RAID 0 and RAID 1. RAID 0 - When prompted to...

User Manual
Page 15
D-Link ShareCenter Pulse User Manual Step 7: In this option is needed. Then the user can configure the desired capacity to be displayed. This process will involve initializing, formatting ...
D-Link ShareCenter Pulse User Manual Step 7: In this option is needed. Then the user can configure the desired capacity to be displayed. This process will involve initializing, formatting ...

User Manual
Page 16
Page 16 D-Link ShareCenter Pulse User Manual A warning message will be displayed before the procedure starts stating that hard drives will be formatted and if the user wishes to continue. This RAID configuration starts with Initializing. Then continues to continue. Click 'OK' to format and configure the RAID configuration. Step 9: Lastly a configuration summary will be displayed. This will redirect the user to complete the setup procedure. Click in the 'Finish' button to the Login screen again.
Page 16 D-Link ShareCenter Pulse User Manual A warning message will be displayed before the procedure starts stating that hard drives will be formatted and if the user wishes to continue. This RAID configuration starts with Initializing. Then continues to continue. Click 'OK' to format and configure the RAID configuration. Step 9: Lastly a configuration summary will be displayed. This will redirect the user to complete the setup procedure. Click in the 'Finish' button to the Login screen again.

User Manual
Page 17
... file that scheduled backups and downloads will be accurate. The Storage Enclosure, provides a convenient and safe location on the network for storing data and media. D-Link ShareCenter Pulse User Manual Web User Interface Setup Section Wizard: On the Wizard page the user can configure the...
... file that scheduled backups and downloads will be accurate. The Storage Enclosure, provides a convenient and safe location on the network for storing data and media. D-Link ShareCenter Pulse User Manual Web User Interface Setup Section Wizard: On the Wizard page the user can configure the...
User Manual
Page 18
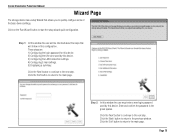
... the password in this window the user will be informed about the steps that allows you to quickly configure some of the basic device settings. D-Link ShareCenter Pulse User Manual Wizard Page The storage device has a setup Wizard that will follow in the given spaces. These steps are: 1) Configuring the login password for...
... the password in this window the user will be informed about the steps that allows you to quickly configure some of the basic device settings. D-Link ShareCenter Pulse User Manual Wizard Page The storage device has a setup Wizard that will follow in the given spaces. These steps are: 1) Configuring the login password for...

User Manual
Page 19
Page 19 Step 4: In this window the user can configure the LAN connection settings used for the ShareCenter Pulse manually. Selecting DHCP Client will be used by this device from the local DHCP server, such as your router. Click the 'Skip' button to forward ... changes and continue to the main page. Click the 'Back' button to discard the changes and return to assign the IP information for this device. D-Link ShareCenter Pulse User Manual Step 3: In this window the user must choose the Time Zone that will cause the...
Page 19 Step 4: In this window the user can configure the LAN connection settings used for the ShareCenter Pulse manually. Selecting DHCP Client will be used by this device from the local DHCP server, such as your router. Click the 'Skip' button to forward ... changes and continue to the main page. Click the 'Back' button to discard the changes and return to assign the IP information for this device. D-Link ShareCenter Pulse User Manual Step 3: In this window the user must choose the Time Zone that will cause the...

User Manual
Page 20
Click the 'Back' button to discard the changes and return to the next step. D-Link ShareCenter Pulse User Manual Step 5: In this window the user can configure the e-mail account settings used on this device. Click the 'Next' button to accept the ...
Click the 'Back' button to discard the changes and return to the next step. D-Link ShareCenter Pulse User Manual Step 5: In this window the user can configure the e-mail account settings used on this device. Click the 'Next' button to accept the ...

