
Product Manual
Page 1
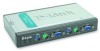
DKVM-2/4 2/4-Port Keyboard, Video, and Mouse Switch Manual Rev. 1.2
DKVM-2/4 2/4-Port Keyboard, Video, and Mouse Switch Manual Rev. 1.2
Product Manual
Page 2
Contents Introduction 1 Hardware Installation 2 Front Panel Layout 2 Rear Panel Layout 2 Using the DKVM-2/4 6 "Select" button 6 Keyboard "Hot Key commands 7 Optional cable 7 Troubleshooting 8 Keyboard ...8 Mouse ...8 Video ...10 Product Features 1 Specifications 11 FCC Certifications 12 D-Link Offices 13 Technical Support 15 Warranty 16 Registration 20 II
Contents Introduction 1 Hardware Installation 2 Front Panel Layout 2 Rear Panel Layout 2 Using the DKVM-2/4 6 "Select" button 6 Keyboard "Hot Key commands 7 Optional cable 7 Troubleshooting 8 Keyboard ...8 Mouse ...8 Video ...10 Product Features 1 Specifications 11 FCC Certifications 12 D-Link Offices 13 Technical Support 15 Warranty 16 Registration 20 II

Product Manual
Page 3
... will ensure easy and accurate control over 2 or 4 PCs through keyboard "Hot Key" commands or by using the convenient front-panel "Select" pushbutton controls. Introduction Thank you for the Microsoft Intellimouse and Microsoft Intellimouse Explorer. The DKVM-2/4 is also provided for purchasing the DKVM-2/4 KVM Switch. Resolutions up to 1920 x 1440 are recommended. Product Features...
... will ensure easy and accurate control over 2 or 4 PCs through keyboard "Hot Key" commands or by using the convenient front-panel "Select" pushbutton controls. Introduction Thank you for the Microsoft Intellimouse and Microsoft Intellimouse Explorer. The DKVM-2/4 is also provided for purchasing the DKVM-2/4 KVM Switch. Resolutions up to 1920 x 1440 are recommended. Product Features...

Product Manual
Page 5
Connect your PS/2 keyboard and PS/2 mouse to the front panel of the cables in a convenient location. Please follow the steps below closely and in the order as shown below. 3 Place the DKVM-2/4 in consideration when placing the KVM switch unit. Do take the length of the DKVM-2/4. The connections should be inserted into the unit...
Connect your PS/2 keyboard and PS/2 mouse to the front panel of the cables in a convenient location. Please follow the steps below closely and in the order as shown below. 3 Place the DKVM-2/4 in consideration when placing the KVM switch unit. Do take the length of the DKVM-2/4. The connections should be inserted into the unit...

Product Manual
Page 6
...this for all PCs. Step 5. To finish the hardware installation, connect the PS/2 keyboard cables from your computers to the DKVM-2/4 unit. Step 6. Connect a mouse cable (6-pin Mini DIN Male / Male) to the PC and to 4 Connect a keyboard cable (6-pin Mini DIN Male / Male) to the PC and to the connector with... the mouse symbol on the rear panel of the DKVM-2/4 unit. Step 4. Now the PC connections will be made with the Male side to...
...this for all PCs. Step 5. To finish the hardware installation, connect the PS/2 keyboard cables from your computers to the DKVM-2/4 unit. Step 6. Connect a mouse cable (6-pin Mini DIN Male / Male) to the PC and to 4 Connect a keyboard cable (6-pin Mini DIN Male / Male) to the PC and to the connector with... the mouse symbol on the rear panel of the DKVM-2/4 unit. Step 4. Now the PC connections will be made with the Male side to...

Product Manual
Page 7
...light up all PCs. Step 9. You may check to verify all cables for all computers simultaneously. the connector with the keyboard symbol on your monitor. Switch on the rear panel of the DKVM-2/4 unit. Now power up , and you find errors, re-check all cables. If you will be checked because ...they are easily switched and they use the "Select" button to port PC1 will hear a beep. Repeat this is connected to choose the next computer and verify the functionality in the same way. In particular, keyboard and mouse cables should be shown on the ...
...light up all PCs. Step 9. You may check to verify all cables for all computers simultaneously. the connector with the keyboard symbol on your monitor. Switch on the rear panel of the DKVM-2/4 unit. Now power up , and you find errors, re-check all cables. If you will be checked because ...they are easily switched and they use the "Select" button to port PC1 will hear a beep. Repeat this is connected to choose the next computer and verify the functionality in the same way. In particular, keyboard and mouse cables should be shown on the ...
Product Manual
Page 8
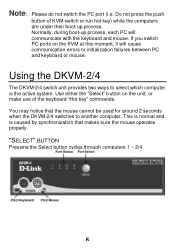
Using the DKVM-2/4 The DKVM-2/4 switch unit provides two ways to another computer. Use either the "Select" b utton on the KVM at this moment, it will communicate with the keyboard and mouse. Normally, during boot-up process. If you switch PC ports on the unit, or make use of KVM switch or run hot key...) while the computers are under their boot-up process, each PC will cause communication errors or initialization failures between PC and keyboard or mouse. Note: Please do not switch the PC port (i.e. Do not press the...
Using the DKVM-2/4 The DKVM-2/4 switch unit provides two ways to another computer. Use either the "Select" b utton on the KVM at this moment, it will communicate with the keyboard and mouse. Normally, during boot-up process. If you switch PC ports on the unit, or make use of KVM switch or run hot key...) while the computers are under their boot-up process, each PC will cause communication errors or initialization failures between PC and keyboard or mouse. Note: Please do not switch the PC port (i.e. Do not press the...

Product Manual
Page 9
...will result if a mouse move or keyboard key press is given just as confirmation. Erratic input will be shown on the monitor in -one has been shown. To exit Auto-Scan mode, press the SPACE BAR. Visit www.dlinkshop.com for DKVM-2/4 KVM switch. OPTIONAL CABLE Model No. In ...this mode, there is no mouse or keyboard control, which is available for details. 7 DKVM-CB 6 feet (180cm) 3 -in a row, starting with the first computer after the...
...will result if a mouse move or keyboard key press is given just as confirmation. Erratic input will be shown on the monitor in -one has been shown. To exit Auto-Scan mode, press the SPACE BAR. Visit www.dlinkshop.com for DKVM-2/4 KVM switch. OPTIONAL CABLE Model No. In ...this mode, there is no mouse or keyboard control, which is available for details. 7 DKVM-CB 6 feet (180cm) 3 -in a row, starting with the first computer after the...

Product Manual
Page 10
.... § Read your motherboard documentation and make sure that all boot up . What can be the cause? Please verify that the keyboard works when plugged into the computer directly. (You will have the same kind of the following may be set for most computers in... the BIOS setup pages) 8 One of the following may be the case: § Make sure the keyboard is plugged into the DKVM-2/4 unit properly. § Verify that the keyboard cables are inserted properly. Troubleshooting KEYBOARD My keyboard is not detected, or a keyboard error is given during boot up.
.... § Read your motherboard documentation and make sure that all boot up . What can be the cause? Please verify that the keyboard works when plugged into the computer directly. (You will have the same kind of the following may be set for most computers in... the BIOS setup pages) 8 One of the following may be the case: § Make sure the keyboard is plugged into the DKVM-2/4 unit properly. § Verify that the keyboard cables are inserted properly. Troubleshooting KEYBOARD My keyboard is not detected, or a keyboard error is given during boot up.

Product Manual
Page 12
... the case: § Please verify that all video cables are inserted properly. § It may be powered-up. But before powering the DKVM-2/4 unit up, the mouse and keyboard must be 9V 600mA. 10 One of the systems. VIDEO The image on my monitor is not clear. Video signals are high frequency...; Make sure that the power adapter is plugged in at both ends and that it is working correctly. § Before booting up any PCs, the DKVM-2/4 unit must be that your resolution or refresh rate is too high. Try a lower refresh rate, or try lowering the resolution. § Your video cable...
... the case: § Please verify that all video cables are inserted properly. § It may be powered-up. But before powering the DKVM-2/4 unit up, the mouse and keyboard must be 9V 600mA. 10 One of the systems. VIDEO The image on my monitor is not clear. Video signals are high frequency...; Make sure that the power adapter is plugged in at both ends and that it is working correctly. § Before booting up any PCs, the DKVM-2/4 unit must be that your resolution or refresh rate is too high. Try a lower refresh rate, or try lowering the resolution. § Your video cable...

Product Manual
Page 13
Specifications Physical Properties: DKVM-2 DKVM-4 Width: 119mm Width: 185mm Height: 46mm Height: 46mm Depth: 105mm Depth: 105mm Weight: 478g Weight: 684g Operation and Storage parameters: Operating Temperature: 0~40 Degrees C (32 to 104 Degrees F) Storage Temperature: -20~60 Degrees C (-4~140 Degrees F) Humidity: 0~80% RH non condensing PC port connections Keyboard: Mini DIN 6 pin Female Mouse: Mini DIN 6 pin Female Monitor: HDDB 15 pin Female Console connections Keyboard: Mini DIN 6 pin Female Mouse: Mini DIN 6 pin Female Monitor: HDDB 15 pin Female 11
Specifications Physical Properties: DKVM-2 DKVM-4 Width: 119mm Width: 185mm Height: 46mm Height: 46mm Depth: 105mm Depth: 105mm Weight: 478g Weight: 684g Operation and Storage parameters: Operating Temperature: 0~40 Degrees C (32 to 104 Degrees F) Storage Temperature: -20~60 Degrees C (-4~140 Degrees F) Humidity: 0~80% RH non condensing PC port connections Keyboard: Mini DIN 6 pin Female Mouse: Mini DIN 6 pin Female Monitor: HDDB 15 pin Female Console connections Keyboard: Mini DIN 6 pin Female Mouse: Mini DIN 6 pin Female Monitor: HDDB 15 pin Female 11
