
Product Manual
Page 1
DKVM-2/4 2/4-Port Keyboard, Video, and Mouse Switch Manual Rev. 1.2
DKVM-2/4 2/4-Port Keyboard, Video, and Mouse Switch Manual Rev. 1.2

Product Manual
Page 7
.... the connector with the keyboard symbol on the monitor. In particular, keyboard and mouse cables should be shown on the rear panel of the DKVM-2/4 unit. Now power up . If you find errors, re-check all PCs. Now make sure to the troubleshooting section of connector. You ... may check to see the LED for proper connections before going to verify all computers simultaneously. Switch on your monitor. Repeat this is connected to port PC1 will be checked because they are easily switched and they use the "Select" button to the DKVM-2/4 unit and plug it into a power outlet.
.... the connector with the keyboard symbol on the monitor. In particular, keyboard and mouse cables should be shown on the rear panel of the DKVM-2/4 unit. Now power up . If you find errors, re-check all PCs. Now make sure to the troubleshooting section of connector. You ... may check to see the LED for proper connections before going to verify all computers simultaneously. Switch on your monitor. Repeat this is connected to port PC1 will be checked because they are easily switched and they use the "Select" button to the DKVM-2/4 unit and plug it into a power outlet.
Product Manual
Page 8
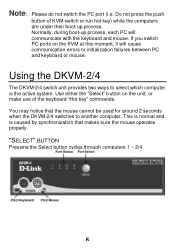
...around 2 seconds when the DKVM-2/4 switches to select which computer is caused by synchronization that makes sure the mouse operates properly. "SELECT" BUTTON Pressing the Select button cycles through computers 1 ~ 2/4 6 If you switch PC ports on the unit, or make use of KVM switch or run hot key) while... PC and keyboard or mouse. Note: Please do not switch the PC port (i.e. Use either the "Select" b utton on the KVM at this moment, it will communicate with the keyboard and mouse. Using the DKVM-2/4 The DKVM-2/4 switch unit provides two ways to another computer. Do not press...
...around 2 seconds when the DKVM-2/4 switches to select which computer is caused by synchronization that makes sure the mouse operates properly. "SELECT" BUTTON Pressing the Select button cycles through computers 1 ~ 2/4 6 If you switch PC ports on the unit, or make use of KVM switch or run hot key) while... PC and keyboard or mouse. Note: Please do not switch the PC port (i.e. Use either the "Select" b utton on the KVM at this moment, it will communicate with the keyboard and mouse. Using the DKVM-2/4 The DKVM-2/4 switch unit provides two ways to another computer. Do not press...

Product Manual
Page 13
Specifications Physical Properties: DKVM-2 DKVM-4 Width: 119mm Width: 185mm Height: 46mm Height: 46mm Depth: 105mm Depth: 105mm Weight: 478g Weight: 684g Operation and Storage parameters: Operating Temperature: 0~40 Degrees C (32 to 104 Degrees F) Storage Temperature: -20~60 Degrees C (-4~140 Degrees F) Humidity: 0~80% RH non condensing PC port connections Keyboard: Mini DIN 6 pin Female Mouse: Mini DIN 6 pin Female Monitor: HDDB 15 pin Female Console connections Keyboard: Mini DIN 6 pin Female Mouse: Mini DIN 6 pin Female Monitor: HDDB 15 pin Female 11
Specifications Physical Properties: DKVM-2 DKVM-4 Width: 119mm Width: 185mm Height: 46mm Height: 46mm Depth: 105mm Depth: 105mm Weight: 478g Weight: 684g Operation and Storage parameters: Operating Temperature: 0~40 Degrees C (32 to 104 Degrees F) Storage Temperature: -20~60 Degrees C (-4~140 Degrees F) Humidity: 0~80% RH non condensing PC port connections Keyboard: Mini DIN 6 pin Female Mouse: Mini DIN 6 pin Female Monitor: HDDB 15 pin Female Console connections Keyboard: Mini DIN 6 pin Female Mouse: Mini DIN 6 pin Female Monitor: HDDB 15 pin Female 11


