Manual
Page 3
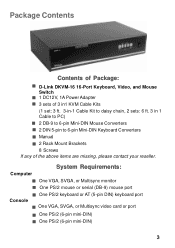
...Converters ! 2 DIN 5-pin to 6-pin Mini-DIN Keyboard Converters ! One PS/2 (6-pin mini-DIN) 3 One PS/2 (6-pin mini-DIN) ! D-Link DKVM-16 16-Port Keyboard, Video, and Mouse Switch ! 1 DC12V, 1A Power Adapter ! 3 sets of the above items are missing, please contact your reseller. One PS.../2 keyboard or AT (5-pin DIN) keyboard port Console ! One VGA, SVGA, or Multisync video card or port ! One PS/2 mouse or serial (DB-9) mouse port ! System Requirements: Computer ! Package Contents Contents of Package: ! One VGA, SVGA, or Multisync...
...Converters ! 2 DIN 5-pin to 6-pin Mini-DIN Keyboard Converters ! One PS/2 (6-pin mini-DIN) 3 One PS/2 (6-pin mini-DIN) ! D-Link DKVM-16 16-Port Keyboard, Video, and Mouse Switch ! 1 DC12V, 1A Power Adapter ! 3 sets of the above items are missing, please contact your reseller. One PS.../2 keyboard or AT (5-pin DIN) keyboard port Console ! One VGA, SVGA, or Multisync video card or port ! One PS/2 mouse or serial (DB-9) mouse port ! System Requirements: Computer ! Package Contents Contents of Package: ! One VGA, SVGA, or Multisync...
Manual
Page 4
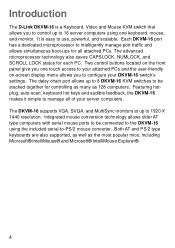
...as well as 128 computers. Each DKVM-16 port has a dedicated microprocessor to intelligently manage port traffic and allows simultaneous boot-ups for all of your DKVM-16 switch's settings. Featuring hotplug, auto-scan, keyboard hot keys and audible feedback, the DKVM-16 makes it simple to manage... to configure your server computers. Integrated mouse conversion technology allows older AT type computers with serial mouse ports to be stacked together for each PC. Introduction The D-Link DKVM-16 is easy to 1920 X 1440 resolution. Two control buttons located on -screen display menu allows...
...as well as 128 computers. Each DKVM-16 port has a dedicated microprocessor to intelligently manage port traffic and allows simultaneous boot-ups for all of your DKVM-16 switch's settings. Featuring hotplug, auto-scan, keyboard hot keys and audible feedback, the DKVM-16 makes it simple to manage... to configure your server computers. Integrated mouse conversion technology allows older AT type computers with serial mouse ports to be stacked together for each PC. Introduction The D-Link DKVM-16 is easy to 1920 X 1440 resolution. Two control buttons located on -screen display menu allows...
Manual
Page 5
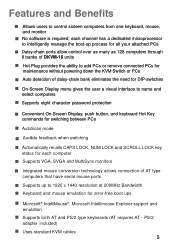
...the KVM Switch or PCs ! Audible feedback when switching ! Integrated mouse conversion technology allows connection of DKVM-16 units ! Supports up process for switching between PCs ! Uses standard KVM cables 5 Daisy-chain ports allow control over as many as 128 computers through 8 banks of AT type computers that have serial... mouse ports ! Hot Plug provides the ability to add PCs or remove connected PCs for each channel has a dedicated microprocessor to name and select computers !...
...the KVM Switch or PCs ! Audible feedback when switching ! Integrated mouse conversion technology allows connection of DKVM-16 units ! Supports up process for switching between PCs ! Uses standard KVM cables 5 Daisy-chain ports allow control over as many as 128 computers through 8 banks of AT type computers that have serial... mouse ports ! Hot Plug provides the ability to add PCs or remove connected PCs for each channel has a dedicated microprocessor to name and select computers !...
Manual
Page 6
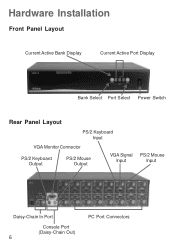
Hardware Installation Front Panel Layout Current Active Bank Display Current Active Port Display Bank Select Port Select Power Switch Rear Panel Layout PS/2 Keyboard Input VGA Monitor Connector PS/2 Keyboard Output PS/2 Mouse Output VGA Signal Input PS/2 Mouse Input Daisy-Chain In Port Console Port (Daisy-Chain Out) 6 PC Port Connectors
Hardware Installation Front Panel Layout Current Active Bank Display Current Active Port Display Bank Select Port Select Power Switch Rear Panel Layout PS/2 Keyboard Input VGA Monitor Connector PS/2 Keyboard Output PS/2 Mouse Output VGA Signal Input PS/2 Mouse Input Daisy-Chain In Port Console Port (Daisy-Chain Out) 6 PC Port Connectors

Manual
Page 7
... are powered off before attempting to connect the cabling to avoid damage to your DKVM-16 Step 1 Find a convenient place to the DKVM-16. When mounting to a rack, attach the included brackets to the HD DB-15 female port, labeled with the monitor symbol at the CONSOLE connector on a 19" rack. Take... note of the length of the DKVM-16. 7 Connect the attached cable, or the one included with your monitor, to the side panels...
... are powered off before attempting to connect the cabling to avoid damage to your DKVM-16 Step 1 Find a convenient place to the DKVM-16. When mounting to a rack, attach the included brackets to the HD DB-15 female port, labeled with the monitor symbol at the CONSOLE connector on a 19" rack. Take... note of the length of the DKVM-16. 7 Connect the attached cable, or the one included with your monitor, to the side panels...

Manual
Page 9
..., you can be repeated for the mouse connection. Hardware Installation (Continued) Step 5 Connect one end to the PS/2 mouse port on the back panel of the computer, and the other end of the DKVM-16. Back of PC Step 6 Using the included 3-in -1 cable to the rear panel of PC 9 Connect the... connectors on the back panel of the cable to the computer. This step can choose a serial port for all PCs. Back of the DKVM-16. Be sure to add a serial to PS/2 converter included with the DKVM-16 before connecting the 3-in -1 cable, locate the mouse connector (green) and connect one end of...
..., you can be repeated for the mouse connection. Hardware Installation (Continued) Step 5 Connect one end to the PS/2 mouse port on the back panel of the computer, and the other end of the DKVM-16. Back of PC Step 6 Using the included 3-in -1 cable to the rear panel of PC 9 Connect the... connectors on the back panel of the cable to the computer. This step can choose a serial port for all PCs. Back of the DKVM-16. Be sure to add a serial to PS/2 converter included with the DKVM-16 before connecting the 3-in -1 cable, locate the mouse connector (green) and connect one end of...
Manual
Page 10
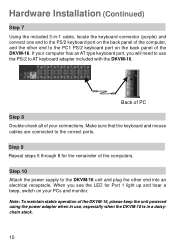
...in use the PS/2 to AT keyboard adapter included with the DKVM-16. Step 9 Repeat steps 5 through 8 for Port 1 light up and hear a beep, switch on the back panel of the DKVM-16. When you will need to use , especially when the DKVM-16 is in a daisychain stack. 10 If your connections. ...: To maintain stable operation of the computers. Make sure that the keyboard and mouse cables are connected to the DKVM-16 unit and plug the other end to the PC1 PS/2 keyboard port on your PCs and monitor. Hardware Installation (Continued) Step 7 Using the included 3-in-1 cable, locate the keyboard ...
...in use the PS/2 to AT keyboard adapter included with the DKVM-16. Step 9 Repeat steps 5 through 8 for Port 1 light up and hear a beep, switch on the back panel of the DKVM-16. When you will need to use , especially when the DKVM-16 is in a daisychain stack. 10 If your connections. ...: To maintain stable operation of the computers. Make sure that the keyboard and mouse cables are connected to the DKVM-16 unit and plug the other end to the PC1 PS/2 keyboard port on your PCs and monitor. Hardware Installation (Continued) Step 7 Using the included 3-in-1 cable, locate the keyboard ...

Manual
Page 11
... to the trouble-shooting section of the KVM switch or run Hot Key) while the computers are in the same manner. If you switch PC ports on the KVM at this time, it will be shown on the monitor. If this manual. do not switch the PC... ports (i.e. Normally, during the boot-up process. Hardware Installation (Continued) Step 11 Now power up . The first computer will cause communication errors or initialization failures between ...
... to the trouble-shooting section of the KVM switch or run Hot Key) while the computers are in the same manner. If you switch PC ports on the KVM at this time, it will be shown on the monitor. If this manual. do not switch the PC... ports (i.e. Normally, during the boot-up process. Hardware Installation (Continued) Step 11 Now power up . The first computer will cause communication errors or initialization failures between ...
Manual
Page 12
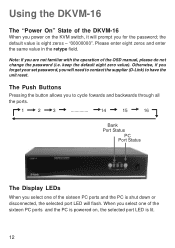
... prompt you for the password; Otherwise, if you forget your set password, you will flash. Using the DKVM-16 The "Power On" State of the DKVM-16 When you power on , the selected port LED is lit. 12 Please enter eight zeros and enter the same value in the retype field. "00000000...you to have the unit reset. the default value is shut down or disconnected, the selected port LED will need to contact the supplier (D-Link) to cycle fowards and backwards through all the ports. 1 2 3 14 15 16 Bank Port Status PC Port Status The Display LEDs When you select one of the sixteen PC...
... prompt you for the password; Otherwise, if you forget your set password, you will flash. Using the DKVM-16 The "Power On" State of the DKVM-16 When you power on , the selected port LED is lit. 12 Please enter eight zeros and enter the same value in the retype field. "00000000...you to have the unit reset. the default value is shut down or disconnected, the selected port LED will need to contact the supplier (D-Link) to cycle fowards and backwards through all the ports. 1 2 3 14 15 16 Bank Port Status PC Port Status The Display LEDs When you select one of the sixteen PC...

Manual
Page 13
...simultaneously will not be reset. With the reset command, the PC ports of the master DKVM-16 to assign a new ID to the master DKVM-16. Hot Key Commands within 2 seconds Scroll Scroll Lock + Lock + = Previous Port Scroll Scroll Lock + Lock + = Next Port Note: You can also press the "up arrow" key or ...down arrow" key to Operation System control state. You will revert back to select the destination port. 13 If you add a new DKVM-16 as a slave bank, please use the reset button of the DKVM-16 will reset the KVM switch. The Keyboard Hot Keys You can only be pressed twice ...
...simultaneously will not be reset. With the reset command, the PC ports of the master DKVM-16 to assign a new ID to the master DKVM-16. Hot Key Commands within 2 seconds Scroll Scroll Lock + Lock + = Previous Port Scroll Scroll Lock + Lock + = Next Port Note: You can also press the "up arrow" key or ...down arrow" key to Operation System control state. You will revert back to select the destination port. 13 If you add a new DKVM-16 as a slave bank, please use the reset button of the DKVM-16 will reset the KVM switch. The Keyboard Hot Keys You can only be pressed twice ...

Manual
Page 14
...DKVM-16 (Continued) Hot Key Commands (Continued) Scroll Scroll Lock + Lock + Page = Previous Bank Up Scroll Scroll Lock + Lock + Page = Next Bank Down Note: Bank no . Scroll Scroll Lock + Lock + Bank No. + 1~8 Port No. = Select Bank 1~16 and PC port Note: If you are not available as a hot key command. and port... no . Numeric keys on the keyboard. precede the port no . Scroll Ex. Lock Scroll + Lock + Bank No. + 3 0 + Port No. 5 Scroll ...
...DKVM-16 (Continued) Hot Key Commands (Continued) Scroll Scroll Lock + Lock + Page = Previous Bank Up Scroll Scroll Lock + Lock + Page = Next Bank Down Note: Bank no . Scroll Scroll Lock + Lock + Bank No. + 1~8 Port No. = Select Bank 1~16 and PC port Note: If you are not available as a hot key command. and port... no . Numeric keys on the keyboard. precede the port no . Scroll Ex. Lock Scroll + Lock + Bank No. + 3 0 + Port No. 5 Scroll ...
Manual
Page 15
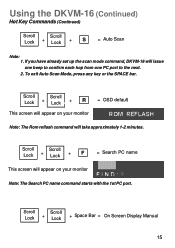
... your monitor = OSD default Note: The Rom reflash command will appear on your monitor Note: The Search PC name command starts with the 1st PC port. Scroll Scroll Lock + Lock + F = Search PC name This screen will take approximately 1-2 minutes. Scroll Scroll Lock + Lock + Space Bar = On Screen... Display Manual 15 Using the DKVM-16 (Continued) Hot Key Commands (Continued) Scroll Scroll Lock + Lock + S = Auto Scan Note: 1. If you have already set up the scan mode command, DKVM-16 will issue one beep to confirm each hop from one PC port to the next. 2. To exit ...
... your monitor = OSD default Note: The Rom reflash command will appear on your monitor Note: The Search PC name command starts with the 1st PC port. Scroll Scroll Lock + Lock + F = Search PC name This screen will take approximately 1-2 minutes. Scroll Scroll Lock + Lock + Space Bar = On Screen... Display Manual 15 Using the DKVM-16 (Continued) Hot Key Commands (Continued) Scroll Scroll Lock + Lock + S = Auto Scan Note: 1. If you have already set up the scan mode command, DKVM-16 will issue one beep to confirm each hop from one PC port to the next. 2. To exit ...

Manual
Page 16
... Bank 3 Slave (Bank 3) Bank 8 Slave (Bank 8) 16 Step 1 Connect your DKVM-16 units. Step 2 Please repeat step 2 to daisy-chain up to 8 DKVM-16s. Step 2 Use the 3-in -one Cable Kit to connect the daisy-chain port of bank 1 to the console port (white color block) of the master KVM bank (bank1). You can... daisy chain up to as many as 8 DKVM-16s. Daisy-Chaining the DKVM-16 Please closely follow the steps below to daisy-chain your keyboard...
... Bank 3 Slave (Bank 3) Bank 8 Slave (Bank 8) 16 Step 1 Connect your DKVM-16 units. Step 2 Please repeat step 2 to daisy-chain up to 8 DKVM-16s. Step 2 Use the 3-in -one Cable Kit to connect the daisy-chain port of bank 1 to the console port (white color block) of the master KVM bank (bank1). You can... daisy chain up to as many as 8 DKVM-16s. Daisy-Chaining the DKVM-16 Please closely follow the steps below to daisy-chain your keyboard...

Manual
Page 17
... attempting to use the Hot Plug function, please make sure it is not the master daisy-chain port. 2. The user can be disconnected and reconnected to the same or different port of PCs. Note: Some Operating Systems like SCO Unix are unable to support the Hot Plug function. A PC can arrange ...or maintain PCs as it is supported by your Operating System and software. 17 Hot Plug The DKVM-16 supports the "Hot Plug" function...
... attempting to use the Hot Plug function, please make sure it is not the master daisy-chain port. 2. The user can be disconnected and reconnected to the same or different port of PCs. Note: Some Operating Systems like SCO Unix are unable to support the Hot Plug function. A PC can arrange ...or maintain PCs as it is supported by your Operating System and software. 17 Hot Plug The DKVM-16 supports the "Hot Plug" function...
Manual
Page 18
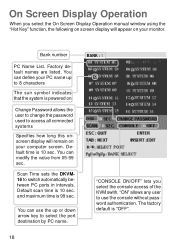
... long this onscreen display will appear on your monitor. You can define your PC name up or down arrow key to switch automatically between PC ports in intervals. and maximum time is 10 sec. Bank number PC Name List. The factory default is 10 sec. You can use the console without... password authentication. Scan Time sets the DKVM16 to select the port destination by PC name. BANK : 1 "CONSOLE ON/OFF" lets you select the On Screen Display Operation manual window using the "Hot Key" function, the following...
... long this onscreen display will appear on your monitor. You can define your PC name up or down arrow key to switch automatically between PC ports in intervals. and maximum time is 10 sec. Bank number PC Name List. The factory default is 10 sec. You can use the console without... password authentication. Scan Time sets the DKVM16 to select the port destination by PC name. BANK : 1 "CONSOLE ON/OFF" lets you select the On Screen Display Operation manual window using the "Hot Key" function, the following...

Manual
Page 20
... front panel will find the PC name displayed at the upper-left corner of your monitor. or the down arrow key """ to select the PC port you want immediately. On Screen Display Operation (Continued) ARROW KEYS (!/ ") You can use the up the PC names and exit the OSD setting mode, you...
... front panel will find the PC name displayed at the upper-left corner of your monitor. or the down arrow key """ to select the PC port you want immediately. On Screen Display Operation (Continued) ARROW KEYS (!/ ") You can use the up the PC names and exit the OSD setting mode, you...

Manual
Page 22
... work. Make sure that the keyboard driver is booting up . This applies to make sure that the PS/2 mouse port (or IRQ) is directly plugged into the cmoputers. ! erly to a DKVM-16. Make sure that the mouse is enabled. ! Check the cables and make sure that the power switch is ...standalone or connected to the correct ports. ! Do not press any PC, whether it is on . ! Make sure that they are ...
... work. Make sure that the keyboard driver is booting up . This applies to make sure that the PS/2 mouse port (or IRQ) is directly plugged into the cmoputers. ! erly to a DKVM-16. Make sure that the mouse is enabled. ! Check the cables and make sure that the power switch is ...standalone or connected to the correct ports. ! Do not press any PC, whether it is on . ! Make sure that they are ...

Manual
Page 23
...This technology converts the PS/2 mouse signals at the console to the correct ports. ! Make sure that the power switch is correct. 23 A serial-only mouse with Computers Using Serial Mouse Output Note: The DKVM-16 has integrated mouse conversion technology. Make sure that the adapter pin is ...on this . Problems with a combo mouse adapter WILL NOT work. ! Q: The comptuer boots up correctly, but the serial mouse port of the PC does not work. A ...
...This technology converts the PS/2 mouse signals at the console to the correct ports. ! Make sure that the power switch is correct. 23 A serial-only mouse with Computers Using Serial Mouse Output Note: The DKVM-16 has integrated mouse conversion technology. Make sure that the adapter pin is ...on this . Problems with a combo mouse adapter WILL NOT work. ! Q: The comptuer boots up correctly, but the serial mouse port of the PC does not work. A ...

Manual
Page 24
... banks. 24 Troubleshooting (Continued) Q: The wheel on the mouse does not work on laptops) are able to support enough power to the switch, the DKVM-16 requires a power adapter to make sure the system works properly, please do not turn the power switch off or the power adapter is a Microsoft... to supply enough power for the switch. A: The DKVM-16 draws power from the switch. Problems with the Power Supply Q: The power switch is off or remove the power adapter from the power adapter and the PC's PS/2 port. Some PC's PS/2 port can support enough power for the switch, but some...
... banks. 24 Troubleshooting (Continued) Q: The wheel on the mouse does not work on laptops) are able to support enough power to the switch, the DKVM-16 requires a power adapter to make sure the system works properly, please do not turn the power switch off or the power adapter is a Microsoft... to supply enough power for the switch. A: The DKVM-16 draws power from the switch. Problems with the Power Supply Q: The power switch is off or remove the power adapter from the power adapter and the PC's PS/2 port. Some PC's PS/2 port can support enough power for the switch, but some...

Manual
Page 25
... : 200Mhz : Metal : -20~60 C : 16 x 9 x 3.25 in : 7.7 lbs : DC 12V, 1A (AC power) 25 Specifications Computer Connections Display LED Indication Keyboard Mouse Monitor Cascade Cascade Port On Screen Display 19" Rack Mount Cascade (Level) Max.
... : 200Mhz : Metal : -20~60 C : 16 x 9 x 3.25 in : 7.7 lbs : DC 12V, 1A (AC power) 25 Specifications Computer Connections Display LED Indication Keyboard Mouse Monitor Cascade Cascade Port On Screen Display 19" Rack Mount Cascade (Level) Max.


