Product Manual
Page 4
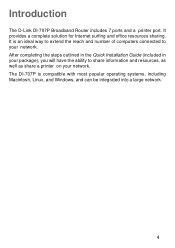
...package), you will have the ability to your network. The DI-707P is an ideal way to extend the reach and number of computers connected to share information and resources, as well as share a printer on your network. It is compatible with most popular operating... systems, including Macintosh, Linux, and Windows, and can be integrated into a large network. 4 It provides a complete solution for Internet surfing and office resources sharing. Introduction The D-Link DI-707P Broadband Router includes ...
...package), you will have the ability to your network. The DI-707P is an ideal way to extend the reach and number of computers connected to share information and resources, as well as share a printer on your network. It is compatible with most popular operating... systems, including Macintosh, Linux, and Windows, and can be integrated into a large network. 4 It provides a complete solution for Internet surfing and office resources sharing. Introduction The D-Link DI-707P Broadband Router includes ...
Product Manual
Page 5
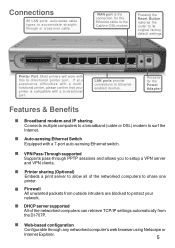
...the Power Adapter Features & Benefits Broadband modem and IP sharing Connects multiple computers to a broadband (cable or DSL) modem to share one printer. DHCP server supported All of the networked computers to surf the Internet. Web-based configuration Configurable through PPTP sessions and allows you experience ... Pressing the Reset Button restores the router to setup a VPN server and VPN clients. Firewall All unwanted packets from the DI-707P. Connections All LAN ports auto-sense cable types to Ethernetenabled devices. Most printers will work with this bi-directional...
...the Power Adapter Features & Benefits Broadband modem and IP sharing Connects multiple computers to a broadband (cable or DSL) modem to share one printer. DHCP server supported All of the networked computers to surf the Internet. Web-based configuration Configurable through PPTP sessions and allows you experience ... Pressing the Reset Button restores the router to setup a VPN server and VPN clients. Firewall All unwanted packets from the DI-707P. Connections All LAN ports auto-sense cable types to Ethernetenabled devices. Most printers will work with this bi-directional...
Product Manual
Page 8
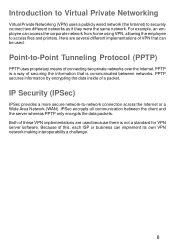
PPTP is a way of connecting two private networks over the Internet. IP Security (IPSec) IPSec provides a more secure network-to access files and printers. IPSec encrypts all communication between networks. Point-to securely connect two different networks as if they were the same network. Because of VPN that is ...
PPTP is a way of connecting two private networks over the Internet. IP Security (IPSec) IPSec provides a more secure network-to access files and printers. IPSec encrypts all communication between networks. Point-to securely connect two different networks as if they were the same network. Because of VPN that is ...
Product Manual
Page 10
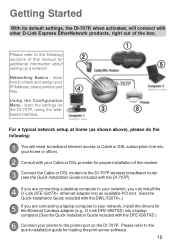
... files. 4 Using the Configuration Menu - Consult with other D-Link Express EtherNetwork products, right out of this manual for loading the print server software. 10 Connect the Cable or DSL modem to the printer port on the DI-707P. learn the settings for the DI-707P, using the webbased interface. 3 6 For a typical network setup at home (as...
... files. 4 Using the Configuration Menu - Consult with other D-Link Express EtherNetwork products, right out of this manual for loading the print server software. 10 Connect the Cable or DSL modem to the printer port on the DI-707P. learn the settings for the DI-707P, using the webbased interface. 3 6 For a typical network setup at home (as...
Product Manual
Page 45
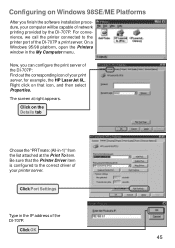
..., your computer will be capable of the DI-707P a print server. Click Port Settings Type in the IP address of your printer server. Right click on that the Printer Driver item is configured to the printer port of network printing provided by the DI-707P. Click on the Details tab Choose the ... Computer menu. Configuring on Windows 98SE/ME Platforms After you can configure the print server of the DI-707P: Find out the corresponding icon of the DI-707P. For convenience, we call the printer connected to the correct driver of your print server, for example, the HP LaserJet 6L. On ...
..., your computer will be capable of the DI-707P a print server. Click Port Settings Type in the IP address of your printer server. Right click on that the Printer Driver item is configured to the printer port of network printing provided by the DI-707P. Click on the Details tab Choose the ... Computer menu. Configuring on Windows 98SE/ME Platforms After you can configure the print server of the DI-707P: Find out the corresponding icon of the DI-707P. For convenience, we call the printer connected to the correct driver of your print server, for example, the HP LaserJet 6L. On ...

Product Manual
Page 46
Click OK (Note: Screen shots are taken in Windows 2000, similar screens will appear in the IP address of Windows 95/98 except for the printer Properties screen: Click Configure Port Type in Windows XP.) 46 Configuring on Windows XP/2000/NT Platforms Click Port The configuration procedure for a Windows 2000/XP platform is similar to that of the DI-707P.
Click OK (Note: Screen shots are taken in Windows 2000, similar screens will appear in the IP address of Windows 95/98 except for the printer Properties screen: Click Configure Port Type in Windows XP.) 46 Configuring on Windows XP/2000/NT Platforms Click Port The configuration procedure for a Windows 2000/XP platform is similar to that of the DI-707P.
Product Manual
Page 60
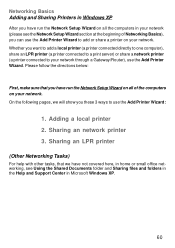
...the directions below: First, make sure that we will show you these 3 ways to use the Add Printer Wizard to your network through a Gateway/Router), use the Add Printer Wizard. Sharing an network printer 3. On the following pages, we have run the Network Setup Wizard on all of Networking Basics), you... Tasks) For help with other tasks, that you have not covered here, in Microsoft Windows XP. 60 Networking Basics Adding and Sharing Printers in Windows XP After you have run the Network Setup Wizard on all the computers in your network (please see Using the Shared Documents...
...the directions below: First, make sure that we will show you these 3 ways to use the Add Printer Wizard to your network through a Gateway/Router), use the Add Printer Wizard. Sharing an network printer 3. On the following pages, we have run the Network Setup Wizard on all of Networking Basics), you... Tasks) For help with other tasks, that you have not covered here, in Microsoft Windows XP. 60 Networking Basics Adding and Sharing Printers in Windows XP After you have run the Network Setup Wizard on all the computers in your network (please see Using the Shared Documents...

Product Manual
Page 61
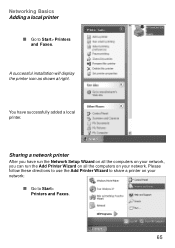
If you do not need to share your printer on a network, follow these directions to add the printer to one computer is called a local printer. Click on Add a printer. 61 Go to Start> Printers and Faxes. Networking Basics Adding a local printer (a printer connected directly to a computer) A printer that is not shared on the network and is connected directly to one computer.
If you do not need to share your printer on a network, follow these directions to add the printer to one computer is called a local printer. Click on Add a printer. 61 Go to Start> Printers and Faxes. Networking Basics Adding a local printer (a printer connected directly to a computer) A printer that is not shared on the network and is connected directly to one computer.

Product Manual
Page 62
Networking Basics Adding a local printer Click Next. Select Local printer attached to this computer. (Deselect Automatically detect and install my Plug and Play printer if it has been selected.) Click Next. Select Use the following port: From the pull-down menu select the correct port for your printer. (Most computers use the LPT1: port, as shown in the illustration.) Click Next. 62
Networking Basics Adding a local printer Click Next. Select Local printer attached to this computer. (Deselect Automatically detect and install my Plug and Play printer if it has been selected.) Click Next. Select Use the following port: From the pull-down menu select the correct port for your printer. (Most computers use the LPT1: port, as shown in the illustration.) Click Next. 62

Product Manual
Page 63
Click Next. Click Next. 63 A successful printing will confirm that came with your printer. Networking Basics Adding a local printer Select and highlight the correct driver for your printer and click Have Disk.) At this screen, you have chosen the correct driver. Select Yes, to print a test page. Click Next. (If the correct driver is not displayed, insert the CD or floppy disk that you can change the name of the printer (optional).
Click Next. Click Next. 63 A successful printing will confirm that came with your printer. Networking Basics Adding a local printer Select and highlight the correct driver for your printer and click Have Disk.) At this screen, you have chosen the correct driver. Select Yes, to print a test page. Click Next. (If the correct driver is not displayed, insert the CD or floppy disk that you can change the name of the printer (optional).

Product Manual
Page 64
Click Finish. When the test page has printed, Click OK. 64 Networking Basics Adding a local printer This screen gives you information about your printer.
Click Finish. When the test page has printed, Click OK. 64 Networking Basics Adding a local printer This screen gives you information about your printer.
Product Manual
Page 65
Please follow these directions to use the Add Printer Wizard to share a printer on your network: Go to Start> Printers and Faxes. A successful installation will display the printer icon as shown at right. Sharing a network printer After you can run the Add Printer Wizard on all the computers on your network. You have run the Network Setup Wizard on all the computers on your network, you have successfully added a local printer. Networking Basics Adding a local printer Go to Start> Printers and Faxes. 65
Please follow these directions to use the Add Printer Wizard to share a printer on your network: Go to Start> Printers and Faxes. A successful installation will display the printer icon as shown at right. Sharing a network printer After you can run the Add Printer Wizard on all the computers on your network. You have run the Network Setup Wizard on all the computers on your network, you have successfully added a local printer. Networking Basics Adding a local printer Go to Start> Printers and Faxes. 65

Product Manual
Page 66
Select Network Printer. Click Next. 66 Click Next. Networking Basics Sharing a network printer Click on Add a printer.
Select Network Printer. Click Next. 66 Click Next. Networking Basics Sharing a network printer Click on Add a printer.

Product Manual
Page 67
Select the printer you would like to share. Click Finish. 67 Click Next. Networking Basics Sharing a network printer Select Browse for a printer. Click Next.
Select the printer you would like to share. Click Finish. 67 Click Next. Networking Basics Sharing a network printer Select Browse for a printer. Click Next.
Product Manual
Page 68
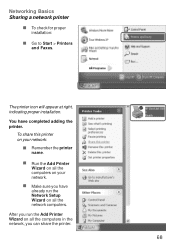
The printer icon will appear at right, indicating proper installation. To share this printer on all the computers in the network, you run the Network Setup Wizard on your network. Make sure you have completed adding the printer. Run the Add Printer Wizard on all the computers on all the network computers. After you can share the printer. 68 You have already run the Add Printer Wizard on your network: Remember the printer name. Networking Basics Sharing a network printer To check for proper installation: Go to Start > Printers and Faxes.
The printer icon will appear at right, indicating proper installation. To share this printer on all the computers in the network, you run the Network Setup Wizard on your network. Make sure you have completed adding the printer. Run the Add Printer Wizard on all the computers on all the network computers. After you can share the printer. 68 You have already run the Add Printer Wizard on your network: Remember the printer name. Networking Basics Sharing a network printer To check for proper installation: Go to Start > Printers and Faxes.
Product Manual
Page 69
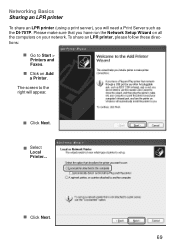
The screen to Start > Printers and Faxes. Click Next. 69 Click on your network. Select Local Printer... Networking Basics Sharing an LPR printer To share an LPR printer (using a print server), you have run the Network Setup Wizard on all the computers on Add a Printer. Please make sure that you will appear. To share an LPR printer, please follow these directions: Go to the right will need a Print Server such as the DI-707P. Click Next.
The screen to Start > Printers and Faxes. Click Next. 69 Click on your network. Select Local Printer... Networking Basics Sharing an LPR printer To share an LPR printer (using a print server), you have run the Network Setup Wizard on all the computers on Add a Printer. Please make sure that you will appear. To share an LPR printer, please follow these directions: Go to the right will need a Print Server such as the DI-707P. Click Next.

Product Manual
Page 70
Click Next. Please read the instructions on this screen. Click Next. Enter the Printer IP Address and the Port Name, as shown. From the pull-down menu, select Standard TCP/IP Port, as shown. Click Next. 70 Networking Basics Sharing an LPR printer Select Create a new port.
Click Next. Please read the instructions on this screen. Click Next. Enter the Printer IP Address and the Port Name, as shown. From the pull-down menu, select Standard TCP/IP Port, as shown. Click Next. 70 Networking Basics Sharing an LPR printer Select Create a new port.

Product Manual
Page 71
Enter a Queue Name (if your PrintServer/ Gateway has more than one port, you will need a Queue name). Select LPR. Networking Basics Sharing an LPR printer In this screen, select Custom. Click LPR Byte Counting Enabled. Click OK. 71 Enter the Port Name and the Printer Name or IP Address. Click Settings.
Enter a Queue Name (if your PrintServer/ Gateway has more than one port, you will need a Queue name). Select LPR. Networking Basics Sharing an LPR printer In this screen, select Custom. Click LPR Byte Counting Enabled. Click OK. 71 Enter the Port Name and the Printer Name or IP Address. Click Settings.
Product Manual
Page 72
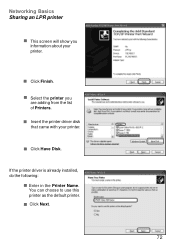
If the printer driver is already installed, do the following: Enter in the Printer Name. You can choose to use this printer as the default printer. Click Finish. Click Have Disk. Insert the printer driver disk that came with your printer. Click Next. 72 Select the printer you information about your printer. Networking Basics Sharing an LPR printer This screen will show you are adding from the list of Printers.
If the printer driver is already installed, do the following: Enter in the Printer Name. You can choose to use this printer as the default printer. Click Finish. Click Have Disk. Insert the printer driver disk that came with your printer. Click Next. 72 Select the printer you information about your printer. Networking Basics Sharing an LPR printer This screen will show you are adding from the list of Printers.

Product Manual
Page 73
If you want to print a test page. Enter the location of this printer with other network users. Click Next. Networking Basics Sharing an LPR printer You can share this printer. Click Next. Click Next. 73 It is optional. You have the option of supplying a location and description of the printer and any comments. Select Yes, to shre the printer, click Share name and enter a name for the printer.
If you want to print a test page. Enter the location of this printer with other network users. Click Next. Networking Basics Sharing an LPR printer You can share this printer. Click Next. Click Next. 73 It is optional. You have the option of supplying a location and description of the printer and any comments. Select Yes, to shre the printer, click Share name and enter a name for the printer.

