Manual
Page 2
Contents Package Contents 3 Introduction 4 Features and Benefits 5 LEDs ...6 Connections 7 Introduction to Broadband Technology 8 Sample Scenario 10 Network Setup 11 Setup Wizard 12 Using the Configuration Menu 17 Networking Basics 62 Reset 90 Technical Specifications 91 Contacting Technical Support 92 Warranty and Registration 93 2
Contents Package Contents 3 Introduction 4 Features and Benefits 5 LEDs ...6 Connections 7 Introduction to Broadband Technology 8 Sample Scenario 10 Network Setup 11 Setup Wizard 12 Using the Configuration Menu 17 Networking Basics 62 Reset 90 Technical Specifications 91 Contacting Technical Support 92 Warranty and Registration 93 2

Manual
Page 5
...a few clicks. 1 Print Server software included is included with the DI-704P to get you to the DI-704P for Easy Installation - One Ethernet cable is for Windows Operating Systems only. The D-Link setup wizard simplifies the installation process, getting you attach - Easily applied filtering...easily share an Internet connection with Macintosh OS. 5 The DI-704P does not support non-Postscript printers with multiple computers and devices. whether straight through or cross-over. Built-In Print Server - Simple Setup Wizard for Macintosh OS 9.x or X computers. Connect ...
...a few clicks. 1 Print Server software included is included with the DI-704P to get you to the DI-704P for Easy Installation - One Ethernet cable is for Windows Operating Systems only. The D-Link setup wizard simplifies the installation process, getting you attach - Easily applied filtering...easily share an Internet connection with Macintosh OS. 5 The DI-704P does not support non-Postscript printers with multiple computers and devices. whether straight through or cross-over. Built-In Print Server - Simple Setup Wizard for Macintosh OS 9.x or X computers. Connect ...

Manual
Page 10
... or DSL modem to the DI-704P wireless broadband router (see the Network Setup section on the DI-704P. For specific information on setting up your network with the DI-704P please see the Quick Installation Guide included with the DI-704P.) If you are connecting a desktop computer to your network, you can install the D-Link DFE-530TX+ Ethernet adapter...
... or DSL modem to the DI-704P wireless broadband router (see the Network Setup section on the DI-704P. For specific information on setting up your network with the DI-704P please see the Quick Installation Guide included with the DI-704P.) If you are connecting a desktop computer to your network, you can install the D-Link DFE-530TX+ Ethernet adapter...

Manual
Page 11
...(Network Card) of your computer. Power up the devices in sequence. Network Setup Turn everything off switch, disconnect the power cable. If you modem does not have an on your Cable or DSL modem. Use the D-Link supplied Ethernet cable to one of the LAN ports of the router. The complete... setup should look like Fig.1 shown above. A. B. C. Now, refer to either the Quick Installation Guide or continue ...
...(Network Card) of your computer. Power up the devices in sequence. Network Setup Turn everything off switch, disconnect the power cable. If you modem does not have an on your Cable or DSL modem. Use the D-Link supplied Ethernet cable to one of the LAN ports of the router. The complete... setup should look like Fig.1 shown above. A. B. C. Now, refer to either the Quick Installation Guide or continue ...
Manual
Page 12
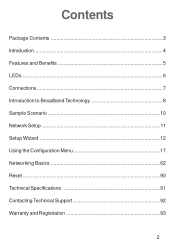
The logon pop-up screen will appear. Click Run Wizard 12 Click OK Once you have logged in, the Home screen will appear. Type "admin" for the username and leave the password field blank. Using the Setup Wizard Open your Web browser and type "http://192.168.0.1" into the URL address box. Then press the Enter or Return key.
The logon pop-up screen will appear. Click Run Wizard 12 Click OK Once you have logged in, the Home screen will appear. Type "admin" for the username and leave the password field blank. Using the Setup Wizard Open your Web browser and type "http://192.168.0.1" into the URL address box. Then press the Enter or Return key.

Manual
Page 13
Using the Setup Wizard (continued) You will see the following screens Click Next Set up your new password. Click Next 13 You have the option to establish a password.
Using the Setup Wizard (continued) You will see the following screens Click Next Set up your new password. Click Next 13 You have the option to establish a password.

Manual
Page 14
If you use PPTP in Europe or BigPond Cable in Australia. 14 Using the Setup Wizard (continued) Set up your Internet Connection. Click Next Select Others only if you are unsure of Internet connection for your router. Click Next Select your Time Zone. You will be prompted to select the type of which setting to the set standard time for your Internet Service Provider. You have the option to select, please contact your router. To change the default selection, select the drop down arrow and chose the correct time zone.
If you use PPTP in Europe or BigPond Cable in Australia. 14 Using the Setup Wizard (continued) Set up your Internet Connection. Click Next Select Others only if you are unsure of Internet connection for your router. Click Next Select your Time Zone. You will be prompted to select the type of which setting to the set standard time for your Internet Service Provider. You have the option to select, please contact your router. To change the default selection, select the drop down arrow and chose the correct time zone.
Manual
Page 15
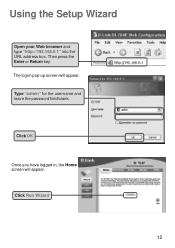
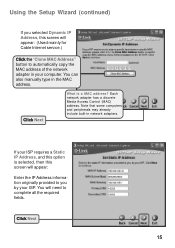
... complete all the required fields. You can also manually type in network adapters. Each network adapter has a discrete Media Access Control (MAC) address. Using the Setup Wizard (continued) If you selected Dynamic IP Address, this screen will appear: Enter the IP Address information originally provided to you by your ISP. If...
... complete all the required fields. You can also manually type in network adapters. Each network adapter has a discrete Media Access Control (MAC) address. Using the Setup Wizard (continued) If you selected Dynamic IP Address, this screen will appear: Enter the IP Address information originally provided to you by your ISP. If...
Manual
Page 16
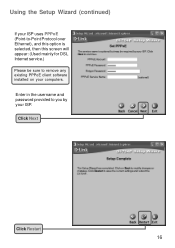
Using the Setup Wizard (continued) If your ISP uses PPPoE (Point-to-Point Protocol over Ethernet), and this option is selected, then this screen will appear: (Used mainly for DSL Internet service.) Please be sure to you by your computers. Enter in the username and password provided to remove any existing PPPoE client software installed on your ISP. Click Next Click Restart 16
Using the Setup Wizard (continued) If your ISP uses PPPoE (Point-to-Point Protocol over Ethernet), and this option is selected, then this screen will appear: (Used mainly for DSL Internet service.) Please be sure to you by your computers. Enter in the username and password provided to remove any existing PPPoE client software installed on your ISP. Click Next Click Restart 16
Manual
Page 18
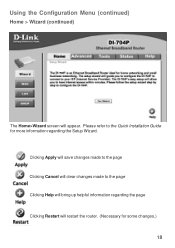
Clicking Apply will save changes made to the page Clicking Cancel will clear changes made to the Quick Installation Guide for more information regarding the page Clicking Restart will restart the router. (Necessary for some changes.) 18 Using the Configuration Menu (continued) Home > Wizard (continued) The Home>Wizard screen will bring up helpful information regarding the Setup Wizard. Please refer to the page Clicking Help will appear.
Clicking Apply will save changes made to the page Clicking Cancel will clear changes made to the Quick Installation Guide for more information regarding the page Clicking Restart will restart the router. (Necessary for some changes.) 18 Using the Configuration Menu (continued) Home > Wizard (continued) The Home>Wizard screen will bring up helpful information regarding the Setup Wizard. Please refer to the page Clicking Help will appear.
Manual
Page 56
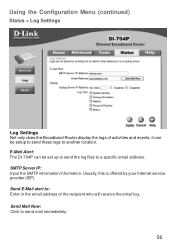
Send Mail Now: Click to : Enter in the email address of activities and events, it can be setup to send these logs to a specific email address. SMTP Server IP: Input the SMTP information information. Send E-Mail alert to send mail immediately. 56 Usually, this is offered by your Internet service provider (ISP). Using the Configuration Menu (continued) Status > Log Settings Log Settings Not only does the Broadband Router display the logs of the recipient who will receive the email log. E-Mail Alert: The DI-704P can be set up to send the log files to another location.
Send Mail Now: Click to : Enter in the email address of activities and events, it can be setup to send these logs to a specific email address. SMTP Server IP: Input the SMTP information information. Send E-Mail alert to send mail immediately. 56 Usually, this is offered by your Internet service provider (ISP). Using the Configuration Menu (continued) Status > Log Settings Log Settings Not only does the Broadband Router display the logs of the recipient who will receive the email log. E-Mail Alert: The DI-704P can be set up to send the log files to another location.
Manual
Page 62
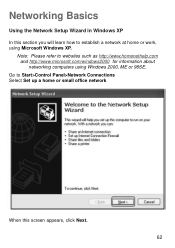
Networking Basics Using the Network Setup Wizard in Windows XP In this screen appears, click Next. 62 Go to Start>Control Panel>Network Connections Select Set up a home or small office network When this section you will learn how to websites such as http://www.homenethelp.com and http://www.microsoft.com/windows2000 for information about networking computers using Microsoft Windows XP. Note: Please refer to establish a network at home or work, using Windows 2000, ME or 98SE.
Networking Basics Using the Network Setup Wizard in Windows XP In this screen appears, click Next. 62 Go to Start>Control Panel>Network Connections Select Set up a home or small office network When this section you will learn how to websites such as http://www.homenethelp.com and http://www.microsoft.com/windows2000 for information about networking computers using Microsoft Windows XP. Note: Please refer to establish a network at home or work, using Windows 2000, ME or 98SE.
Manual
Page 65
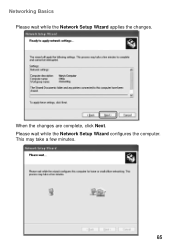
Please wait while the Network Setup Wizard configures the computer. When the changes are complete, click Next. Networking Basics Please wait while the Network Setup Wizard applies the changes. This may take a few minutes. 65
Please wait while the Network Setup Wizard configures the computer. When the changes are complete, click Next. Networking Basics Please wait while the Network Setup Wizard applies the changes. This may take a few minutes. 65
Manual
Page 66
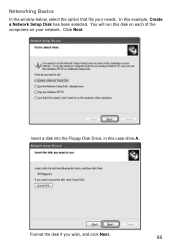
You will run this case drive A. Click Next. Insert a disk into the Floppy Disk Drive, in this disk on each of the computers on your needs. In this example, Create a Network Setup Disk has been selected. Format the disk if you wish, and click Next. 66 Networking Basics In the window below, select the option that fits your network.
You will run this case drive A. Click Next. Insert a disk into the Floppy Disk Drive, in this disk on each of the computers on your needs. In this example, Create a Network Setup Disk has been selected. Format the disk if you wish, and click Next. 66 Networking Basics In the window below, select the option that fits your network.
Manual
Page 67
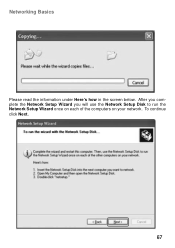
After you complete the Network Setup Wizard you will use the Network Setup Disk to run the Network Setup Wizard once on each of the computers on your network. To continue click Next. 67 Networking Basics Please read the information under Here's how in the screen below.
After you complete the Network Setup Wizard you will use the Network Setup Disk to run the Network Setup Wizard once on each of the computers on your network. To continue click Next. 67 Networking Basics Please read the information under Here's how in the screen below.

Manual
Page 68
The new settings will take effect when you will be ready to run the Network Setup Disk on all the other computers on all your computers, your network. After running the Network Setup Disk on your new wireless network will need to use. 68 Networking Basics Please read the information on this computer. You have completed configuring this screen, then click Finish to restart the computer. Next, you restart the computer. Click Yes to complete the Network Setup Wizard.
The new settings will take effect when you will be ready to run the Network Setup Disk on all the other computers on all your computers, your network. After running the Network Setup Disk on your new wireless network will need to use. 68 Networking Basics Please read the information on this computer. You have completed configuring this screen, then click Finish to restart the computer. Next, you restart the computer. Click Yes to complete the Network Setup Wizard.

Manual
Page 76
... printer (a printer connected to use the Add Printer Wizard. Networking Basics Adding and Sharing Printers in Windows XP After you have run the Network Setup Wizard on all the computers in your network (please see Using the Shared Documents folder and Sharing files and folders in the Help and Support... Center in home or small office networking, see the Network Setup Wizard section at the beginning of Networking Basics,) you have run the Network Setup Wizard on all of the computers on your network.
... printer (a printer connected to use the Add Printer Wizard. Networking Basics Adding and Sharing Printers in Windows XP After you have run the Network Setup Wizard on all the computers in your network (please see Using the Shared Documents folder and Sharing files and folders in the Help and Support... Center in home or small office networking, see the Network Setup Wizard section at the beginning of Networking Basics,) you have run the Network Setup Wizard on all of the computers on your network.
Manual
Page 81
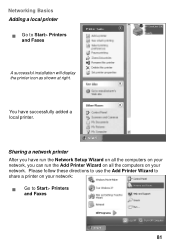
You have run the Network Setup Wizard on all the computers on your network. Sharing a network printer After you can run the Add Printer Wizard on all the computers on your network, you have successfully added a local printer. Please follow these directions to use the Add Printer Wizard to share a printer on your network: ! Networking Basics Adding a local printer ! Go to Start> Printers and Faxes A successful installation will display the printer icon as shown at right. Go to Start> Printers and Faxes 81
You have run the Network Setup Wizard on all the computers on your network. Sharing a network printer After you can run the Add Printer Wizard on all the computers on your network, you have successfully added a local printer. Please follow these directions to use the Add Printer Wizard to share a printer on your network: ! Networking Basics Adding a local printer ! Go to Start> Printers and Faxes A successful installation will display the printer icon as shown at right. Go to Start> Printers and Faxes 81
Manual
Page 84
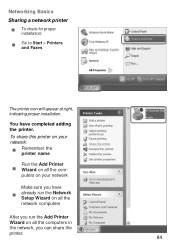
Networking Basics Sharing a network printer ! You have ! Wizard on your network: ! puters on all the computers in the network, you have completed adding the printer. To check for proper installation: ! To share this printer on all the com- Go to Start > Printers and Faxes The printer icon will appear at right, indicating proper installation. already run the Network Setup Wizard on all the network computers After you run the Add Printer Wizard on your network Make sure you can share the printer. 84 Remember the printer name Run the Add Printer !
Networking Basics Sharing a network printer ! You have ! Wizard on your network: ! puters on all the computers in the network, you have completed adding the printer. To check for proper installation: ! To share this printer on all the com- Go to Start > Printers and Faxes The printer icon will appear at right, indicating proper installation. already run the Network Setup Wizard on all the network computers After you run the Add Printer Wizard on your network Make sure you can share the printer. 84 Remember the printer name Run the Add Printer !
Manual
Page 85
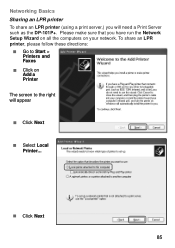
Please make sure that you will appear ! Click Next 85 Click on your network. Click Next ! To share an LPR printer, please follow these directions: ! Networking Basics Sharing an LPR printer To share an LPR printer (using a print server,) you have run the Network Setup Wizard on all the computers on Add a Printer The screen to Start > Printers and Faxes ! Go to the right will need a Print Server such as the DP-101P+. Select Local Printer... !
Please make sure that you will appear ! Click Next 85 Click on your network. Click Next ! To share an LPR printer, please follow these directions: ! Networking Basics Sharing an LPR printer To share an LPR printer (using a print server,) you have run the Network Setup Wizard on all the computers on Add a Printer The screen to Start > Printers and Faxes ! Go to the right will need a Print Server such as the DP-101P+. Select Local Printer... !


