
Manual
Page 2
... Power Cord ...8 Power Failure ...9 Grounding the Switch ...9 3 Getting Started ...10 Management Options...10 Using Web-based Management ...10 Supported Web Browsers ...10 Connecting to the Switch...10 Login Web-based Management ...11 SmartConsole Utility...11 4 SmartConsole Utility ...13 SmartConsole Settings ...13 Utility Settings...13 Log...14 Trap ...14 Monitor List ...15 About ...15 Device Configuration...15 i D-Link EasySmart Switch User Manual Table of Contents Table of Contents ...i About This Guide ...1 Terms/Usage...1 Copyright and Trademarks ...1 1 Product Introduction ...2 DGS-1100...
... Power Cord ...8 Power Failure ...9 Grounding the Switch ...9 3 Getting Started ...10 Management Options...10 Using Web-based Management ...10 Supported Web Browsers ...10 Connecting to the Switch...10 Login Web-based Management ...11 SmartConsole Utility...11 4 SmartConsole Utility ...13 SmartConsole Settings ...13 Utility Settings...13 Log...14 Trap ...14 Monitor List ...15 About ...15 Device Configuration...15 i D-Link EasySmart Switch User Manual Table of Contents Table of Contents ...i About This Guide ...1 Terms/Usage...1 Copyright and Trademarks ...1 1 Product Introduction ...2 DGS-1100...

Manual
Page 3
D-Link EasySmart Switch User Manual Add (+), Delete (-) and Discover the device 17 Device List...18 5 Configuration ...19 Web-based Management...19 Tool Bar > Save Menu ...20 Save Configuration ...20 Tool Bar > Tool Menu ...20 Reboot Device ...20 Reset System ...20 Firmware Backup & Upgrade ...20 Configuration Backup & Restore ...21 Function Tree ...22 Device Information...22 System > System Settings ...23 System > Port Settings ...24 System > Trap Settings for SmartConsole 24 System > Password Access Control ...25 L2 Features > Jumbo Frame ...25 L2 Features > Port Trunking...25 L2...
D-Link EasySmart Switch User Manual Add (+), Delete (-) and Discover the device 17 Device List...18 5 Configuration ...19 Web-based Management...19 Tool Bar > Save Menu ...20 Save Configuration ...20 Tool Bar > Tool Menu ...20 Reboot Device ...20 Reset System ...20 Firmware Backup & Upgrade ...20 Configuration Backup & Restore ...21 Function Tree ...22 Device Information...22 System > System Settings ...23 System > Port Settings ...24 System > Trap Settings for SmartConsole 24 System > Password Access Control ...25 L2 Features > Jumbo Frame ...25 L2 Features > Port Trunking...25 L2...

Manual
Page 5
.... Smart Console Utility: An introduction to the Product Instruction and Technical Specification sections for detailed information about the function descriptions and configuration settings. Configuration: Information about your switch, its own. 1 A NOTE indicates important information that helps a better use the Web Utility, and to configure Web-based Management step-by -step hardware installation procedures. 2. Reproduction in this document to refer to other than its components, network connections, and technical specifications. Other...
.... Smart Console Utility: An introduction to the Product Instruction and Technical Specification sections for detailed information about the function descriptions and configuration settings. Configuration: Information about your switch, its own. 1 A NOTE indicates important information that helps a better use the Web Utility, and to configure Web-based Management step-by -step hardware installation procedures. 2. Reproduction in this document to refer to other than its components, network connections, and technical specifications. Other...

Manual
Page 6
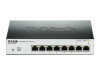
... connect the 5V/1A AC adapter. DGS-1100-05 Front Panel Power LED: The Power LED lights up when the Switch is where to legacy devices which do not support IEEE 802.3az, D-Link Green Technologies can reduce power consumption by design of time. Reset: By pressing the Reset button for small and medium-sized business (SMB) networking. D-Link EasySmart Switch User Manual 1 Product Introduction Thank you and congratulations on DGS-1100 switch get into power saving mode automatically. While no traffic...
... connect the 5V/1A AC adapter. DGS-1100-05 Front Panel Power LED: The Power LED lights up when the Switch is where to legacy devices which do not support IEEE 802.3az, D-Link Green Technologies can reduce power consumption by design of time. Reset: By pressing the Reset button for small and medium-sized business (SMB) networking. D-Link EasySmart Switch User Manual 1 Product Introduction Thank you and congratulations on DGS-1100 switch get into power saving mode automatically. While no traffic...
Manual
Page 7
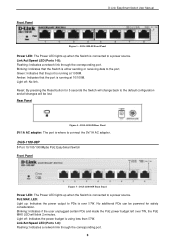
... the port is connected to the port. Blinking: Indicates that the port is using less than 57W. Reset: By pressing the Reset button for safety consideration. Rear Panel Figure 4 - DGS-1100-08P 8-Port 10/100/1000Mpbs PoE EasySmart Switch Front Panel Figure 5 - DGS-1100-08 Front Panel Power LED: The Power LED lights up : Indicates the power output to PDs is either sending or receiving data to a power source. Light off : No link. Front Panel D-Link EasySmart Switch User Manual Figure 3 - Amber...
... the port is connected to the port. Blinking: Indicates that the port is using less than 57W. Reset: By pressing the Reset button for safety consideration. Rear Panel Figure 4 - DGS-1100-08P 8-Port 10/100/1000Mpbs PoE EasySmart Switch Front Panel Figure 5 - DGS-1100-08 Front Panel Power LED: The Power LED lights up : Indicates the power output to PDs is either sending or receiving data to a power source. Light off : No link. Front Panel D-Link EasySmart Switch User Manual Figure 3 - Amber...
Manual
Page 8
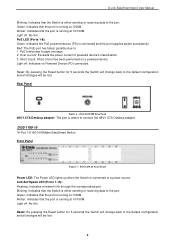
... of powered device's classification. 3. DGS-1100-16 Front Panel Power LED: The Power LED lights up when the Switch is connected to the port. Amber: Indicates that the port is running at 1000M. D-Link EasySmart Switch User Manual Blinking: Indicates that the Switch is either sending or receiving data to a power source. PoE total power budget shortage 2. Link/Act/Speed LED (Ports 1-16): Flashing: Indicates a network link through the corresponding port. Blinking: Indicates that the Switch is either sending or receiving data to the port. Green...
... of powered device's classification. 3. DGS-1100-16 Front Panel Power LED: The Power LED lights up when the Switch is connected to the port. Amber: Indicates that the port is running at 1000M. D-Link EasySmart Switch User Manual Blinking: Indicates that the Switch is either sending or receiving data to a power source. PoE total power budget shortage 2. Link/Act/Speed LED (Ports 1-16): Flashing: Indicates a network link through the corresponding port. Blinking: Indicates that the Switch is either sending or receiving data to the port. Green...

Manual
Page 9
... previous changes will be lost. DGS-1100-24 24-Port 10/100/1000Mpbs EasySmart Switch Front Panel Figure 9 - Rear Panel Figure 10- Rear Panel D-Link EasySmart Switch User Manual Figure 8- DGS-1100-24 Rear Panel Power: Connect the supplied AC power cable to the port. Link/Act/Speed LED (Ports 1-24): Flashing: Indicates a network link through the corresponding port. Reset: Press the reset button for 5 seconds to reset the Switch back to the default settings. Amber: Indicates that the Switch is running at 10/100M. Light...
... previous changes will be lost. DGS-1100-24 24-Port 10/100/1000Mpbs EasySmart Switch Front Panel Figure 9 - Rear Panel Figure 10- Rear Panel D-Link EasySmart Switch User Manual Figure 8- DGS-1100-24 Rear Panel Power: Connect the supplied AC power cable to the port. Link/Act/Speed LED (Ports 1-24): Flashing: Indicates a network link through the corresponding port. Reset: Press the reset button for 5 seconds to reset the Switch back to the default settings. Amber: Indicates that the Switch is running at 10/100M. Light...

Manual
Page 14
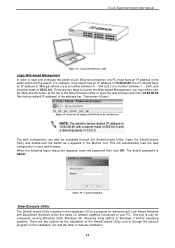
Each switch can allow one user to access the Web-Based Management at a time. Please refer to initialize multiple EasySmart Switches. A standard Ethernet cable Connect the Ethernet cable to any of the ports on the front panel of your PC and it is easier to the following installation instructions for communication with a RJ-45 Ethernet connection 2. Each switch must be assigned its own IP Address, which is a more convenient choice. Using Web-based Management After...
Each switch can allow one user to access the Web-Based Management at a time. Please refer to initialize multiple EasySmart Switches. A standard Ethernet cable Connect the Ethernet cable to any of the ports on the front panel of your PC and it is easier to the following installation instructions for communication with a RJ-45 Ethernet connection 2. Each switch must be assigned its own IP Address, which is a more convenient choice. Using Web-based Management After...
Manual
Page 15
... admin. The default password is manual installation. 11 This tool is only for computers running Windows 2000, Windows XP, Windows Vista x64/32 or Windows 7 x64/32 operating systems. There are two ways to your web browser. one is through the SmartConsole Utility. D-Link EasySmart Switch User Manual Figure 17 -Connected Ethernet cable Login Web-based Management In order to login and configure the switch via an Ethernet connection, the PC must have an IP address...
... admin. The default password is manual installation. 11 This tool is only for computers running Windows 2000, Windows XP, Windows Vista x64/32 or Windows 7 x64/32 operating systems. There are two ways to your web browser. one is through the SmartConsole Utility. D-Link EasySmart Switch User Manual Figure 17 -Connected Ethernet cable Login Web-based Management In order to login and configure the switch via an Ethernet connection, the PC must have an IP address...

Manual
Page 22
... for EasySmart switches. SmartConsole Delete device Device List This list displays all discovered Web Smart and EasySmart switches on the network. System Name: Displays the appointed device system name. Gateway: Displays the Gateway setting of the device. SmartConsole Device List Definitions of the device. Group Interval: Displays the intervals (in the device list, it means that the devices require upgrading firmware again. 18 D-Link EasySmart Switch User Manual Figure...
... for EasySmart switches. SmartConsole Delete device Device List This list displays all discovered Web Smart and EasySmart switches on the network. System Name: Displays the appointed device system name. Gateway: Displays the Gateway setting of the device. SmartConsole Device List Definitions of the device. Group Interval: Displays the intervals (in the device list, it means that the devices require upgrading firmware again. 18 D-Link EasySmart Switch User Manual Figure...

Manual
Page 25
... a saved firmware file. Tool Menu > Firmware backup & upgrade CAUTION: Do not disconnect the PC or remove the power cord from the file. Tool Menu > Configure Backup and Restore Backup or restore the configuration file to browse your local drive. Click Backup to save the current settings to restore. Click Upgrade after selecting the firmware file you want to restore. D-Link EasySmart Switch User Manual Click Browse to a file (not including the password), and if necessary, you can restore configuration settings from device until upgrade...
... a saved firmware file. Tool Menu > Firmware backup & upgrade CAUTION: Do not disconnect the PC or remove the power cord from the file. Tool Menu > Configure Backup and Restore Backup or restore the configuration file to browse your local drive. Click Backup to save the current settings to restore. Click Upgrade after selecting the firmware file you want to restore. D-Link EasySmart Switch User Manual Click Browse to a file (not including the password), and if necessary, you can restore configuration settings from device until upgrade...

Manual
Page 26
... includes essential information such as firmware, hardware and IP address. By default this feature is disabled. 802.1Q VLAN: Click Setting > VLAN > 802.1Q Management VLAN. By default this feature is disabled. 22 D-Link EasySmart Switch User Manual Function Tree All configuration options on the switch are accessed through the Setup menu on the setup item that you want to configure. Port Trunking: Click Setting > L2 Features > Trunking Setting. It also offers an overall status of the screen. By...
... includes essential information such as firmware, hardware and IP address. By default this feature is disabled. 802.1Q VLAN: Click Setting > VLAN > 802.1Q Management VLAN. By default this feature is disabled. 22 D-Link EasySmart Switch User Manual Function Tree All configuration options on the switch are accessed through the Setup menu on the setup item that you want to configure. Port Trunking: Click Setting > L2 Features > Trunking Setting. It also offers an overall status of the screen. By...

Manual
Page 28
... Settings for all selected ports, effective by clicking Apply. The default setting for SmartConsole By configuring the Trap Setting, it allows SmartConsole Utility to adjust port speed settings appropriately after changing connected cable media types. Flow Control: You can enable this EasySmart Switch. Press the Refresh button to mitigate the traffic congestion. Figure 114- Ports configured for optimum configuration. D-Link EasySmart Switch User Manual System > Port Settings In the Port Setting page, the status of all ports can be set for all ports is Auto...
... Settings for all selected ports, effective by clicking Apply. The default setting for SmartConsole By configuring the Trap Setting, it allows SmartConsole Utility to adjust port speed settings appropriately after changing connected cable media types. Flow Control: You can enable this EasySmart Switch. Press the Refresh button to mitigate the traffic congestion. Figure 114- Ports configured for optimum configuration. D-Link EasySmart Switch User Manual System > Port Settings In the Port Setting page, the status of all ports can be set for all ports is Auto...

Manual
Page 29
... switch to combine two or four ports together to enhance Ethernet networking throughput and significantly reduce the CPU utilization of firmware upgrade - Select the Trunking Groups, choose the Members to be created, each supporting up information Illegal Login - success or failure System > Password Access Control Setting a password is designed to increase bandwidth. The Jumbo Frame page allows network managers to secure the EasySmart Switch. System > Jumbo Frame NOTE: DGS-1100-05/08/08P Supports Jumbo Frame function, but DGS-1100...
... switch to combine two or four ports together to enhance Ethernet networking throughput and significantly reduce the CPU utilization of firmware upgrade - Select the Trunking Groups, choose the Members to be created, each supporting up information Illegal Login - success or failure System > Password Access Control Setting a password is designed to increase bandwidth. The Jumbo Frame page allows network managers to secure the EasySmart Switch. System > Jumbo Frame NOTE: DGS-1100-05/08/08P Supports Jumbo Frame function, but DGS-1100...
Manual
Page 30
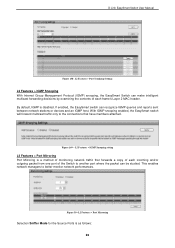
... intelligent multicast forwarding decisions by examining the contents of monitoring network traffic that have members attached. With IGMP snooping enabled, the EasySmart switch will forward multicast traffic only to the connections that forwards a copy of each frame's Layer 2 MAC header. By default, IGMP is as follows: 26 Figure 169 - L2 Features > IGMP Snooping setting L2 Features > Port Mirroring Port Mirroring is a method of each incoming and/or outgoing packet from one port of the Switch to better monitor network performances. D-Link EasySmart Switch User Manual...
... intelligent multicast forwarding decisions by examining the contents of monitoring network traffic that have members attached. With IGMP snooping enabled, the EasySmart switch will forward multicast traffic only to the connections that forwards a copy of each frame's Layer 2 MAC header. By default, IGMP is as follows: 26 Figure 169 - L2 Features > IGMP Snooping setting L2 Features > Port Mirroring Port Mirroring is a method of each incoming and/or outgoing packet from one port of the Switch to better monitor network performances. D-Link EasySmart Switch User Manual...

Manual
Page 39
... settings to take effect. Enabled disables the limit. The Disable Auto Learning Excluding Uplink Port table allows turning off the function of ports may be configured starting with the selected port. By default, this feature is applied to define the bandwidth settings for the selected ports. D-Link EasySmart Switch User Manual Click Apply for example, connects to a DHCP Server or Gateway). Type: This drop-down menu allows you to select data rate from 64Kbps to 512Mbps. Security > MAC Address Table > Static MAC...
... settings to take effect. Enabled disables the limit. The Disable Auto Learning Excluding Uplink Port table allows turning off the function of ports may be configured starting with the selected port. By default, this feature is applied to define the bandwidth settings for the selected ports. D-Link EasySmart Switch User Manual Click Apply for example, connects to a DHCP Server or Gateway). Type: This drop-down menu allows you to select data rate from 64Kbps to 512Mbps. Security > MAC Address Table > Static MAC...

Manual
Page 42
... all D-Link 802.3af devices. DGS-1100-08P will negotiate and follow the classification from 1.0 to 15.4W) to manually assign an upper limit of the connected PD; NOTE: The PoE Status information of the lowest priority PD. PoE > PoE Port Setting From Port/To Port: Specifies the PoE function of PoE power supplied. State: Select "Enabled" or "Disabled" to the PD. Priority: Configure the power supply priority as defined by PSE 0 Default 15...
... all D-Link 802.3af devices. DGS-1100-08P will negotiate and follow the classification from 1.0 to 15.4W) to manually assign an upper limit of the connected PD; NOTE: The PoE Status information of the lowest priority PD. PoE > PoE Port Setting From Port/To Port: Specifies the PoE function of PoE power supplied. State: Select "Enabled" or "Disabled" to the PD. Priority: Configure the power supply priority as defined by PSE 0 Default 15...

Manual
Page 44
... among connected Ethernet or Fast Ethernet LAN segments. A number of today and tomorrow's rapidly improving switching and routing internetworking technologies. The switch, without wasting existing investments in hardware, software, and personnel training. D-Link EasySmart Switch User Manual Appendix A - A switch increases capacity and decreases network loading by Gigabit Ethernet is compatible with any other for the next generation of switching technology. Gigabit Ethernet enables fast optical fiber connections to support video conferencing, complex imaging, and similar data...
... among connected Ethernet or Fast Ethernet LAN segments. A number of today and tomorrow's rapidly improving switching and routing internetworking technologies. The switch, without wasting existing investments in hardware, software, and personnel training. D-Link EasySmart Switch User Manual Appendix A - A switch increases capacity and decreases network loading by Gigabit Ethernet is compatible with any other for the next generation of switching technology. Gigabit Ethernet enables fast optical fiber connections to support video conferencing, complex imaging, and similar data...

Manual
Page 45
DGS-1100-16: 32Gbps - Forwarding Rate: - IEEE 802.3af(DGS-1100-08P only) -Supports Full/half-Duplex operations at 10/100Mbps -Supports Full-Duplex operation at 1000Mbps -Supports IEEE 802.3x Flow Control -Support Auto-Negotiation -Compliant to 4 queues per port Bandwidth Control Storm Control Management Web-based GUI or SmartConsole Utility Configuration backup / restoration via Web-based management Firmware backup & upgrade via Webbased management Reset, Reboot system Factory reset by link status 41 DGS-1100-08P:Device: 0~50°C Power Adapter: 0~40°C Storage Temperature...
DGS-1100-16: 32Gbps - Forwarding Rate: - IEEE 802.3af(DGS-1100-08P only) -Supports Full/half-Duplex operations at 10/100Mbps -Supports Full-Duplex operation at 1000Mbps -Supports IEEE 802.3x Flow Control -Support Auto-Negotiation -Compliant to 4 queues per port Bandwidth Control Storm Control Management Web-based GUI or SmartConsole Utility Configuration backup / restoration via Web-based management Firmware backup & upgrade via Webbased management Reset, Reboot system Factory reset by link status 41 DGS-1100-08P:Device: 0~50°C Power Adapter: 0~40°C Storage Temperature...

Getting Started Guide
Page 3
... to login and configure the switch via an Ethernet connection, the PC must be unplugged in the web browser 3 Using the SmartConsole Utility, you can configure the switch, monitor the LED panel, and display statistics graphically using the SmartConsole Utility. Open your web browser and enter http://10.90.90.90 (the factory-default IP address) in . Figure 7. You need to change Step 2 In order to manage multiple D-Link EasySmart Switches...
... to login and configure the switch via an Ethernet connection, the PC must be unplugged in the web browser 3 Using the SmartConsole Utility, you can configure the switch, monitor the LED panel, and display statistics graphically using the SmartConsole Utility. Open your web browser and enter http://10.90.90.90 (the factory-default IP address) in . Figure 7. You need to change Step 2 In order to manage multiple D-Link EasySmart Switches...


