
DGS-1100 Series Datasheet
Page 2
... power consumption when the traffic volume is designed for extensive switch configuration and basic setup of discovered devices, including password changes and firmware upgrades. Technical Specification DGS-1100-08 DGS-1100-16 DGS-1100-24 General Port Standard & Functions Number of Ports 8 IEEE ...20 meters. The SmartConsole allows customers to the port level. Loopback Detection is without a link. Cable Diagnostics is low. DGS-1100-08/16/24 EasySmart Switch D-Link Green/Power Saving Performance Compliant with IEEE802.3az Energy Efficient Ethernet, these switches consume less...
... power consumption when the traffic volume is designed for extensive switch configuration and basic setup of discovered devices, including password changes and firmware upgrades. Technical Specification DGS-1100-08 DGS-1100-16 DGS-1100-24 General Port Standard & Functions Number of Ports 8 IEEE ...20 meters. The SmartConsole allows customers to the port level. Loopback Detection is without a link. Cable Diagnostics is low. DGS-1100-08/16/24 EasySmart Switch D-Link Green/Power Saving Performance Compliant with IEEE802.3az Energy Efficient Ethernet, these switches consume less...

Manual
Page 2
... Configuration ...19 Tool Bar > Tool Menu ...19 i D-Link EasySmart Switch User Manual Table of Contents Table of Contents ...i About This Guide ...1 Terms/Usage...1 Copyright and Trademarks ...1 1 Product Introduction ...2 DGS-1100-08 ...2 Front Panel ...2 Rear Panel...2 DGS-1100-16 ...3 Front Panel ...3 Rear Panel...3 DGS-1100-24 ...3 Front Panel ...3 Rear Panel...4 2 Hardware Installation ...5 Step 1: Unpacking...5 Packing contents of DGS-1100-08...5 Packing contents of DGS-1100...
... Configuration ...19 Tool Bar > Tool Menu ...19 i D-Link EasySmart Switch User Manual Table of Contents Table of Contents ...i About This Guide ...1 Terms/Usage...1 Copyright and Trademarks ...1 1 Product Introduction ...2 DGS-1100-08 ...2 Front Panel ...2 Rear Panel...2 DGS-1100-16 ...3 Front Panel ...3 Rear Panel...3 DGS-1100-24 ...3 Front Panel ...3 Rear Panel...4 2 Hardware Installation ...5 Step 1: Unpacking...5 Packing contents of DGS-1100-08...5 Packing contents of DGS-1100...

Manual
Page 3
... VLAN ...38 QoS (Quality of Service)...38 Management...38 Power Saving ...38 Appendix C - Rack mount Instructions ...39 ii D-Link EasySmart Switch User Manual Reboot Device ...19 Reset System ...19 Firmware Backup & Upgrade ...19 Configuration Backup & Restore ...20 Function Tree ...21 Device Information...21 System > System Settings ...22 System > Port Settings ...23 System...
... VLAN ...38 QoS (Quality of Service)...38 Management...38 Power Saving ...38 Appendix C - Rack mount Instructions ...39 ii D-Link EasySmart Switch User Manual Reboot Device ...19 Reset System ...19 Firmware Backup & Upgrade ...19 Configuration Backup & Restore ...20 Function Tree ...21 Device Information...21 System > System Settings ...22 System > Port Settings ...23 System...

Manual
Page 4
..."bridge" and "switching hubs" interchangeably, and both are registered trademarks of D-Link Corporation is mainly divided into four parts: 1. D-Link Corporation disclaims any manner whatsoever without notice. © 2010 D-Link Corporation. Configuration: Information about your switch, its own. 1 Hardware Installation: Step-by ... is subjected to change without the written permission of Microsoft Corporation. D-Link EasySmart Switch User Manual About This Guide This guide provides instructions to install the D-Link Gigabit Ethernet EasySmart Switch DGS-1100-08/16/24, how to use of...
..."bridge" and "switching hubs" interchangeably, and both are registered trademarks of D-Link Corporation is mainly divided into four parts: 1. D-Link Corporation disclaims any manner whatsoever without notice. © 2010 D-Link Corporation. Configuration: Information about your switch, its own. 1 Hardware Installation: Step-by ... is subjected to change without the written permission of Microsoft Corporation. D-Link EasySmart Switch User Manual About This Guide This guide provides instructions to install the D-Link Gigabit Ethernet EasySmart Switch DGS-1100-08/16/24, how to use of...

Manual
Page 5
...purchase of time, ports on DGS-1100 switch get into power saving mode automatically. The brand-new DGS-1100 series are born to EEE compliant devices, such as EEE) and D-Link Green Technologies. Once if a packet is where to -view front panel diagnostic LEDs. DGS-1100-08 Rear Panel 5V/1A AC ... corresponding port. Blinking: Indicates that the Switch is running at 1000M. While connecting to the default configuration and all changes will be green by detecting short cable and link-down devices. Green: Indicates that the port is connected to the port. It allows significant power ...
...purchase of time, ports on DGS-1100 switch get into power saving mode automatically. The brand-new DGS-1100 series are born to EEE compliant devices, such as EEE) and D-Link Green Technologies. Once if a packet is where to -view front panel diagnostic LEDs. DGS-1100-08 Rear Panel 5V/1A AC ... corresponding port. Blinking: Indicates that the Switch is running at 1000M. While connecting to the default configuration and all changes will be green by detecting short cable and link-down devices. Green: Indicates that the port is connected to the port. It allows significant power ...

Manual
Page 6
...port is running at 1000M. Link/Act/Speed LED (Ports 1-24): Flashing: Indicates a network link through the corresponding port. Green: Indicates that the port is where to the default configuration and all changes will be lost. Rear Panel Figure 4- DGS-1100-24 24-Port 10/100/...1000Mpbs EasySmart Switch Front Panel Figure 5 - DGS-1100-24 Front Panel Power LED:...
...port is running at 1000M. Link/Act/Speed LED (Ports 1-24): Flashing: Indicates a network link through the corresponding port. Green: Indicates that the port is where to the default configuration and all changes will be lost. Rear Panel Figure 4- DGS-1100-24 24-Port 10/100/...1000Mpbs EasySmart Switch Front Panel Figure 5 - DGS-1100-24 Front Panel Power LED:...

Manual
Page 12
D-Link EasySmart Switch User Manual 3 Getting Started This chapter introduces the management interface of your device: 1. Each switch can configure the Switch, monitor the network status, and display statistics using the SmartConsole Utility, you do not need... the following installation instructions for communication with a RJ-45 Ethernet connection 2. Using Web-based Management After a successful physical installation, you want to change the IP address of D-Link...
D-Link EasySmart Switch User Manual 3 Getting Started This chapter introduces the management interface of your device: 1. Each switch can configure the Switch, monitor the network status, and display statistics using the SmartConsole Utility, you do not need... the following installation instructions for communication with a RJ-45 Ethernet connection 2. Using Web-based Management After a successful physical installation, you want to change the IP address of D-Link...

Manual
Page 13
D-Link EasySmart Switch User Manual Figure 13 -Connected Ethernet cable Login Web-based Management In order to login and configure the switch via an Ethernet connection, the PC must have an IP address of 10.x.y.z (where x/y is a number between 1 ~ 254), and a subnet mask of the ... in the address bar. This tool is 10.90.90.90 with a subnet mask of 255.0.0.0 and a default gateway of the SmartConsole Utility; The web configuration can also be accessed through the autorun program on the installation CD and the other is a number between 0 ~ 254 and z is manual installation. 10 This...
D-Link EasySmart Switch User Manual Figure 13 -Connected Ethernet cable Login Web-based Management In order to login and configure the switch via an Ethernet connection, the PC must have an IP address of 10.x.y.z (where x/y is a number between 1 ~ 254), and a subnet mask of the ... in the address bar. This tool is 10.90.90.90 with a subnet mask of 255.0.0.0 and a default gateway of the SmartConsole Utility; The web configuration can also be accessed through the autorun program on the installation CD and the other is a number between 0 ~ 254 and z is manual installation. 10 This...

Manual
Page 15
...Utility Settings, Log, Trap, File, and Help. Refresh time refreshes the devices which are in the same domain of three parts, Device Configurations at the top, Device List as monitored device in the Device List. Choices include 15 secs, 30 secs, 1mins, 2mins, and 5... seconds) that the Switch will be discovered in the SmartConsole Device List. D-Link EasySmart Switch User Manual 4 SmartConsole Utility The D-Link SmartConsole Utility allows the administrator to quickly discover all D-Link Smart Switches and EasySmart Switches which were selected as the main body, and SmartConsole...
...Utility Settings, Log, Trap, File, and Help. Refresh time refreshes the devices which are in the same domain of three parts, Device Configurations at the top, Device List as monitored device in the Device List. Choices include 15 secs, 30 secs, 1mins, 2mins, and 5... seconds) that the Switch will be discovered in the SmartConsole Device List. D-Link EasySmart Switch User Manual 4 SmartConsole Utility The D-Link SmartConsole Utility allows the administrator to quickly discover all D-Link Smart Switches and EasySmart Switches which were selected as the main body, and SmartConsole...

Manual
Page 17
... Refresh Web Access and the , , device buttons for the next time the SmartConsole Utility is used. Figure 21- Click on this icon you can configure the Product Name, IP Address, Gateway, Subnet Mask, System Name, Location, Trap Host IP, and DHCP Client Setting of the Switch. 14 File... By clicking on this icon to launch the SmartConsole Info window. Here you will see below options: D-Link EasySmart Switch User Manual Figure 20- Help Click this icon to launch the Device Settings window. Device Settings Select a switch from the Device List...
... Refresh Web Access and the , , device buttons for the next time the SmartConsole Utility is used. Figure 21- Click on this icon you can configure the Product Name, IP Address, Gateway, Subnet Mask, System Name, Location, Trap Host IP, and DHCP Client Setting of the Switch. 14 File... By clicking on this icon to launch the SmartConsole Info window. Here you will see below options: D-Link EasySmart Switch User Manual Figure 20- Help Click this icon to launch the Device Settings window. Device Settings Select a switch from the Device List...

Manual
Page 18
SmartConsole Device Settings NOTE: The EasySmart Switch automatically sends out discovery packets to configure the Group Interval setting. Here you are going to use. Input the correct password of same model name from the Device List. Figure 23- ...Select one ) that you can enter a new password and confirm it. Specify the Firmware Path (or Browse for any reason. 15 D-Link EasySmart Switch User Manual To apply the configuration, insert the correct device password in the Confirm Password box and then click OK Figure 22 - Therefore, ensure to maintain the connection...
SmartConsole Device Settings NOTE: The EasySmart Switch automatically sends out discovery packets to configure the Group Interval setting. Here you are going to use. Input the correct password of same model name from the Device List. Figure 23- ...Select one ) that you can enter a new password and confirm it. Specify the Firmware Path (or Browse for any reason. 15 D-Link EasySmart Switch User Manual To apply the configuration, insert the correct device password in the Confirm Password box and then click OK Figure 22 - Therefore, ensure to maintain the connection...
Manual
Page 19
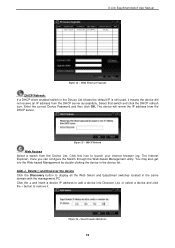
... click the DHCP refresh icon. Click this icon to remove it means the device did not receive an IP address from the DHCP server successfully. D-Link EasySmart Switch User Manual Figure 24 - Here you can configure the Switch through the Web-based Management utility.
... click the DHCP refresh icon. Click this icon to remove it means the device did not receive an IP address from the DHCP server successfully. D-Link EasySmart Switch User Manual Figure 24 - Here you can configure the Switch through the Web-based Management utility.

Manual
Page 21
... a quick and convenient way for optimum use through the Web-based Management Utility. The main configuration screen will show the current status of your Switch by clicking on the D-Link logo at the upper-left corner of the screen you close the web browser without clicking the... top of the screen the username and current IP address will be displayed. D-Link EasySmart Switch User Manual 5 Configuration The features and functions of the D-Link EasySmart Switch can change all the settings in the Main Configuration Screen. Finally, by clicking the model name on top, the Function Tree, ...
... a quick and convenient way for optimum use through the Web-based Management Utility. The main configuration screen will show the current status of your Switch by clicking on the D-Link logo at the upper-left corner of the screen you close the web browser without clicking the... top of the screen the username and current IP address will be displayed. D-Link EasySmart Switch User Manual 5 Configuration The features and functions of the D-Link EasySmart Switch can change all the settings in the Main Configuration Screen. Finally, by clicking the model name on top, the Function Tree, ...

Manual
Page 22
... Menu offers global function controls such as Reset System, Reboot Device, Firmware Upgrade and Configuration Backup & Restore. Figure 33- Figure 34- D-Link EasySmart Switch User Manual Tool Bar > Save Menu The Save Menu provides Save Configuration. Save Menu Save Configuration Select to save the firmware to factory default and then the Switch will be...
... Menu offers global function controls such as Reset System, Reboot Device, Firmware Upgrade and Configuration Backup & Restore. Figure 33- Figure 34- D-Link EasySmart Switch User Manual Tool Bar > Save Menu The Save Menu provides Save Configuration. Save Menu Save Configuration Select to save the firmware to factory default and then the Switch will be...

Manual
Page 23
...incomplete. Click Browse to restore. Click Restore after restore and all current configurations will be saved to a file (not including the password), and if necessary, you want to browse your disk. D-Link EasySmart Switch User Manual Figure 35 - Tool Menu > Firmware backup & ...Upgrade is complete. Note: Switch will reboot after selecting the backup settings file you can restore configuration settings from the file. Configuration Backup & Restore Allow the current configuration settings to your inventories for a saved backup settings file. Click Backup to save the current...
...incomplete. Click Browse to restore. Click Restore after restore and all current configurations will be saved to a file (not including the password), and if necessary, you want to browse your disk. D-Link EasySmart Switch User Manual Figure 35 - Tool Menu > Firmware backup & ...Upgrade is complete. Note: Switch will reboot after selecting the backup settings file you can restore configuration settings from the file. Configuration Backup & Restore Allow the current configuration settings to your inventories for a saved backup settings file. Click Backup to save the current...

Manual
Page 24
... default this feature is disabled. 802.1Q VLAN: Click Setting > VLAN > 802.1Q Management VLAN. The following sections provide more detailed description of the screen. D-Link EasySmart Switch User Manual Function Tree All configuration options on the switch are accessed through the Setup menu on the setup item that you want to...
... default this feature is disabled. 802.1Q VLAN: Click Setting > VLAN > 802.1Q Management VLAN. The following sections provide more detailed description of the screen. D-Link EasySmart Switch User Manual Function Tree All configuration options on the switch are accessed through the Setup menu on the setup item that you want to...

Manual
Page 25
... mode, the IP Address, Subnet Mask and Gateway can more easily be manually configured. IP Information: There are two ways for a specific time span in the Web-based Management. Figure 39- System > System Setting 22 D-Link EasySmart Switch User Manual Figure 38- By default the IP setting is static mode...SmartConsole Utility and from 3 to provide it with IP address is 10.90.90.90 and subnet mask is no action for the switch to configure the IP address and the basic system information of the Switch. Login Timeout: The Login Timeout controls the idle time-out period for a ...
... mode, the IP Address, Subnet Mask and Gateway can more easily be manually configured. IP Information: There are two ways for a specific time span in the Web-based Management. Figure 39- System > System Setting 22 D-Link EasySmart Switch User Manual Figure 38- By default the IP setting is static mode...SmartConsole Utility and from 3 to provide it with IP address is 10.90.90.90 and subnet mask is no action for the switch to configure the IP address and the basic system information of the Switch. Login Timeout: The Login Timeout controls the idle time-out period for a ...

Manual
Page 26
... Port Setting page, the status of ports (From Port and To Port), the Speed can be monitored and adjusted for optimum configuration. Link Status: Reporting Down indicates the port is disabled. The default setting is disconnected. By default, Trap Setting is enabled, enter ..., or Disabled. System > Port Setting Speed: Copper connections can enable this EasySmart Switch. System > Trap Settings For SmartConsole By configuring the Trap Setting, it allows SmartConsole Utility to monitor specified events on this function to mitigate the traffic congestion. Press the Refresh button...
... Port Setting page, the status of ports (From Port and To Port), the Speed can be monitored and adjusted for optimum configuration. Link Status: Reporting Down indicates the port is disabled. The default setting is disconnected. By default, Trap Setting is enabled, enter ..., or Disabled. System > Port Setting Speed: Copper connections can enable this EasySmart Switch. System > Trap Settings For SmartConsole By configuring the Trap Setting, it allows SmartConsole Utility to monitor specified events on this function to mitigate the traffic congestion. Press the Refresh button...

Manual
Page 29
...Time (0 or 60-1000000): Time allowed (in seconds) for recovery when a Loopback is Disabled. The Loop Detection Recover Time can be configured starting with the selected port. From Port: The beginning of a consecutive group of ports may be set at 0 seconds, or 60 to .... The default is 1 seconds. To Port: The ending of a consecutive group of ports may be configured starting with the selected port. Clear All Counters: To reset the details displayed. D-Link EasySmart Switch User Manual Figure 46- The default is 60 seconds. Default is Disabled. Interval (1-32767):...
...Time (0 or 60-1000000): Time allowed (in seconds) for recovery when a Loopback is Disabled. The Loop Detection Recover Time can be configured starting with the selected port. From Port: The beginning of a consecutive group of ports may be set at 0 seconds, or 60 to .... The default is 1 seconds. To Port: The ending of a consecutive group of ports may be configured starting with the selected port. Clear All Counters: To reset the details displayed. D-Link EasySmart Switch User Manual Figure 46- The default is 60 seconds. Default is Disabled. Interval (1-32767):...

Manual
Page 30
D-Link Cameras can be configured for a component. •MAC address: Input MAC address of 2: •Component Type: Surveillance VLAN will pass through switch with desired priority. 3 Video Management Software + Storage... Software 2 EasySmart Switch 1 IP Cameras The Surveillance VLAN settings are necessary components for an IP surveillance service. •Description: Put description for surveillance VLAN. D-Link EasySmart Switch User Manual RxOK: Number of received packets resulting in error. If it matches specified MAC address / VLAN ID, the packets will automatically detect...
D-Link Cameras can be configured for a component. •MAC address: Input MAC address of 2: •Component Type: Surveillance VLAN will pass through switch with desired priority. 3 Video Management Software + Storage... Software 2 EasySmart Switch 1 IP Cameras The Surveillance VLAN settings are necessary components for an IP surveillance service. •Description: Put description for surveillance VLAN. D-Link EasySmart Switch User Manual RxOK: Number of received packets resulting in error. If it matches specified MAC address / VLAN ID, the packets will automatically detect...


