
DGS-1100 Series Datasheet
Page 2
.../Security Network maintenance features include Loopback Detection and Cable Diagnostics. Loopback Detection is low. This allows for extensive switch configuration and basic setup of Ports 8 IEEE 802.3 compliant IEEE 802.3u compliant IEEE 802.3ab compliance Supports Half/Full...customers to discover multiple D-Link Smart and EasySmart Switches within the same L2 network segment that are connected to authorized devices only. Easily find, manage, and update your SmartSwitches from the SmartConsole Utility. Technical Specification DGS-1100-08 DGS-1100-16 DGS-1100-24 General Port Standard ...
.../Security Network maintenance features include Loopback Detection and Cable Diagnostics. Loopback Detection is low. This allows for extensive switch configuration and basic setup of Ports 8 IEEE 802.3 compliant IEEE 802.3u compliant IEEE 802.3ab compliance Supports Half/Full...customers to discover multiple D-Link Smart and EasySmart Switches within the same L2 network segment that are connected to authorized devices only. Easily find, manage, and update your SmartSwitches from the SmartConsole Utility. Technical Specification DGS-1100-08 DGS-1100-16 DGS-1100-24 General Port Standard ...

Manual
Page 2
... Configuration ...19 Tool Bar > Tool Menu ...19 i D-Link EasySmart Switch User Manual Table of Contents Table of Contents ...i About This Guide ...1 Terms/Usage...1 Copyright and Trademarks ...1 1 Product Introduction ...2 DGS-1100-08 ...2 Front Panel ...2 Rear Panel...2 DGS-1100-16 ...3 Front Panel ...3 Rear Panel...3 DGS-1100-24 ...3 Front Panel ...3 Rear Panel...4 2 Hardware Installation ...5 Step 1: Unpacking...5 Packing contents of DGS-1100-08...5 Packing contents of DGS-1100...
... Configuration ...19 Tool Bar > Tool Menu ...19 i D-Link EasySmart Switch User Manual Table of Contents Table of Contents ...i About This Guide ...1 Terms/Usage...1 Copyright and Trademarks ...1 1 Product Introduction ...2 DGS-1100-08 ...2 Front Panel ...2 Rear Panel...2 DGS-1100-16 ...3 Front Panel ...3 Rear Panel...3 DGS-1100-24 ...3 Front Panel ...3 Rear Panel...4 2 Hardware Installation ...5 Step 1: Unpacking...5 Packing contents of DGS-1100-08...5 Packing contents of DGS-1100...

Manual
Page 3
... Saving ...38 Appendix C - Ethernet Technology...37 Gigabit Ethernet Technology ...37 Fast Ethernet Technology ...37 Switching Technology ...37 Appendix B - D-Link EasySmart Switch User Manual Reboot Device ...19 Reset System ...19 Firmware Backup & Upgrade ...19 Configuration Backup & Restore ...20 Function Tree ...21 Device Information...21 System > System Settings ...22 System > Port Settings ...23 System...
... Saving ...38 Appendix C - Ethernet Technology...37 Gigabit Ethernet Technology ...37 Fast Ethernet Technology ...37 Switching Technology ...37 Appendix B - D-Link EasySmart Switch User Manual Reboot Device ...19 Reset System ...19 Firmware Backup & Upgrade ...19 Configuration Backup & Restore ...20 Function Tree ...21 Device Information...21 System > System Settings ...22 System > Port Settings ...23 System...

Manual
Page 4
...D-Link Gigabit Ethernet EasySmart Switch DGS-1100-08/16/24, how to use of D-Link Corporation; Configuration: Information about your switch, its own. 1 A CAUTION indicates potential property damage or personal injury. Microsoft and Windows are registered trademarks of D-Link ... connections, and technical specifications. Terms/Usage In this text: D-Link and the D-LINK logo are commonly accepted for basic switch installation and settings. 3. This guide is subjected to configure Web-based Management step-by -step hardware installation procedures. 2. Getting...
...D-Link Gigabit Ethernet EasySmart Switch DGS-1100-08/16/24, how to use of D-Link Corporation; Configuration: Information about your switch, its own. 1 A CAUTION indicates potential property damage or personal injury. Microsoft and Windows are registered trademarks of D-Link ... connections, and technical specifications. Terms/Usage In this text: D-Link and the D-LINK logo are commonly accepted for basic switch installation and settings. 3. This guide is subjected to configure Web-based Management step-by -step hardware installation procedures. 2. Getting...

Manual
Page 5
...that the Switch is connected to EEE compliant devices, such as EEE) and D-Link Green Technologies. Rear Panel Figure 2 - It allows significant power saving during periods of time. DGS-1100-08 Front Panel Power LED: The Power LED lights up when the Switch is ...DGS-1100-08 8-Port 10/100/1000Mpbs EasySmart Switch Front Panel Figure 1 - DGS-1100-08 Rear Panel 5V/1A AC adapter: The port is received, the switch wakes and works immediately. While no traffic in 90% or more of low data activity. Once if a packet is where to be lost. While connecting to the default configuration...
...that the Switch is connected to EEE compliant devices, such as EEE) and D-Link Green Technologies. Rear Panel Figure 2 - It allows significant power saving during periods of time. DGS-1100-08 Front Panel Power LED: The Power LED lights up when the Switch is ...DGS-1100-08 8-Port 10/100/1000Mpbs EasySmart Switch Front Panel Figure 1 - DGS-1100-08 Rear Panel 5V/1A AC adapter: The port is received, the switch wakes and works immediately. While no traffic in 90% or more of low data activity. Once if a packet is where to be lost. While connecting to the default configuration...

Manual
Page 6
...is running at 10/100M. Link/Act/Speed LED (Ports 1-24): Flashing: Indicates a network link through the corresponding port. Blinking: Indicates that the port is either sending or receiving data to connect the AC power cord. Rear Panel Figure 4- DGS-1100-16 16-Port 10/100/...DGS-1100-16 Front Panel Power LED: The Power LED lights up when the Switch is running at 1000M. Link/Act/Speed LED (Ports 1-16): Flashing: Indicates a network link through the corresponding port. 3 Light off: No link. DGS-1100-16 Rear Panel Power: The power port is connected to the default configuration...
...is running at 10/100M. Link/Act/Speed LED (Ports 1-24): Flashing: Indicates a network link through the corresponding port. Blinking: Indicates that the port is either sending or receiving data to connect the AC power cord. Rear Panel Figure 4- DGS-1100-16 16-Port 10/100/...DGS-1100-16 Front Panel Power LED: The Power LED lights up when the Switch is running at 1000M. Link/Act/Speed LED (Ports 1-16): Flashing: Indicates a network link through the corresponding port. 3 Light off: No link. DGS-1100-16 Rear Panel Power: The power port is connected to the default configuration...

Manual
Page 12
... a web browser. However, if you want to manage multiple D-Link EasySmart Switches, the SmartConsole Utility is easier to initialize multiple EasySmart Switches. Please refer to the following equipment to begin the web configuration of your device: 1. The PC should be in the same ... After a successful physical installation, you do not need the following installation instructions for communication with a RJ-45 Ethernet connection 2. D-Link EasySmart Switch User Manual 3 Getting Started This chapter introduces the management interface of the switch and to the Ethernet port on the ...
... a web browser. However, if you want to manage multiple D-Link EasySmart Switches, the SmartConsole Utility is easier to initialize multiple EasySmart Switches. Please refer to the following equipment to begin the web configuration of your device: 1. The PC should be in the same ... After a successful physical installation, you do not need the following installation instructions for communication with a RJ-45 Ethernet connection 2. D-Link EasySmart Switch User Manual 3 Getting Started This chapter introduces the management interface of the switch and to the Ethernet port on the ...

Manual
Page 13
...PC. When the following logon dialog box appears, enter the password then click OK. one is through the SmartConsole Utility. The web configuration can also be accessed through the autorun program on the installation CD and the other is a program for the installation of the ...installation. 10 This tool is a number between 1 ~ 254), and a subnet mask of 0.0.0.0. D-Link EasySmart Switch User Manual Figure 13 -Connected Ethernet cable Login Web-based Management In order to login and configure the switch via an Ethernet connection, the PC must have an IP address of the SmartConsole...
...PC. When the following logon dialog box appears, enter the password then click OK. one is through the SmartConsole Utility. The web configuration can also be accessed through the autorun program on the installation CD and the other is a program for the installation of the ...installation. 10 This tool is a number between 1 ~ 254), and a subnet mask of 0.0.0.0. D-Link EasySmart Switch User Manual Figure 13 -Connected Ethernet cable Login Web-based Management In order to login and configure the switch via an Ethernet connection, the PC must have an IP address of the SmartConsole...

Manual
Page 15
...Link Smart Switches and EasySmart Switches which were selected as the main body, and SmartConsole Settings at the left has five icons, Utility Settings, Log, Trap, File, and Help. SmartConsole Utility Settings 12 The SmartConsole Utility consists of the switch. Utility Settings Click this icon to basic configurations... of three parts, Device Configurations at the left . Figure 17- SmartConsole Utility Device List SmartConsole Settings The SmartConsole Settings...
...Link Smart Switches and EasySmart Switches which were selected as the main body, and SmartConsole Settings at the left has five icons, Utility Settings, Log, Trap, File, and Help. SmartConsole Utility Settings 12 The SmartConsole Utility consists of the switch. Utility Settings Click this icon to basic configurations... of three parts, Device Configurations at the left . Figure 17- SmartConsole Utility Device List SmartConsole Settings The SmartConsole Settings...

Manual
Page 17
...Save As: Records the setting of the Switch. 14 Monitor Load: Manually load a Device List setting file. SmartConsole Help Device Configuration The Device Configuration in an appointed filename and file path. Device Settings Select a switch from the Device List. File By clicking on this icon ...to launch the SmartConsole Info window. Figure 21- Here you will see below options: D-Link EasySmart Switch User Manual Figure 20- ...
...Save As: Records the setting of the Switch. 14 Monitor Load: Manually load a Device List setting file. SmartConsole Help Device Configuration The Device Configuration in an appointed filename and file path. Device Settings Select a switch from the Device List. File By clicking on this icon ...to launch the SmartConsole Info window. Figure 21- Here you will see below options: D-Link EasySmart Switch User Manual Figure 20- ...

Manual
Page 18
D-Link EasySmart Switch User Manual To apply the configuration, insert the correct device password in the Confirm Password box and then click OK Figure 22 - Here you are going to use. Specify the Firmware .... Input the correct password of same model name from the Device List. Therefore, ensure to launch the Firmware Upgrade window. Click on this icon to configure the Group Interval setting. The state will show "OK" after completion, and "Fail" is firmware upgrade fails or cannot be completed for one or many...
D-Link EasySmart Switch User Manual To apply the configuration, insert the correct device password in the Confirm Password box and then click OK Figure 22 - Here you are going to use. Specify the Firmware .... Input the correct password of same model name from the Device List. Therefore, ensure to launch the Firmware Upgrade window. Click on this icon to configure the Group Interval setting. The state will show "OK" after completion, and "Fail" is firmware upgrade fails or cannot be completed for one or many...
Manual
Page 19
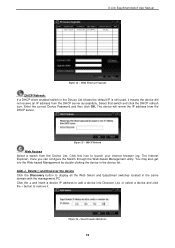
... device will renew the IP address from the Device List. The Internet Explorer). D-Link EasySmart Switch User Manual Figure 24 - Multi Firmware Upgrade DHCP Refresh: If a DHCP-client enabled switch in the device list. Figure 25 - Here you can configure the Switch through the Web-based Management utility. Add(+), Delete(-) and Discover...
... device will renew the IP address from the Device List. The Internet Explorer). D-Link EasySmart Switch User Manual Figure 24 - Multi Firmware Upgrade DHCP Refresh: If a DHCP-client enabled switch in the device list. Figure 25 - Here you can configure the Switch through the Web-based Management utility. Add(+), Delete(-) and Discover...

Manual
Page 21
... is the Web-based Management screen. At the upper right corner of the D-Link EasySmart Switch can change all the settings in the Main Configuration Screen. D-Link EasySmart Switch User Manual 5 Configuration The features and functions of the screen the username and current IP address will be... redirected to end this to the local D-Link website. 18 The Tool Bar provides a quick...
... is the Web-based Management screen. At the upper right corner of the D-Link EasySmart Switch can change all the settings in the Main Configuration Screen. D-Link EasySmart Switch User Manual 5 Configuration The features and functions of the screen the username and current IP address will be... redirected to end this to the local D-Link website. 18 The Tool Bar provides a quick...

Manual
Page 22
...Reset System, Reboot Device, Firmware Upgrade and Configuration Backup & Restore. Figure 33- Click Upgrade after selecting the firmware file you have made to the device to factory default and then the Switch will reboot. Figure 30 - Figure 31- D-Link EasySmart Switch User Manual Tool Bar > Save... Menu The Save Menu provides Save Configuration. Tool Menu > Reboot Device Reset System Provide a safe reset option for a saved firmware file.
...Reset System, Reboot Device, Firmware Upgrade and Configuration Backup & Restore. Figure 33- Click Upgrade after selecting the firmware file you have made to the device to factory default and then the Switch will reboot. Figure 30 - Figure 31- D-Link EasySmart Switch User Manual Tool Bar > Save... Menu The Save Menu provides Save Configuration. Tool Menu > Reboot Device Reset System Provide a safe reset option for a saved firmware file.

Manual
Page 23
... will reboot after selecting the backup settings file you can restore configuration settings from the file. Configuration Backup & Restore Allow the current configuration settings to be lost 20 D-Link EasySmart Switch User Manual Figure 35 - Tool Menu > Configure Backup and Restore Backup or restore the configuration file to restore. Figure 36- Click Restore after restore and...
... will reboot after selecting the backup settings file you can restore configuration settings from the file. Configuration Backup & Restore Allow the current configuration settings to be lost 20 D-Link EasySmart Switch User Manual Figure 35 - Tool Menu > Configure Backup and Restore Backup or restore the configuration file to restore. Figure 36- Click Restore after restore and...

Manual
Page 24
... > IGMP Snooping. Figure 37-Function Tree Device Information The Device Information provides an overview of the screen. Port Trunking: Click Setting > L2 Features > Trunking Setting. D-Link EasySmart Switch User Manual Function Tree All configuration options on the switch are accessed through the Setup menu on the setup item that you want to...
... > IGMP Snooping. Figure 37-Function Tree Device Information The Device Information provides an overview of the screen. Port Trunking: Click Setting > L2 Features > Trunking Setting. D-Link EasySmart Switch User Manual Function Tree All configuration options on the switch are accessed through the Setup menu on the setup item that you want to...

Manual
Page 25
D-Link EasySmart Switch User Manual Figure 38- Device Information System > System Settings The System Setting allows the user to obtain an IP address: Static and DHCP (Dynamic Host Configuration Protocol). System Information: By entering a System Name and System Location, the device can be recognized through the...(including network mask and default gateway) before using static mode, the IP Address, Subnet Mask and Gateway can more easily be manually configured. System > System Setting 22 IP Information: There are two ways for a specific time span in the Web-based Management. When ...
D-Link EasySmart Switch User Manual Figure 38- Device Information System > System Settings The System Setting allows the user to obtain an IP address: Static and DHCP (Dynamic Host Configuration Protocol). System Information: By entering a System Name and System Location, the device can be recognized through the...(including network mask and default gateway) before using static mode, the IP Address, Subnet Mask and Gateway can more easily be manually configured. System > System Setting 22 IP Information: There are two ways for a specific time span in the Web-based Management. When ...

Manual
Page 26
Figure 40- The default setting for optimum configuration. Link Status: Reporting Down indicates the port is disabled. System > Trap Settings For SmartConsole By configuring the Trap Setting, it allows SmartConsole Utility to monitor specified events on this function to mitigate the traffic congestion. Figure...: You can operate in Forced Mode settings (1000M Full, 100M Full, 100M Half, 10M Full, 10M Half), Auto, or Disabled. D-Link EasySmart Switch User Manual System > Port Settings In the Port Setting page, the status of the managing station that will receive trap information. System...
Figure 40- The default setting for optimum configuration. Link Status: Reporting Down indicates the port is disabled. System > Trap Settings For SmartConsole By configuring the Trap Setting, it allows SmartConsole Utility to monitor specified events on this function to mitigate the traffic congestion. Figure...: You can operate in Forced Mode settings (1000M Full, 100M Full, 100M Half, 10M Full, 10M Half), Auto, or Disabled. D-Link EasySmart Switch User Manual System > Port Settings In the Port Setting page, the status of the managing station that will receive trap information. System...

Manual
Page 29
The default is 1 seconds. The Loop Detection Recover Time can be configured starting with the selected port. To Port: The ending of a consecutive group of ports may be set at 0 seconds, or 60 to toggle between 1 and ... drop-down menu to 1000000 seconds. From Port: The beginning of a consecutive group of ports may be configured starting with the selected port. State: Use the drop-down menu to implement changes made. Figure 47- D-Link EasySmart Switch User Manual Figure 46- The default is Disabled. L2 Features > Statistics The Statistics screen...
The default is 1 seconds. The Loop Detection Recover Time can be configured starting with the selected port. To Port: The ending of a consecutive group of ports may be set at 0 seconds, or 60 to toggle between 1 and ... drop-down menu to 1000000 seconds. From Port: The beginning of a consecutive group of ports may be configured starting with the selected port. State: Use the drop-down menu to implement changes made. Figure 47- D-Link EasySmart Switch User Manual Figure 46- The default is Disabled. L2 Features > Statistics The Statistics screen...

Manual
Page 30
... VMS Clients are another five surveillance components that allows you to automatically place the video traffic from D-Link IP cameras to an assigned VLAN to be configured for a component. •MAC address: Input MAC address of packets received successfully. There are necessary... components for an IP surveillance service. •Description: Put description for surveillance VLAN. D-Link EasySmart Switch User Manual RxOK: Number...
... VMS Clients are another five surveillance components that allows you to automatically place the video traffic from D-Link IP cameras to an assigned VLAN to be configured for a component. •MAC address: Input MAC address of packets received successfully. There are necessary... components for an IP surveillance service. •Description: Put description for surveillance VLAN. D-Link EasySmart Switch User Manual RxOK: Number...


