Product Manual
Page 2
...In diesem Fall kann vom Benutzer verlangt werden, angemessene Massnahmen zu ergreifen. Se utilizzato in a commercial environment. D-Link DGS-1016D/DGS-1024D Unmanaged Gigabit Ethernet Switch Information in this equipment in a residential area is likely to cause harmful interference in which case the user may ...limits are designed to Part 15 of Microsoft Corporation. Precaución! All rights reserved. In a domestic environment, this text: D-Link and the D-LINK logo are registered trademarks of the FCC Rules. Dies ist ein Produkt der Klasse A. En un entorno doméstico, puede...
...In diesem Fall kann vom Benutzer verlangt werden, angemessene Massnahmen zu ergreifen. Se utilizzato in a commercial environment. D-Link DGS-1016D/DGS-1024D Unmanaged Gigabit Ethernet Switch Information in this equipment in a residential area is likely to cause harmful interference in which case the user may ...limits are designed to Part 15 of Microsoft Corporation. Precaución! All rights reserved. In a domestic environment, this text: D-Link and the D-LINK logo are registered trademarks of the FCC Rules. Dies ist ein Produkt der Klasse A. En un entorno doméstico, puede...
Product Manual
Page 3
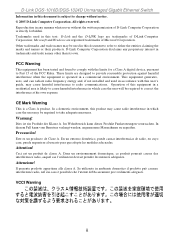
...SAFETY INSTRUCTIONS V Safety Cautions v General Precautions for Rack-Mountable Products vii Protecting Against Electrostatic Discharge ix INTRODUCTION 10 SWITCH DESCRIPTIO N 10 Switch Features 11 Gigabit Ethernet Technology 12 802.1P and QoS 12 FRONT-PANEL COMPONENTS 15 LED Indicators 15 Cable Diagnostic...Rubber Feet 22 Provide for Adequate Ventilation 22 POWER ON...23 Power Failure 23 CONNECTING THE SWITCH 24 Switch to End Node 25 Switch to Hub or Switch 26 Connecting to Network Backbone or Server 27 TECHNICAL SPECIFICATIONS 28 GLOSSARY 31 USA WARRANTY ...
...SAFETY INSTRUCTIONS V Safety Cautions v General Precautions for Rack-Mountable Products vii Protecting Against Electrostatic Discharge ix INTRODUCTION 10 SWITCH DESCRIPTIO N 10 Switch Features 11 Gigabit Ethernet Technology 12 802.1P and QoS 12 FRONT-PANEL COMPONENTS 15 LED Indicators 15 Cable Diagnostic...Rubber Feet 22 Provide for Adequate Ventilation 22 POWER ON...23 Power Failure 23 CONNECTING THE SWITCH 24 Switch to End Node 25 Switch to Hub or Switch 26 Connecting to Network Backbone or Server 27 TECHNICAL SPECIFICATIONS 28 GLOSSARY 31 USA WARRANTY ...

Product Manual
Page 4
... injury or death. Section 1. NOTICE: A NOTICE indicates either potential damage to hardware or loss of data and tells you make better use of the DGS1016D/DGS-1024D. . iv D-Link DGS-1016D/DGS-1024D Unmanaged Gigabit Ethernet Switch Preface The DGS-1016D/DGS-1024D Manual is divided into sections that helps you how to avoid the problem.
... injury or death. Section 1. NOTICE: A NOTICE indicates either potential damage to hardware or loss of data and tells you make better use of the DGS1016D/DGS-1024D. . iv D-Link DGS-1016D/DGS-1024D Unmanaged Gigabit Ethernet Switch Preface The DGS-1016D/DGS-1024D Manual is divided into sections that helps you how to avoid the problem.

Product Manual
Page 5
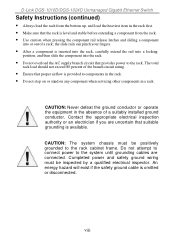
... part or contact your trained service provider: - Only a trained service technician should service components inside these compartments. If any objects into the product. - D-Link DGS-1016D/DGS-1024D Unmanaged Gigabit Ethernet Switch Safety Instructions Use the following safety guidelines to ensure your own personal safety and to help protect your system from radiators and heat...
... part or contact your trained service provider: - Only a trained service technician should service components inside these compartments. If any objects into the product. - D-Link DGS-1016D/DGS-1024D Unmanaged Gigabit Ethernet Switch Safety Instructions Use the following safety guidelines to ensure your own personal safety and to help protect your system from radiators and heat...

Product Manual
Page 6
... supply before removing the power supply. - Make sure that is set to the power supply. - D-Link DGS-1016D/DGS-1024D Unmanaged Gigabit Ethernet Switch Safety Instructions (continued) • To help avoid damaging your system, be sure the voltage selection Switch (if provided) on the power supply is approved for use in your country. Do not use...
... supply before removing the power supply. - Make sure that is set to the power supply. - D-Link DGS-1016D/DGS-1024D Unmanaged Gigabit Ethernet Switch Safety Instructions (continued) • To help avoid damaging your system, be sure the voltage selection Switch (if provided) on the power supply is approved for use in your country. Do not use...

Product Manual
Page 7
... , potentially resulting in the rack. Also refer to the rack installation documentation accompanying the system and the rack for rack stability and safety. D-Link DGS-1016D/DGS-1024D Unmanaged Gigabit Ethernet Switch General Precautions for RackMountable Products • Observe the following precautions for specific caution statements and procedures. • Systems are secured to the rack...
... , potentially resulting in the rack. Also refer to the rack installation documentation accompanying the system and the rack for rack stability and safety. D-Link DGS-1016D/DGS-1024D Unmanaged Gigabit Ethernet Switch General Precautions for RackMountable Products • Observe the following precautions for specific caution statements and procedures. • Systems are secured to the rack...
Product Manual
Page 8
... appropriate electrical inspection authority or an electrician if you are connected. An energy hazard will exist if the safety ground cable is available. D-Link DGS-1016D/DGS-1024D Unmanaged Gigabit Ethernet Switch Safety Instructions (continued) • Always load the rack from the rack. • Use caution when pressing the component rail release latches and sliding...
... appropriate electrical inspection authority or an electrician if you are connected. An energy hazard will exist if the safety ground cable is available. D-Link DGS-1016D/DGS-1024D Unmanaged Gigabit Ethernet Switch Safety Instructions (continued) • Always load the rack from the rack. • Use caution when pressing the component rail release latches and sliding...
Product Manual
Page 9
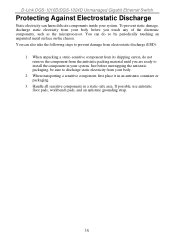
... material until you touch any of the electronic components, such as the microprocessor. You can do not remove the component from your system. D-Link DGS-1016D/DGS-1024D Unmanaged Gigabit Ethernet Switch Protecting Against Electrostatic Discharge Static electricity can harm delicate components inside your body before unwrapping the antistatic packaging, be sure to discharge static...
... material until you touch any of the electronic components, such as the microprocessor. You can do not remove the component from your system. D-Link DGS-1016D/DGS-1024D Unmanaged Gigabit Ethernet Switch Protecting Against Electrostatic Discharge Static electricity can harm delicate components inside your body before unwrapping the antistatic packaging, be sure to discharge static...

Product Manual
Page 10
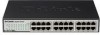
...ports will automatically detect the speed, duplex and MDI/MDIX status of the device it is no network management required. The Switch ports can be used to , and adjust these settings accordingly. For best performance, use Category 5 or better Ethernet cabling...computers, printers, servers, routers, other switches or any device equipped with an Ethernet port. SECTION 1 Introduction Switch Description Switch Features Ports Front-Panel Components LED Indicators Power Input on Rear Panel Switch Description The 16-port DGS-1016D and 24-port DGS-1024D Switches provide dedicated 10, 100 or 1000 ...
...ports will automatically detect the speed, duplex and MDI/MDIX status of the device it is no network management required. The Switch ports can be used to , and adjust these settings accordingly. For best performance, use Category 5 or better Ethernet cabling...computers, printers, servers, routers, other switches or any device equipped with an Ethernet port. SECTION 1 Introduction Switch Description Switch Features Ports Front-Panel Components LED Indicators Power Input on Rear Panel Switch Description The 16-port DGS-1016D and 24-port DGS-1024D Switches provide dedicated 10, 100 or 1000 ...

Product Manual
Page 11
... Full-duplex transfer mode for 1000Mbps • Full wire speed reception and transmission • Store-and-Forward Switching method • Supports 8K absolute MAC addresses • DGS-1016D Supports 340KB RAM for data buffering • DGS-1024D Supports 500KB RAM for data buffering • Easy to read diagnostic LEDs • IEEE 802.3x flow...
... Full-duplex transfer mode for 1000Mbps • Full wire speed reception and transmission • Store-and-Forward Switching method • Supports 8K absolute MAC addresses • DGS-1016D Supports 340KB RAM for data buffering • DGS-1024D Supports 500KB RAM for data buffering • Easy to read diagnostic LEDs • IEEE 802.3x flow...

Product Manual
Page 12
... network bottlenecks that frequently develop as computers and their bus speeds get faster and more users use applications that generate more traffic. The Switch has separate hardware queues on every physical port to Gigabit Ethernet can be limited, so bandwidth can greatly improve network response times as...Gigabit Ethernet is essential to perform 10 times the number of operations in the same amount of time. 802.1P and QoS The DGS-1024D and DGS-1016D Switches support 802.1p priority queuing Quality of Service. The implementation of QoS (Quality of Service) and benefits of using 802.1p ...
... network bottlenecks that frequently develop as computers and their bus speeds get faster and more users use applications that generate more traffic. The Switch has separate hardware queues on every physical port to Gigabit Ethernet can be limited, so bandwidth can greatly improve network response times as...Gigabit Ethernet is essential to perform 10 times the number of operations in the same amount of time. 802.1P and QoS The DGS-1024D and DGS-1016D Switches support 802.1p priority queuing Quality of Service. The implementation of QoS (Quality of Service) and benefits of using 802.1p ...

Product Manual
Page 13
... they will follow the priority 0 to 0, the lowest queue. The eight priority tags, specified in the Switch. The eight IEEE 802.1P priority levels defined by the standard are mapped to the Switch's priority tags as 3, the high queue to work (i.e. Then the user may forward these tagged packets to the ...four class queues used in IEEE 802.1p are mapped to designated queues on the Switch The picture above shows the default priority setting for 802.1p QoS. In order to implement QoS, the user is implemented on the...
... they will follow the priority 0 to 0, the lowest queue. The eight priority tags, specified in the Switch. The eight IEEE 802.1P priority levels defined by the standard are mapped to the Switch's priority tags as 3, the high queue to work (i.e. Then the user may forward these tagged packets to the ...four class queues used in IEEE 802.1p are mapped to designated queues on the Switch The picture above shows the default priority setting for 802.1p QoS. In order to implement QoS, the user is implemented on the...

Product Manual
Page 14
• Priority 7 is assigned to the Switch's Q3 queue. Strict priority-based scheduling, any packets residing in the higher priority queues are transmitted first. 14 The Switch uses strict priority for Scheduling.
• Priority 7 is assigned to the Switch's Q3 queue. Strict priority-based scheduling, any packets residing in the higher priority queues are transmitted first. 14 The Switch uses strict priority for Scheduling.
Product Manual
Page 15
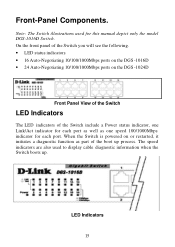
... 100/1000Mbps indicator for each port as well as part of the Switch include a Power status indicator, one Link/Act indicator for this manual depict only the model DGS-1016D Switch. When the Switch is powered on the DGS -1024D Front Panel View of the Switch LED Indicators The LED indicators of the boot up . Front-Panel Components...
... 100/1000Mbps indicator for each port as well as part of the Switch include a Power status indicator, one Link/Act indicator for this manual depict only the model DGS-1016D Switch. When the Switch is powered on the DGS -1024D Front Panel View of the Switch LED Indicators The LED indicators of the boot up . Front-Panel Components...

Product Manual
Page 16
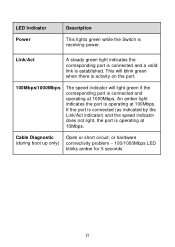
...• Short circuit - During the diagnostic process the speed LED for running 1000Mbps. This port scan takes about 2 seconds for the Switch to determine is the problem is detected, the corresponding port's speed LED will light amber for less specific troubleshooting. NOTE: the cable diagnostic...100 meters (or 300 feet). 16 The faults detected by the cable diagnostic for normal operation. Cable Diagnostic. Upon booting up the Switch, a Cable Diagnostic is then reset for 1000Mbps operation are connected to ensure its capability for each end of a cable to 1000Mbps ...
...• Short circuit - During the diagnostic process the speed LED for running 1000Mbps. This port scan takes about 2 seconds for the Switch to determine is the problem is detected, the corresponding port's speed LED will light amber for less specific troubleshooting. NOTE: the cable diagnostic...100 meters (or 300 feet). 16 The faults detected by the cable diagnostic for normal operation. Cable Diagnostic. Upon booting up the Switch, a Cable Diagnostic is then reset for 1000Mbps operation are connected to ensure its capability for each end of a cable to 1000Mbps ...
Product Manual
Page 17
... receiving power. If the port is connected (as indicated by the Link/Act indicator) and the speed indicator does not light, the port is operating at 1000Mbps. LED Indicator Power Description This lights green while the Switch is established. This will blink green when there is activity on the port. 100Mbps/1000Mbps...
... receiving power. If the port is connected (as indicated by the Link/Act indicator) and the speed indicator does not light, the port is operating at 1000Mbps. LED Indicator Power Description This lights green while the Switch is established. This will blink green when there is activity on the port. 100Mbps/1000Mbps...

Product Manual
Page 18
The AC power connector is located on the rear panel of the Switch Switch power input is provided by and internal universal power supply (100-240VAC : 12V/3.3A). The power cable connection is a standard three-pronged connector that supports the power cord. Rear panel view of the Switch. Power Input on how to properly connect the Switch to a power source. 18 Please see the Power On section below for instructions on Rear Panel.
The AC power connector is located on the rear panel of the Switch Switch power input is provided by and internal universal power supply (100-240VAC : 12V/3.3A). The power cable connection is a standard three-pronged connector that supports the power cord. Rear panel view of the Switch. Power Input on how to properly connect the Switch to a power source. 18 Please see the Power On section below for instructions on Rear Panel.
Product Manual
Page 19
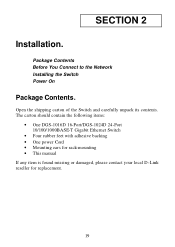
SECTION 2 Installation. Package Contents Before You Connect to the Network Installing the Switch Power On Package Contents. The carton should contain the following items: • One DGS-1016D 16-Port/DGS-1024D 24-Port 10/100/1000BASE-T Gigabit Ethernet Switch • Four rubber feet with adhesive backing • One power Cord • Mounting ears for rack-mounting • This manual If any item is found missing or damaged, please contact your local D-Link reseller for replacement. 19 Open the shipping carton of the Switch and carefully unpack its contents.
SECTION 2 Installation. Package Contents Before You Connect to the Network Installing the Switch Power On Package Contents. The carton should contain the following items: • One DGS-1016D 16-Port/DGS-1024D 24-Port 10/100/1000BASE-T Gigabit Ethernet Switch • Four rubber feet with adhesive backing • One power Cord • Mounting ears for rack-mounting • This manual If any item is found missing or damaged, please contact your local D-Link reseller for replacement. 19 Open the shipping carton of the Switch and carefully unpack its contents.

Product Manual
Page 20
... performance. Leave at least 10 cm (4 inches) of space at least 3 kg (6.6 lbs) of the device. The rubber feet cushion the Switch, protect the casing from scratches and prevent it is fully secured to the Network. Do not place heavy objects on a sturdy, level surface that... site free from scratching other surfaces. 20 Please follow these guidelines for setting up the Switch. • Install the Switch on the Switch. • The power outlet should be within 1.82 meters (6 feet) of the Switch. • Visually inspect the power cord and see that it from strong electromagnetic field ...
... performance. Leave at least 10 cm (4 inches) of space at least 3 kg (6.6 lbs) of the device. The rubber feet cushion the Switch, protect the casing from scratches and prevent it is fully secured to the Network. Do not place heavy objects on a sturdy, level surface that... site free from scratching other surfaces. 20 Please follow these guidelines for setting up the Switch. • Install the Switch on the Switch. • The power outlet should be within 1.82 meters (6 feet) of the Switch. • Visually inspect the power cord and see that it from strong electromagnetic field ...
Product Manual
Page 21
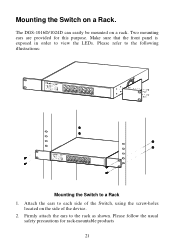
Make sure that the front panel is exposed in order to each side of the Switch, using the screw-holes located on the side of the device. 2. Please follow the usual safety precautions for this purpose. Attach the ears to view the LEDs. Mounting the Switch on a rack. The DGS-1016D/1024D can easily be mounted on a Rack. Firmly attach the ears to a Rack 1. Please refer to the following illustrations: Mounting the Switch to the rack as shown. Two mounting ears are provided for rack-mountable products 21
Make sure that the front panel is exposed in order to each side of the Switch, using the screw-holes located on the side of the device. 2. Please follow the usual safety precautions for this purpose. Attach the ears to view the LEDs. Mounting the Switch on a rack. The DGS-1016D/1024D can easily be mounted on a Rack. Firmly attach the ears to a Rack 1. Please refer to the following illustrations: Mounting the Switch to the rack as shown. Two mounting ears are provided for rack-mountable products 21


