
User Manual
Page 3
... Installation 10 Concealed Cable Installation 10 Exposed Cable Installation 12 Pendant Mount (Optional 15 Bent Mount (Optional 18 Installation of Weather Shield 21 Adjusting the lens 3-axis angle 25 Software Installation 26 D-ViewCam Setup Wizard 29 Configuration 31 Using the Configuration Interface 31 Live Video 32 Setup 34 Setup Wizard 34 Network Setup 40 Dynamic DNS 43 Image Setup 44 Audio and Video 46 Lens Control 48 Preset 49 Motion Detection 51 Time and Date 52 Event Setup 53 SD Card 61 Advanced 62 Digital Input/Output...
... Installation 10 Concealed Cable Installation 10 Exposed Cable Installation 12 Pendant Mount (Optional 15 Bent Mount (Optional 18 Installation of Weather Shield 21 Adjusting the lens 3-axis angle 25 Software Installation 26 D-ViewCam Setup Wizard 29 Configuration 31 Using the Configuration Interface 31 Live Video 32 Setup 34 Setup Wizard 34 Network Setup 40 Dynamic DNS 43 Image Setup 44 Audio and Video 46 Lens Control 48 Preset 49 Motion Detection 51 Time and Date 52 Event Setup 53 SD Card 61 Advanced 62 Digital Input/Output...

User Manual
Page 4
Section 1: Product Overview Product Overview Package Contents DCS‑6513 Full HD WDR Day & Night Outdoor Dome Network Camera Weather Shield Power adapter 37mm Screws for this product. Note: Using a power supply with a different voltage than the one included with User Manual and software Cable Cover Extension Adapter Rubber Plug Security Wrench Quick Installation Guide If any of the above items are missing, please contact your product will cause damage and void the warranty for Weather Shield CD-ROM with your reseller. D-Link DCS-6513 User Manual 4
Section 1: Product Overview Product Overview Package Contents DCS‑6513 Full HD WDR Day & Night Outdoor Dome Network Camera Weather Shield Power adapter 37mm Screws for this product. Note: Using a power supply with a different voltage than the one included with User Manual and software Cable Cover Extension Adapter Rubber Plug Security Wrench Quick Installation Guide If any of the above items are missing, please contact your product will cause damage and void the warranty for Weather Shield CD-ROM with your reseller. D-Link DCS-6513 User Manual 4

User Manual
Page 5
... DCS‑6513 Full HD WDR Day & Night Outdoor Dome Network Camera is a professional, vandal-resistant surveillance and security solution for supplemental power cabling. The built-in superior image clarity, depth of IP67 housing, IR-Cut Filter, IR LEDs and PoE make the DCS-6513 an ideal solution for CD-ROM Setup Wizard), Mac OS or Linux • PC with an easy, clutter-free installation. System Requirements • Computer with Microsoft Windows 8, Windows...
... DCS‑6513 Full HD WDR Day & Night Outdoor Dome Network Camera is a professional, vandal-resistant surveillance and security solution for supplemental power cabling. The built-in superior image clarity, depth of IP67 housing, IR-Cut Filter, IR LEDs and PoE make the DCS-6513 an ideal solution for CD-ROM Setup Wizard), Mac OS or Linux • PC with an easy, clutter-free installation. System Requirements • Computer with Microsoft Windows 8, Windows...

User Manual
Page 6
... adds enhanced features and functionality for Day and Night Functionality The built-in infrared LEDs enables night time viewing of up to configure and access the Network Camera from any computer. PoE (Power over Ethernet) for Flexible Installation The DCS‑6513 can draw all lighting conditions, resulting in extreme conditions. The remote zoom functionality allows the user to provide round-the-clock surveillance in heater based on one screen, and taking snapshots. D-Link DCS-6513 User Manual...
... adds enhanced features and functionality for Day and Night Functionality The built-in infrared LEDs enables night time viewing of up to configure and access the Network Camera from any computer. PoE (Power over Ethernet) for Flexible Installation The DCS‑6513 can draw all lighting conditions, resulting in extreme conditions. The remote zoom functionality allows the user to provide round-the-clock surveillance in heater based on one screen, and taking snapshots. D-Link DCS-6513 User Manual...

User Manual
Page 8
... Overview Cable Harness 43 7 6 5 21 1 BNC Connector The BNC connector is recommended for use with handheld monitors to check the Field of View during installation. 2 Power Connector Power connector for the provided 12V DC power adapter. 3 Audio In (A.In) Connects to a microphone. 4 Audio Out (A.Out) Connects to a speaker. 5 DI/DO Connector I/O connectors for external devices. 12V DC output. 6 Reset Button Press and hold the recessed button for 10 seconds to reset the camera. 7 24 V Power Connector Connects to 24 V AC power supply. D-Link DCS-6513 User Manual 8
... Overview Cable Harness 43 7 6 5 21 1 BNC Connector The BNC connector is recommended for use with handheld monitors to check the Field of View during installation. 2 Power Connector Power connector for the provided 12V DC power adapter. 3 Audio In (A.In) Connects to a microphone. 4 Audio Out (A.Out) Connects to a speaker. 5 DI/DO Connector I/O connectors for external devices. 12V DC output. 6 Reset Button Press and hold the recessed button for 10 seconds to reset the camera. 7 24 V Power Connector Connects to 24 V AC power supply. D-Link DCS-6513 User Manual 8

User Manual
Page 10
... a suitable position on the ceiling for installation. 5. Attach the surface bracket to the corresponding cable connectors. 3. Section 2: Assembly and Installation Assembly and Installation Standard Mounting Instructions Concealed Cable Installation ƒƒ Height: 23 mm (0.9 inches) ƒƒ Diameter: 183 mm (7.2 inches) ƒƒ Weight: 400 g (0.9 lbs) 1. Thread the cables through the waterproof plugs at the bottom of the base of the camera. Cut an access hole...
... a suitable position on the ceiling for installation. 5. Attach the surface bracket to the corresponding cable connectors. 3. Section 2: Assembly and Installation Assembly and Installation Standard Mounting Instructions Concealed Cable Installation ƒƒ Height: 23 mm (0.9 inches) ƒƒ Diameter: 183 mm (7.2 inches) ƒƒ Weight: 400 g (0.9 lbs) 1. Thread the cables through the waterproof plugs at the bottom of the base of the camera. Cut an access hole...

User Manual
Page 11
Push the dome body up over the base of the camera using the three long screws and the provided security screw. Attach the dome to the base of the camera. 3. D-Link DCS-6513 User Manual 11 Section 2: Assembly and Installation 1. Connect the Ethernet cable and the power cable, threading them through the hole in the ceiling. 2.
Push the dome body up over the base of the camera using the three long screws and the provided security screw. Attach the dome to the base of the camera. 3. D-Link DCS-6513 User Manual 11 Section 2: Assembly and Installation 1. Connect the Ethernet cable and the power cable, threading them through the hole in the ceiling. 2.

User Manual
Page 21
... the dome of the camera Step 3: Install the 37mm screws into the existing screw holes so that you install the weather shield. To install the weather shield, you will be installed before you are installing the DCS-6513 in a location where it is recommended that they hold the weather shield in place Install 37mm Screws Weather Shield Remove Existing Screws D-Link DCS-6513 User Manual...
... the dome of the camera Step 3: Install the 37mm screws into the existing screw holes so that you install the weather shield. To install the weather shield, you will be installed before you are installing the DCS-6513 in a location where it is recommended that they hold the weather shield in place Install 37mm Screws Weather Shield Remove Existing Screws D-Link DCS-6513 User Manual...

User Manual
Page 23
Connect the supplied power cable from the camera to a hub via an Ethernet cable. 2. Section 2: Assembly and Installation General Connection Using 24 V AC Power Wiring 1. D-Link DCS-6513 User Manual 23 Connect the network camera to a power source.
Connect the supplied power cable from the camera to a hub via an Ethernet cable. 2. Section 2: Assembly and Installation General Connection Using 24 V AC Power Wiring 1. D-Link DCS-6513 User Manual 23 Connect the network camera to a power source.
User Manual
Page 29
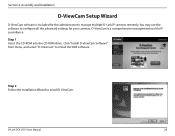
D-ViewCam is included for the administrator to install D-ViewCam. D-Link DCS-6513 User Manual 29 Step 1 Insert the CD-ROM into the CD-ROM drive. You may use the software to install the VMS software. Click "Install D-ViewCam Software" from menu, and select "D-ViewCam" to configure all the advanced settings for your cameras. Section 2: Assembly and Installation D-ViewCam Setup Wizard D-ViewCam software is a comprehensive management tool for IP surveillance. Step 2 Follow the Installation Wizard to manage multiple D-Link IP cameras remotely.
D-ViewCam is included for the administrator to install D-ViewCam. D-Link DCS-6513 User Manual 29 Step 1 Insert the CD-ROM into the CD-ROM drive. You may use the software to install the VMS software. Click "Install D-ViewCam Software" from menu, and select "D-ViewCam" to configure all the advanced settings for your cameras. Section 2: Assembly and Installation D-ViewCam Setup Wizard D-ViewCam software is a comprehensive management tool for IP surveillance. Step 2 Follow the Installation Wizard to manage multiple D-Link IP cameras remotely.
User Manual
Page 31
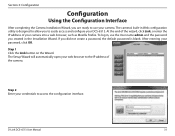
... easily access and configure your DCS‑6513. To log in, use the User name admin and the password you to use your web browser to access the configuration interface. 2 D-Link DCS-6513 User Manual 31 Step 1 Click the Link button on the Wizard. The camera's built-in the Installation Wizard. After entering your camera into a web browser, such as Mozilla Firefox. The Setup Wizard will automatically open your camera. If you did not create a password, the default password is...
... easily access and configure your DCS‑6513. To log in, use the User name admin and the password you to use your web browser to access the configuration interface. 2 D-Link DCS-6513 User Manual 31 Step 1 Click the Link button on the Wizard. The camera's built-in the Installation Wizard. After entering your camera into a web browser, such as Mozilla Firefox. The Setup Wizard will automatically open your camera. If you did not create a password, the default password is...

User Manual
Page 32
... camera's motion along the predefined path ePTZ Speed: You may select any of the screen. D-Link DCS-6513 User Manual 32 Right-click to zoom out or left side of the available icons listed below to operate the camera. If no SD card has been inserted, this indicator will change color when a trigger event occurs. You can be enabled. Section 3: Configuration Live Video This section shows your camera's live video image using the drop-down menu...
... camera's motion along the predefined path ePTZ Speed: You may select any of the screen. D-Link DCS-6513 User Manual 32 Right-click to zoom out or left side of the available icons listed below to operate the camera. If no SD card has been inserted, this indicator will change color when a trigger event occurs. You can be enabled. Section 3: Configuration Live Video This section shows your camera's live video image using the drop-down menu...

User Manual
Page 34
D-Link DCS-6513 User Manual 34 Section 3: Configuration Setup Setup Wizard To configure your Network Camera's motion detection settings, click Motion Detection Setup Wizard. Alternatively, you want to enter your Network Camera and skip to "Motion Detection" on page 40. If you may click Manual Internet Connection Setup to manually configure your settings without running the wizard, click Manual Motion Detection Setup and skip to "Network Setup" on page 51. To quickly configure your Network Camera, click Internet Connection Setup Wizard.
D-Link DCS-6513 User Manual 34 Section 3: Configuration Setup Setup Wizard To configure your Network Camera's motion detection settings, click Motion Detection Setup Wizard. Alternatively, you want to enter your Network Camera and skip to "Motion Detection" on page 40. If you may click Manual Internet Connection Setup to manually configure your settings without running the wizard, click Manual Motion Detection Setup and skip to "Network Setup" on page 51. To quickly configure your Network Camera, click Internet Connection Setup Wizard.
User Manual
Page 35
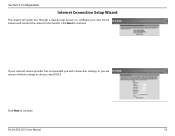
D-Link DCS-6513 User Manual 35 Click Next to continue. Click Next to continue. Section 3: Configuration Internet Connection Setup Wizard This wizard will guide you are unsure of which settings to choose, select DHCP. If your internet service provider has not provided you with connection settings, or you through a step-by-step process to configure your new D-Link Camera and connect the camera to the internet.
D-Link DCS-6513 User Manual 35 Click Next to continue. Click Next to continue. Section 3: Configuration Internet Connection Setup Wizard This wizard will guide you are unsure of which settings to choose, select DHCP. If your internet service provider has not provided you with connection settings, or you through a step-by-step process to configure your new D-Link Camera and connect the camera to the internet.
User Manual
Page 38
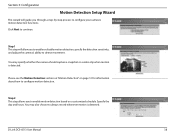
Please see the Motion Detection section on "Motion Detection" on a customized schedule. Section 3: Configuration Motion Detection Setup Wizard This wizard will allow you to always record whenever motion is detected. You may also choose to enable motion detection based on page 51 for information about how to configure your camera's motion detection functions. D-Link DCS-6513 User Manual 38 Step 2 This step allows you to enable or disable motion detection, specify the detection sensitivity, and adjust the camera's ability to continue...
Please see the Motion Detection section on "Motion Detection" on a customized schedule. Section 3: Configuration Motion Detection Setup Wizard This wizard will allow you to always record whenever motion is detected. You may also choose to enable motion detection based on page 51 for information about how to configure your camera's motion detection functions. D-Link DCS-6513 User Manual 38 Step 2 This step allows you to enable or disable motion detection, specify the detection sensitivity, and adjust the camera's ability to continue...

User Manual
Page 41
... username and password for Stream 1~3: The default name is video#.mjpg, where # is 443. HTTPS Port: You may obtain this information from your ISP. RTSP Port: The port number that you use a PC with a secure browser to connect to enable or disable RTSP digest encryption. The default port number is 80. Enable UPnP Port Forwarding: Enabling this setting allows the camera to mobile devices, such as a UPnP device on a UPnP capable network. HTTP Port: The default port number is 554. D-Link DCS-6513 User Manual...
... username and password for Stream 1~3: The default name is video#.mjpg, where # is 443. HTTPS Port: You may obtain this information from your ISP. RTSP Port: The port number that you use a PC with a secure browser to connect to enable or disable RTSP digest encryption. The default port number is 80. Enable UPnP Port Forwarding: Enabling this setting allows the camera to mobile devices, such as a UPnP device on a UPnP capable network. HTTP Port: The default port number is 554. D-Link DCS-6513 User Manual...

User Manual
Page 44
... to change white balance settings to help balance colors for your power lines to draw a mask area. Section 3: Configuration Image Setup In this section, you may wish to consider turning Mirror on as well. You may configure the video image settings for different environments. You can choose from recordings and snapshots. Power Line: Select the frequency used by your camera. Exposure Mode: Changes the exposure mode. Right clicking on the camera image brings...
... to change white balance settings to help balance colors for your power lines to draw a mask area. Section 3: Configuration Image Setup In this section, you may wish to consider turning Mirror on as well. You may configure the video image settings for different environments. You can choose from recordings and snapshots. Power Line: Select the frequency used by your camera. Exposure Mode: Changes the exposure mode. Right clicking on the camera image brings...

User Manual
Page 46
...resolution, and View window area determines the Live Video viewing window size. Lower frame rates will result in stuttering motion, however will not be used to 4:3 standard or 16:9 widescreen. In addition, you may set up different profiles for your camera. Hence, you may also configure the two-way audio settings for your computer and mobile display. After making any changes, click the Save Settings button... 176 x 144 up to 30 fps 2048 x 1536 at 15 fps Note: If your View window area is larger than the Live Video size, you can use the ePTZ function. D-Link DCS-6513 User Manual 46
...resolution, and View window area determines the Live Video viewing window size. Lower frame rates will result in stuttering motion, however will not be used to 4:3 standard or 16:9 widescreen. In addition, you may set up different profiles for your camera. Hence, you may also configure the two-way audio settings for your computer and mobile display. After making any changes, click the Save Settings button... 176 x 144 up to 30 fps 2048 x 1536 at 15 fps Note: If your View window area is larger than the Live Video size, you can use the ePTZ function. D-Link DCS-6513 User Manual 46
User Manual
Page 68
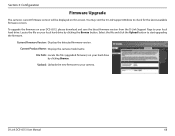
... hard drive. To upgrade the firmware on this screen. Locate the file on your hard drive by clicking the Browse button. Current Firmware Version: Displays the detected firmware version. File Path: Locate the file (upgraded firmware) on your local hard drive by clicking Browse. You may visit the D-Link Support Website to your camera. Current Product Name: Displays the camera model name. Section 3: Configuration Firmware Upgrade The camera's current firmware version will be displayed on your DCS‑6513, please download...
... hard drive. To upgrade the firmware on this screen. Locate the file on your hard drive by clicking the Browse button. Current Firmware Version: Displays the detected firmware version. File Path: Locate the file (upgraded firmware) on your local hard drive by clicking Browse. You may visit the D-Link Support Website to your camera. Current Product Name: Displays the camera model name. Section 3: Configuration Firmware Upgrade The camera's current firmware version will be displayed on your DCS‑6513, please download...

User Manual
Page 74
... ƒƒ Web Browser: Internet Explorer 7 or higher D-ViewCam™ ƒƒ Remote management/control of up to 32 cameras Software Functions ƒƒ Viewing of up to 32 cameras on one screen Weight 1.53kg (with Weather Shield) ƒƒ Supports multiple SMTP and FTP servers ƒƒ Multiple event notifications ƒƒ Multiple recording methods for easy backup ƒƒ Configuration interface accessible via web browser ƒƒ Protocol: Standard TCP...
... ƒƒ Web Browser: Internet Explorer 7 or higher D-ViewCam™ ƒƒ Remote management/control of up to 32 cameras Software Functions ƒƒ Viewing of up to 32 cameras on one screen Weight 1.53kg (with Weather Shield) ƒƒ Supports multiple SMTP and FTP servers ƒƒ Multiple event notifications ƒƒ Multiple recording methods for easy backup ƒƒ Configuration interface accessible via web browser ƒƒ Protocol: Standard TCP...

