
Product Manual
Page 1
D-Link DCS-1000/W 2.4 GHz Internet Camera and Wireless Internet Camera Manual (10/04/04) Building Networks for People
D-Link DCS-1000/W 2.4 GHz Internet Camera and Wireless Internet Camera Manual (10/04/04) Building Networks for People

Product Manual
Page 3
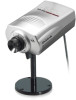
Package Contents Contents of Package: • One Internet Camera • Two External Wireless Antennas (DCS-1000W only) • One Installation CD-ROM • One AC power adapter • One Camera Stand • One Category 5 Ethernet Cable If any of the... above 3 System Requirements: Local Area Network: 10Base-T Ethernet or 100Base TX Fast Ethernet Wireless Local Area Network: IEEE 802.11b Wireless LAN (DCS-1000W only) Recommended: PC or Notebook to Access the Internet Camera Web Configuration • Java Enabled and Compliant Web Browser • CPU: Pentium II, 266...
Package Contents Contents of Package: • One Internet Camera • Two External Wireless Antennas (DCS-1000W only) • One Installation CD-ROM • One AC power adapter • One Camera Stand • One Category 5 Ethernet Cable If any of the... above 3 System Requirements: Local Area Network: 10Base-T Ethernet or 100Base TX Fast Ethernet Wireless Local Area Network: IEEE 802.11b Wireless LAN (DCS-1000W only) Recommended: PC or Notebook to Access the Internet Camera Web Configuration • Java Enabled and Compliant Web Browser • CPU: Pentium II, 266...
Product Manual
Page 4
It is different from the conventional PC Camera because the Internet Camera is a stand-alone system with a built-in CPU requiring no special hardware or software such as the current Internet Explorer 6.0 or Netscape 7.0. Features & Benefits Simple to Use The Internet Camera is a computer with a Web browser software such as PC frame grabber cards. Supports a Variety of Platforms Supporting TCP/IP networking, SMTP e-mail, HTTP and other Internet/Intranet applications because of its standards-based features. 4 The simple installation procedures and Web-based interface offers easy ...
It is different from the conventional PC Camera because the Internet Camera is a stand-alone system with a built-in CPU requiring no special hardware or software such as the current Internet Explorer 6.0 or Netscape 7.0. Features & Benefits Simple to Use The Internet Camera is a computer with a Web browser software such as PC frame grabber cards. Supports a Variety of Platforms Supporting TCP/IP networking, SMTP e-mail, HTTP and other Internet/Intranet applications because of its standards-based features. 4 The simple installation procedures and Web-based interface offers easy ...
Product Manual
Page 5
... Local Area Network. The Internet Camera provides up to External Devices Supporting auxiliary Input/Output connectors, you can also be accessed at the same time-DCS-1000W only.) • WLAN (Wireless Local Area Network Only) Web Configuration Applying a standard web browser, administrators can modify the Internet Camera settings from the slide...
... Local Area Network. The Internet Camera provides up to External Devices Supporting auxiliary Input/Output connectors, you can also be accessed at the same time-DCS-1000W only.) • WLAN (Wireless Local Area Network Only) Web Configuration Applying a standard web browser, administrators can modify the Internet Camera settings from the slide...

Product Manual
Page 6
...are reverting back to the factory settings. Release the reset button and the Power LED will be Category 5 twisted-pair cable). DC Power Connector The DC power input connector is located on channel 11 and ESS-ID is pressed once and Power LED begins to flash. Connections Antenna ...Connectors Ethernet Cable Connector Slide Switch DC Power Connector Reset Button I/O Connector Network Cable Connector The Internet Camera's rear panel features an RJ-45 connector for three seconds or ...
...are reverting back to the factory settings. Release the reset button and the Power LED will be Category 5 twisted-pair cable). DC Power Connector The DC power input connector is located on channel 11 and ESS-ID is pressed once and Power LED begins to flash. Connections Antenna ...Connectors Ethernet Cable Connector Slide Switch DC Power Connector Reset Button I/O Connector Network Cable Connector The Internet Camera's rear panel features an RJ-45 connector for three seconds or ...

Product Manual
Page 7
..., two for input and two for output situated on the camera stand into the mounting cavity of the Internet Camera. 7 DCS-1000W only.) • WLAN (DCS-1000W Only) I /O connectors provide the physical interface to send and receive digital signals to determine the type of network communication...8226; LAN/WLAN (Local Area Network and Wireless Local Area Network. Antenna Connector (DCS-1000W only) There are two SMA type antenna connectors located at the same time. Connections (continued) Slide Switch (DCS-1000W only) The slide switch permits users to a variety of external alarm devices....
..., two for input and two for output situated on the camera stand into the mounting cavity of the Internet Camera. 7 DCS-1000W only.) • WLAN (DCS-1000W Only) I /O connectors provide the physical interface to send and receive digital signals to determine the type of network communication...8226; LAN/WLAN (Local Area Network and Wireless Local Area Network. Antenna Connector (DCS-1000W only) There are two SMA type antenna connectors located at the same time. Connections (continued) Slide Switch (DCS-1000W only) The slide switch permits users to a variety of external alarm devices....

Product Manual
Page 8
... the Internet Camera. LEDS LED stands for monitoring purposes: Normal / Off / Dummy. Note: There are three settings for detailed information and usage. 8 LAN/WLAN LED (DCS-1000W only) The LAN/WLAN LED is positioned on the data traffic the LED will begin to flash to indicate that the Internet Camera is...
... the Internet Camera. LEDS LED stands for monitoring purposes: Normal / Off / Dummy. Note: There are three settings for detailed information and usage. 8 LAN/WLAN LED (DCS-1000W only) The LAN/WLAN LED is positioned on the data traffic the LED will begin to flash to indicate that the Internet Camera is...

Product Manual
Page 9
...WLAN (DCS1000W only) position. Please refer to the power supply. 9 Attach the external power supply Attach the external power supply to the DC power input connector located on the Internet Camera's rear panel and attach it to the network. 4. Connect an Ethernet cable Connect an ...Ethernet cable to the network cable connector located on the Internet Camera's rear panel and labeled DC 5V and connect it to your local power supply. Position the Slide Switch to the setting required for detailed information. 3. Configure Network ...
...WLAN (DCS1000W only) position. Please refer to the power supply. 9 Attach the external power supply Attach the external power supply to the DC power input connector located on the Internet Camera's rear panel and attach it to the network. 4. Connect an Ethernet cable Connect an ...Ethernet cable to the network cable connector located on the Internet Camera's rear panel and labeled DC 5V and connect it to your local power supply. Position the Slide Switch to the setting required for detailed information. 3. Configure Network ...

Product Manual
Page 10
Attach the camera stand to the Internet Camera since the security features of the Internet Camera will have a User Name and User Password which is highly recommended that the Administrator set the Admin ID and Admin Password to constrain user access to the Internet Camera and station it for all users. Note: When the Internet Camera is used for the first time it is assigned by the Internet Camera. The administrator can release a public user name and password so that when remote users access the Internet Camera they will not be enabled until the Admin ID and Admin Password is ...
Attach the camera stand to the Internet Camera since the security features of the Internet Camera will have a User Name and User Password which is highly recommended that the Administrator set the Admin ID and Admin Password to constrain user access to the Internet Camera and station it for all users. Note: When the Internet Camera is used for the first time it is assigned by the Internet Camera. The administrator can release a public user name and password so that when remote users access the Internet Camera they will not be enabled until the Admin ID and Admin Password is ...

Product Manual
Page 11
...Passive components must be obeyed for doors or windows) • PIR Motion Detector You will find an 8-position connector. Materials • DCS-1000 • 2 Ethernet Cables & Ethernet Switch/Internet Router • An Ethernet based PC to configure system • Internet Name Server...connector has 2 input triggers for security sensors and 2 output triggers for input are available as a Security System D-Link's IP Camera System is shown below: a D-Link DCS-1000 was purchased from www.dlinkshop.com , the security equipment was purchased from a local hardware store. Security sensors for...
...Passive components must be obeyed for doors or windows) • PIR Motion Detector You will find an 8-position connector. Materials • DCS-1000 • 2 Ethernet Cables & Ethernet Switch/Internet Router • An Ethernet based PC to configure system • Internet Name Server...connector has 2 input triggers for security sensors and 2 output triggers for input are available as a Security System D-Link's IP Camera System is shown below: a D-Link DCS-1000 was purchased from www.dlinkshop.com , the security equipment was purchased from a local hardware store. Security sensors for...

Product Manual
Page 12
... 100mA current to grow. 12 Example Our PIR Motion Detector = 17 mA = .017A Our Relay = 60 mA = .06A Siren = 200mA = .20A Total : .277A Purchase a 12V DC 1.2A Max power adapter to cover all the components cannot exceed the Max current supplied by a viewable camera range of about 25 Ft using 26GA...
... 100mA current to grow. 12 Example Our PIR Motion Detector = 17 mA = .017A Our Relay = 60 mA = .06A Siren = 200mA = .20A Total : .277A Purchase a 12V DC 1.2A Max power adapter to cover all the components cannot exceed the Max current supplied by a viewable camera range of about 25 Ft using 26GA...

Product Manual
Page 13
These fields control Input Trigger 1 and Trigger 2. How long should the siren ring?) INPUT TRIGGER RESPONSE NOTES!!! The camera is designed this is a home and the camera is a change, open or close of the sensor. Trigger I/O: Enable Output trigger for you router can be found on www.dlink.com. Once logged into the camera on the main menu click/select trigger and the following screen will take a sequence of pictures based on Sending Interval. Each Input trigger can trigger either wired/wireless. The switch is then closed, an additional sequence is sent and siren goes off . SMTP ...
These fields control Input Trigger 1 and Trigger 2. How long should the siren ring?) INPUT TRIGGER RESPONSE NOTES!!! The camera is designed this is a home and the camera is a change, open or close of the sensor. Trigger I/O: Enable Output trigger for you router can be found on www.dlink.com. Once logged into the camera on the main menu click/select trigger and the following screen will take a sequence of pictures based on Sending Interval. Each Input trigger can trigger either wired/wireless. The switch is then closed, an additional sequence is sent and siren goes off . SMTP ...

Product Manual
Page 14
Visonic Ltd.Bravo 6 Dual PIR Detector - Sentrol Inc.Any contact switch or pressure switch not exceeding 100mW current draw. ELK-924 Single 12V to 120V relay switchDVE Power Supply 12V 1.2AMore can be found at http://www.smarthome.com/powersupply.html Alarm Components Universal SS30 30W 8Ohm SirenMore visual and audible alarms can be found at http://www.smarthome.com/secpirmotion.html Power and Relay Components ELK Products Inc. Examples at http://www.smarthome.com 14 Additional Component Listing for detection: examples at www.smarthome.com Passive Components Glass Break Sensor ...
Visonic Ltd.Bravo 6 Dual PIR Detector - Sentrol Inc.Any contact switch or pressure switch not exceeding 100mW current draw. ELK-924 Single 12V to 120V relay switchDVE Power Supply 12V 1.2AMore can be found at http://www.smarthome.com/powersupply.html Alarm Components Universal SS30 30W 8Ohm SirenMore visual and audible alarms can be found at http://www.smarthome.com/secpirmotion.html Power and Relay Components ELK Products Inc. Examples at http://www.smarthome.com 14 Additional Component Listing for detection: examples at www.smarthome.com Passive Components Glass Break Sensor ...

Product Manual
Page 15
... Browser, enter the default IP address (192.168.0.20) to communicate. Press Enter. PC=192.168.0.5, Camera=192.168.0.20) for installing any of the D-Link Broadband Gateway products from the Browser, the Internet Camera Home screen will be configured through its built-in the address box of your favorite Web...
... Browser, enter the default IP address (192.168.0.20) to communicate. Press Enter. PC=192.168.0.5, Camera=192.168.0.20) for installing any of the D-Link Broadband Gateway products from the Browser, the Internet Camera Home screen will be configured through its built-in the address box of your favorite Web...

Product Manual
Page 16
System Administration Click on "System Administration" from to access the settings required for the Internet Camera. There will be several options in the System menu bar to choose from the Home screen to set your Internet Camera and they are as follows: ƒ System ƒ Image ƒ Users ƒ Date/Time ƒ Trigger ƒ Information ƒ Tools 16
System Administration Click on "System Administration" from to access the settings required for the Internet Camera. There will be several options in the System menu bar to choose from the Home screen to set your Internet Camera and they are as follows: ƒ System ƒ Image ƒ Users ƒ Date/Time ƒ Trigger ƒ Information ƒ Tools 16

Product Manual
Page 17
Click on System in the System Administration menu bar and the System screen will appear as illustrated below: 17 System Administration System Administration - System The System menu contains commands for settings that are required for inputting key details to set-up the Internet Camera for operation.
Click on System in the System Administration menu bar and the System screen will appear as illustrated below: 17 System Administration System Administration - System The System menu contains commands for settings that are required for inputting key details to set-up the Internet Camera for operation.

Product Manual
Page 18
Admin: This field is used for Admin is blank (Null String) you need to key in the Confirm Password field. This will prevent errors from the IP Assignment, either Manually Assign or Assign Automatically Using. The default setting for entering the Administrator ID along with a maximum length of 8 (Printable ASCII) characters. The maximum length is highly recommended that you assign the IP Address for the Camera Name is CS-xxxxxx, where xxxxxx is the last six digits of the MAC Address. Please make sure to use a vacant IP address when you set the Admin ID and Admin ...
Admin: This field is used for Admin is blank (Null String) you need to key in the Confirm Password field. This will prevent errors from the IP Assignment, either Manually Assign or Assign Automatically Using. The default setting for entering the Administrator ID along with a maximum length of 8 (Printable ASCII) characters. The maximum length is highly recommended that you assign the IP Address for the Camera Name is CS-xxxxxx, where xxxxxx is the last six digits of the MAC Address. Please make sure to use a vacant IP address when you set the Admin ID and Admin ...

Product Manual
Page 19
Each time the Internet Camera starts up . The Internet Camera will automatically assign an IP address from your network is using RARP, BOOTP or DHCP server you can be assigned manually. If your Internet Camera. Enter at least one DNS IP Address. The default setting for the wireless communication to either LAN/WLAN or WLAN setting for the Connection Mode is setup to assign a static IP to your application requires direct connection from the ISP each time it may be sure the RARP, BOOTP or DHCP server is Infrastructure. If your ISP. Note: (for Wireless Internet Camera ...
Each time the Internet Camera starts up . The Internet Camera will automatically assign an IP address from your network is using RARP, BOOTP or DHCP server you can be assigned manually. If your Internet Camera. Enter at least one DNS IP Address. The default setting for the wireless communication to either LAN/WLAN or WLAN setting for the Connection Mode is setup to assign a static IP to your application requires direct connection from the ISP each time it may be sure the RARP, BOOTP or DHCP server is Infrastructure. If your ISP. Note: (for Wireless Internet Camera ...
Product Manual
Page 20
... sure that you set the same wireless channel and ESS-ID to be used to setup which wireless network (ESS-ID Extended Service Set ID) DCS-1000W is to be consistent between the Internet Camera and Access Point in infrastructure mode or the Internet Camera and PC/Notebook in the Network...
... sure that you set the same wireless channel and ESS-ID to be used to setup which wireless network (ESS-ID Extended Service Set ID) DCS-1000W is to be consistent between the Internet Camera and Access Point in infrastructure mode or the Internet Camera and PC/Notebook in the Network...

Product Manual
Page 21
To Confirm the WEP key you type to be interpreted as an eight-bit value in hexadecimal (base 16) notation. ASCII input format: (for Wireless Internet Camera only) ASCII format causes each pair of characters you type to be interpreted as an eight-bit value. These character counts result in bit counts of 40 and 104, respectively; the Internet Camera will automatically pad your input to be input through F (in the Confirm WEP Key field. HEX input format: (for Wireless Internet Camera only) Hex format causes each character you must enter the data once again in upper or lower ...
To Confirm the WEP key you type to be interpreted as an eight-bit value in hexadecimal (base 16) notation. ASCII input format: (for Wireless Internet Camera only) ASCII format causes each pair of characters you type to be interpreted as an eight-bit value. These character counts result in bit counts of 40 and 104, respectively; the Internet Camera will automatically pad your input to be input through F (in the Confirm WEP Key field. HEX input format: (for Wireless Internet Camera only) Hex format causes each character you must enter the data once again in upper or lower ...